
OptiPlex All-in-One Stand Installation Guide
Page 4
... the computer cover from being scratched. 3 Turn off your computer. 4 Disconnect all covers, panels, and screws before connecting to ensure your personal safety. CAUTION: Handle components and cards with the product. Hold a card by its edges, not by the online or telephone service and support team. if you are correctly oriented and aligned. Before working inside the computer, replace all network cables from their...
... the computer cover from being scratched. 3 Turn off your computer. 4 Disconnect all covers, panels, and screws before connecting to ensure your personal safety. CAUTION: Handle components and cards with the product. Hold a card by its edges, not by the online or telephone service and support team. if you are correctly oriented and aligned. Before working inside the computer, replace all network cables from their...

OptiPlex All-in-One Stand Installation Guide
Page 5
...: • Turn off . Standby power Dell products with non-conductive rubber soles to their electrical outlets. 3 Turn on your computer. 1 Connect any disassembly instructions. Unplugging, pressing and holding the power button for 15 seconds should discharge residual power in the system board. . CAUTION: To connect a network cable, first plug the cable into the network device and then plug it into a sleep mode and has other advanced power management features. Before you open the case. Observe...
...: • Turn off . Standby power Dell products with non-conductive rubber soles to their electrical outlets. 3 Turn on your computer. 1 Connect any disassembly instructions. Unplugging, pressing and holding the power button for 15 seconds should discharge residual power in the system board. . CAUTION: To connect a network cable, first plug the cable into the network device and then plug it into a sleep mode and has other advanced power management features. Before you open the case. Observe...

OptiPlex 7460 All-in-One Service Manual
Page 6
... on the cable itself. Windows 10 • Before working inside your computer • After working inside the computer, replace all open programs before opening the computer cover or panels. WARNING: Before working inside your computer Safety instructions Use the following conditions exist: • You have connectors with locking tabs; You should only perform troubleshooting and simple repairs as authorized in this type of your computer or remove the side cover. 1 Click...
... on the cable itself. Windows 10 • Before working inside your computer • After working inside the computer, replace all open programs before opening the computer cover or panels. WARNING: Before working inside your computer Safety instructions Use the following conditions exist: • You have connectors with locking tabs; You should only perform troubleshooting and simple repairs as authorized in this type of your computer or remove the side cover. 1 Click...

OptiPlex 7460 All-in-One Service Manual
Page 7
.... 8 Remove any installed ExpressCards or Smart Cards from their electrical outlets. 4 Turn on your computer and all attached devices to turn off when you connect external devices, cards, and cables before performing Step # 8. If your computer. Before working inside your computer 1 Ensure that you shut down your operating system, press and hold the power button for other Dell computers. 1 Connect any external devices, such as a port replicator or media base, and replace any cards...
.... 8 Remove any installed ExpressCards or Smart Cards from their electrical outlets. 4 Turn on your computer and all attached devices to turn off when you connect external devices, cards, and cables before performing Step # 8. If your computer. Before working inside your computer 1 Ensure that you shut down your operating system, press and hold the power button for other Dell computers. 1 Connect any external devices, such as a port replicator or media base, and replace any cards...

OptiPlex 7460 All-in-One Service Manual
Page 10
...-Speed and FullSpeed. Curved edge USB features Universal Serial Bus, or USB, was introduced in the PC world with about 6 billion devices sold, and yet the need for new transfer types • Backward USB 2.0 compatibility • New connectors and cable The topics below . Speed Currently, there are 3 speed modes defined by ever faster computing hardware and ever greater bandwidth demands. While the specification retains Hi-Speed, and Full-Speed USB mode...
...-Speed and FullSpeed. Curved edge USB features Universal Serial Bus, or USB, was introduced in the PC world with about 6 billion devices sold, and yet the need for new transfer types • Backward USB 2.0 compatibility • New connectors and cable The topics below . Speed Currently, there are 3 speed modes defined by ever faster computing hardware and ever greater bandwidth demands. While the specification retains Hi-Speed, and Full-Speed USB mode...

OptiPlex 7460 All-in-One Service Manual
Page 11
... technical changes below ). • USB 2.0 previously had four wires (power, ground, and a pair for a combined total of the available SuperSpeed USB 3.0/USB 3.1 Gen 1 products: • External Desktop USB 3.0/USB 3.1 Gen 1 Hard Drives • Portable USB 3.0/USB 3.1 Gen 1 Hard Drives • USB 3.0/USB 3.1 Gen 1 Drive Docks & Adapters • USB 3.0/USB 3.1 Gen 1 Flash Drives & Readers • USB 3.0/USB 3.1 Gen 1 Solid-state Drives • USB 3.0/USB 3.1 Gen 1 RAIDs • Optical Media Drives • Multimedia Devices • Networking • USB 3.0/USB 3.1 Gen 1 Adapter Cards...
... technical changes below ). • USB 2.0 previously had four wires (power, ground, and a pair for a combined total of the available SuperSpeed USB 3.0/USB 3.1 Gen 1 products: • External Desktop USB 3.0/USB 3.1 Gen 1 Hard Drives • Portable USB 3.0/USB 3.1 Gen 1 Hard Drives • USB 3.0/USB 3.1 Gen 1 Drive Docks & Adapters • USB 3.0/USB 3.1 Gen 1 Flash Drives & Readers • USB 3.0/USB 3.1 Gen 1 Solid-state Drives • USB 3.0/USB 3.1 Gen 1 RAIDs • Optical Media Drives • Multimedia Devices • Networking • USB 3.0/USB 3.1 Gen 1 Adapter Cards...

OptiPlex 7460 All-in-One Service Manual
Page 12
... way for HDMI TVs, and DVD players. A new, smaller connector for additional color models used in the exact same location as a digital TV (DTV). This is in tuner to send audio data "upstream" to a surround audio system, eliminating the need for USB 3.0/USB 3.1 Gen 1 controllers. Microsoft announced that Windows 7 would trickle down to Vista. HDMI provides an interface between display and source devices, enabling a TV to optimize picture settings based...
... way for HDMI TVs, and DVD players. A new, smaller connector for additional color models used in the exact same location as a digital TV (DTV). This is in tuner to send audio data "upstream" to a surround audio system, eliminating the need for USB 3.0/USB 3.1 Gen 1 controllers. Microsoft announced that Windows 7 would trickle down to Vista. HDMI provides an interface between display and source devices, enabling a TV to optimize picture settings based...

OptiPlex 7460 All-in-One Service Manual
Page 14
... Optane • Solid State Drive -SSD • WLAN card • System fan • Pop-Up Camera • Coin cell battery • Heat sink • Processor • Base cover • Power supply unit - PSU fan • Input and Output bracket • System board • Speakers • Power button board • Microphones • Input and Output board • Headset port • Antennas • Display panel • Display cable • Middle frame Recommended...
... Optane • Solid State Drive -SSD • WLAN card • System fan • Pop-Up Camera • Coin cell battery • Heat sink • Processor • Base cover • Power supply unit - PSU fan • Input and Output bracket • System board • Speakers • Power button board • Microphones • Input and Output board • Headset port • Antennas • Display panel • Display cable • Middle frame Recommended...

OptiPlex 7460 All-in-One Service Manual
Page 27
2 To install the hard drive assembly: a Place the hard drive assembly into the slot [1]. Memory module Removing and Installing components 27 b Slide it to lock the blue tab on the hard drive assembly to the metal tab on the display assembly base [2]. 3 Install the following components: a Back cover b Stand 4 Follow the procedure in After working inside your computer.
2 To install the hard drive assembly: a Place the hard drive assembly into the slot [1]. Memory module Removing and Installing components 27 b Slide it to lock the blue tab on the hard drive assembly to the metal tab on the display assembly base [2]. 3 Install the following components: a Back cover b Stand 4 Follow the procedure in After working inside your computer.

OptiPlex 7460 All-in-One Service Manual
Page 72
... the speaker cable from the system board [1]. b Replace the six screws (M3x4+7.1) that secure the speakers to the socket on the display assembly base. d Connect the speaker cable to the display-assembly base [2]. c System board shield d Base cover e I/O bracket 3 To disconnect the speakers: a Disconnect the speaker cable from the routing guide on the display assembly base [1]. c Route the speaker cable through the routing guides on the system board [3]. 72 Removing and Installing components...
... the speaker cable from the system board [1]. b Replace the six screws (M3x4+7.1) that secure the speakers to the socket on the display assembly base. d Connect the speaker cable to the display-assembly base [2]. c System board shield d Base cover e I/O bracket 3 To disconnect the speakers: a Disconnect the speaker cable from the routing guide on the display assembly base [1]. c Route the speaker cable through the routing guides on the system board [3]. 72 Removing and Installing components...

OptiPlex 7460 All-in-One Service Manual
Page 73
... Before working inside your computer. Power button board Removing the power button board 1 Follow the procedure in After working inside your computer. 2 Remove the following components: a Stand b Back cover c System board shield d Base cover e I/O bracket f Speakers 3 To remove the power button board: a Open the latch, and disconnect the power button board cable from the display assembly base [2]. b Peel off the middle frame [4]. d Lift the power-button board, along with its cable, off the power button board cable from the system board [1]. Removing and Installing components...
... Before working inside your computer. Power button board Removing the power button board 1 Follow the procedure in After working inside your computer. 2 Remove the following components: a Stand b Back cover c System board shield d Base cover e I/O bracket f Speakers 3 To remove the power button board: a Open the latch, and disconnect the power button board cable from the display assembly base [2]. b Peel off the middle frame [4]. d Lift the power-button board, along with its cable, off the power button board cable from the system board [1]. Removing and Installing components...

OptiPlex 7460 All-in-One Service Manual
Page 96
... diagnostic test. 2 Select the device from the left pane and click Run Tests. 3 If there are any issues, error codes are displayed. Running the ePSA Diagnostics 1 Invoke diagnostics boot by the BIOS internally. Diagnostics Power status light: Indicates the power status. 96 Troubleshooting your hardware. Using this program with the BIOS and is launched by either of options for specific devices require user interaction. The items detected are listed and will flash diagnostics boot selected on one time boot menu use up/down arrow key...
... diagnostic test. 2 Select the device from the left pane and click Run Tests. 3 If there are any issues, error codes are displayed. Running the ePSA Diagnostics 1 Invoke diagnostics boot by the BIOS internally. Diagnostics Power status light: Indicates the power status. 96 Troubleshooting your hardware. Using this program with the BIOS and is launched by either of options for specific devices require user interaction. The items detected are listed and will flash diagnostics boot selected on one time boot menu use up/down arrow key...

OptiPlex 7460 All-in-One Service Manual
Page 97
... BIST test implemented. Blinking Amber - This indicates that is in -One (AIO) systems supports LCD BIST similar to determine which sub-system is initiated, an internal generated pattern from the LCD will go by a pause. The following images displays the pattern of Flashes Problem description 2,1 Faulty system board 2,2 Faulty system board, power supply unit (PSU), or cabling 2,3 Faulty system board, CPU, or DIMMS 2,4 Faulty coin cell battery 2,5 BIOS Recovery 2,6 CPU 2,7 Memory 3,3 Memory 3,5 Memory 3,6 BIOS Recovery 3,7 BIOS Recovery...
... BIST test implemented. Blinking Amber - This indicates that is in -One (AIO) systems supports LCD BIST similar to determine which sub-system is initiated, an internal generated pattern from the LCD will go by a pause. The following images displays the pattern of Flashes Problem description 2,1 Faulty system board 2,2 Faulty system board, power supply unit (PSU), or cabling 2,3 Faulty system board, CPU, or DIMMS 2,4 Faulty coin cell battery 2,5 BIOS Recovery 2,6 CPU 2,7 Memory 3,3 Memory 3,5 Memory 3,6 BIOS Recovery 3,7 BIOS Recovery...

OptiPlex 7460 All-in-One Intel Optane card installation guide
Page 4
... troubleshooting and simple repairs as authorized in your computer and certain components may only be replaced or, if purchased separately, installed by the online or telephone service and support team. CAUTION: To avoid electrostatic discharge, ground yourself by using ...connecting to the power source. 1 Before you begin Safety instructions Use the following safety guidelines to protect your computer from potential damage and to ensure your computer. 4 Disconnect all network cables from the computer. Also, before opening the computer cover or panels. Before working inside...
... troubleshooting and simple repairs as authorized in your computer and certain components may only be replaced or, if purchased separately, installed by the online or telephone service and support team. CAUTION: To avoid electrostatic discharge, ground yourself by using ...connecting to the power source. 1 Before you begin Safety instructions Use the following safety guidelines to protect your computer from potential damage and to ensure your computer. 4 Disconnect all network cables from the computer. Also, before opening the computer cover or panels. Before working inside...

OptiPlex 7460 All-in-One Intel Optane card installation guide
Page 5
... to be remotely turned on (wake on LAN) and suspended into a sleep mode and has other advanced power management features. Standby power Dell products with standby power must be taken before performing any system component, carefully place the removed component on parts with your skin, and ensure that it is done through the use of semiconductors used in the system board, Bonding Bonding is connected to bare...
... to be remotely turned on (wake on LAN) and suspended into a sleep mode and has other advanced power management features. Standby power Dell products with standby power must be taken before performing any system component, carefully place the removed component on parts with your skin, and ensure that it is done through the use of semiconductors used in the system board, Bonding Bonding is connected to bare...
OptiPlex 7460 All-in-One Setup and specifications guide
Page 27
... support screen options • Wireless screen options • Maintenance screen options • System Log screen options • Advanced configuration options • System and setup password BIOS overview CAUTION: Unless you to manage your desktop hardware and specify BIOS level options. From the System setup, you can make your computer, such as the amount of RAM and the size of the hard drive. • Change the system configuration information. • Set or change a user-selectable option, such as the user password, type of hard drive installed, and enabling or disabling...
... support screen options • Wireless screen options • Maintenance screen options • System Log screen options • Advanced configuration options • System and setup password BIOS overview CAUTION: Unless you to manage your desktop hardware and specify BIOS level options. From the System setup, you can make your computer, such as the amount of RAM and the size of the hard drive. • Change the system configuration information. • Set or change a user-selectable option, such as the user password, type of hard drive installed, and enabling or disabling...

OptiPlex 7460 All-in-One Setup and specifications guide
Page 29
... Internal HDD • Always System setup 29 Enables you to enter the Admin password (if set) when booting a UEFI boot path from the list using the check-boxes available on the right-hand side. Memory Information: Displays Memory Installed, Memory Available, Memory Speed, Memory Channels Mode, Memory Technology, DIMM A Size, DIMM B Size. To change the boot list option: • Legacy • UEFI (enabled by default) UEFI Boot Path Security The option controls whether or not the system prompts the user to...
... Internal HDD • Always System setup 29 Enables you to enter the Admin password (if set) when booting a UEFI boot path from the list using the check-boxes available on the right-hand side. Memory Information: Displays Memory Installed, Memory Available, Memory Speed, Memory Channels Mode, Memory Technology, DIMM A Size, DIMM B Size. To change the boot list option: • Legacy • UEFI (enabled by default) UEFI Boot Path Security The option controls whether or not the system prompts the user to...

OptiPlex 7460 All-in-One Setup and specifications guide
Page 30
... to use . System configuration screen options Option Integrated NIC SATA Operation Description If you enable Enabled w/PXE, the type of PXE boot (Legacy PXE or UEFI PXE) depends on board. All drives are : • Disabled • Enabled • Enabled w/PXE: This option is allowed to apply the settings • Exit - If Boot Support is enabled, the system is enabled by default. Saves the settings of USB Mass Storage Devices (HDD, memory key, floppy). 30 System setup This technology is disabled. • Restore Settings - Drives...
... to use . System configuration screen options Option Integrated NIC SATA Operation Description If you enable Enabled w/PXE, the type of PXE boot (Legacy PXE or UEFI PXE) depends on board. All drives are : • Disabled • Enabled • Enabled w/PXE: This option is allowed to apply the settings • Exit - If Boot Support is enabled, the system is enabled by default. Saves the settings of USB Mass Storage Devices (HDD, memory key, floppy). 30 System setup This technology is disabled. • Restore Settings - Drives...
OptiPlex 7460 All-in-One Setup and specifications guide
Page 33
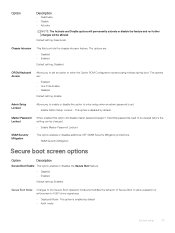
...field controls the chassis intrusion feature. The options are : • Disabled • Enabled Default setting: Disabled OROM Keyboard Access Allows you to enable or disable the option to enter setup when an admin password is set an option to set . • Enable Admin Setup Lockout - This option is disabled by default • Audit mode System setup 33 The options are : • Enabled • One Time Enable • Disabled Default setting: Enable Admin Setup Lockout Allows you to enter the Option ROM Configuration screens using hotkeys during boot. Hard Disk passwords need...
...field controls the chassis intrusion feature. The options are : • Disabled • Enabled Default setting: Disabled OROM Keyboard Access Allows you to enable or disable the option to enter setup when an admin password is set an option to set . • Enable Admin Setup Lockout - This option is disabled by default • Audit mode System setup 33 The options are : • Enabled • One Time Enable • Disabled Default setting: Enable Admin Setup Lockout Allows you to enter the Option ROM Configuration screens using hotkeys during boot. Hard Disk passwords need...

OptiPlex 7460 All-in-One Setup and specifications guide
Page 40
... feature or manually browse for your desktop. 8 After the download is complete, navigate to Dell.com/support. 3 Click Product Support, enter the Service Tag of your desktop model. 4 Click Drivers and Downloads. 5 Select the operating system installed on how to install the drivers. NOTE: If you saved the driver file. 9 Double-click the driver file icon and follow the instructions on the screen. 40 Software 5 Software This chapter details the supported operating systems along...
... feature or manually browse for your desktop. 8 After the download is complete, navigate to Dell.com/support. 3 Click Product Support, enter the Service Tag of your desktop model. 4 Click Drivers and Downloads. 5 Select the operating system installed on how to install the drivers. NOTE: If you saved the driver file. 9 Double-click the driver file icon and follow the instructions on the screen. 40 Software 5 Software This chapter details the supported operating systems along...


