
Quick Reference Guide
Page 15
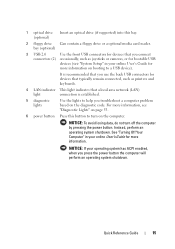
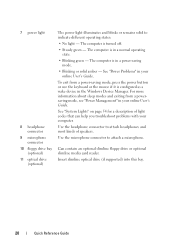
...drive Can contain a floppy drive or a optional media card reader. 1 optical drive Insert an optical drive (if supported) into this button to turn off the computer by pressing the power button. It is established. 5 diagnostic lights Use the lights to a USB device). Instead, perform an ...operating system shutdown. Quick Reference Guide 15 See "Turning Off Your Computer" in your online User's Guide for more information, see "System Setup" in your online User's Guide for bootable USB ...
...drive Can contain a floppy drive or a optional media card reader. 1 optical drive Insert an optical drive (if supported) into this button to turn off the computer by pressing the power button. It is established. 5 diagnostic lights Use the lights to a USB device). Instead, perform an ...operating system shutdown. Quick Reference Guide 15 See "Turning Off Your Computer" in your online User's Guide for more information, see "System Setup" in your online User's Guide for bootable USB ...
Quick Reference Guide
Page 16
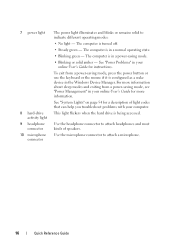
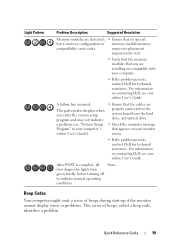
The computer is turned off. • Steady green - Use the headphone connector to attach headphones and most kinds of light codes that can help you troubleshoot problems with your ...
The computer is turned off. • Steady green - Use the headphone connector to attach headphones and most kinds of light codes that can help you troubleshoot problems with your ...
Quick Reference Guide
Page 22
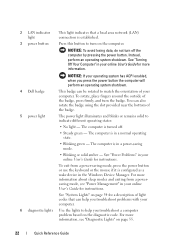
... with your computer. 6 diagnostic lights Use the lights to help you press the power button the computer will perform an operating system shutdown. 4 Dell badge 5 power light This badge can also rotate the badge using the slot provided near the bottom of your computer. The computer is in your... power-saving mode, press the power button or use the keyboard or the mouse if it is established. 3 power button Press this button to turn on the computer. The power light illuminates and blinks or remains solid to match the orientation of the badge. NOTICE: To avoid losing data, do...
... with your computer. 6 diagnostic lights Use the lights to help you press the power button the computer will perform an operating system shutdown. 4 Dell badge 5 power light This badge can also rotate the badge using the slot provided near the bottom of your computer. The computer is in your... power-saving mode, press the power button or use the keyboard or the mouse if it is established. 3 power button Press this button to turn on the computer. The power light illuminates and blinks or remains solid to match the orientation of the badge. NOTICE: To avoid losing data, do...
Quick Reference Guide
Page 27
... User's Guide for instructions about booting to help you troubleshoot a computer problem based on the computer. NOTICE: To avoid losing data, do not turn the badge. NOTICE: If your operating system has ACPI enabled, when you press the power button the computer will perform an operating system shutdown.... 3 Dell badge This badge can also rotate the badge using the slot provided near the bottom of the badge. 4 hard drive activity light This light...
... User's Guide for instructions about booting to help you troubleshoot a computer problem based on the computer. NOTICE: To avoid losing data, do not turn the badge. NOTICE: If your operating system has ACPI enabled, when you press the power button the computer will perform an operating system shutdown.... 3 Dell badge This badge can also rotate the badge using the slot provided near the bottom of the badge. 4 hard drive activity light This light...
Quick Reference Guide
Page 28
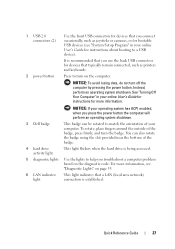
... microphone connector to attach headphones and most kinds of light codes that can help you troubleshoot problems with your online User's Guide. The computer is turned off. • Steady green - Use the headphone connector to attach a microphone. The computer is in a normal operating state. • Blinking green - For more information about...
... microphone connector to attach headphones and most kinds of light codes that can help you troubleshoot problems with your online User's Guide. The computer is turned off. • Steady green - Use the headphone connector to attach a microphone. The computer is in a normal operating state. • Blinking green - For more information about...
Quick Reference Guide
Page 32
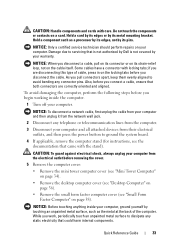
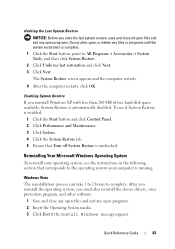
... click Shut Down. Before Working Inside Your Computer Use the following safety guidelines to help ensure your own personal safety. The computer turns off after the operating system shutdown process finishes. 2 Ensure that the computer and any of the procedures in this section, follow the...Guide. 32 Quick Reference Guide If your computer and attached devices did not automatically turn off when you turn off your computer. 1 Shut down your operating system, turn them off . The default designations are turned off now. b In the Shut Down window, select the Shut Down option ...
... click Shut Down. Before Working Inside Your Computer Use the following safety guidelines to help ensure your own personal safety. The computer turns off after the operating system shutdown process finishes. 2 Ensure that the computer and any of the procedures in this section, follow the...Guide. 32 Quick Reference Guide If your computer and attached devices did not automatically turn off when you turn off your computer. 1 Shut down your operating system, turn them off . The default designations are turned off now. b In the Shut Down window, select the Shut Down option ...
Quick Reference Guide
Page 33
... internal components. Do not touch the components or contacts on page 38). NOTICE: When you disconnect the cable. NOTICE: Before touching anything inside the computer. 1 Turn off your warranty. Hold a card by its edges or by your computer. Hold a component such as the metal at the back of cable, press in...: Handle components and cards with the stand). Some cables have a connector with locking tabs; Also, before you connect a cable, ensure that is not authorized by Dell is not covered by its pins. Quick Reference Guide 33
... internal components. Do not touch the components or contacts on page 38). NOTICE: When you disconnect the cable. NOTICE: Before touching anything inside the computer. 1 Turn off your warranty. Hold a card by its edges or by your computer. Hold a component such as the metal at the back of cable, press in...: Handle components and cards with the stand). Some cables have a connector with locking tabs; Also, before you connect a cable, ensure that is not authorized by Dell is not covered by its pins. Quick Reference Guide 33
Quick Reference Guide
Page 51
... online User's Guide for technical assistance. NOTE: If your computer cannot display a screen image, contact Dell (see your computer. 2 When the DELL™ logo appears, press immediately. Turn on your online User's Guide and run the Dell Diagnostics before you contact Dell for instructions), review your computer's configuration information, and ensure that require help from...
... online User's Guide for technical assistance. NOTE: If your computer cannot display a screen image, contact Dell (see your computer. 2 When the DELL™ logo appears, press immediately. Turn on your online User's Guide and run the Dell Diagnostics before you contact Dell for instructions), review your computer's configuration information, and ensure that require help from...

Quick Reference Guide
Page 54
... A configuration error exists. Press the power button, move the mouse, or press a key on , and the computer is then turns off identified. 54 Quick Reference Guide See "Diagnostic Lights" on your computer or all devices attached to your hardware configuration for all the... Function (continued) Displays your computer. The device list may indicate a computer problem. Blinking green The computer is required. The Dell Diagnostics obtains configuration information for the selected device. No corrective action is in the left pane of all devices from the Drivers and...
... A configuration error exists. Press the power button, move the mouse, or press a key on , and the computer is then turns off identified. 54 Quick Reference Guide See "Diagnostic Lights" on your computer or all devices attached to your hardware configuration for all the... Function (continued) Displays your computer. The device list may indicate a computer problem. Blinking green The computer is required. The Dell Diagnostics obtains configuration information for the selected device. No corrective action is in the left pane of all devices from the Drivers and...
Quick Reference Guide
Page 59
...diagnostic lights turn green briefly before turning off to the system board from the hard drive, and optical drive. • Check the computer message that appears on your monitor screen. • If the problem persists, contact Dell for technical assistance. For information on contacting Dell, see... • Verify that the memory modules that the cables are compatible with your computer. • If the problem persists, contact Dell for technical assistance. This pattern also displays when you enter the system setup program and may not indicate a problem (see your online...
...diagnostic lights turn green briefly before turning off to the system board from the hard drive, and optical drive. • Check the computer message that appears on your monitor screen. • If the problem persists, contact Dell for technical assistance. For information on contacting Dell, see... • Verify that the memory modules that the cables are compatible with your computer. • If the problem persists, contact Dell for technical assistance. This pattern also displays when you enter the system setup program and may not indicate a problem (see your online...
Quick Reference Guide
Page 63
... any open programs. 2 Insert the Operating System media. 3 Click Exit if the Install Windows message appears. To see the instructions in the following section that Turn off System Restore is complete. 1 Click the Start button, point to All Programs→ Accessories→ System Tools, and then click System Restore. 2 Click Undo...
... any open programs. 2 Insert the Operating System media. 3 Click Exit if the Install Windows message appears. To see the instructions in the following section that Turn off System Restore is complete. 1 Click the Start button, point to All Programs→ Accessories→ System Tools, and then click System Restore. 2 Click Undo...
User's Guide
Page 3
Contents 1 Finding Information 13 2 Before You Begin 19 Recommended Tools 19 Turning Off Your Computer 19 Before Working Inside Your Computer 20 3 Mini Tower Computer 21 About Your Mini Tower Computer 21 Front View 21 Back View ...
Contents 1 Finding Information 13 2 Before You Begin 19 Recommended Tools 19 Turning Off Your Computer 19 Before Working Inside Your Computer 20 3 Mini Tower Computer 21 About Your Mini Tower Computer 21 Front View 21 Back View ...
User's Guide
Page 19
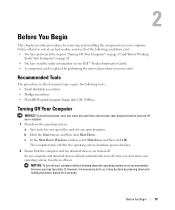
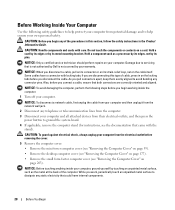
... 1 Shut down and holding the power button for removing and installing the components in your computer and attached devices did not automatically turn them off now. Recommended Tools The procedures in this document may be replaced by pressing down the operating system: a Save and close..., select Shut down your computer without shutting down the operating system is necessary to do so, it is not recommended, because you turn off your Dell™ Product Information Guide. • A component can be done by performing the removal procedure in reverse order. 2 Before You ...
... 1 Shut down and holding the power button for removing and installing the components in your computer and attached devices did not automatically turn them off now. Recommended Tools The procedures in this document may be replaced by pressing down the operating system: a Save and close..., select Shut down your computer without shutting down the operating system is necessary to do so, it is not recommended, because you turn off your Dell™ Product Information Guide. • A component can be done by performing the removal procedure in reverse order. 2 Before You ...
User's Guide
Page 20
... button to avoid bending any of the procedures in this type of the computer. NOTICE: Before touching anything inside the computer. 1 Turn off your computer. Damage due to servicing that both connectors are disconnecting this section, follow the safety instructions in on the locking tabs... before you connect a cable, ensure that is not authorized by Dell is not covered by its strain-relief loop, not on the cable itself. Also, before you begin any connector pins. CAUTION: Before...
... button to avoid bending any of the procedures in this type of the computer. NOTICE: Before touching anything inside the computer. 1 Turn off your computer. Damage due to servicing that both connectors are disconnecting this section, follow the safety instructions in on the locking tabs... before you connect a cable, ensure that is not authorized by Dell is not covered by its strain-relief loop, not on the cable itself. Also, before you begin any connector pins. CAUTION: Before...

User's Guide
Page 22
...information on the diagnostic code. NOTICE: If your computer. The computer is being accessed. This light flickers when the hard drive is turned off the computer by pressing the power button. Can contain an optional floppy drive or an optional media card reader. Use the front... an operating system shutdown. Use the microphone connector to indicate different operating modes: • No light - NOTICE: To avoid losing data, do not turn on page 329 for devices that a local area network (LAN) connection is established. To exit from a power-saving mode, see "Power Management" ...
...information on the diagnostic code. NOTICE: If your computer. The computer is being accessed. This light flickers when the hard drive is turned off the computer by pressing the power button. Can contain an optional floppy drive or an optional media card reader. Use the front... an operating system shutdown. Use the microphone connector to indicate different operating modes: • No light - NOTICE: To avoid losing data, do not turn on page 329 for devices that a local area network (LAN) connection is established. To exit from a power-saving mode, see "Power Management" ...
User's Guide
Page 35
... the user to enter a device for a single boot (during start-up only) as well as options to 265 V at start-up (after correct password is turned on integrated network rear panel - amber light - solid amber indicates an internal power problem (see "Power Problems" on front panel) front panel - Standby power light...
... the user to enter a device for a single boot (during start-up only) as well as options to 265 V at start-up (after correct password is turned on integrated network rear panel - amber light - solid amber indicates an internal power problem (see "Power Problems" on front panel) front panel - Standby power light...

User's Guide
Page 43
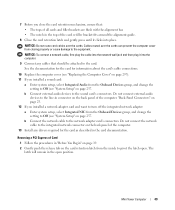
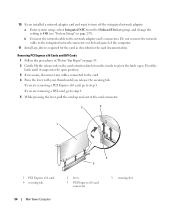
... 43 NOTE: See the documentation for the card for information about the card's cable connections. 10 If you installed a network adapter card and want to turn off the integrated network adapter: a Enter system setup, select Integrated NIC from the Onboard Devices group, and change the setting to Off (see "Replacing the...
... 43 NOTE: See the documentation for the card for information about the card's cable connections. 10 If you installed a network adapter card and want to turn off the integrated network adapter: a Enter system setup, select Integrated NIC from the Onboard Devices group, and change the setting to Off (see "Replacing the...
User's Guide
Page 49
... 257. b Connect the network cable to Off (see "Replacing the Computer Cover" on page 297). 11 If you installed a network adapter card and want to turn off the integrated network adapter: a Enter system setup, select Integrated NIC from the Onboard Devices group, and change the setting to Off (see "System Setup...
... 257. b Connect the network cable to Off (see "Replacing the Computer Cover" on page 297). 11 If you installed a network adapter card and want to turn off the integrated network adapter: a Enter system setup, select Integrated NIC from the Onboard Devices group, and change the setting to Off (see "System Setup...
User's Guide
Page 54
... cable to the integrated network connector on page 257). If you release the securing tab. 10 If you installed a network adapter card and want to turn off the integrated network adapter: a Enter system setup, select Integrated NIC from the inside to pivot the latch open position. 3 If necessary, disconnect any drivers...
... cable to the integrated network connector on page 257). If you release the securing tab. 10 If you installed a network adapter card and want to turn off the integrated network adapter: a Enter system setup, select Integrated NIC from the inside to pivot the latch open position. 3 If necessary, disconnect any drivers...
User's Guide
Page 86
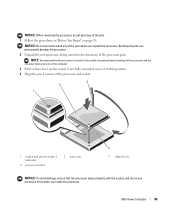
... and processor pin-1 indicator 4 processor socket 2 processor 4 3 release lever NOTICE: To avoid damage, ensure that position. 4 Align the pin-1 corners of the pins when you turn on the computer. 3 If the release lever on page 19. NOTE: You must position the processor correctly in "Before You Begin" on the socket is...
... and processor pin-1 indicator 4 processor socket 2 processor 4 3 release lever NOTICE: To avoid damage, ensure that position. 4 Align the pin-1 corners of the pins when you turn on the computer. 3 If the release lever on page 19. NOTE: You must position the processor correctly in "Before You Begin" on the socket is...


