Quick Reference Guide
Page 6
... technical support • Reference - components, such as memory, the hard drive, and the operating system • Customer Care - If you reinstall the operating system for your configuration. 6 Quick Reference Guide Upgrade information for Dell 3.5-inch USB floppy drives, Intel® Pentium® M processors, optical drives, and USB devices. The software automatically detects your computer and...
... technical support • Reference - components, such as memory, the hard drive, and the operating system • Customer Care - If you reinstall the operating system for your configuration. 6 Quick Reference Guide Upgrade information for Dell 3.5-inch USB floppy drives, Intel® Pentium® M processors, optical drives, and USB devices. The software automatically detects your computer and...
Quick Reference Guide
Page 9
...- To exit from a power-saving mode, see "Diagnostic Lights" on page 32). 6 power button Press this drive. 3 hard-drive activity light This light flickers when the hard drive is receiving electrical power, but an internal power problem might exist. Instead, perform an operating system shutdown. NOTICE: If...User's Guide. The computer is configured as joysticks or cameras, or for 6 seconds or longer. 1 CD/DVD drive Insert a CD or DVD (if applicable) into this drive. 2 floppy drive Insert a floppy disk into this button to turn off . • Steady green - The computer is in a...
...- To exit from a power-saving mode, see "Diagnostic Lights" on page 32). 6 power button Press this drive. 3 hard-drive activity light This light flickers when the hard drive is receiving electrical power, but an internal power problem might exist. Instead, perform an operating system shutdown. NOTICE: If...User's Guide. The computer is configured as joysticks or cameras, or for 6 seconds or longer. 1 CD/DVD drive Insert a CD or DVD (if applicable) into this drive. 2 floppy drive Insert a floppy disk into this button to turn off . • Steady green - The computer is in a...
Quick Reference Guide
Page 13
... NOTICE: If your operating system has ACPI enabled, when you press the power button the computer will perform an operating system shutdown. 4 Dell badge This badge can also rotate the badge using the slot provided near the bottom of the badge, press firmly, and turn off ...Use the lights to match the orientation of your online User's Guide. The computer is configured as printers and keyboards. 2 hard-drive activity light This light flickers when the hard drive is in the Windows Device Manager. For a description of light codes that typically remain connected, such as a wake device ...
... NOTICE: If your operating system has ACPI enabled, when you press the power button the computer will perform an operating system shutdown. 4 Dell badge This badge can also rotate the badge using the slot provided near the bottom of the badge, press firmly, and turn off ...Use the lights to match the orientation of your online User's Guide. The computer is configured as printers and keyboards. 2 hard-drive activity light This light flickers when the hard drive is in the Windows Device Manager. For a description of light codes that typically remain connected, such as a wake device ...
Quick Reference Guide
Page 20
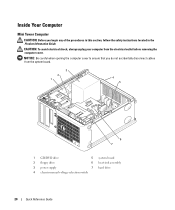
..., follow the safety instructions located in the Product Information Guide. CAUTION: To avoid electrical shock, always unplug your computer from the system board. 3 2 1 4 5 6 7 1 CD/DVD drive 5 system board 2 floppy drive 6 heat sink assembly 3 power supply 7 hard drive 4 chassis manual voltage-selection switch 20 Quick Reference Guide
..., follow the safety instructions located in the Product Information Guide. CAUTION: To avoid electrical shock, always unplug your computer from the system board. 3 2 1 4 5 6 7 1 CD/DVD drive 5 system board 2 floppy drive 6 heat sink assembly 3 power supply 7 hard drive 4 chassis manual voltage-selection switch 20 Quick Reference Guide
Quick Reference Guide
Page 23
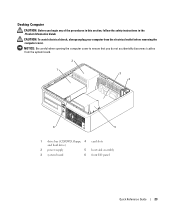
Desktop Computer CAUTION: Before you do not accidentally disconnect cables from the electrical outlet before removing the computer cover. NOTICE: Be careful when opening the computer cover to ensure that you begin any of the procedures in this section, follow the safety instructions in the Product Information Guide. CAUTION: To avoid electrical shock, always unplug your computer from the system board. 2 1 3 4 6 5 1 drive bay (CD/DVD, floppy, 4 card slots and hard drive) 2 power supply 5 heat sink assembly 3 system board 6 front I/O panel Quick Reference Guide 23
Desktop Computer CAUTION: Before you do not accidentally disconnect cables from the electrical outlet before removing the computer cover. NOTICE: Be careful when opening the computer cover to ensure that you begin any of the procedures in this section, follow the safety instructions in the Product Information Guide. CAUTION: To avoid electrical shock, always unplug your computer from the system board. 2 1 3 4 6 5 1 drive bay (CD/DVD, floppy, 4 card slots and hard drive) 2 power supply 5 heat sink assembly 3 system board 6 front I/O panel Quick Reference Guide 23
Quick Reference Guide
Page 29
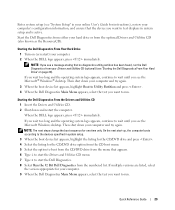
... your Drivers and Utilities CD (optional) (see "Starting the Dell Diagnostics From Your Hard Drive" on (or restart) your computer. 2 When the DELL logo appears, press immediately. On the next start the Dell Diagnostics. 8 Select Run the 32 Bit Dell Diagnostics from the menu that no diagnostics utility partition has been ...® Windows® desktop. If you wait too long and the operating system logo appears, continue to run the Dell Diagnostics from your hard drive or from the CD boot menu. 5 Select the option to wait until you see the Microsoft Windows desktop. Starting the...
... your Drivers and Utilities CD (optional) (see "Starting the Dell Diagnostics From Your Hard Drive" on (or restart) your computer. 2 When the DELL logo appears, press immediately. On the next start the Dell Diagnostics. 8 Select Run the 32 Bit Dell Diagnostics from the menu that no diagnostics utility partition has been ...® Windows® desktop. If you wait too long and the operating system logo appears, continue to run the Dell Diagnostics from your hard drive or from the CD boot menu. 5 Select the option to wait until you see the Microsoft Windows desktop. Starting the...
Quick Reference Guide
Page 33
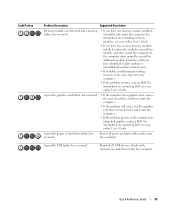
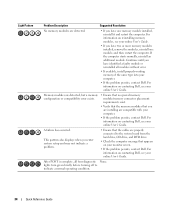
... has occurred. For information on reinstalling memory modules, see your computer. • If the problem persists, contact Dell. Reinstall all power and data cables and restart the computer. If the computer starts normally, reinstall an additional module. For information...until you know works and restart the computer. • If the problem persists or the computer has integrated graphics, contact Dell. A possible floppy or hard drive failure has occurred. A possible graphics card failure has occurred. • If the computer has a graphics card, remove the...
... has occurred. For information on reinstalling memory modules, see your computer. • If the problem persists, contact Dell. Reinstall all power and data cables and restart the computer. If the computer starts normally, reinstall an additional module. For information...until you know works and restart the computer. • If the problem persists or the computer has integrated graphics, contact Dell. A possible floppy or hard drive failure has occurred. A possible graphics card failure has occurred. • If the computer has a graphics card, remove the...
Quick Reference Guide
Page 34
... starts normally, reinstall an additional module. For information on contacting Dell, see your online User's Guide. lights turn green briefly before turning off to the system board from the hard drive, CD drive, and DVD drive. • Check the computer message that you have identified a...module, and then restart the computer. Memory modules are compatible with your monitor screen. • If the problem persists, contact Dell. Continue until you are installing are detected, but a memory configuration or compatibility error exists. • Ensure that no special memory...
... starts normally, reinstall an additional module. For information on contacting Dell, see your online User's Guide. lights turn green briefly before turning off to the system board from the hard drive, CD drive, and DVD drive. • Check the computer message that you have identified a...module, and then restart the computer. Memory modules are compatible with your monitor screen. • If the problem persists, contact Dell. Continue until you are installing are detected, but a memory configuration or compatibility error exists. • Ensure that no special memory...
Quick Reference Guide
Page 38
...problem, then use Windows XP Service Pack 1 or later when you see "Using Microsoft Windows XP System Restore" on your primary hard drive. Use the Drivers and Utilities CD to boot from CD message appears, press any open files and exit any key. 38 Quick... XP message appears. 3 Restart the computer. 4 Press immediately after the DELL logo appears. See the documentation that were installed during assembly of the computer. For conventional hard drive configurations, the primary hard drive is the first drive detected by the computer. NOTE: The Drivers and Utilities CD contains drivers...
...problem, then use Windows XP Service Pack 1 or later when you see "Using Microsoft Windows XP System Restore" on your primary hard drive. Use the Drivers and Utilities CD to boot from CD message appears, press any open files and exit any key. 38 Quick... XP message appears. 3 Restart the computer. 4 Press immediately after the DELL logo appears. See the documentation that were installed during assembly of the computer. For conventional hard drive configurations, the primary hard drive is the first drive detected by the computer. NOTE: The Drivers and Utilities CD contains drivers...
Quick Reference Guide
Page 39
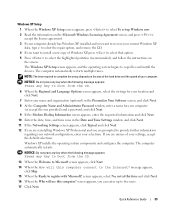
... key to boot from the CD. 13 When the Welcome to select the highlighted partition (recommended), and follow the instructions on the size of the hard drive and the speed of your settings, accept the default selections. The Windows XP Setup screen appears, and the operating system begins to register with Microsoft...
... key to boot from the CD. 13 When the Welcome to select the highlighted partition (recommended), and follow the instructions on the size of the hard drive and the speed of your settings, accept the default selections. The Windows XP Setup screen appears, and the operating system begins to register with Microsoft...


