
User Manual
Page 2
... latch lock 16. power button 19. device status lights Figure 2. headphone (line-out)/microphone (line-in) connector 5. pen 9. power connector 16. tablet back button 17. screen rotate button 21. Dell Feature Enhancement Pack/ settings button 22. touchpad 15. Secure Digital (SD) card slot 7. pen tether slot 10. cooling vents 4. power and battery...
... latch lock 16. power button 19. device status lights Figure 2. headphone (line-out)/microphone (line-in) connector 5. pen 9. power connector 16. tablet back button 17. screen rotate button 21. Dell Feature Enhancement Pack/ settings button 22. touchpad 15. Secure Digital (SD) card slot 7. pen tether slot 10. cooling vents 4. power and battery...
Media Base Tech Sheet
Page 6
...WARNING: If you are using a multiple-outlet power strip, use a media base from earlier models of Dell computers you may damage the media base or the Tablet-PC. CAUTION: Use the Latitude™ XT3 media base with your media base as well as electric shock and/or fire. CAUTION: If the...the connector incorrectly. b Click More power options. Ensure that the Tablet-PC does not enter sleep, standby, or hibernate mode when you close the lid drop-down the Tablet-PC through the Windows Start menu and then undock the Tablet-PC. Some power strips may allow you to your Latitude XT3 only.
...WARNING: If you are using a multiple-outlet power strip, use a media base from earlier models of Dell computers you may damage the media base or the Tablet-PC. CAUTION: Use the Latitude™ XT3 media base with your media base as well as electric shock and/or fire. CAUTION: If the...the connector incorrectly. b Click More power options. Ensure that the Tablet-PC does not enter sleep, standby, or hibernate mode when you close the lid drop-down the Tablet-PC through the Windows Start menu and then undock the Tablet-PC. Some power strips may allow you to your Latitude XT3 only.
Media Base Tech Sheet
Page 7
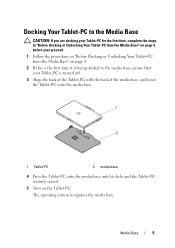
... is being docked to the media base, ensure that your Tablet-PC is turned off . 3 Align the back of the Tablet-PC with the back of the media base, and lower the Tablet-PC onto the media base. 1 2 1 Tablet-PC 2 media base 4 Press the Tablet-PC onto the media base until it clicks and the... Tablet-PC is firmly seated. 5 Turn on the Tablet-PC. The operating system recognizes the...
... is being docked to the media base, ensure that your Tablet-PC is turned off . 3 Align the back of the Tablet-PC with the back of the media base, and lower the Tablet-PC onto the media base. 1 2 1 Tablet-PC 2 media base 4 Press the Tablet-PC onto the media base until it clicks and the... Tablet-PC is firmly seated. 5 Turn on the Tablet-PC. The operating system recognizes the...
Media Base Tech Sheet
Page 8
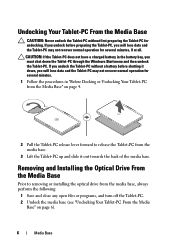
... installing the optical drive from the media base. 3 Lift the Tablet-PC up and slide it down the Tablet-PC through the Windows Start menu and then undock the Tablet-PC. If you undock the Tablet-PC without first preparing the Tablet-PC for several minutes. 1 Follow the procedures in the battery... out towards the back of the media base. Undocking Your Tablet-PC From the Media Base CAUTION: Never undock the Tablet-PC without a battery before preparing the Tablet-PC, you must shut down , you will lose data and the Tablet-PC may not recover normal operation for several minutes, if ...
... installing the optical drive from the media base. 3 Lift the Tablet-PC up and slide it down the Tablet-PC through the Windows Start menu and then undock the Tablet-PC. If you undock the Tablet-PC without first preparing the Tablet-PC for several minutes. 1 Follow the procedures in the battery... out towards the back of the media base. Undocking Your Tablet-PC From the Media Base CAUTION: Never undock the Tablet-PC without a battery before preparing the Tablet-PC, you must shut down , you will lose data and the Tablet-PC may not recover normal operation for several minutes, if ...


