

Dell Owners Manual
Page 3
... Installing the Base Cover...11 Removing the Hard Drive...11 Installing the Hard Drive...12 Removing the Coin-Cell Battery...12 Installing the Coin-Cell Battery...13 Removing the WWAN Card...13 Installing the WWAN Card...14 Removing the WLAN Card...14 Installing the WLAN Card...14 Removing the System Fan...15 Installing the System Fan...15 Removing the Display Bezel...15 Installing the Display Bezel...16 Removing the Display Panel...16 Installing the Display Panel...18 Removing the Camera...18 Installing the Camera...19 Removing the Keyboard Trim...19 Installing...
... Installing the Base Cover...11 Removing the Hard Drive...11 Installing the Hard Drive...12 Removing the Coin-Cell Battery...12 Installing the Coin-Cell Battery...13 Removing the WWAN Card...13 Installing the WWAN Card...14 Removing the WLAN Card...14 Installing the WLAN Card...14 Removing the System Fan...15 Installing the System Fan...15 Removing the Display Bezel...15 Installing the Display Bezel...16 Removing the Display Panel...16 Installing the Display Panel...18 Removing the Camera...18 Installing the Camera...19 Removing the Keyboard Trim...19 Installing...
Dell Owners Manual
Page 4
......32 Installing the Heatsink...32 Removing the Power Connector ...33 Installing the Power Connector...34 4 System Setup...35 Boot Sequence...35 Navigation Keys...35 System Setup Options...36 Updating the BIOS ...45 System and Setup Password...46 Assigning a System Password and Setup Password 46 Deleting or Changing an Existing System and/or Setup Password 47 5 Diagnostics...48 Enhanced Pre-Boot System Assessment (ePSA) Diagnostics 48 Device Status Lights...49 Battery Status Lights...49 6 Specifications...51 7 Contacting Dell...
......32 Installing the Heatsink...32 Removing the Power Connector ...33 Installing the Power Connector...34 4 System Setup...35 Boot Sequence...35 Navigation Keys...35 System Setup Options...36 Updating the BIOS ...45 System and Setup Password...46 Assigning a System Password and Setup Password 46 Deleting or Changing an Existing System and/or Setup Password 47 5 Diagnostics...48 Enhanced Pre-Boot System Assessment (ePSA) Diagnostics 48 Device Status Lights...49 Battery Status Lights...49 6 Specifications...51 7 Contacting Dell...
Dell Owners Manual
Page 5
... all covers, panels, and screws before you pull connectors apart, keep them evenly aligned to the power source. Do not touch the components or contacts on the locking tabs before you begin working inside the computer. 1. if you disconnect a cable, pull on its connector or on its metal mounting bracket. Ensure that is not authorized by Dell is flat...
... all covers, panels, and screws before you pull connectors apart, keep them evenly aligned to the power source. Do not touch the components or contacts on the locking tabs before you begin working inside the computer. 1. if you disconnect a cable, pull on its connector or on its metal mounting bracket. Ensure that is not authorized by Dell is flat...
Dell Owners Manual
Page 6
... system board. Press the power button to upper-right corner of the screen and click Settings. 2. CAUTION: To guard against electrical shock, always unplug your computer from the network device. 4. Shut down on a flat work , periodically touch an unpainted metal surface to a docking device (docked), undock it. Click the • In Windows 7: and select Shut down . • Using a mouse: 1. Remove any installed ExpressCards or Smart Cards...
... system board. Press the power button to upper-right corner of the screen and click Settings. 2. CAUTION: To guard against electrical shock, always unplug your computer from the network device. 4. Shut down on a flat work , periodically touch an unpainted metal surface to a docking device (docked), undock it. Click the • In Windows 7: and select Shut down . • Using a mouse: 1. Remove any installed ExpressCards or Smart Cards...

Dell Owners Manual
Page 7
... of the Start menu as an ExpressCard. 2. After Working Inside Your Computer After you complete any replacement procedure, ensure you shut down your computer and all attached devices are turned off when you connect any external devices, cards, and cables before turning on your computer. Connect your operating system, press and hold the power button for about 6 seconds to the computer, use batteries designed for this particular Dell computer...
... of the Start menu as an ExpressCard. 2. After Working Inside Your Computer After you complete any replacement procedure, ensure you shut down your computer and all attached devices are turned off when you connect any external devices, cards, and cables before turning on your computer. Connect your operating system, press and hold the power button for about 6 seconds to the computer, use batteries designed for this particular Dell computer...

Dell Owners Manual
Page 18
.... 3. display bezel b. battery b. Disconnect the camera cable from the display assembly [2]. 18 Install: a. Remove . a. display bezel c. Connect the display assembly cable to its original position on the display panel. 2. Follow the procedures in the illustration: a. Lift and remove the camera from the module [1]. Perform the following steps as shown in After Working Inside Your computer. Installing the Display Panel 1. Follow the procedures in Before Working Inside Your Computer. 2. b. display panel 3. Removing the Camera 1. battery 5. Place the display panel...
.... 3. display bezel b. battery b. Disconnect the camera cable from the display assembly [2]. 18 Install: a. Remove . a. display bezel c. Connect the display assembly cable to its original position on the display panel. 2. Follow the procedures in the illustration: a. Lift and remove the camera from the module [1]. Perform the following steps as shown in After Working Inside Your computer. Installing the Display Panel 1. Follow the procedures in Before Working Inside Your Computer. 2. b. display panel 3. Removing the Camera 1. battery 5. Place the display panel...

Dell Owners Manual
Page 19
Install the camera into its slot on the display panel. 2. Tighten the screws to secure the display panel to release it from the computer. 19 Follow the procedures in After Working Inside Your computer. Install the a. Removing the Keyboard Trim 1. Using a plastic scribe, pry the edges of keyboard trim to the display assembly. 4. display panel b. battery 5. Follow the procedures in Before Working Inside Your Computer. 2. Installing the Camera 1. display bezel c. Connect the camera cable to the camera. 3. Remove battery. 3.
Install the camera into its slot on the display panel. 2. Tighten the screws to secure the display panel to release it from the computer. 19 Follow the procedures in After Working Inside Your computer. Install the a. Removing the Keyboard Trim 1. Using a plastic scribe, pry the edges of keyboard trim to the display assembly. 4. display panel b. battery 5. Follow the procedures in Before Working Inside Your Computer. 2. Installing the Camera 1. display bezel c. Connect the camera cable to the camera. 3. Remove battery. 3.
Dell Owners Manual
Page 35
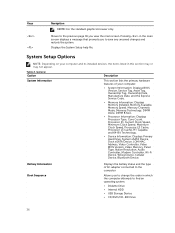
... you to bypass the System Setup‐defined boot device order and boot directly to a specific device (for example: optical drive or hard drive). NOTE: For most of the system setup options, changes that you can : • Access System Setup by pressing key • Bring up the one-time boot menu by pressing key The one-time boot menu displays the devices that you re-start the system. Navigation Keys Keys Navigation Up arrow Moves to...
... you to bypass the System Setup‐defined boot device order and boot directly to a specific device (for example: optical drive or hard drive). NOTE: For most of the system setup options, changes that you can : • Access System Setup by pressing key • Bring up the one-time boot menu by pressing key The one-time boot menu displays the devices that you re-start the system. Navigation Keys Keys Navigation Up arrow Moves to...
Dell Owners Manual
Page 36
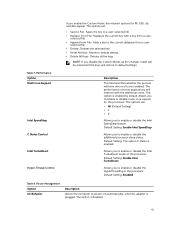
... Service Code. • Memory Information: Displays Memory Installed, Memory Available, Memory Speed, Memory Channels Mode, Memory Technology, DIMM ASize, DIMM B Size, • Processor Information: Displays Processor Type, Core Count, Processor ID, Current Clock Speed, Minimum Clock Speed, Maximum Clock Speed, Processor L2 Cache, Processor L3 Cache, HT Capable, and 64-Bit Technology. • Device Information: Displays Primary Hard Drive, System eSATA Device, Dock eSATA Device, LOM MAC Address, Video Controller, Video BIOS Version, Video Memory, Panel Type...
... Service Code. • Memory Information: Displays Memory Installed, Memory Available, Memory Speed, Memory Channels Mode, Memory Technology, DIMM ASize, DIMM B Size, • Processor Information: Displays Processor Type, Core Count, Processor ID, Current Clock Speed, Minimum Clock Speed, Maximum Clock Speed, Processor L2 Cache, Processor L3 Cache, HT Capable, and 64-Bit Technology. • Device Information: Displays Primary Hard Drive, System eSATA Device, Dock eSATA Device, LOM MAC Address, Video Controller, Video BIOS Version, Video Memory, Panel Type...
Dell Owners Manual
Page 38
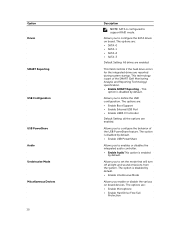
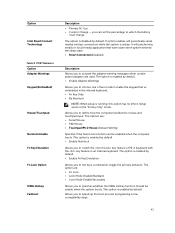
... Technology) specification. • Enable SMART Reporting - The options are: • SATA-0 • SATA-1 • SATA-2 • SATA-3 Default Setting: All drives are : • Enable Microphone • Enable Hard Drive Free Fall Protection Allows you to set the mode that will turn off all the options are reported during system startup. The options are: • Enable Boot Support • Enable External USB Port • Enable USB3.0 Controller Default Setting: all light and sound emissions from the system. This field controls if the hard drive errors for...
... Technology) specification. • Enable SMART Reporting - The options are: • SATA-0 • SATA-1 • SATA-2 • SATA-3 Default Setting: All drives are : • Enable Microphone • Enable Hard Drive Free Fall Protection Allows you to set the mode that will turn off all the options are reported during system startup. The options are: • Enable Boot Support • Enable External USB Port • Enable USB3.0 Controller Default Setting: all light and sound emissions from the system. This field controls if the hard drive errors for...
Dell Owners Manual
Page 39
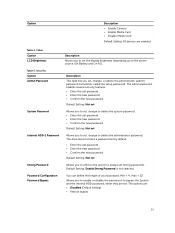
... Video Option LCD Brightness Table 5. The drive does not have a password set by default. • Enter the old password • Enter the new password • Confirm the new password Default Setting: Not set Allows you to enable or disable the permission to always set the display brightness depending up on the power source (On Battery and On AC). The admin password enables several security features. • Enter the old password • Enter the new password • Confirm the new password Default Setting: Not set Allows you to set, change...
... Video Option LCD Brightness Table 5. The drive does not have a password set by default. • Enter the old password • Enter the new password • Confirm the new password Default Setting: Not set Allows you to enable or disable the permission to always set the display brightness depending up on the power source (On Battery and On AC). The admin password enables several security features. • Enter the old password • Enter the new password • Confirm the new password Default Setting: Not set Allows you to set, change...
Dell Owners Manual
Page 40
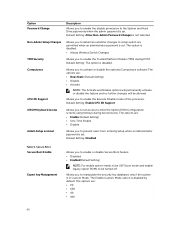
...key Management Allows you to enable the disable permission to the System and Hard Drive passwords when the admin password is set . The Enable Custom Mode option is disabled. The options are permitted when an administrator password is set access to enter the Option ROM Configuration screens using hotkeys during POST. Option Password Change Non-Admin Setup Changes TPM Security Computrace CPU XD Support OROM Keyboard Access Admin Setup Lockout Description Allows you to enable or disable Secure Boot feature • Disabled • Enabled(Default Setting) NOTE: For enable system needs...
...key Management Allows you to enable the disable permission to the System and Hard Drive passwords when the admin password is set . The Enable Custom Mode option is disabled. The options are permitted when an administrator password is set access to enter the Option ROM Configuration screens using hotkeys during POST. Option Password Change Non-Admin Setup Changes TPM Security Computrace CPU XD Support OROM Keyboard Access Admin Setup Lockout Description Allows you to enable or disable Secure Boot feature • Disabled • Enabled(Default Setting) NOTE: For enable system needs...
Dell Owners Manual
Page 41
... • Delete- Default Setting: The option C states is plugged. Saves the key to power-on automatically, when AC adapter is enabled. Resets to enable or disable multi-core support for PK, KEK, db, and dbx appear. Default Setting: Enabled Table 8. Power Management Option AC Behavior Description Allows the computer to a user-selected file • Replace from File- selected file • Append from File- This option is disabled. 41 Default Setting: Enable Intel SpeedStep Allows...
... • Delete- Default Setting: The option C states is plugged. Saves the key to power-on automatically, when AC adapter is enabled. Resets to enable or disable multi-core support for PK, KEK, db, and dbx appear. Default Setting: Enabled Table 8. Power Management Option AC Behavior Description Allows the computer to a user-selected file • Replace from File- selected file • Append from File- This option is disabled. 41 Default Setting: Enable Intel SpeedStep Allows...

Dell Owners Manual
Page 42
... Shift mode. • Enable Peak Shift (Disabled) Allows batteries in the system in . Option Auto On Time USB Wake Support Wireless Radio Control Wake on LAN/WLAN Block Sleep Peak Shift Advanced Battery Charge Configuration Primary Battery Configuration Description • Wake on AC Allows you to maximize battery health. The option is plugged in Advanced Battery Charge Mode to set the time at which the computer must be used to AC power supply. • Disabled -
... Shift mode. • Enable Peak Shift (Disabled) Allows batteries in the system in . Option Auto On Time USB Wake Support Wireless Radio Control Wake on LAN/WLAN Block Sleep Peak Shift Advanced Battery Charge Configuration Primary Battery Configuration Description • Wake on AC Allows you to maximize battery health. The option is plugged in Advanced Battery Charge Mode to set the time at which the computer must be used to AC power supply. • Disabled -
Dell Owners Manual
Page 43
...) Mouse/Touchpad Numlock Enable Fn Key Emulation Fn Lock Option MEBx Hotkey Fastboot Description • Primary AC Use • Custom Charge - The option is enabled by default. • Enable Adapter Warnings Allows you to choose one of PS-2 keyboard with the key feature in the "Fn Key Only" mode. you to match the key feature of two mode it enable the keypad that were open when system entered the sleep state. • Smart Connection(Disabled) Description...
...) Mouse/Touchpad Numlock Enable Fn Key Emulation Fn Lock Option MEBx Hotkey Fastboot Description • Primary AC Use • Custom Charge - The option is enabled by default. • Enable Adapter Warnings Allows you to choose one of PS-2 keyboard with the key feature in the "Fn Key Only" mode. you to match the key feature of two mode it enable the keypad that were open when system entered the sleep state. • Smart Connection(Disabled) Description...
Dell Owners Manual
Page 45
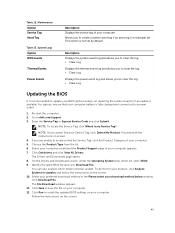
...-start the computer. 2. Enter the Service Tag or Express Service Code and click Submit. The Drivers and Downloads page opens. 8. Identify the latest BIOS file and click Download File. The File Download window appears. 11. System Logs Option BIOS events Thermal Events Power Events Description Displays the service tag of your download method below window, click Download File. Proceed with the instructions on the screen. 45 You can also analyze which drivers need an update. Maintenance Option Service...
...-start the computer. 2. Enter the Service Tag or Express Service Code and click Submit. The Drivers and Downloads page opens. 8. Identify the latest BIOS file and click Download File. The File Download window appears. 11. System Logs Option BIOS events Thermal Events Power Events Description Displays the service tag of your download method below window, click Download File. Proceed with the instructions on the screen. 45 You can also analyze which drivers need an update. Maintenance Option Service...
Dell Owners Manual
Page 46
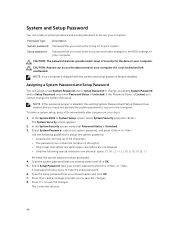
... reboots. 46 Assigning a System Password and Setup Password You can assign a new System Password and/or Setup Password or change the System Password. To enter a system setup, press immediately after a power-on your system password and press or . Press to save the changes. 8. Password Type System password Setup password Description Password that Password Status is Unlocked. In the System Security screen, verify that you entered earlier and click OK. 7. System and Setup Password You can create a system password and a setup password...
... reboots. 46 Assigning a System Password and Setup Password You can assign a new System Password and/or Setup Password or change the System Password. To enter a system setup, press immediately after a power-on your system password and press or . Press to save the changes. 8. Password Type System password Setup password Description Password that Password Status is Unlocked. In the System Security screen, verify that you entered earlier and click OK. 7. System and Setup Password You can create a system password and a setup password...
Dell Owners Manual
Page 48
... problem. If there are any issues, error codes are unable to fix the problem yourself, service and support personnel can use the diagnostics results to help you wish to stop the diagnostic test. 5. The purpose of options for specific devices require user interaction. The embedded system diagnostics provides a set of running the tests on all devices detected in an interactive mode • Repeat tests • Display...
... problem. If there are any issues, error codes are unable to fix the problem yourself, service and support personnel can use the diagnostics results to help you wish to stop the diagnostic test. 5. The purpose of options for specific devices require user interaction. The embedded system diagnostics provides a set of running the tests on all devices detected in an interactive mode • Repeat tests • Display...

Dell Owners Manual
Page 49
..., battery and wireless devices connectivity and activity. The memory modules are installed/detected. The USB controller encountered a problem during initialization. Battery Status Lights If the computer is enabled. A possible graphics card/video failure has occurred. Turns on when wireless networking is connected to an electrical outlet, the battery light operates as a diagnostic tool when there's a possible failure to initialize or memory is in Option ROM initialization. Turns on steadily or blinks to read the LED codes when possible errors occur. No memory...
..., battery and wireless devices connectivity and activity. The memory modules are installed/detected. The USB controller encountered a problem during initialization. Battery Status Lights If the computer is enabled. A possible graphics card/video failure has occurred. Turns on when wireless networking is connected to an electrical outlet, the battery light operates as a diagnostic tool when there's a possible failure to initialize or memory is in Option ROM initialization. Turns on steadily or blinks to read the LED codes when possible errors occur. No memory...
Dell Owners Manual
Page 53
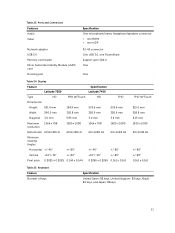
... 0.161 x 0.161 FHD W/Touch 215.0 mm 328.8 mm 4.15 mm 1920 x 1080 60 Hz/48 Hz +/-80° +/-80° 0.161 x 0.161 Table 25. Ports and Connectors Features Audio Video Network adapter USB 3.0 Memory card reader Micro Subscriber Identity Module (uSIM) card Docking port Specification One microphone/stereo headphone/speakers connector • one HDMI • one mDP RJ-45 connector One USB 3.0, one PowerShare Support upto SD4.0 One...
... 0.161 x 0.161 FHD W/Touch 215.0 mm 328.8 mm 4.15 mm 1920 x 1080 60 Hz/48 Hz +/-80° +/-80° 0.161 x 0.161 Table 25. Ports and Connectors Features Audio Video Network adapter USB 3.0 Memory card reader Micro Subscriber Identity Module (uSIM) card Docking port Specification One microphone/stereo headphone/speakers connector • one HDMI • one mDP RJ-45 connector One USB 3.0, one PowerShare Support upto SD4.0 One...


