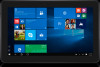
User Guide
Page 3
... power button on the Start screen 16 Using the Charms menu 16 Using the power button 17 Turning off the screen 17 Using the Charms menu 17 Using the power button 17 Start screen 17 Wi-Fi 18 Turning Wi-Fi on or off 18 Connecting to a network 18 Mobile broadband settings 18 Turning mobile broadband on or off 18 Connecting to a network 18 Bluetooth 19 Turning Bluetooth on or off 19 Pairing with Bluetooth-enabled devices 19 Screen orientation 19 Locking/unlocking the screen...
... power button on the Start screen 16 Using the Charms menu 16 Using the power button 17 Turning off the screen 17 Using the Charms menu 17 Using the power button 17 Start screen 17 Wi-Fi 18 Turning Wi-Fi on or off 18 Connecting to a network 18 Mobile broadband settings 18 Turning mobile broadband on or off 18 Connecting to a network 18 Bluetooth 19 Turning Bluetooth on or off 19 Pairing with Bluetooth-enabled devices 19 Screen orientation 19 Locking/unlocking the screen...
User Guide
Page 4
... 22 4 Keyboards and Pens 25 Latitude 11 Slim Keyboard 25 Connecting your tablet 25 Disconnecting your tablet 27 Tilt 28 Dell Active Pen holder 28 Latitude 11 Keyboard 29 Features 29 Connecting your tablet 30 Disconnecting your tablet 32 Charging the keyboard 32 Using the mini Active Pen 34 Charging the mini Active Pen 35 5 Entering BIOS setup program 37 With keyboard 37 Without keyboard 37 6 Specifications 38 7 Troubleshooting 42 Battery 42 Network 43...
... 22 4 Keyboards and Pens 25 Latitude 11 Slim Keyboard 25 Connecting your tablet 25 Disconnecting your tablet 27 Tilt 28 Dell Active Pen holder 28 Latitude 11 Keyboard 29 Features 29 Connecting your tablet 30 Disconnecting your tablet 32 Charging the keyboard 32 Using the mini Active Pen 34 Charging the mini Active Pen 35 5 Entering BIOS setup program 37 With keyboard 37 Without keyboard 37 6 Specifications 38 7 Troubleshooting 42 Battery 42 Network 43...
User Guide
Page 7
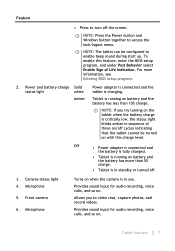
... battery-charge Solid status light white Amber Power adapter is connected and the tablet is in use. Tablet is running on battery and the battery has more information, see Entering BIOS setup program. 2. Feature • Press to turn off cycles indicating that the tablet cannot be configured to enable beep sound during start up. NOTE: Press the Power button and Windows button together to video chat, capture photos, and record videos. Provides sound input for audio...
... battery-charge Solid status light white Amber Power adapter is connected and the tablet is in use. Tablet is running on battery and the battery has more information, see Entering BIOS setup program. 2. Feature • Press to turn off cycles indicating that the tablet cannot be configured to enable beep sound during start up. NOTE: Press the Power button and Windows button together to video chat, capture photos, and record videos. Provides sound input for audio...

User Guide
Page 8
... fingerprint reader allows your tablet to communicate with the system 15. Allows docking to register your finger on . Docking connector Press your finger print and enable access. Allows NFC-enabled devices to recognize your tablet and charge the battery. NOTE: You must configure the fingerprint reader to the docking station. Tablet features 8 optional • Latitude 5179 - Microphone Provides sound input for user authentication. Provides video and audio...
... fingerprint reader allows your tablet to communicate with the system 15. Allows docking to register your finger on . Docking connector Press your finger print and enable access. Allows NFC-enabled devices to recognize your tablet and charge the battery. NOTE: You must configure the fingerprint reader to the docking station. Tablet features 8 optional • Latitude 5179 - Microphone Provides sound input for user authentication. Provides video and audio...
User Guide
Page 9
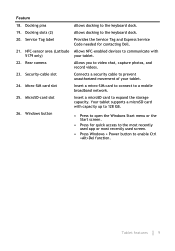
... keyboard dock. Insert a micro-SIM card to connect to video chat, capture photos, and record videos. NFC-sensor area (Latitude 5179 only) 22. Rear camera 23. Allows you to a mobile broadband network. Service Tag label 21. Provides the Service Tag and Express Service Code needed for quick access to the most recently used app or most recently used screen. • Press Windows + Power button to open the Windows Start menu or the Start screen. • Press for contacting Dell...
... keyboard dock. Insert a micro-SIM card to connect to video chat, capture photos, and record videos. NFC-sensor area (Latitude 5179 only) 22. Rear camera 23. Allows you to a mobile broadband network. Service Tag label 21. Provides the Service Tag and Express Service Code needed for quick access to the most recently used app or most recently used screen. • Press Windows + Power button to open the Windows Start menu or the Start screen. • Press for contacting Dell...
User Guide
Page 10
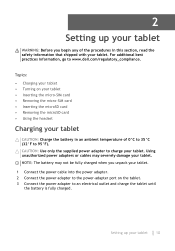
... severely damage your tablet. Setting up your tablet WARNING: Before you unpack your tablet. 1 Connect the power cable into the power adapter. 2 Connect the power adapter to the power-adapter port on your tablet • Inserting the micro-SIM card • Removing the micro-SIM card • Inserting the microSD card • Removing the microSD card • Using the headset Charging your tablet CAUTION: Charge the battery in an ambient temperature of...
... severely damage your tablet. Setting up your tablet WARNING: Before you unpack your tablet. 1 Connect the power cable into the power adapter. 2 Connect the power adapter to the power-adapter port on your tablet • Inserting the micro-SIM card • Removing the micro-SIM card • Inserting the microSD card • Removing the microSD card • Using the headset Charging your tablet CAUTION: Charge the battery in an ambient temperature of...
User Guide
Page 11
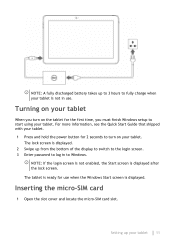
...-SIM card 1 Open the slot cover and locate the micro-SIM card slot. For more information, see the Quick Start Guide that shipped with your tablet. 1 Press and hold the power button for 2 seconds to turn on your tablet. NOTE: A fully discharged battery takes up from the bottom of the display to switch to the login screen. 3 Enter password to log in use when the Windows Start screen is displayed after the lock screen. The lock screen is...
...-SIM card 1 Open the slot cover and locate the micro-SIM card slot. For more information, see the Quick Start Guide that shipped with your tablet. 1 Press and hold the power button for 2 seconds to turn on your tablet. NOTE: A fully discharged battery takes up from the bottom of the display to switch to the login screen. 3 Enter password to log in use when the Windows Start screen is displayed after the lock screen. The lock screen is...
User Guide
Page 12
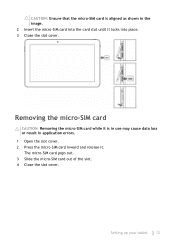
Removing the micro-SIM card CAUTION: Removing the micro-SIM card while it is aligned as shown in application errors. 1 Open the slot cover. 2 Press the micro-SIM card inward and release it locks into the card slot until it . CAUTION: Ensure that the micro-SIM card is in use may cause data loss or result in the image. 2 Insert the micro-SIM card into place. 3 Close the slot cover. Setting up your tablet 12 The micro-SIM card pops out. 3 Slide the micro-SIM card out of the slot. 4 Close the slot cover.
Removing the micro-SIM card CAUTION: Removing the micro-SIM card while it is aligned as shown in application errors. 1 Open the slot cover. 2 Press the micro-SIM card inward and release it locks into the card slot until it . CAUTION: Ensure that the micro-SIM card is in use may cause data loss or result in the image. 2 Insert the micro-SIM card into place. 3 Close the slot cover. Setting up your tablet 12 The micro-SIM card pops out. 3 Slide the micro-SIM card out of the slot. 4 Close the slot cover.
User Guide
Page 13
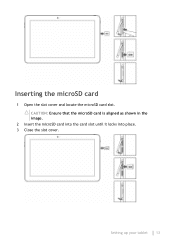
CAUTION: Ensure that the microSD card is aligned as shown in the image. 2 Insert the microSD card into the card slot until it locks into place. 3 Close the slot cover. Inserting the microSD card 1 Open the slot cover and locate the microSD card slot. Setting up your tablet 13
CAUTION: Ensure that the microSD card is aligned as shown in the image. 2 Insert the microSD card into the card slot until it locks into place. 3 Close the slot cover. Inserting the microSD card 1 Open the slot cover and locate the microSD card slot. Setting up your tablet 13
User Guide
Page 14
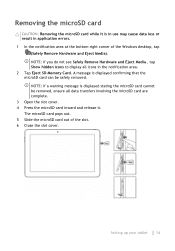
... involving the microSD card are complete. 3 Open the slot cover. 4 Press the microSD card inward and release it is in use may cause data loss or result in the notification area. 2 Tap Eject SD Memory Card. The microSD card pops out. 5 Slide the microSD card out of the Windows desktop, tap (Safely Remove Hardware and Eject Media). Removing the microSD card CAUTION: Removing the microSD card while it . NOTE...
... involving the microSD card are complete. 3 Open the slot cover. 4 Press the microSD card inward and release it is in use may cause data loss or result in the notification area. 2 Tap Eject SD Memory Card. The microSD card pops out. 5 Slide the microSD card out of the Windows desktop, tap (Safely Remove Hardware and Eject Media). Removing the microSD card CAUTION: Removing the microSD card while it . NOTE...
User Guide
Page 16
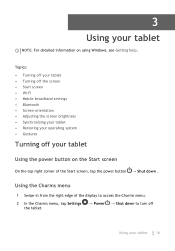
Topics: • Turning off your tablet • Turning off the screen • Start screen • Wi-Fi • Mobile broadband settings • Bluetooth • Screen orientation • Adjusting the screen brightness • Synchronizing your tablet • Restoring your operating system • Gestures Turning off Using your tablet Using the power button on using Windows, see Getting help. Using the Charms menu 1 Swipe-in from the right edge of the Start screen, tap the power button → Shut...
Topics: • Turning off your tablet • Turning off the screen • Start screen • Wi-Fi • Mobile broadband settings • Bluetooth • Screen orientation • Adjusting the screen brightness • Synchronizing your tablet • Restoring your operating system • Gestures Turning off Using your tablet Using the power button on using Windows, see Getting help. Using the Charms menu 1 Swipe-in from the right edge of the Start screen, tap the power button → Shut...
User Guide
Page 18
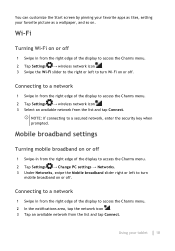
... the display to access the Charms menu. 2 Tap Settings → Change PC settings → Networks. 3 Under Networks, swipe the Mobile broadband slider right or left to a secured network, enter the security key when prompted. NOTE: If connecting to turn mobile broadband on or off . You can customize the Start screen by pinning your favorite apps as tiles, setting your tablet 18 Connecting to a network 1 Swipe in from the list...
... the display to access the Charms menu. 2 Tap Settings → Change PC settings → Networks. 3 Under Networks, swipe the Mobile broadband slider right or left to a secured network, enter the security key when prompted. NOTE: If connecting to turn mobile broadband on or off . You can customize the Start screen by pinning your favorite apps as tiles, setting your tablet 18 Connecting to a network 1 Swipe in from the list...
User Guide
Page 19
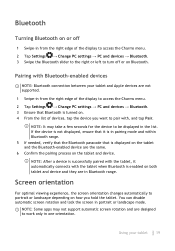
... needed, verify that the Bluetooth passcode that is not displayed, ensure that Bluetooth is enabled on . 4 From the list of the display to access the Charms menu. 2 Tap Settings → Change PC settings → PC and devices → Bluetooth. 3 Swipe the Bluetooth slider to the right or left to work only in from the right edge of devices, tap the device you hold the tablet. Pairing with Bluetooth-enabled devices NOTE: Bluetooth connection...
... needed, verify that the Bluetooth passcode that is not displayed, ensure that Bluetooth is enabled on . 4 From the list of the display to access the Charms menu. 2 Tap Settings → Change PC settings → PC and devices → Bluetooth. 3 Swipe the Bluetooth slider to the right or left to work only in from the right edge of devices, tap the device you hold the tablet. Pairing with Bluetooth-enabled devices NOTE: Bluetooth connection...
User Guide
Page 20
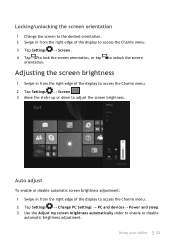
... unlock the screen Adjusting the screen brightness 1 Swipe-in from the right edge of the display to access the Charms menu. 3 Tap Settings → Screen . 4 Tap to enable or disable automatic-brightness adjustment. Using your tablet 20 Auto adjust To enable or disable automatic screen brightness adjustment: 1 Swipe-in from the right edge of the display to access the Charms menu. 2 Tap Settings → Change PC Settings → PC and devices→ Power and sleep. 3 Use the Adjust my screen brightness automatically slider to lock...
... unlock the screen Adjusting the screen brightness 1 Swipe-in from the right edge of the display to access the Charms menu. 3 Tap Settings → Screen . 4 Tap to enable or disable automatic-brightness adjustment. Using your tablet 20 Auto adjust To enable or disable automatic screen brightness adjustment: 1 Swipe-in from the right edge of the display to access the Charms menu. 2 Tap Settings → Change PC Settings → PC and devices→ Power and sleep. 3 Use the Adjust my screen brightness automatically slider to lock...
User Guide
Page 21
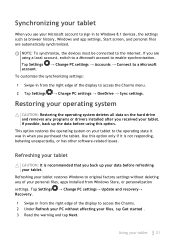
.... This option restores the operating system on the hard drive and removes any of the display to access the Charms menu. 2 Tap Settings → Change PC settings → OneDrive → Sync settings. Tap Settings → Change PC settings→ Update and recovery→ Recovery. 1 Swipe in when you purchased the tablet. If possible, back up your Microsoft account to sign in to Windows 8.1 devices, the settings such as browser history, Windows and app settings, Start screen...
.... This option restores the operating system on the hard drive and removes any of the display to access the Charms menu. 2 Tap Settings → Change PC settings → OneDrive → Sync settings. Tap Settings → Change PC settings→ Update and recovery→ Recovery. 1 Swipe in when you purchased the tablet. If possible, back up your Microsoft account to sign in to Windows 8.1 devices, the settings such as browser history, Windows and app settings, Start screen...
User Guide
Page 22
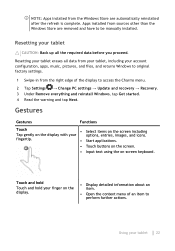
... -screen keyboard. Apps installed from the right edge of an item to perform further actions. fingertip. • Start applications. • Touch buttons on the screen. • Input text using the on the display. • Display detailed information about an item. • Open the context menu of the display to access the Charms menu. 2 Tap Settings → Change PC settings → Update and recovery → Recovery. 3 Under Remove everything and reinstall Windows, tap Get started...
... -screen keyboard. Apps installed from the right edge of an item to perform further actions. fingertip. • Start applications. • Touch buttons on the screen. • Input text using the on the display. • Display detailed information about an item. • Open the context menu of the display to access the Charms menu. 2 Tap Settings → Change PC settings → Update and recovery → Recovery. 3 Under Remove everything and reinstall Windows, tap Get started...
User Guide
Page 29
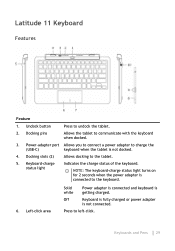
... power adapter is getting charged. Docking slots (2) Allows docking to left-click. Left-click area Solid white Power adapter is connected and keyboard is not connected. Keyboards and Pens 29 Latitude 11 Keyboard Features Feature 1. Power-adapter port Allows you to connect a power adapter to charge the (USB-C) keyboard when the tablet is connected to the keyboard. 6. Press to the tablet. 5. NOTE: The keyboard-charge status light turns on for 2 seconds when the power adapter is not docked. 4. Keyboard-charge status light Indicates...
... power adapter is getting charged. Docking slots (2) Allows docking to left-click. Left-click area Solid white Power adapter is connected and keyboard is not connected. Keyboards and Pens 29 Latitude 11 Keyboard Features Feature 1. Power-adapter port Allows you to connect a power adapter to charge the (USB-C) keyboard when the tablet is connected to the keyboard. 6. Press to the tablet. 5. NOTE: The keyboard-charge status light turns on for 2 seconds when the power adapter is not docked. 4. Keyboard-charge status light Indicates...
User Guide
Page 43
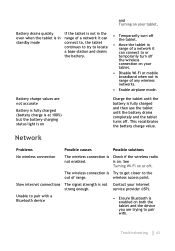
... range of a network it can connect to, the tablet continues to try to locate a base station and drains the battery. • Temporarily turn off . wireless access point. This recalibrates the battery charge value. is Check if the wireless radio not enabled. Troubleshooting 43 Battery drains quickly even when the tablet is in standby mode If the tablet is not Contact your tablet. • Disable Wi-Fi...
... range of a network it can connect to, the tablet continues to try to locate a base station and drains the battery. • Temporarily turn off . wireless access point. This recalibrates the battery charge value. is Check if the wireless radio not enabled. Troubleshooting 43 Battery drains quickly even when the tablet is in standby mode If the tablet is not Contact your tablet. • Disable Wi-Fi...
User Guide
Page 45
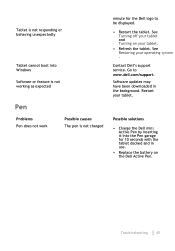
... www.dell.com/support. Possible solutions • Charge the Dell mini Active Pen by inserting it into Windows Software or feature is not working as expected Pen Problems Pen does not work Possible causes The pen is not charged minute for 10 seconds with the tablet docked and in the background. See Restoring your tablet. Software updates may have been downloaded in use. • Replace the battery on...
... www.dell.com/support. Possible solutions • Charge the Dell mini Active Pen by inserting it into Windows Software or feature is not working as expected Pen Problems Pen does not work Possible causes The pen is not charged minute for 10 seconds with the tablet docked and in the background. See Restoring your tablet. Software updates may have been downloaded in use. • Replace the battery on...
User Guide
Page 46
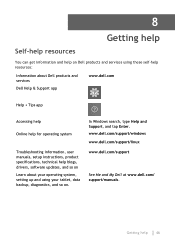
In Windows search, type Help and Support, and tap Enter. Getting help blogs, drivers, software updates, and so on Learn about your operating system, setting up and using these self-help resources: Information about Dell products and services Dell Help & Support app www.dell.com Help + Tips app Accessing help Online help for operating system Troubleshooting information, user manuals, setup instructions, product specifications, technical help 46 8 Getting help Self-help resources You can get...
In Windows search, type Help and Support, and tap Enter. Getting help blogs, drivers, software updates, and so on Learn about your operating system, setting up and using these self-help resources: Information about Dell products and services Dell Help & Support app www.dell.com Help + Tips app Accessing help Online help for operating system Troubleshooting information, user manuals, setup instructions, product specifications, technical help 46 8 Getting help Self-help resources You can get...


