
User Guide
Page 4
... 21 Restoring your operating system 21 Refreshing your tablet 21 Resetting your tablet 22 Gestures 22 4 Keyboards and Pens 25 Latitude 11 Slim Keyboard 25 Connecting your tablet 25 Disconnecting your tablet 27 Tilt 28 Dell Active Pen holder 28 Latitude 11 Keyboard 29 Features 29 Connecting your tablet 30 Disconnecting your tablet 32 Charging the...
... 21 Restoring your operating system 21 Refreshing your tablet 21 Resetting your tablet 22 Gestures 22 4 Keyboards and Pens 25 Latitude 11 Slim Keyboard 25 Connecting your tablet 25 Disconnecting your tablet 27 Tilt 28 Dell Active Pen holder 28 Latitude 11 Keyboard 29 Features 29 Connecting your tablet 30 Disconnecting your tablet 32 Charging the...
User Guide
Page 9
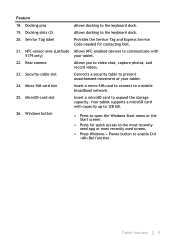
... area (Latitude 5179 only) 22. Allows NFC-enabled devices to communicate with capacity up to 128 GB. • Press to prevent unauthorized movement of your tablet. Rear camera 23. Windows button Allows docking to video chat, capture photos, and record videos. Allows you to the keyboard dock. ... Ctrl +Alt+Del function. Connects a security cable to open the Windows Start menu or the Start screen. • Press for contacting Dell. Tablet features 9 Service Tag label 21. Micro-SIM card slot 25. Provides the Service Tag and Express Service Code needed for quick access...
... area (Latitude 5179 only) 22. Allows NFC-enabled devices to communicate with capacity up to 128 GB. • Press to prevent unauthorized movement of your tablet. Rear camera 23. Windows button Allows docking to video chat, capture photos, and record videos. Allows you to the keyboard dock. ... Ctrl +Alt+Del function. Connects a security cable to open the Windows Start menu or the Start screen. • Press for contacting Dell. Tablet features 9 Service Tag label 21. Micro-SIM card slot 25. Provides the Service Tag and Express Service Code needed for quick access...
User Guide
Page 22
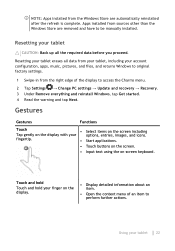
... to be manually installed. Gestures Gestures Functions Touch • Select items on the screen including Tap gently on the display with your finger on -screen keyboard. Touch and hold Touch and hold your options, entries, images, and icons.
... to be manually installed. Gestures Gestures Functions Touch • Select items on the screen including Tap gently on the display with your finger on -screen keyboard. Touch and hold Touch and hold your options, entries, images, and icons.
User Guide
Page 25
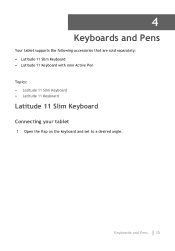
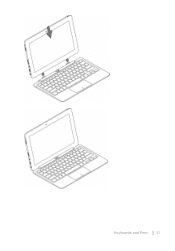
4 Keyboards and Pens Your tablet supports the following accessories that are sold separately: • Latitude 11 Slim Keyboard • Latitude 11 Keyboard with mini Active Pen Topics: • Latitude 11 Slim Keyboard • Latitude 11 Keyboard Latitude 11 Slim Keyboard Connecting your tablet 1 Open the flap on the keyboard and set to a desired angle. Keyboards and Pens 25
4 Keyboards and Pens Your tablet supports the following accessories that are sold separately: • Latitude 11 Slim Keyboard • Latitude 11 Keyboard with mini Active Pen Topics: • Latitude 11 Slim Keyboard • Latitude 11 Keyboard Latitude 11 Slim Keyboard Connecting your tablet 1 Open the flap on the keyboard and set to a desired angle. Keyboards and Pens 25

User Guide
Page 26
Keyboards and Pens 26 2 Align the tabs on the keyboard dock to the slots on the tablet and dock the tablet to the keyboard dock.
Keyboards and Pens 26 2 Align the tabs on the keyboard dock to the slots on the tablet and dock the tablet to the keyboard dock.
User Guide
Page 27
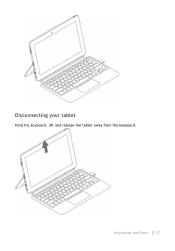
Keyboards and Pens 27 Disconnecting your tablet Hold the keyboard, lift and release the tablet away from the keyboard.
Keyboards and Pens 27 Disconnecting your tablet Hold the keyboard, lift and release the tablet away from the keyboard.
User Guide
Page 28
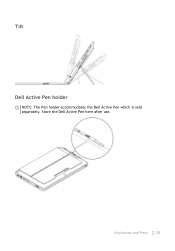
Store the Dell Active Pen here after use. Keyboards and Pens 28 Tilt Dell Active Pen holder NOTE: The Pen holder accommodates the Dell Active Pen which is sold separately.
Store the Dell Active Pen here after use. Keyboards and Pens 28 Tilt Dell Active Pen holder NOTE: The Pen holder accommodates the Dell Active Pen which is sold separately.
User Guide
Page 29
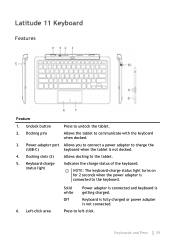
... is getting charged. Left-click area Solid white Power adapter is connected and keyboard is not connected. Keyboards and Pens 29 Latitude 11 Keyboard Features Feature 1. Undock button Press to the tablet. 5. Keyboard-charge status light Indicates the charge status of the keyboard. Power-adapter port Allows you to connect a power adapter to charge the (USB...
... is getting charged. Left-click area Solid white Power adapter is connected and keyboard is not connected. Keyboards and Pens 29 Latitude 11 Keyboard Features Feature 1. Undock button Press to the tablet. 5. Keyboard-charge status light Indicates the charge status of the keyboard. Power-adapter port Allows you to connect a power adapter to charge the (USB...
User Guide
Page 30
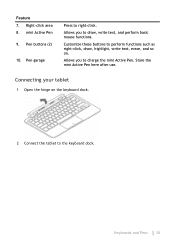
Feature 7. Pen buttons (2) 10. Pen garage Press to perform functions such as right-click, draw, highlight, write text, erase, and so on the keyboard dock. 2 Connect the tablet to draw, write text, and perform basic mouse functions. Customize these buttons to right-click. Connecting your tablet 1 Open the hinge on . Right-click area 8. Store the mini Active Pen here after use. Allows you to charge the mini Active Pen. Keyboards and Pens 30 mini Active Pen 9. Allows you to the keyboard dock.
Feature 7. Pen buttons (2) 10. Pen garage Press to perform functions such as right-click, draw, highlight, write text, erase, and so on the keyboard dock. 2 Connect the tablet to draw, write text, and perform basic mouse functions. Customize these buttons to right-click. Connecting your tablet 1 Open the hinge on . Right-click area 8. Store the mini Active Pen here after use. Allows you to charge the mini Active Pen. Keyboards and Pens 30 mini Active Pen 9. Allows you to the keyboard dock.
User Guide
Page 31
Keyboards and Pens 31
Keyboards and Pens 31
User Guide
Page 32
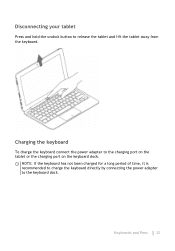
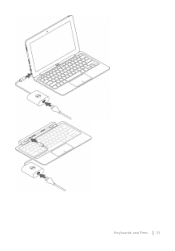
Keyboards and Pens 32 NOTE: If the keyboard has not been charged for a long period of time, it is recommended to charge the keyboard directly by connecting the power adapter to release the tablet and lift the tablet away from the keyboard. Disconnecting your tablet Press and hold the undock button to the keyboard dock. Charging the keyboard To charge the keyboard connect the power adapter to the charging port on the tablet or the charging port on the keyboard dock.
Keyboards and Pens 32 NOTE: If the keyboard has not been charged for a long period of time, it is recommended to charge the keyboard directly by connecting the power adapter to release the tablet and lift the tablet away from the keyboard. Disconnecting your tablet Press and hold the undock button to the keyboard dock. Charging the keyboard To charge the keyboard connect the power adapter to the charging port on the tablet or the charging port on the keyboard dock.
User Guide
Page 33
Keyboards and Pens 33
Keyboards and Pens 33
User Guide
Page 34
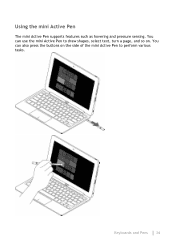
Keyboards and Pens 34 Using the mini Active Pen The mini Active Pen supports features such as hovering and pressure sensing. You can also press the buttons on . You can use the mini Active Pen to draw shapes, select text, turn a page, and so on the side of the mini Active Pen to perform various tasks.
Keyboards and Pens 34 Using the mini Active Pen The mini Active Pen supports features such as hovering and pressure sensing. You can also press the buttons on . You can use the mini Active Pen to draw shapes, select text, turn a page, and so on the side of the mini Active Pen to perform various tasks.
User Guide
Page 35
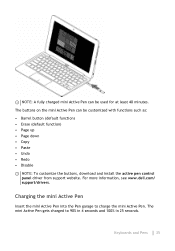
... • Paste • Undo • Redo • Disable NOTE: To customize the buttons, download and install the active pen control panel driver from support website. Keyboards and Pens 35 The mini Active Pen gets charged to charge the mini Active Pen. For more information, see www...
... • Paste • Undo • Redo • Disable NOTE: To customize the buttons, download and install the active pen control panel driver from support website. Keyboards and Pens 35 The mini Active Pen gets charged to charge the mini Active Pen. For more information, see www...
User Guide
Page 36
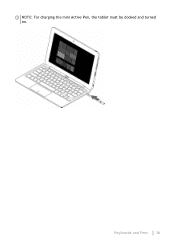
NOTE: For charging the mini Active Pen, the tablet must be docked and turned on. Keyboards and Pens 36
NOTE: For charging the mini Active Pen, the tablet must be docked and turned on. Keyboards and Pens 36

User Guide
Page 37
Entering BIOS setup program 37 5 Entering BIOS setup program With keyboard 1 Connect your tablet to the keyboard dock or connect a USB-enabled keyboard to your tablet. 2 Press the power button to enter BIOS setup program. Without keyboard 1 Press the power button to turn on your tablet. 2 Press and hold the Volume Up button when the Dell logo is displayed on your tablet. 3 When the Dell logo is displayed, select BIOS Setup using the Volume Up button. 4 Press the Volume Down button to turn on the screen. 3 When the F12 boot selection menu is displayed, press F2.
Entering BIOS setup program 37 5 Entering BIOS setup program With keyboard 1 Connect your tablet to the keyboard dock or connect a USB-enabled keyboard to your tablet. 2 Press the power button to enter BIOS setup program. Without keyboard 1 Press the power button to turn on your tablet. 2 Press and hold the Volume Up button when the Dell logo is displayed on your tablet. 3 When the Dell logo is displayed, select BIOS Setup using the Volume Up button. 4 Press the Volume Down button to turn on the screen. 3 When the F12 boot selection menu is displayed, press F2.
User Guide
Page 41
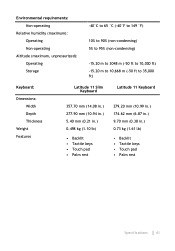
....20 m to 3048 m (-50 ft to 10,000 ft) -15.20 m to 10,668 m (-50 ft to 35,000 ft) Keyboard: Dimensions: Width Depth Thickness Weight Features Latitude 11 Slim Keyboard Latitude 11 Keyboard 357.70 mm (14.08 in.) 277.90 mm (10.94 in.) 5.40 mm (0.21 in.) 0.498 kg (1.10 lb) •...
....20 m to 3048 m (-50 ft to 10,000 ft) -15.20 m to 10,668 m (-50 ft to 35,000 ft) Keyboard: Dimensions: Width Depth Thickness Weight Features Latitude 11 Slim Keyboard Latitude 11 Keyboard 357.70 mm (14.08 in.) 277.90 mm (10.94 in.) 5.40 mm (0.21 in.) 0.498 kg (1.10 lb) •...


