Owners Manual
Page 4
... Removing the Camera Module...36 Installing the Camera Module...36 3 System Setup...39 Boot Sequence...39 Navigation Keys...39 System Setup Options...40 Updating the BIOS ...43 System and Setup Password...43 Assigning a System Password and Setup Password 44 Deleting or Changing an Existing System and/or Setup Password 44 4 Troubleshooting... Pre-Boot System Assessment (ePSA) Diagnostics 47 Device Status Lights...47 Battery Status Lights...48 Beep Codes...48 LED Error Codes...48 5 Specifications...51 6 Contacting Dell...57
... Removing the Camera Module...36 Installing the Camera Module...36 3 System Setup...39 Boot Sequence...39 Navigation Keys...39 System Setup Options...40 Updating the BIOS ...43 System and Setup Password...43 Assigning a System Password and Setup Password 44 Deleting or Changing an Existing System and/or Setup Password 44 4 Troubleshooting... Pre-Boot System Assessment (ePSA) Diagnostics 47 Device Status Lights...47 Battery Status Lights...48 Beep Codes...48 LED Error Codes...48 5 Specifications...51 6 Contacting Dell...57
Owners Manual
Page 10
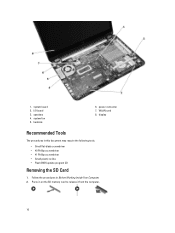
I/O board 3. power connector 7. 1. speakers 4. heatsink 6. WLAN card 8. display Recommended Tools The procedures in Before Working Inside Your Computer. 2. Follow the procedures in this document may require the following tools: • Small flat-blade screwdriver • #0 Phillips screwdriver • #1 Phillips screwdriver • Small plastic scribe • Flash BIOS update program CD Removing the SD Card 1. Press in on the SD memory card to release it from the computer. 10 system fan 5. system board 2.
I/O board 3. power connector 7. 1. speakers 4. heatsink 6. WLAN card 8. display Recommended Tools The procedures in Before Working Inside Your Computer. 2. Follow the procedures in this document may require the following tools: • Small flat-blade screwdriver • #0 Phillips screwdriver • #1 Phillips screwdriver • Small plastic scribe • Flash BIOS update program CD Removing the SD Card 1. Press in on the SD memory card to release it from the computer. 10 system fan 5. system board 2.
Owners Manual
Page 39
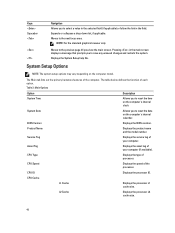
During the Power-on Self Test (POST), when the Dell logo appears, you can: • Access System Setup by pressing key • Bring up the one-time boot menu by pressing key The one-time ... • Set performance and power management thresholds • Manage your computer security Boot Sequence Boot Sequence allows you to manage your computer hardware and specify BIOS‐level options. Table 1. Down arrow Moves to access the System Setup screen. The boot sequence screen also displays the option to the next field...
During the Power-on Self Test (POST), when the Dell logo appears, you can: • Access System Setup by pressing key • Bring up the one-time boot menu by pressing key The one-time ... • Set performance and power management thresholds • Manage your computer security Boot Sequence Boot Sequence allows you to manage your computer hardware and specify BIOS‐level options. Table 1. Down arrow Moves to access the System Setup screen. The boot sequence screen also displays the option to the next field...
Owners Manual
Page 40
... Type Displays the type of the computer. Moves to the next focus area. The Main tab lists out the primary hardware features of processor. BIOS Version Displays the BIOS revision. CPU Cache L1 Cache Displays the processor L1 cache size. Moves to the previous page till you view the main screen. System...
... Type Displays the type of the computer. Moves to the next focus area. The Main tab lists out the primary hardware features of processor. BIOS Version Displays the BIOS revision. CPU Cache L1 Cache Displays the processor L1 cache size. Moves to the previous page till you view the main screen. System...

Owners Manual
Page 43
...provide a basic level of your computer appears. 8. Restart the computer. 2. Choose the Product Type from the list. 7. Identify the latest BIOS file and click Download File. 11. Password Type System password Setup password Description Password that your computer battery is shipped with the instructions on...can access the data stored on your computer. 13. Enter the Service Tag or Express Service Code and click Submit. 5. Click Run to dell.com/support. 3. CAUTION: Anyone can create a system password and a setup password to save the file on your computer if is available...
...provide a basic level of your computer appears. 8. Restart the computer. 2. Choose the Product Type from the list. 7. Identify the latest BIOS file and click Download File. 11. Password Type System password Setup password Description Password that your computer battery is shipped with the instructions on...can access the data stored on your computer. 13. Enter the Service Tag or Express Service Code and click Submit. 5. Click Run to dell.com/support. 3. CAUTION: Anyone can create a system password and a setup password to save the file on your computer if is available...
Owners Manual
Page 44
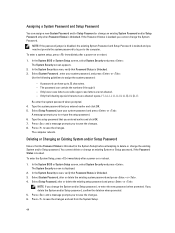
...Ensure that Password Status is displayed. 2. If you need not provide the system password to log on or reboot. 1. In the System BIOS or System Setup screen, select System Security and press . Assigning a System Password and Setup Password You can assign a new System Password and...screen appears. 2. Use the following special characters are not allowed. - Press and a message prompts you to save the changes. 6. In the System BIOS or System Setup screen, select System Security and press . Select Setup Password, alter or delete the existing setup password and press or . Press and...
...Ensure that Password Status is displayed. 2. If you need not provide the system password to log on or reboot. 1. In the System BIOS or System Setup screen, select System Security and press . Assigning a System Password and Setup Password You can assign a new System Password and...screen appears. 2. Use the following special characters are not allowed. - Press and a message prompts you to save the changes. 6. In the System BIOS or System Setup screen, select System Security and press . Select Setup Password, alter or delete the existing setup password and press or . Press and...
Owners Manual
Page 47
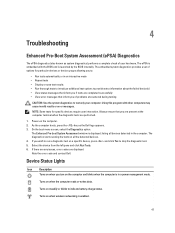
..., select the Diagnostics option. The Enhanced Pre-boot System Assessment window is launched by the BIOS internally. Note the error code and contact Dell. Using this program with the BIOS and is displayed, listing all the detected devices. 4. NOTE: Some tests for particular devices... Turns on the computer. 2. 4 Troubleshooting Enhanced Pre-Boot System Assessment (ePSA) Diagnostics The ePSA diagnostics (also known as the Dell logo appears. 3. Power-on when the computer reads or writes data. Always ensure that inform you of options for specific devices require user...
..., select the Diagnostics option. The Enhanced Pre-boot System Assessment window is launched by the BIOS internally. Note the error code and contact Dell. Using this program with the BIOS and is displayed, listing all the detected devices. 4. NOTE: Some tests for particular devices... Turns on the computer. 2. 4 Troubleshooting Enhanced Pre-Boot System Assessment (ePSA) Diagnostics The ePSA diagnostics (also known as the Dell logo appears. 3. Power-on when the computer reads or writes data. Always ensure that inform you of options for specific devices require user...
Owners Manual
Page 48
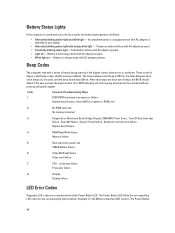
... Keyboard controller test failure System board failure 4 RAM Read/Write failure Memory failure 5 Real-time clock power fail CMOS battery failure 6 Video BIOS test failure Video card failure 7 CPU - Fatal battery failure with AC adapter present. • Constantly blinking amber light - Beep Codes The... if the user presses the power button. Code Cause and Troubleshooting Steps 1 BIOS ROM checksum in full charge mode with AC adapter present. An unauthenticated or unsupported non-Dell AC adapter is attached to an electrical outlet, the battery light operates as ...
... Keyboard controller test failure System board failure 4 RAM Read/Write failure Memory failure 5 Real-time clock power fail CMOS battery failure 6 Video BIOS test failure Video card failure 7 CPU - Fatal battery failure with AC adapter present. • Constantly blinking amber light - Beep Codes The... if the user presses the power button. Code Cause and Troubleshooting Steps 1 BIOS ROM checksum in full charge mode with AC adapter present. An unauthenticated or unsupported non-Dell AC adapter is attached to an electrical outlet, the battery light operates as ...

Owners Manual
Page 49
... two times, pause, etc. This pattern continues until the system is powered off. Code 1 Cause and Troubleshooting Steps System board: BIOS ROM failure System board failure, covers BIOS corruption or ROM error 2 Memory No memory/RAM detected 3 Chipset Error (North and South Bridge Chipset, DMA/IMR/ Timer Error)... controller test failure System board failure 4 RAM Read/Write failure Memory failure 5 Real-time clock power fail CMOS battery failure 6 Video BIOS test failure Video card failure 7 CPU - cache test failure Processor failure 8 Display Display failure 49
... two times, pause, etc. This pattern continues until the system is powered off. Code 1 Cause and Troubleshooting Steps System board: BIOS ROM failure System board failure, covers BIOS corruption or ROM error 2 Memory No memory/RAM detected 3 Chipset Error (North and South Bridge Chipset, DMA/IMR/ Timer Error)... controller test failure System board failure 4 RAM Read/Write failure Memory failure 5 Real-time clock power fail CMOS battery failure 6 Video BIOS test failure Video card failure 7 CPU - cache test failure Processor failure 8 Display Display failure 49


