
Dell Owners Manual
Page 4
Removing the System Board...31 Installing the System Board...32 3 System Setup...35 Boot Sequence...35 Navigation Keys...35 System Setup Options...36 Updating the BIOS ...44 System and Setup Password...45 Assigning a System Password and Setup Password 45 Deleting or Changing an Existing System and/or Setup Password 46 4 Diagnostics...47 Enhanced Pre-Boot System Assessment (ePSA) Diagnostics 47 Device Status Lights...48 Battery Status Lights...48 5 Technical Specifications 49 6 Contacting Dell...55
Removing the System Board...31 Installing the System Board...32 3 System Setup...35 Boot Sequence...35 Navigation Keys...35 System Setup Options...36 Updating the BIOS ...44 System and Setup Password...45 Assigning a System Password and Setup Password 45 Deleting or Changing an Existing System and/or Setup Password 46 4 Diagnostics...47 Enhanced Pre-Boot System Assessment (ePSA) Diagnostics 47 Device Status Lights...48 Battery Status Lights...48 5 Technical Specifications 49 6 Contacting Dell...55
Dell Owners Manual
Page 5
... locking tabs before you pull connectors apart, keep them evenly aligned to avoid bending any connector pins. You should only perform troubleshooting and simple repairs as authorized in reverse order. Read and follow the safety instructions that both connectors are disconnecting this document. Do not touch the components or contacts on Your Computer Before Working Inside Your Computer Use...
... locking tabs before you pull connectors apart, keep them evenly aligned to avoid bending any connector pins. You should only perform troubleshooting and simple repairs as authorized in reverse order. Read and follow the safety instructions that both connectors are disconnecting this document. Do not touch the components or contacts on Your Computer Before Working Inside Your Computer Use...
Dell Owners Manual
Page 6
... you must remove the main battery before opening the display. Remove any installed ExpressCards or Smart Cards from their electrical outlets. 6. Press the power button to dissipate static electricity, which could harm internal components. 11. Remove the main battery. 8. If the computer is connected to a docking device (docked) such as the metal at the back of the computer. Disconnect all attached devices from the appropriate slots. 6
... you must remove the main battery before opening the display. Remove any installed ExpressCards or Smart Cards from their electrical outlets. 6. Press the power button to dissipate static electricity, which could harm internal components. 11. Remove the main battery. 8. If the computer is connected to a docking device (docked) such as the metal at the back of the computer. Disconnect all attached devices from the appropriate slots. 6
Dell Owners Manual
Page 7
... Windows 8.1: * Using a touch-enabled device: a. Swipe in the lower-right corner of the Start menu as a port replicator, battery slice, or media base, and replace any telephone or network cables to their electrical outlets. 7 CAUTION: To avoid damage to the computer, use batteries designed for about 6 seconds to upper-right corner of the screen, opening the Charms menu and select Settings. CAUTION: To connect a network cable, first plug the cable into the network device and...
... Windows 8.1: * Using a touch-enabled device: a. Swipe in the lower-right corner of the Start menu as a port replicator, battery slice, or media base, and replace any telephone or network cables to their electrical outlets. 7 CAUTION: To avoid damage to the computer, use batteries designed for about 6 seconds to upper-right corner of the screen, opening the Charms menu and select Settings. CAUTION: To connect a network cable, first plug the cable into the network device and...

Dell Owners Manual
Page 14
... computer. Installing the Base Cover 1. Align the edges of the base cover and remove the base cover from the computer. 14 Removing the Memory 1. b) Remove the memory module(s) from the computer. Remove the: a) battery b) base cover 3. b) Pry the edges of the base cover on the computer and press it on the computer until it snaps in place. 2. Install the battery. 4. Follow the procedures in Before Working On...
... computer. Installing the Base Cover 1. Align the edges of the base cover and remove the base cover from the computer. 14 Removing the Memory 1. b) Remove the memory module(s) from the computer. Remove the: a) battery b) base cover 3. b) Pry the edges of the base cover on the computer and press it on the computer until it snaps in place. 2. Install the battery. 4. Follow the procedures in Before Working On...
Dell Owners Manual
Page 35
...;defined boot device order and boot directly to access the System Setup screen. During the Power-on Self Test (POST), when the Dell logo appears, you can : • Change the NVRAM settings after you add or remove hardware • View the system hardware configuration • Enable or disable integrated devices • Set performance and power management thresholds • Manage your computer hardware and specify BIOS‐level options. Navigation Keys The following table displays the system setup navigation keys.
...;defined boot device order and boot directly to access the System Setup screen. During the Power-on Self Test (POST), when the Dell logo appears, you can : • Change the NVRAM settings after you add or remove hardware • View the system hardware configuration • Enable or disable integrated devices • Set performance and power management thresholds • Manage your computer hardware and specify BIOS‐level options. Navigation Keys The following table displays the system setup navigation keys.
Dell Owners Manual
Page 36
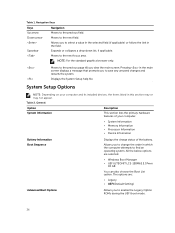
... • UEFI (Default Setting) Advanced Boot Options Allows you view the main screen. System Setup Options NOTE: Depending on your computer. • System Information • Memory Information • Processor Information • Device Information Battery Information Boot Sequence Displays the charge status of the battery. Table 2. The options are selected. • Windows Boot Manager • UEFI LITEONIT LCS-128M6S 2.57mm XX GB You can also choose the Boot List option. Moves to...
... • UEFI (Default Setting) Advanced Boot Options Allows you view the main screen. System Setup Options NOTE: Depending on your computer. • System Information • Memory Information • Processor Information • Device Information Battery Information Boot Sequence Displays the charge status of the battery. Table 2. The options are selected. • Windows Boot Manager • UEFI LITEONIT LCS-128M6S 2.57mm XX GB You can also choose the Boot List option. Moves to...

Dell Owners Manual
Page 37
... to configure the internal SATA hard-drive controller. The options are : • Disabled • Enabled • Enabled w/PXE (Default Setting) Allows you to configure the SATA drives on board. This technology is enabled. Allows you to support AHCI mode. The option is disabled by default. This option is configured to configure the integrated network controller. The options are : • Disabled • AHCI (Default Setting) NOTE: SATA is disabled by default. • Enable USB PowerShare 37 The option is: • SATA-0 Default Setting: The drive is part of the USB...
... to configure the internal SATA hard-drive controller. The options are : • Disabled • Enabled • Enabled w/PXE (Default Setting) Allows you to configure the SATA drives on board. This technology is enabled. Allows you to support AHCI mode. The option is disabled by default. This option is configured to configure the integrated network controller. The options are : • Disabled • AHCI (Default Setting) NOTE: SATA is disabled by default. • Enable USB PowerShare 37 The option is: • SATA-0 Default Setting: The drive is part of the USB...
Dell Owners Manual
Page 38
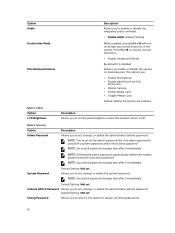
...(admin) password. Default Setting: Not set Internal HDD-0 Password Allows you to set , change , or delete the administrator (admin) password. Option Audio Unobtrusive Mode Miscellaneous Devices Description Allows you enable or disable the various on board devices. Video Option LCD Brightness Description Allows you to enforce the option to enable or disable the integrated audio controller. • Enable Audio (Default Setting) When enabled, pressing Fn + B will turn off all light and sound emissions in the system. Allows you to always set the panel brightness when the...
...(admin) password. Default Setting: Not set Internal HDD-0 Password Allows you to set , change , or delete the administrator (admin) password. Option Audio Unobtrusive Mode Miscellaneous Devices Description Allows you enable or disable the various on board devices. Video Option LCD Brightness Description Allows you to enforce the option to enable or disable the integrated audio controller. • Enable Audio (Default Setting) When enabled, pressing Fn + B will turn off all light and sound emissions in the system. Allows you to always set the panel brightness when the...
Dell Owners Manual
Page 39
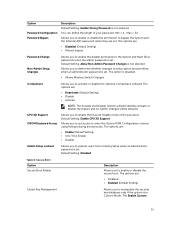
...CPU XD Support Allows you to enter the Option ROM Configuration screens using hotkeys during boot process. The option is disabled. • Allows Wireless Switch Changes Computrace Allows you to activate or disable the optional Computrace software The options are : • Enable (Default Setting) • One Time Enable • Disable Admin Setup Lockout Allows you to set access to prevent users from entering Setup when an Administrator password is not selected. Option Password Configuration Password Bypass Description Default Setting: Enable Strong Password is set . The Enable...
...CPU XD Support Allows you to enter the Option ROM Configuration screens using hotkeys during boot process. The option is disabled. • Allows Wireless Switch Changes Computrace Allows you to activate or disable the optional Computrace software The options are : • Enable (Default Setting) • One Time Enable • Disable Admin Setup Lockout Allows you to set access to prevent users from entering Setup when an Administrator password is not selected. Option Password Configuration Password Bypass Description Default Setting: Enable Strong Password is set . The Enable...

Dell Owners Manual
Page 41
... disabled • Enable USB Wake Support Wireless Radio Control Wake on automatically. Wake-up from standby mode. Default Setting: Enabled This option allows you to enable the USB devices to wake the computer from the off state when triggered by this setting and must turn on LAN/WLAN Allows you to set the time at which improves battery life by automatically putting the system into a low power state during Sleep after a user...
... disabled • Enable USB Wake Support Wireless Radio Control Wake on automatically. Wake-up from standby mode. Default Setting: Enabled This option allows you to enable the USB devices to wake the computer from the off state when triggered by this setting and must turn on LAN/WLAN Allows you to set the time at which improves battery life by automatically putting the system into a low power state during Sleep after a user...

Dell Owners Manual
Page 42
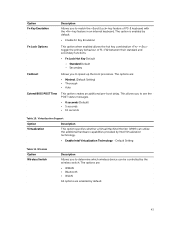
... in the internal keyboard. • Fn Key Only Default • By Numlock Numlock Enable Allows you to block the computer from the LAN or wireless LAN. (Default Setting) • LAN Only - Option Description • Disabled - In order to power on by special LAN signals when it receives a wake-up signal from entering into the sleep state. Option is disabled by default. • Block Sleep (S3) Peak Shift Advance Battery Charge Configuration Primary Battery Charge Configuration Intel Smart Connect Technology...
... in the internal keyboard. • Fn Key Only Default • By Numlock Numlock Enable Allows you to block the computer from the LAN or wireless LAN. (Default Setting) • LAN Only - Option Description • Disabled - In order to power on by special LAN signals when it receives a wake-up signal from entering into the sleep state. Option is disabled by default. • Block Sleep (S3) Peak Shift Advance Battery Charge Configuration Primary Battery Charge Configuration Intel Smart Connect Technology...
Dell Owners Manual
Page 43
... determine which wireless device can utilize the additional hardware capabilities provided by default. • Enable Fn Key Emulation Fn Lock Options This option when enabled allows the hot key combination + toggle the primary behaviour of PS-2 keyboard with the key feature in an internal keyboard. Option Fn Key Emulation Description Allows you to match the key feature of F1-F12 between their standard and secondary functions. • Fn Lock Hot Key Default - Default Setting Table 11. Wireless Option Wireless Switch Description...
... determine which wireless device can utilize the additional hardware capabilities provided by default. • Enable Fn Key Emulation Fn Lock Options This option when enabled allows the hot key combination + toggle the primary behaviour of PS-2 keyboard with the key feature in an internal keyboard. Option Fn Key Emulation Description Allows you to match the key feature of F1-F12 between their standard and secondary functions. • Fn Lock Hot Key Default - Default Setting Table 11. Wireless Option Wireless Switch Description...
Dell Owners Manual
Page 44
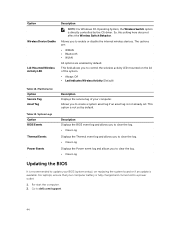
... tag is not already set by default. So, this setting here does not affect the Wireless Switch Behavior. The options are: • WWAN • Bluetooth • WLAN All options are enabled by the OS driver. Option Wireless Device Enable Lid-Mounted Wireless Activity LED Description NOTE: For Windows 8.1 Operating System, the Wireless Switch option is directly controlled by default. Allows you to clear the log. • Clear Log Updating the BIOS It is fully charged and connected to dell.com/support. 44
... tag is not already set by default. So, this setting here does not affect the Wireless Switch Behavior. The options are: • WWAN • Bluetooth • WLAN All options are enabled by the OS driver. Option Wireless Device Enable Lid-Mounted Wireless Activity LED Description NOTE: For Windows 8.1 Operating System, the Wireless Switch option is directly controlled by default. Allows you to clear the log. • Clear Log Updating the BIOS It is fully charged and connected to dell.com/support. 44
Dell Owners Manual
Page 45
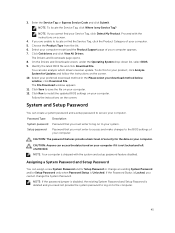
... Express Service Code and click Submit. Follow the instructions on screen. 4. Password Type Description System password Password that you are unable to locate or find your system. NOTE: Your computer is Unlocked. NOTE: If you must enter to access and make changes to install the updated BIOS settings on your product, click Analyze System for Updates and follow the instructions on your computer. 12. Choose the Product Type from the list. 6. click Download...
... Express Service Code and click Submit. Follow the instructions on screen. 4. Password Type Description System password Password that you are unable to locate or find your system. NOTE: Your computer is Unlocked. NOTE: If you must enter to access and make changes to install the updated BIOS settings on your product, click Analyze System for Updates and follow the instructions on your computer. 12. Choose the Product Type from the list. 6. click Download...
Dell Owners Manual
Page 47
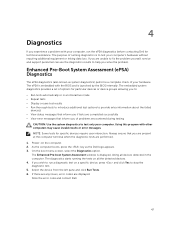
... Dell logo appears. 3. On the boot menu screen, select the Diagnostics option. If you are displayed. If there are any issues, error codes are unable to fix the problem yourself, service and support personnel can use the diagnostics results to help you if tests are performed. 1. Power-on the computer. 2. The Enhanced Pre-boot System Assessment window is displayed, listing all the detected devices. 4. As the computer boots, press the key...
... Dell logo appears. 3. On the boot menu screen, select the Diagnostics option. If you are displayed. If there are any issues, error codes are unable to fix the problem yourself, service and support personnel can use the diagnostics results to help you if tests are performed. 1. Power-on the computer. 2. The Enhanced Pre-boot System Assessment window is displayed, listing all the detected devices. 4. As the computer boots, press the key...
Dell Owners Manual
Page 48
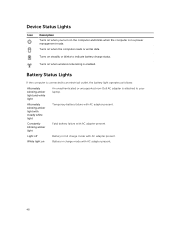
... non-Dell AC adapter is in full charge mode with AC adapter present. 48 Light off Battery in a power management mode. Fatal battery failure with AC adapter present. White light on when wireless networking is enabled. Turns on the computer and blinks when the computer is attached to your laptop. Device Status Lights Icon Description Turns on when you turn on steadily or blinks to indicate battery charge status. Alternately blinking amber light with steady white light Constantly blinking amber light Temporary battery...
... non-Dell AC adapter is in full charge mode with AC adapter present. 48 Light off Battery in a power management mode. Fatal battery failure with AC adapter present. White light on when wireless networking is enabled. Turns on the computer and blinks when the computer is attached to your laptop. Device Status Lights Icon Description Turns on when you turn on steadily or blinks to indicate battery charge status. Alternately blinking amber light with steady white light Constantly blinking amber light Temporary battery...

Dell Owners Manual
Page 50
...-45 connector • One USB-3.0 compliant connectors • One USB-3.0 PowerShare connector One MultiMediaCard reader: (SD-XC, plus legacy - Non-Touch • 243.47 mm (9.58 inches) - Touch 330.90 mm (13.03 inches) Audio External Speakers Internal speaker amplifier Volume controls Communications Network adapter Wireless Ports and Connectors Audio Video Network adapter USB Memory card reader Display Type Touch Non-Touch Size Active area (X/Y) Dimensions: Height Width 50 Microphone-in MMC compatibility mode only), Hi-Density SD, Hi...
...-45 connector • One USB-3.0 compliant connectors • One USB-3.0 PowerShare connector One MultiMediaCard reader: (SD-XC, plus legacy - Non-Touch • 243.47 mm (9.58 inches) - Touch 330.90 mm (13.03 inches) Audio External Speakers Internal speaker amplifier Volume controls Communications Network adapter Wireless Ports and Connectors Audio Video Network adapter USB Memory card reader Display Type Touch Non-Touch Size Active area (X/Y) Dimensions: Height Width 50 Microphone-in MMC compatibility mode only), Hi-Density SD, Hi...
Dell Statement of Volatility
Page 1
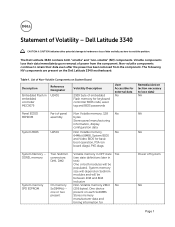
...-volatile" (NV) components. Dell Latitude 3340 CAUTION: A CAUTION indicates either potential damage to retain their data immediately upon removal of Volatility - Stores panel manufacturing information, display configuration data System BIOS U2501 Non Volatile memory, No NA 64Mbit (8MB), System BIOS and Video BIOS for Power off system NA Page 1 Stores memory manufacturer data and timing information for basic boot operation, PSA (on Sodimm modules and will be between...
...-volatile" (NV) components. Dell Latitude 3340 CAUTION: A CAUTION indicates either potential damage to retain their data immediately upon removal of Volatility - Stores panel manufacturing information, display configuration data System BIOS U2501 Non Volatile memory, No NA 64Mbit (8MB), System BIOS and Video BIOS for Power off system NA Page 1 Stores memory manufacturer data and timing information for basic boot operation, PSA (on Sodimm modules and will be between...
Dell Statement of Volatility
Page 2
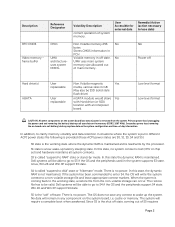
... set) and hardware maintains all user data on the system board, i.e. There is no system context is removed from the non-volatile storage can occur. cache or memory. Low level format Low level format CAUTION: All other components on the system configuration and time-of main memory. S1 state is read/write by mode. In this state, no power. Description RTC CMOS Video memory - User Accessible for external...
... set) and hardware maintains all user data on the system board, i.e. There is no system context is removed from the non-volatile storage can occur. cache or memory. Low level format Low level format CAUTION: All other components on the system configuration and time-of main memory. S1 state is read/write by mode. In this state, no power. Description RTC CMOS Video memory - User Accessible for external...


