

Dell Owners Manual
Page 3
... LED Board...22 Removing the Memory...23 Installing the Memory...23 Removing the Coin-Cell Battery...23 Installing the Coin-Cell Battery...24 Removing the Keyboard Trim...24 Installing the Keyboard Trim...25 Removing the Keyboard...25 Installing the Keyboard...27 Removing the Heatsink...27 3
... LED Board...22 Removing the Memory...23 Installing the Memory...23 Removing the Coin-Cell Battery...23 Installing the Coin-Cell Battery...24 Removing the Keyboard Trim...24 Installing the Keyboard Trim...25 Removing the Keyboard...25 Installing the Keyboard...27 Removing the Heatsink...27 3

Dell Owners Manual
Page 13
Remove the screws that secure the display hinges to separate them. 13 Pull the keyboard base assembly away from the display assembly to the computer [1] and open the display [2]. 5. 4.
Remove the screws that secure the display hinges to separate them. 13 Pull the keyboard base assembly away from the display assembly to the computer [1] and open the display [2]. 5. 4.

Dell Owners Manual
Page 24
Route the coin-cell battery cable along its edges. 24 battery b. Follow the procedures in Before Working Inside Your Computer. 2. Fix the adhesive tape to its place on the system board. 5. Follow the steps in After Working Inside Your Computer. Pry the keyboard trim from its routing channels. 3. Removing the Keyboard Trim 1. base cover 6. Connect the coin-cell battery cable to secure the coin-cell battery cable. 4. Install the: a. Insert the coin-cell battery in its connector on the computer. 2. Installing the Coin-Cell Battery 1.
Route the coin-cell battery cable along its edges. 24 battery b. Follow the procedures in Before Working Inside Your Computer. 2. Fix the adhesive tape to its place on the system board. 5. Follow the steps in After Working Inside Your Computer. Pry the keyboard trim from its routing channels. 3. Removing the Keyboard Trim 1. base cover 6. Connect the coin-cell battery cable to secure the coin-cell battery cable. 4. Install the: a. Insert the coin-cell battery in its connector on the computer. 2. Installing the Coin-Cell Battery 1.

Dell Owners Manual
Page 25
Remove the: a. Follow the procedures in Before Working Inside Your Computer. 2. base cover 25 Remove the keyboard trim from its place. 2. NOTE: You may need a sharp tool to the keyboard until it snaps in its edges. 3. Installing the Keyboard Trim 1. Follow the procedures in After Working Inside Your Computer. Insert the keyboard trim to pry the keyboard trim from the keyboard. battery b. Removing the Keyboard 1.
Remove the: a. Follow the procedures in Before Working Inside Your Computer. 2. base cover 25 Remove the keyboard trim from its place. 2. NOTE: You may need a sharp tool to the keyboard until it snaps in its edges. 3. Installing the Keyboard Trim 1. Follow the procedures in After Working Inside Your Computer. Insert the keyboard trim to pry the keyboard trim from the keyboard. battery b. Removing the Keyboard 1.

Dell Owners Manual
Page 26
Disconnect the keyboard cable from the computer [2]. 26 b. Remove the keyboard from its connector on the system board [1] [2]. 4. Perform the following steps: a. c. keyboard trim NOTE: After removing the keyboard trim, flip the computer to the computer. 5. Flip the computer and remove the screws that secure the keyboard to access the keyboard cable. 3. Pry the keyboard to release it from the computer [1].
Disconnect the keyboard cable from the computer [2]. 26 b. Remove the keyboard from its connector on the system board [1] [2]. 4. Perform the following steps: a. c. keyboard trim NOTE: After removing the keyboard trim, flip the computer to the computer. 5. Flip the computer and remove the screws that secure the keyboard to access the keyboard cable. 3. Pry the keyboard to release it from the computer [1].

Dell Owners Manual
Page 27
...Working Inside Your Computer. 2. c. battery c. base cover b. Remove the screw that secure the heatsink from the metal bracket [1]. Place the keyboard to the computer. 4. b. base cover 5. Remove the: a. Install the: a. Follow the procedures in After Working Inside Your Computer. To... release the heatsink from the system board [2]. keyboard trim b. Installing the Keyboard 1. Removing the Heatsink 1. Flip the computer and connect the keyboard cable to the system board [3]. 27 Remove the screws that secures the heatsink to ...
...Working Inside Your Computer. 2. c. battery c. base cover b. Remove the screw that secure the heatsink from the metal bracket [1]. Place the keyboard to the computer. 4. b. base cover 5. Remove the: a. Install the: a. Follow the procedures in After Working Inside Your Computer. To... release the heatsink from the system board [2]. keyboard trim b. Installing the Keyboard 1. Removing the Heatsink 1. Flip the computer and connect the keyboard cable to the system board [3]. 27 Remove the screws that secures the heatsink to ...

Dell Owners Manual
Page 29
... d. base cover b. coin-cell battery and power-connector port [5] g. display [6] 4. b. network and speaker [3] e. touchpad c. Remove the system board from the system board [1] [2]: a. memory d. Remove the: a. keyboard b. Perform the following cables from the computer [2]. 29
... d. base cover b. coin-cell battery and power-connector port [5] g. display [6] 4. b. network and speaker [3] e. touchpad c. Remove the system board from the system board [1] [2]: a. memory d. Remove the: a. keyboard b. Perform the following cables from the computer [2]. 29

Dell Owners Manual
Page 30
... board 3. Perform the following cables to the computer. 3. display b. memory c. base cover 5. Follow the procedures in Before Working Inside Your Computer. 2. heatsink e. hard-drive assembly d. keyboard 4. Connect the following steps: 30 Removing the Speaker 1. Follow the procedures in After Working Inside Your Computer. memory d. Tighten the screws to secure the system...
... board 3. Perform the following cables to the computer. 3. display b. memory c. base cover 5. Follow the procedures in Before Working Inside Your Computer. 2. heatsink e. hard-drive assembly d. keyboard 4. Connect the following steps: 30 Removing the Speaker 1. Follow the procedures in After Working Inside Your Computer. memory d. Tighten the screws to secure the system...
Dell Owners Manual
Page 38
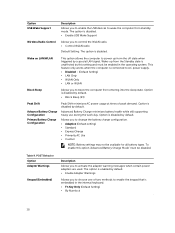
... adapter warning messages when certain power adapters are used. Option is disabled by this option 'Advanced Battery Charge Mode' must be enabled in the internal keyboard. • Fn Key Only (Default Setting) • By Numlock 38 Wake-up from entering into the sleep state. Option USB Wake Support Description Allows you...
... adapter warning messages when certain power adapters are used. Option is disabled by this option 'Advanced Battery Charge Mode' must be enabled in the internal keyboard. • Fn Key Only (Default Setting) • By Numlock 38 Wake-up from entering into the sleep state. Option USB Wake Support Description Allows you...
Dell Owners Manual
Page 39
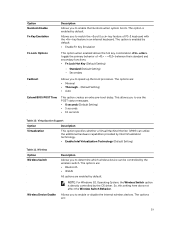
...; Enable Fn Key Emulation Fn Lock Options This option when enabled allows the hot key combination + toggle the primary behavior of PS-2 keyboard with the key feature in an internal keyboard. between their standard and secondary functions. • Fn Lock Hot Key (Default Setting) - Standard (Default Setting) - Virtualization Support Option Description Virtualization...
...; Enable Fn Key Emulation Fn Lock Options This option when enabled allows the hot key combination + toggle the primary behavior of PS-2 keyboard with the key feature in an internal keyboard. between their standard and secondary functions. • Fn Lock Hot Key (Default Setting) - Standard (Default Setting) - Virtualization Support Option Description Virtualization...

Dell Owners Manual
Page 44
... (X/Y) Dimensions: Height Width Maximum resolution Maximum Brightness Refresh rate Operating Angle Minimum Viewing Angles: 44 Two (2W per channel) Software program menus, media controls, and keyboard function keys 10/100/1000 Mbps Ethernet LAN • Intel Dual Band Wireless- 7265 802.11AC Wi-Fi + BT 4.0 LE Wireless Card (2x2) • Intel...
... (X/Y) Dimensions: Height Width Maximum resolution Maximum Brightness Refresh rate Operating Angle Minimum Viewing Angles: 44 Two (2W per channel) Software program menus, media controls, and keyboard function keys 10/100/1000 Mbps Ethernet LAN • Intel Dual Band Wireless- 7265 802.11AC Wi-Fi + BT 4.0 LE Wireless Card (2x2) • Intel...

Dell Owners Manual
Page 45
Display Horizontal Vertical Pixel pitch Keyboard Number of keys HD +40/- 40 degrees HD +10/-30 degrees 0.2148 mm x 0.2148 mm • United States and Canada: 82 keys • Europe and ...
Display Horizontal Vertical Pixel pitch Keyboard Number of keys HD +40/- 40 degrees HD +10/-30 degrees 0.2148 mm x 0.2148 mm • United States and Canada: 82 keys • Europe and ...
Dell Owners Manual
Page 49
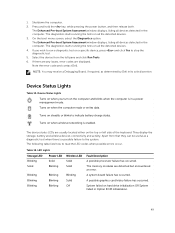
...turn on the computer and blinks when the computer is enabled. Note the error code and contact Dell. Turns on hard drive initialization OR System failed in Option ROM initialization. 49 They display the storage... the boot menu screen, select the Diagnostics option. Select the device from that they can be useful as determined by Dell in the computer. If there are any issues, error codes are detected but encountered an error. The diagnostics starts running... occur. A possible graphics card/video failure has occurred. 1. Apart from the left side of the keyboard.
...turn on the computer and blinks when the computer is enabled. Note the error code and contact Dell. Turns on hard drive initialization OR System failed in Option ROM initialization. 49 They display the storage... the boot menu screen, select the Diagnostics option. Select the device from that they can be useful as determined by Dell in the computer. If there are any issues, error codes are detected but encountered an error. The diagnostics starts running... occur. A possible graphics card/video failure has occurred. 1. Apart from the left side of the keyboard.


