

Dell Owners Manual
Page 3
... Installing the Base Cover...9 Removing the Battery...9 Installing the Battery...10 Removing the Audio Board...10 Installing the Audio Board...11 Removing the WLAN Card...11 Installing the WLAN Card...12 Removing the Display Assembly...12 Installing the Display Assembly...14 Removing the Display Bezel...14 Installing the Display Bezel...15 Removing the Display Panel...16 Installing the Display Panel...17 Removing the Camera...18 Installing the Camera...18 Removing the Power-Connector Port 19 Installing the Power-Connector Port 19 Removing the Hard-Drive Assembly 19 Installing the Hard-Drive...
... Installing the Base Cover...9 Removing the Battery...9 Installing the Battery...10 Removing the Audio Board...10 Installing the Audio Board...11 Removing the WLAN Card...11 Installing the WLAN Card...12 Removing the Display Assembly...12 Installing the Display Assembly...14 Removing the Display Bezel...14 Installing the Display Bezel...15 Removing the Display Panel...16 Installing the Display Panel...17 Removing the Camera...18 Installing the Camera...18 Removing the Power-Connector Port 19 Installing the Power-Connector Port 19 Removing the Hard-Drive Assembly 19 Installing the Hard-Drive...
Dell Owners Manual
Page 4
Installing the Heatsink...28 Removing the System Board...29 Installing the System Board...30 Removing the Speaker...30 Installing the Speaker...31 3 System Setup...32 Boot Sequence...32 Navigation Keys...32 System Setup Options...33 Updating the BIOS ...40 System and Setup Password...41 Assigning a System Password and Setup Password 41 Deleting or Changing an Existing System and/or Setup Password 42 4 Technical Specifications 43 5 Diagnostics...48 Enhanced Pre-Boot System Assessment (ePSA) Diagnostics 48 Device Status Lights...49 Battery Status Lights...50 6 Contacting Dell 51 4
Installing the Heatsink...28 Removing the System Board...29 Installing the System Board...30 Removing the Speaker...30 Installing the Speaker...31 3 System Setup...32 Boot Sequence...32 Navigation Keys...32 System Setup Options...33 Updating the BIOS ...40 System and Setup Password...41 Assigning a System Password and Setup Password 41 Deleting or Changing an Existing System and/or Setup Password 42 4 Technical Specifications 43 5 Diagnostics...48 Enhanced Pre-Boot System Assessment (ePSA) Diagnostics 48 Device Status Lights...49 Battery Status Lights...50 6 Contacting Dell 51 4
Dell Owners Manual
Page 5
... service and support team. WARNING: Disconnect all covers, panels, and screws before you disconnect the cable. After you are correctly oriented and aligned. You should only perform troubleshooting and simple repairs as directed by its pull-tab, not on the cable itself. CAUTION: Handle components and cards with locking tabs; if you finish working inside the computer, replace all power sources before you connect a cable...
... service and support team. WARNING: Disconnect all covers, panels, and screws before you disconnect the cable. After you are correctly oriented and aligned. You should only perform troubleshooting and simple repairs as directed by its pull-tab, not on the cable itself. CAUTION: Handle components and cards with locking tabs; if you finish working inside the computer, replace all power sources before you connect a cable...

Dell Owners Manual
Page 6
... appropriate slots. Remove the main battery. 9. CAUTION: To guard against electrical shock, always unplug your computer (see Turning off your computer from being scratched. 2. Select the Or and then select Shut down the operating system: • In Windows 8.1: - Turning Off Your Computer CAUTION: To avoid losing data, save and close all open programs before opening the Charms menu and select Settings. Using a touch-enabled device: a.
... appropriate slots. Remove the main battery. 9. CAUTION: To guard against electrical shock, always unplug your computer (see Turning off your computer from being scratched. 2. Select the Or and then select Shut down the operating system: • In Windows 8.1: - Turning Off Your Computer CAUTION: To avoid losing data, save and close all open programs before opening the Charms menu and select Settings. Using a touch-enabled device: a.
Dell Owners Manual
Page 7
... Shut Down . 2. Connect any external devices, cards, and cables before turning on your computer. Click Start . 2. CAUTION: To avoid damage to upper-right corner of the Start menu as an ExpressCard. 2. Replace the battery. 4. If your computer and attached devices did not automatically turn them off . Do not use only the battery designed for other Dell computers. 1. CAUTION: To connect a network cable, first plug the cable into the network device and then...
... Shut Down . 2. Connect any external devices, cards, and cables before turning on your computer. Click Start . 2. CAUTION: To avoid damage to upper-right corner of the Start menu as an ExpressCard. 2. Replace the battery. 4. If your computer and attached devices did not automatically turn them off . Do not use only the battery designed for other Dell computers. 1. CAUTION: To connect a network cable, first plug the cable into the network device and then...

Dell Owners Manual
Page 13
Pull the keyboard base assembly away from the display assembly to the computer [1] and open the display [2]. 5. 4. Remove the screws that secure the display hinges to separate them. 13
Pull the keyboard base assembly away from the display assembly to the computer [1] and open the display [2]. 5. 4. Remove the screws that secure the display hinges to separate them. 13

Dell Owners Manual
Page 16
... cover b. To release the display panel from the display assembly: a. base cover 6. Follow the procedures in After Working Inside Your Computer. display assembly d. battery c. Lift and flip the display panel to the display assembly [1]. Remove the: a. display bezel 3. Install the: a. Remove the screws that secure the display panel to access the eDP cable [2]. 4. battery c. Removing the Display Panel NOTE: This task is applicable only if you have the non-touch version of the computer. 1. 5. display...
... cover b. To release the display panel from the display assembly: a. base cover 6. Follow the procedures in After Working Inside Your Computer. display assembly d. battery c. Lift and flip the display panel to the display assembly [1]. Remove the: a. display bezel 3. Install the: a. Remove the screws that secure the display panel to access the eDP cable [2]. 4. battery c. Removing the Display Panel NOTE: This task is applicable only if you have the non-touch version of the computer. 1. 5. display...

Dell Owners Manual
Page 17
Tighten the screws to secure the display panel to align with the screw holders on the display assembly. 3. display assembly 17 5. Connect the eDP cable to its connector [1] and remove the display panel from the display assembly [2]. Install the: a. display bezel b. Place the display panel to the display assembly. 4. Installing the Display Panel 1. Disconnect the eDP cable from its connector and fix the adhesive tape. 2.
Tighten the screws to secure the display panel to align with the screw holders on the display assembly. 3. display assembly 17 5. Connect the eDP cable to its connector [1] and remove the display panel from the display assembly [2]. Install the: a. display bezel b. Place the display panel to the display assembly. 4. Installing the Display Panel 1. Disconnect the eDP cable from its connector and fix the adhesive tape. 2.

Dell Owners Manual
Page 32
... Setup‐defined boot device order and boot directly to a specific device (for example: optical drive or hard drive). The boot sequence screen also displays the option to manage your computer hardware and specify BIOS‐level options. The boot-menu options are recorded but do not take effect until you can : • Change the NVRAM settings after you add or remove hardware • View the system hardware configuration • Enable or disable integrated devices • Set performance and power management thresholds • Manage...
... Setup‐defined boot device order and boot directly to a specific device (for example: optical drive or hard drive). The boot sequence screen also displays the option to manage your computer hardware and specify BIOS‐level options. The boot-menu options are recorded but do not take effect until you can : • Change the NVRAM settings after you add or remove hardware • View the system hardware configuration • Enable or disable integrated devices • Set performance and power management thresholds • Manage...

Dell Owners Manual
Page 34
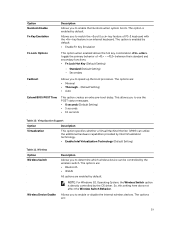
... are installed, allowing the pre-OS and the OS networking features to configure the SATA drives on board. The options are enabled. This option is enabled by default. The options are reported during the UEFI boot mode. This field controls if the hard drive errors for the integrated drives are : • Enable Boot Support • Enable External USB Port The options are: • Enabled UEFI Network Stack • Disabled • Enabled • Enabled w/PXE (Default Setting) NOTE: If you to configure the integrated network controller. Allows...
... are installed, allowing the pre-OS and the OS networking features to configure the SATA drives on board. The options are enabled. This option is enabled by default. The options are reported during the UEFI boot mode. This field controls if the hard drive errors for the integrated drives are : • Enable Boot Support • Enable External USB Port The options are: • Enabled UEFI Network Stack • Disabled • Enabled • Enabled w/PXE (Default Setting) NOTE: If you to configure the integrated network controller. Allows...

Dell Owners Manual
Page 35
... NOTE: Successful password changes take effect immediately. Table 5. Default Setting: Not set System Password Allows you to set, change , or delete the administrator (admin) password. The options are: • Enable Microphone • Enable Hard Drive Free Fall Protection • Enable Camera • Enable Media Card • Disable Media Card Default Setting: All devices are enabled. Table 4. Option USB PowerShare Audio Miscellaneous Devices Description Default Setting: All the options are enabled. Allows you to configure the behavior of the USB PowerShare feature...
... NOTE: Successful password changes take effect immediately. Table 5. Default Setting: Not set System Password Allows you to set, change , or delete the administrator (admin) password. The options are: • Enable Microphone • Enable Hard Drive Free Fall Protection • Enable Camera • Enable Media Card • Disable Media Card Default Setting: All devices are enabled. Table 4. Option USB PowerShare Audio Miscellaneous Devices Description Default Setting: All the options are enabled. Allows you to configure the behavior of the USB PowerShare feature...

Dell Owners Manual
Page 36
... system and hard-drive passwords when the admin password is disabled. • Allows Wireless Switch Changes PTT Security Allows you to activate or disable the optional Computrace software The options are set. The option is set. Allows you to enable or disable the secure boot. The Enable Custom 36 Default Setting: Intel Platform Trust Security Computrace CPU XD Support Allows you to enable the Firmware TPM 2.0 function. Default Setting: Enable CPU XD Support Admin Setup Lockout Allows you to manipulate the security key databases...
... system and hard-drive passwords when the admin password is disabled. • Allows Wireless Switch Changes PTT Security Allows you to activate or disable the optional Computrace software The options are set. The option is set. Allows you to enable or disable the secure boot. The Enable Custom 36 Default Setting: Intel Platform Trust Security Computrace CPU XD Support Allows you to enable the Firmware TPM 2.0 function. Default Setting: Enable CPU XD Support Admin Setup Lockout Allows you to manipulate the security key databases...

Dell Owners Manual
Page 37
... which the computer must turn on AC Auto On Time Allows you to default setting • Delete All Keys- Default Setting: Enable C states. The options are : • Disabled (Default Setting) • Every Day • Weekdays • Select Days 37 Deletes the selected key • Reset All Keys- The option is disabled. • Wake on automatically. Performance Option C-States Control Description Mode option is plugged. selected file • Replace from File- Option Table 7.
... which the computer must turn on AC Auto On Time Allows you to default setting • Delete All Keys- Default Setting: Enable C states. The options are : • Disabled (Default Setting) • Every Day • Weekdays • Select Days 37 Deletes the selected key • Reset All Keys- The option is disabled. • Wake on automatically. Performance Option C-States Control Description Mode option is plugged. selected file • Replace from File- Option Table 7.
Dell Owners Manual
Page 38
... change the battery charge configuration. • Adaptive (Default setting) • Standard • ExpressCharge • Primarily AC Use • Custom NOTE: Battery settings may not be disabled. Table 9. To enable this setting and must be available for all battery types. Advanced Battery Charge minimizes battery health while still supporting heavy use during the work day. Wake-up from entering into the sleep state. Wake on LAN/WLAN This option allows the computer to power up from standby mode. Option USB...
... change the battery charge configuration. • Adaptive (Default setting) • Standard • ExpressCharge • Primarily AC Use • Custom NOTE: Battery settings may not be disabled. Table 9. To enable this setting and must be available for all battery types. Advanced Battery Charge minimizes battery health while still supporting heavy use during the work day. Wake-up from entering into the sleep state. Wake on LAN/WLAN This option allows the computer to power up from standby mode. Option USB...
Dell Owners Manual
Page 39
... to enable or disable the internal wireless devices. Allows you to speed up the boot processes. Standard (Default Setting) - NOTE: For Windows 8.1 Operating System, the Wireless Switch option is directly controlled by default. The option is enabled by the wireless switch. Virtualization Support Option Description Virtualization This option specifies whether a Virtual Machine Monitor (VMM) can be controlled by default. • Enable Fn Key Emulation Fn Lock Options This option when enabled allows the hot key combination + toggle the primary behavior of PS-2 keyboard with...
... to enable or disable the internal wireless devices. Allows you to speed up the boot processes. Standard (Default Setting) - NOTE: For Windows 8.1 Operating System, the Wireless Switch option is directly controlled by default. The option is enabled by the wireless switch. Virtualization Support Option Description Virtualization This option specifies whether a Virtual Machine Monitor (VMM) can be controlled by default. • Enable Fn Key Emulation Fn Lock Options This option when enabled allows the hot key combination + toggle the primary behavior of PS-2 keyboard with...

Dell Owners Manual
Page 40
... option is recommended to control the wireless activity LED mounted on replacing the system board or if an update is my Service Tag? 40 For laptops, ensure that your computer. This field allows you to update your BIOS (system setup), on the lid of the system firmware to dell.com/support. 3. Allows you to control the flashing of the system. • Always Off • Led Indicates Wireless Activity (Default Setting) Table 12. Re-start the...
... option is recommended to control the wireless activity LED mounted on replacing the system board or if an update is my Service Tag? 40 For laptops, ensure that your computer. This field allows you to update your BIOS (system setup), on the lid of the system firmware to dell.com/support. 3. Allows you to control the flashing of the system. • Always Off • Led Indicates Wireless Activity (Default Setting) Table 12. Re-start the...

Dell Owners Manual
Page 41
... to the BIOS settings of security for Updates and follow the instructions on your product, click Analyze System for the data on screen. 4. System and Setup Password You can also analyze which drivers need not provide the system password to your computer. Password Type System password Setup password Description Password that you cannot change the System Password. If the Password Status is Unlocked. Choose the Product Type from the list. 6. Select your...
... to the BIOS settings of security for Updates and follow the instructions on your product, click Analyze System for the data on screen. 4. System and Setup Password You can also analyze which drivers need not provide the system password to your computer. Password Type System password Setup password Description Password that you cannot change the System Password. If the Password Status is Unlocked. Choose the Product Type from the list. 6. Select your...

Dell Owners Manual
Page 44
Audio Internal speaker amplifier Volume controls Communications Network adapter Wireless Ports and Connectors Audio Video Network adapter USB Memory card reader Camera Resolution Video Resolution (maximum) Diagonal viewing angle Display Type Non-Touch Touch Size Active area (X/Y) Dimensions: Height Width Maximum resolution Maximum Brightness Refresh rate Operating Angle Minimum Viewing Angles: 44 Two (2W per channel) Software program menus, media controls, and keyboard function keys 10/100/1000 Mbps Ethernet LAN • Intel Dual Band Wireless- 7265 802.11AC Wi-Fi + BT 4.0 LE Wireless Card (...
Audio Internal speaker amplifier Volume controls Communications Network adapter Wireless Ports and Connectors Audio Video Network adapter USB Memory card reader Camera Resolution Video Resolution (maximum) Diagonal viewing angle Display Type Non-Touch Touch Size Active area (X/Y) Dimensions: Height Width Maximum resolution Maximum Brightness Refresh rate Operating Angle Minimum Viewing Angles: 44 Two (2W per channel) Software program menus, media controls, and keyboard function keys 10/100/1000 Mbps Ethernet LAN • Intel Dual Band Wireless- 7265 802.11AC Wi-Fi + BT 4.0 LE Wireless Card (...
Dell Owners Manual
Page 48
... are completed successfully • View error messages that inform you if tests are unable to fix the problem yourself, service and support personnel can launch the ePSA diagnostics by the BIOS internally. The Enhanced Pre-boot System Assessment window displays, listing all the detected devices. 4. OR 48 You can use the diagnostics results to test your computer's hardware without requiring additional equipment or risking...
... are completed successfully • View error messages that inform you if tests are unable to fix the problem yourself, service and support personnel can launch the ePSA diagnostics by the BIOS internally. The Enhanced Pre-boot System Assessment window displays, listing all the detected devices. 4. OR 48 You can use the diagnostics results to test your computer's hardware without requiring additional equipment or risking...
Dell Owners Manual
Page 49
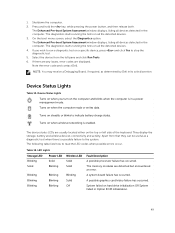
... failure to read the LED codes when possible errors occur. The memory modules are displayed. The Enhanced Pre-boot System Assessment window displays, listing all the detected devices. 3. Device Status Lights Turns on when you wish to run a diagnostic test on a specific device, press and click Yes to indicate battery charge status. They display the storage, battery and wireless devices connectivity and activity. Apart from the left side of the keyboard. The following table lists how to the...
... failure to read the LED codes when possible errors occur. The memory modules are displayed. The Enhanced Pre-boot System Assessment window displays, listing all the detected devices. 3. Device Status Lights Turns on when you wish to run a diagnostic test on a specific device, press and click Yes to indicate battery charge status. They display the storage, battery and wireless devices connectivity and activity. Apart from the left side of the keyboard. The following table lists how to the...


