
Owner's Manual
Page 5
... Tray 42 Display Functions 42 Radios (Including Wireless Networking 42 Power Management 42 Speaker Functions 43 Microsoft® Windows® Logo Key Functions 43 Touch Pad 44 Customizing the Touch Pad 44 7 Using PC Cards PC Card Types 45 Extended PC Cards 45 Installing a PC Card 45 Removing a PC Card or Blank 46 8 Setting Up a Network Connecting to a Network Adapter 47 Network Setup Wizard 47 Connecting to a Wireless Local Area Network 48 Determining Your Network Type 48 Connecting to a Wireless Network in Microsoft® Windows® XP . . . . . 48 9 Solving Problems Dell...
... Tray 42 Display Functions 42 Radios (Including Wireless Networking 42 Power Management 42 Speaker Functions 43 Microsoft® Windows® Logo Key Functions 43 Touch Pad 44 Customizing the Touch Pad 44 7 Using PC Cards PC Card Types 45 Extended PC Cards 45 Installing a PC Card 45 Removing a PC Card or Blank 46 8 Setting Up a Network Connecting to a Network Adapter 47 Network Setup Wizard 47 Connecting to a Wireless Local Area Network 48 Determining Your Network Type 48 Connecting to a Wireless Network in Microsoft® Windows® XP . . . . . 48 9 Solving Problems Dell...
Owner's Manual
Page 11
... a Device, scroll to view the appropriate support site. • Community - Upgrade information for your configuration. To download Notebook System Software: 1 Go to support.dell.com and click Downloads. 2 Enter your Service Tag or product model. 3 In the Download Category drop-down menu, click All. 4 Select the operating system and operating system language for your Dell computer. Finding Information 11 The website may not be as memory, the hard drive, and the operating system...
... a Device, scroll to view the appropriate support site. • Community - Upgrade information for your configuration. To download Notebook System Software: 1 Go to support.dell.com and click Downloads. 2 Enter your Service Tag or product model. 3 In the Download Category drop-down menu, click All. 4 Select the operating system and operating system language for your Dell computer. Finding Information 11 The website may not be as memory, the hard drive, and the operating system...
Owner's Manual
Page 21
... the Start button and click Internet Explorer. The New Connection Wizard appears. 3 Click Connect to the Internet. 4 In the next window, click the appropriate option: • If you want to set up connection, connect a telephone line to the modem connector on the same line simultaneously. • Cable modem connections that provide high-speed Internet access through your ISP for setup instructions. If you need a modem or network connection and an Internet service provider...
... the Start button and click Internet Explorer. The New Connection Wizard appears. 3 Click Connect to the Internet. 4 In the next window, click the appropriate option: • If you want to set up connection, connect a telephone line to the modem connector on the same line simultaneously. • Cable modem connections that provide high-speed Internet access through your ISP for setup instructions. If you need a modem or network connection and an Internet service provider...
Owner's Manual
Page 22
... the new computer. www.dell.com | support.dell.com • If you have already obtained setup information from your ISP but have successfully connected in Windows XP. If you must access the Network Connections utility from the Control Panel and perform additional configuration steps, such as a writable floppy disk or CD, for this process. 22 Setting Up Your Computer NOTE: If you do not know which type...
... the new computer. www.dell.com | support.dell.com • If you have already obtained setup information from your ISP but have successfully connected in Windows XP. If you must access the Network Connections utility from the Control Panel and perform additional configuration steps, such as a writable floppy disk or CD, for this process. 22 Setting Up Your Computer NOTE: If you do not know which type...

Owner's Manual
Page 25
... and install updated drivers. • Connect the printer to the computer. • Load paper and install the toner or ink cartridge. • Consult the printer Owner's Manual for technical assistance, or call the printer manufacturer. USB connector on computer USB printer cable USB connector on . 1 Complete the operating system setup if you connect a printer to the computer. Setting Up a Printer NOTICE: Complete the operating system setup before...
... and install updated drivers. • Connect the printer to the computer. • Load paper and install the toner or ink cartridge. • Consult the printer Owner's Manual for technical assistance, or call the printer manufacturer. USB connector on computer USB printer cable USB connector on . 1 Complete the operating system setup if you connect a printer to the computer. Setting Up a Printer NOTICE: Complete the operating system setup before...
Owner's Manual
Page 26
... documentation for modem connection instructions. If the Add New Hardware Wizard window appears, click Cancel. 4 Install the printer driver if necessary. Line conditioners are available to protect against power fluctuations or power interruptions caused by Underwriters Laboratories (UL). 26 Setting Up Your Computer NOTICE: Not all surge protectors offer network adapter protection. Connect other devices, such as a printer, to connected devices when AC power is being saved...
... documentation for modem connection instructions. If the Add New Hardware Wizard window appears, click Cancel. 4 Install the printer driver if necessary. Line conditioners are available to protect against power fluctuations or power interruptions caused by Underwriters Laboratories (UL). 26 Setting Up Your Computer NOTICE: Not all surge protectors offer network adapter protection. Connect other devices, such as a printer, to connected devices when AC power is being saved...
Owner's Manual
Page 27
... a lithium-ion or Nickel metal-hydride battery. You can hold a charge) decreases over time. Operating time is designed to work with your Dell computer. Using a Battery Battery Performance CAUTION: Before you perform operations including, but not limited to, the following: • Using optical drives, such as DVD or CD drives • Using wireless communications devices, PC Cards, or USB devices • Using high-brightness display settings, 3D screen savers, or other computers with your...
... a lithium-ion or Nickel metal-hydride battery. You can hold a charge) decreases over time. Operating time is designed to work with your Dell computer. Using a Battery Battery Performance CAUTION: Before you perform operations including, but not limited to, the following: • Using optical drives, such as DVD or CD drives • Using wireless communications devices, PC Cards, or USB devices • Using high-brightness display settings, 3D screen savers, or other computers with your...
Owner's Manual
Page 36
... to enter hibernate mode: - NOTICE: You cannot remove devices or USB mobile docking stations while your computer. To exit hibernate mode, press the power button. You cannot make the computer exit standby mode by pressing a key or touching the touch pad. Close the display. - www.dell.com | support.dell.com To exit standby mode, press the power button or open the display depending on how you set the power management options on the hard drive and then completely turning off...
... to enter hibernate mode: - NOTICE: You cannot remove devices or USB mobile docking stations while your computer. To exit hibernate mode, press the power button. You cannot make the computer exit standby mode by pressing a key or touching the touch pad. Close the display. - www.dell.com | support.dell.com To exit standby mode, press the power button or open the display depending on how you set the power management options on the hard drive and then completely turning off...
Owner's Manual
Page 43
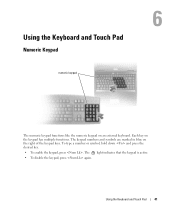
Using the Keyboard and Touch Pad Numeric Keypad numeric keypad The numeric keypad functions like the numeric keypad on the right of the keypad keys. The keypad numbers and symbols are marked in blue on an external keyboard. The 9 light indicates that the keypad is active. • To disable the keypad, press again. To type a number or symbol, hold down and press the desired key. • To enable the keypad, press . Each key on the keypad has multiple functions. Using the Keyboard and Touch Pad 41
Using the Keyboard and Touch Pad Numeric Keypad numeric keypad The numeric keypad functions like the numeric keypad on the right of the keypad keys. The keypad numbers and symbols are marked in blue on an external keyboard. The 9 light indicates that the keypad is active. • To disable the keypad, press again. To type a number or symbol, hold down and press the desired key. • To enable the keypad, press . Each key on the keypad has multiple functions. Using the Keyboard and Touch Pad 41
Owner's Manual
Page 58
... that you are having problems connecting to an Internet provider. If the message is operating properly. www.dell.com | support.dell.com VERIFY THAT THE MODEM IS COMMUNICATING WITH WINDOWS - 1 Click the Start button and click Control Panel. 2 Click Printers and Other Hardware. 3 Click Phone and Modem Options. 4 Click the Modems tab. 5 Click the COM port for the keyword spyware. If Work Offline has a checkmark next...
... that you are having problems connecting to an Internet provider. If the message is operating properly. www.dell.com | support.dell.com VERIFY THAT THE MODEM IS COMMUNICATING WITH WINDOWS - 1 Click the Start button and click Control Panel. 2 Click Printers and Other Hardware. 3 Click Phone and Modem Options. 4 Click the Modems tab. 5 Click the COM port for the keyword spyware. If Work Offline has a checkmark next...
Owner's Manual
Page 70
... part of the display is readable CONNECT AN EXTERNAL MONITOR - 1 Shut down -arrow key to the computer. 2 Turn on the computer and the monitor and adjust the monitor brightness and contrast controls. All devices require a driver program. 68 Solving Problems E L I M I N A T E P O S S I B L E I G H T N E S S - A driver is a program that the subwoofer is difficult to change or click the Display icon. 4 Try different settings for Color quality and Screen resolution. ADJUST THE WINDOWS DISPLAY SETTINGS - 1 Click the Start button and then click Control Panel...
... part of the display is readable CONNECT AN EXTERNAL MONITOR - 1 Shut down -arrow key to the computer. 2 Turn on the computer and the monitor and adjust the monitor brightness and contrast controls. All devices require a driver program. 68 Solving Problems E L I M I N A T E P O S S I B L E I G H T N E S S - A driver is a program that the subwoofer is difficult to change or click the Display icon. 4 Try different settings for Color quality and Screen resolution. ADJUST THE WINDOWS DISPLAY SETTINGS - 1 Click the Start button and then click Control Panel...

Owner's Manual
Page 71
... are installing software appropriate for your operating system. Solving Problems 69 Each device has its own set of your problem and, if necessary, update the driver. 1 Click the Start button and click Control Panel. 2 Under Pick a Category, click Performance and Maintenance. 3 Click System. 4 In the System Properties window, click the Hardware tab. 5 Click Device Manager. 6 Scroll down the list to you with the previously installed version. 1 Click the Start button and click Control Panel. 2 Under...
... are installing software appropriate for your operating system. Solving Problems 69 Each device has its own set of your problem and, if necessary, update the driver. 1 Click the Start button and click Control Panel. 2 Under Pick a Category, click Performance and Maintenance. 3 Click System. 4 In the System Properties window, click the Hardware tab. 5 Click Device Manager. 6 Scroll down the list to you with the previously installed version. 1 Click the Start button and click Control Panel. 2 Under...
Owner's Manual
Page 72
... location to which the new driver was installed and click Properties. 7 Click the Drivers tab. 8 Click Roll Back Driver. To resolve incompatibilities using the Hardware Troubleshooter: 1 Click the Start button and click Help and Support. 2 Type hardware troubleshooter in the Search field and click the arrow to start the search. 3 Click Hardware Troubleshooter in the Search Results list. 4 In the Hardware Troubleshooter list, click I need to resolve the incompatibility. Resolving Software and Hardware Incompatibilities If a device...
... location to which the new driver was installed and click Properties. 7 Click the Drivers tab. 8 Click Roll Back Driver. To resolve incompatibilities using the Hardware Troubleshooter: 1 Click the Start button and click Help and Support. 2 Type hardware troubleshooter in the Search field and click the arrow to start the search. 3 Click Hardware Troubleshooter in the Search Results list. 4 In the Hardware Troubleshooter list, click I need to resolve the incompatibility. Resolving Software and Hardware Incompatibilities If a device...
Owner's Manual
Page 73
... and Support Center" on using System Restore. The Select a Restore Point screen provides a calendar that allows you received the computer. See the Windows Help and Support Center for the Windows default view, so they may not work if you set your hard drive to the operating state it was in when you install a device driver, use System Restore. If that Restore my computer to an earlier time is unsuccessful, then use Device Driver...
... and Support Center" on using System Restore. The Select a Restore Point screen provides a calendar that allows you received the computer. See the Windows Help and Support Center for the Windows default view, so they may not work if you set your hard drive to the operating state it was in when you install a device driver, use System Restore. If that Restore my computer to an earlier time is unsuccessful, then use Device Driver...

Owner's Manual
Page 82
... hard drive. NOTICE: Use firm and even pressure to secure the hard drive. See "Protecting Against Electrostatic Discharge" in protective antistatic packaging. NOTE: Dell does not guarantee compatibility or provide support for hard drives from its packaging. even a slight bump can damage the drive. For instructions, see "Reinstalling Drivers and Utilities" on page 75. 2 Turn the computer over, and remove the hard drive cover screws. 3 Lift the hard drive cover and remove...
... hard drive. NOTICE: Use firm and even pressure to secure the hard drive. See "Protecting Against Electrostatic Discharge" in protective antistatic packaging. NOTE: Dell does not guarantee compatibility or provide support for hard drives from its packaging. even a slight bump can damage the drive. For instructions, see "Reinstalling Drivers and Utilities" on page 75. 2 Turn the computer over, and remove the hard drive cover screws. 3 Lift the hard drive cover and remove...
Owner's Manual
Page 90
... corner displays information about a specific item on a system setup screen, highlight the item and see "Performing a One-Time Boot" on the screen. Changing the Boot Sequence The boot sequence, or boot order, tells the computer where to look to find the software needed to the following: • USB Diskette Drive • Hard Drive • ATAPI CD-ROM Drive • Network • Diagnostics NOTE: You can control the boot sequence and enable/disable devices using the Boot Order page...
... corner displays information about a specific item on a system setup screen, highlight the item and see "Performing a One-Time Boot" on the screen. Changing the Boot Sequence The boot sequence, or boot order, tells the computer where to look to find the software needed to the following: • USB Diskette Drive • Hard Drive • ATAPI CD-ROM Drive • Network • Diagnostics NOTE: You can control the boot sequence and enable/disable devices using the Boot Order page...
Owner's Manual
Page 100
... Greece Website: support.euro.dell.com International Access Code: 00 E-mail: support.euro.dell.com/gr/en/emaildell/ Country Code: 30 Technical Support Gold Service Technical Support Switchboard Gold Service Switchboard Sales Fax Grenada General Support Guatemala General Support Guyana General Support Hong Kong Website: support.ap.dell.com International Access Code: 001 Technical Support E-mail: apsupport@dell.com Country Code: 852 Technical Support (Dimension and Inspiron) Technical Support (OptiPlex, Latitude, and Dell Precision) Technical Support (PowerApp™...
... Greece Website: support.euro.dell.com International Access Code: 00 E-mail: support.euro.dell.com/gr/en/emaildell/ Country Code: 30 Technical Support Gold Service Technical Support Switchboard Gold Service Switchboard Sales Fax Grenada General Support Guatemala General Support Guyana General Support Hong Kong Website: support.ap.dell.com International Access Code: 001 Technical Support E-mail: apsupport@dell.com Country Code: 852 Technical Support (Dimension and Inspiron) Technical Support (OptiPlex, Latitude, and Dell Precision) Technical Support (PowerApp™...
Owner's Manual
Page 102
..., educational institutions, and medical institutions) Global Segment Japan Individual User Switchboard Korea (Seoul) Technical Support International Access Code: 001 Sales Country Code: 82 Customer Service (Penang, Malaysia) City Code: 2 Fax Switchboard Technical Support (Electronics and Accessories) 100 Appendix Area Codes, Local Numbers, and Toll-Free Numbers toll-free: 0120-198-498 81-44-556-4162 toll-free: 0120-198-226 81-44-520-1435 toll...
..., educational institutions, and medical institutions) Global Segment Japan Individual User Switchboard Korea (Seoul) Technical Support International Access Code: 001 Sales Country Code: 82 Customer Service (Penang, Malaysia) City Code: 2 Fax Switchboard Technical Support (Electronics and Accessories) 100 Appendix Area Codes, Local Numbers, and Toll-Free Numbers toll-free: 0120-198-498 81-44-556-4162 toll-free: 0120-198-226 81-44-520-1435 toll...
Owner's Manual
Page 106
... Africa (Johannesburg) Website: support.euro.dell.com International Access Code: E-mail: dell_za_support@dell.com 09/091 Gold Queue Country Code: 27 Technical Support City Code: 11 Customer Care Sales Fax Switchboard Southeast Asian and Pacific Countries Customer Technical Support, Customer Service, and Sales (Penang, Malaysia) Area Codes, Local Numbers, and Toll-Free Numbers toll-free: 1800 394 7430 toll-free: 1800 394 7488 toll-free: 1800 394 7478...
... Africa (Johannesburg) Website: support.euro.dell.com International Access Code: E-mail: dell_za_support@dell.com 09/091 Gold Queue Country Code: 27 Technical Support City Code: 11 Customer Care Sales Fax Switchboard Southeast Asian and Pacific Countries Customer Technical Support, Customer Service, and Sales (Penang, Malaysia) Area Codes, Local Numbers, and Toll-Free Numbers toll-free: 1800 394 7430 toll-free: 1800 394 7488 toll-free: 1800 394 7478...
Owner's Manual
Page 112
..., 17 H hard drive description, 20 problems, 54 replacing, 79 system view, 20 hardware conflicts, 70 Dell Diagnostics, 51 Hardware Troubleshooter, 70 Help and Support Center, 12 hibernate mode, 34-35 I installing parts before you begin, 75 recommended tools, 75 turning off your computer, 75 Internet connection about, 21 options, 21 setting up , 47 network connector description, 18 system view, 18 Network Setup Wizard, 47 numeric keypad, 41 P PC Card slot description, 16...
..., 17 H hard drive description, 20 problems, 54 replacing, 79 system view, 20 hardware conflicts, 70 Dell Diagnostics, 51 Hardware Troubleshooter, 70 Help and Support Center, 12 hibernate mode, 34-35 I installing parts before you begin, 75 recommended tools, 75 turning off your computer, 75 Internet connection about, 21 options, 21 setting up , 47 network connector description, 18 system view, 18 Network Setup Wizard, 47 numeric keypad, 41 P PC Card slot description, 16...


