View
Page 9
... 130 Restoring Your Operating System 131 Using Windows Vista System Restore 132 12 Adding and Replacing Parts 135 Before You Begin 135 Recommended Tools 135 Turning Off Your Computer 135 Before Working Inside Your Computer 136 Hard Drive 138 Removing the Hard Drive 138 Replacing the Hard Drive 140 Returning a Hard...
... 130 Restoring Your Operating System 131 Using Windows Vista System Restore 132 12 Adding and Replacing Parts 135 Before You Begin 135 Recommended Tools 135 Turning Off Your Computer 135 Before Working Inside Your Computer 136 Hard Drive 138 Removing the Hard Drive 138 Replacing the Hard Drive 140 Returning a Hard...
View
Page 21
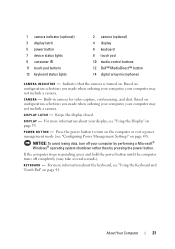
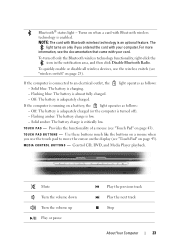
...W E R B U T T O N - K E Y B O A R D - About Your Computer 21 Built-in camera for video capture, conferencing, and chat. Keeps the display closed. Press the power button to turn off completely (may not include a camera. Based on page 39. C A M E R A - D I S P L A Y L A T C H - If the computer stops responding, press and hold the power button... pad buttons 13 keyboard status lights 2 camera (optional) 4 display 6 keyboard 8 touch pad 10 media control buttons 12 Dell™ MediaDirect™ button 14 digital array microphones C A M E R A I N D I C A T O R - Based on .
...W E R B U T T O N - K E Y B O A R D - About Your Computer 21 Built-in camera for video capture, conferencing, and chat. Keeps the display closed. Press the power button to turn off completely (may not include a camera. Based on page 39. C A M E R A - D I S P L A Y L A T C H - If the computer stops responding, press and hold the power button... pad buttons 13 keyboard status lights 2 camera (optional) 4 display 6 keyboard 8 touch pad 10 media control buttons 12 Dell™ MediaDirect™ button 14 digital array microphones C A M E R A I N D I C A T O R - Based on .
View
Page 22
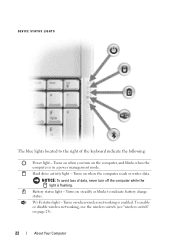
... or blinks to the right of data, never turn on the computer, and blinks when the computer is in a power management mode. Hard drive activity light - Turns on when the computer reads or writes data. Battery status light - Turns on when wireless networking is flashing. Wi-Fi status... light - DEVICE STATUS LIGHTS The blue lights located to indicate battery charge status. Turns on when you turn off the computer while the ...
... or blinks to the right of data, never turn on the computer, and blinks when the computer is in a power management mode. Hard drive activity light - Turns on when the computer reads or writes data. Battery status light - Turns on when wireless networking is flashing. Wi-Fi status... light - DEVICE STATUS LIGHTS The blue lights located to indicate battery charge status. Turns on when you turn off the computer while the ...
View
Page 23
... all wireless devices, use the touch pad to an electrical outlet, the - Off: The battery is an optional feature. Solid amber: The battery charge is turned off only the Bluetooth wireless technology functionality, right-click the icon in the notification area, and then click Disable Bluetooth Radio. T O U C H P A D - Off...volume up Play or pause Play the previous track Play the next track Stop About Your Computer 23 Bluetooth® status light - Turns on page 43). Flashing blue: The battery is connected to move the cursor on the display (see the documentation that came with...
... all wireless devices, use the touch pad to an electrical outlet, the - Off: The battery is an optional feature. Solid amber: The battery charge is turned off only the Bluetooth wireless technology functionality, right-click the icon in the notification area, and then click Disable Bluetooth Radio. T O U C H P A D - Off...volume up Play or pause Play the previous track Play the next track Stop About Your Computer 23 Bluetooth® status light - Turns on page 43). Flashing blue: The battery is connected to move the cursor on the display (see the documentation that came with...
View
Page 24
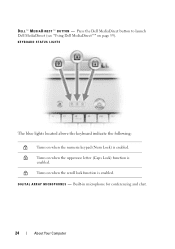
A Turns on when the numeric keypad (Num Lock) is enabled. D I G I T A L A R R A Y M I R E C T ™ B U T T O N - Built-in microphone for conferencing and chat. 24 About Your Computer KEYBOARD STATUS LIGHTS The blue lights located above the keyboard indicate the following: 9 Turns on when the uppercase letter (Caps Lock) function is enabled. Press the Dell MediaDirect button to launch Dell MediaDirect (see "Using Dell MediaDirect™" on when the scroll lock function is enabled. Turns on page 59). D E L L ™ M E D I A D I C R O P H O N E S -
A Turns on when the numeric keypad (Num Lock) is enabled. D I G I T A L A R R A Y M I R E C T ™ B U T T O N - Built-in microphone for conferencing and chat. 24 About Your Computer KEYBOARD STATUS LIGHTS The blue lights located above the keyboard indicate the following: 9 Turns on when the uppercase letter (Caps Lock) function is enabled. Press the Dell MediaDirect button to launch Dell MediaDirect (see "Using Dell MediaDirect™" on when the scroll lock function is enabled. Turns on page 59). D E L L ™ M E D I A D I C R O P H O N E S -
View
Page 25
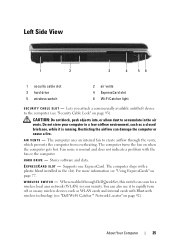
... can damage the computer or cause a fire. About Your Computer 25 CAUTION: Do not block, push objects into, or allow dust to rapidly turn off or on any wireless devices such as WLAN cards and internal cards with Bluetooth wireless technology (see "Using ExpressCards" on when the computer gets... hot. For more information see "Dell Wi-Fi Catcher™ Network Locator" on page 93). A I T Y C A B L E S L O T - Left Side View 1 2 3 4 ...
... can damage the computer or cause a fire. About Your Computer 25 CAUTION: Do not block, push objects into, or allow dust to rapidly turn off or on any wireless devices such as WLAN cards and internal cards with Bluetooth wireless technology (see "Using ExpressCards" on when the computer gets... hot. For more information see "Dell Wi-Fi Catcher™ Network Locator" on page 93). A I T Y C A B L E S L O T - Left Side View 1 2 3 4 ...

View
Page 30
... adapter to the cable. CAUTION: The AC adapter works with your computer. 30 About Your Computer You can connect the AC adapter with your computer turned on using the modem, see the online modem documentation supplied with electrical outlets worldwide. A C A D A P T E R C O N N E C T O R - MODEM CONNECTOR (RJ-11) Connect the telephone line to the modem...
... adapter to the cable. CAUTION: The AC adapter works with your computer. 30 About Your Computer You can connect the AC adapter with your computer turned on using the modem, see the online modem documentation supplied with electrical outlets worldwide. A C A D A P T E R C O N N E C T O R - MODEM CONNECTOR (RJ-11) Connect the telephone line to the modem...

View
Page 32
... not block, push objects into, or allow dust to create airflow through the vents, which prevents the computer from overheating. Compartment for instructions). B A T T E R Y C H A R G E / H E A L T H G A U G E - The computer turns the fan on page 154). When a battery is running. Do not store your computer in the air vents. Provides information on the battery charge (see...
... not block, push objects into, or allow dust to create airflow through the vents, which prevents the computer from overheating. Compartment for instructions). B A T T E R Y C H A R G E / H E A L T H G A U G E - The computer turns the fan on page 154). When a battery is running. Do not store your computer in the air vents. Provides information on the battery charge (see...

View
Page 36
... 3 2 USB connector on the computer and the printer. If you purchased a printer cable at the same time you purchase a cable separately, ensure that it is turned on. 1 Complete the operating system setup if you have not already done so. 2 Attach the USB printer cable to your computer with your computer, the...
... 3 2 USB connector on the computer and the printer. If you purchased a printer cable at the same time you purchase a cable separately, ensure that it is turned on. 1 Complete the operating system setup if you have not already done so. 2 Attach the USB printer cable to your computer with your computer, the...

View
Page 37
... printer, and then turn on page 128 and the documentation that can occur during electrical storms. Setting Up Your Computer 37 Some surge protector manufacturers include warranty coverage for ...
... printer, and then turn on page 128 and the documentation that can occur during electrical storms. Setting Up Your Computer 37 Some surge protector manufacturers include warranty coverage for ...
View
Page 39
... the computer with an external device attached (such as an external monitor or projector) and turned on, the image may appear on either the computer display or the external device. Using the Display Adjusting Brightness When a Dell™ computer is connected to an external monitor and you try to change the brightness...
... the computer with an external device attached (such as an external monitor or projector) and turned on, the image may appear on either the computer display or the external device. Using the Display Adjusting Brightness When a Dell™ computer is connected to an external monitor and you try to change the brightness...
View
Page 50
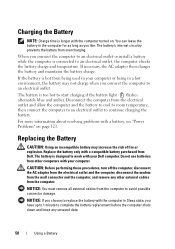
...in a hot environment, the battery may increase the risk of fire or explosion. For more information about resolving problems with your Dell computer. The battery's internal circuitry prevents the battery from the computer to an electrical outlet. Replace the battery only with the ...battery light flashes alternately blue and amber. NOTICE: You must remove all external cables from overcharging. CAUTION: Before performing these procedures, turn off the computer, disconnect the AC adapter from the electrical outlet and the computer, disconnect the modem from the wall connector and ...
...in a hot environment, the battery may increase the risk of fire or explosion. For more information about resolving problems with your Dell computer. The battery's internal circuitry prevents the battery from the computer to an electrical outlet. Replace the battery only with the ...battery light flashes alternately blue and amber. NOTICE: You must remove all external cables from overcharging. CAUTION: Before performing these procedures, turn off the computer, disconnect the AC adapter from the electrical outlet and the computer, disconnect the modem from the wall connector and ...

View
Page 51
... them open. 5 Slide the battery out of time. Storing a Battery Remove the battery when you use it . To remove the battery: 1 If the computer is turned off. 3 Turn the computer over. 4 Slide and click the battery release latches to a docking device (docked), undock it . Using a Battery 51 A battery discharges during prolonged storage...
... them open. 5 Slide the battery out of time. Storing a Battery Remove the battery when you use it . To remove the battery: 1 If the computer is turned off. 3 Turn the computer over. 4 Slide and click the battery release latches to a docking device (docked), undock it . Using a Battery 51 A battery discharges during prolonged storage...
View
Page 59
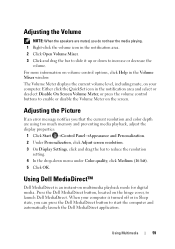
... volume control buttons to enable or disable the Volume Meter on your computer is an instant-on the hinge cover, to launch Dell MediaDirect. Using Dell MediaDirect™ Dell MediaDirect is turned off or in Sleep state, you do not hear the media playing. 1 Right-click the volume icon in the notification area. 2 Click...
... volume control buttons to enable or disable the Volume Meter on your computer is an instant-on the hinge cover, to launch Dell MediaDirect. Using Dell MediaDirect™ Dell MediaDirect is turned off or in Sleep state, you do not hear the media playing. 1 Right-click the volume icon in the notification area. 2 Click...

View
Page 63
... the computer and the TV and/or audio device that you connected (if applicable), and then turn on the computer. 7 See "Enabling the Display Settings for a TV" on page 75 to ensure that you want to the S-video TV-out connector on .... 5 Plug the two RCA connectors on the other end of the audio cable into the audio input connectors on your TV or other audio device. 6 Turn on the TV and any audio device that the computer recognizes and works properly with the TV. NOTE: If your TV or audio device supports...
... the computer and the TV and/or audio device that you connected (if applicable), and then turn on the computer. 7 See "Enabling the Display Settings for a TV" on page 75 to ensure that you want to the S-video TV-out connector on .... 5 Plug the two RCA connectors on the other end of the audio cable into the audio input connectors on your TV or other audio device. 6 Turn on the TV and any audio device that the computer recognizes and works properly with the TV. NOTE: If your TV or audio device supports...

View
Page 65
Using Multimedia 65 1 Turn off the computer and the TV and/or the audio device that you want to connect. 2 Connect the composite video adapter to the S-video TV-... end of the S/PDIF digital audio cable into the audio input connector on your TV or audio device. 7 Turn on the TV, turn on any audio device that you connected (if applicable), and then turn on the computer. 8 See "Enabling the Display Settings for a TV" on page 75 to ensure that the computer...
Using Multimedia 65 1 Turn off the computer and the TV and/or the audio device that you want to connect. 2 Connect the composite video adapter to the S-video TV-... end of the S/PDIF digital audio cable into the audio input connector on your TV or audio device. 7 Turn on the TV, turn on any audio device that you connected (if applicable), and then turn on the computer. 8 See "Enabling the Display Settings for a TV" on page 75 to ensure that the computer...

View
Page 67
1 Turn off the computer and the TV and/or audio device that you want to connect. 2 Connect the composite video adapter to the S-video TV-out ... other end of the audio cable into the audio input connectors on your TV or other audio device. 7 Turn on the TV, turn on any audio device that you connected (if applicable), and then turn on the computer. 8 See "Enabling the Display Settings for a TV" on page 75 to ensure that the computer...
1 Turn off the computer and the TV and/or audio device that you want to connect. 2 Connect the composite video adapter to the S-video TV-out ... other end of the audio cable into the audio input connectors on your TV or other audio device. 7 Turn on the TV, turn on any audio device that you connected (if applicable), and then turn on the computer. 8 See "Enabling the Display Settings for a TV" on page 75 to ensure that the computer...

View
Page 69
1 Turn off the computer and the TV and/or audio device that you want to connect. 2 Connect the composite video adapter to the S-video TV-out ... end of the digital audio cable into the S/PDIF input connector on your TV or other audio device. 7 Turn on the TV, turn on any audio device that you connected (if applicable), and then turn on the computer. 8 See "Enabling the Display Settings for a TV" on page 75 to ensure that the computer...
1 Turn off the computer and the TV and/or audio device that you want to connect. 2 Connect the composite video adapter to the S-video TV-out ... end of the digital audio cable into the S/PDIF input connector on your TV or other audio device. 7 Turn on the TV, turn on any audio device that you connected (if applicable), and then turn on the computer. 8 See "Enabling the Display Settings for a TV" on page 75 to ensure that the computer...

View
Page 71
...of the component video cable into the component video-input connectors on the TV. Using Multimedia 71 1 Turn off the computer and the TV and/or audio device that you connected (if applicable), and then turn on any audio device that you want to connect. 2 Connect the component video adapter to ensure... adapter 4 Plug all three connectors from the other end of the audio cable into the audio input connectors on your TV or audio device. 7 Turn on the TV, turn on the computer. 8 See "Enabling the Display Settings for a TV" on page 75 to the S-video TV-out connector on your computer. 3 Plug...
...of the component video cable into the component video-input connectors on the TV. Using Multimedia 71 1 Turn off the computer and the TV and/or audio device that you connected (if applicable), and then turn on any audio device that you want to connect. 2 Connect the component video adapter to ensure... adapter 4 Plug all three connectors from the other end of the audio cable into the audio input connectors on your TV or audio device. 7 Turn on the TV, turn on the computer. 8 See "Enabling the Display Settings for a TV" on page 75 to the S-video TV-out connector on your computer. 3 Plug...

View
Page 73
Make sure that you want to connect. 2 Connect the component video adapter to the S-video TV-out connector on the component video adapter. 1 2 3 1 component video adapter 3 standard audio cable 2 composite video cable 1 Turn off the computer and the TV and/or audio device that the red, green, and blue colors of the component video cable into the component video-output connectors on the computer. 3 Plug all three ends of the cable match the corresponding adapter ports. Using Multimedia 73
Make sure that you want to connect. 2 Connect the component video adapter to the S-video TV-out connector on the component video adapter. 1 2 3 1 component video adapter 3 standard audio cable 2 composite video cable 1 Turn off the computer and the TV and/or audio device that the red, green, and blue colors of the component video cable into the component video-output connectors on the computer. 3 Plug all three ends of the cable match the corresponding adapter ports. Using Multimedia 73


