Owner's Manual (PDF)
Page 3
Contents Before You Begin 7 Turn Off Your Computer and Connected Devices. . . . . 7 Safety Instructions 7 Recommended Tools 8 After Working Inside Your Computer 9 Installing the SIM Card (Optional 11 Procedure 11 Removing the ...
Contents Before You Begin 7 Turn Off Your Computer and Connected Devices. . . . . 7 Safety Instructions 7 Recommended Tools 8 After Working Inside Your Computer 9 Installing the SIM Card (Optional 11 Procedure 11 Removing the ...
Owner's Manual (PDF)
Page 7
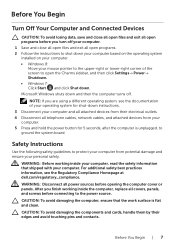
NOTE: If you are using a different operating system, see the Regulatory Compliance Homepage at dell.com/regulatory_compliance. For additional safety best practices information, see the documentation of the screen to ground the system board. After you finish working inside ... for 5 seconds, after the computer is flat and clean. CAUTION: To avoid damaging the computer, ensure that shipped with your computer. Before You Begin Turn Off Your Computer and Connected Devices CAUTION: To avoid losing data, save and close all open files and exit all power sources before connecting to...
NOTE: If you are using a different operating system, see the Regulatory Compliance Homepage at dell.com/regulatory_compliance. For additional safety best practices information, see the documentation of the screen to ground the system board. After you finish working inside ... for 5 seconds, after the computer is flat and clean. CAUTION: To avoid damaging the computer, ensure that shipped with your computer. Before You Begin Turn Off Your Computer and Connected Devices CAUTION: To avoid losing data, save and close all open files and exit all power sources before connecting to...

Owner's Manual (PDF)
Page 9
CAUTION: Before turning on your computer. • Connect your computer. After Working Inside Your Computer | 9 Failure to their electrical outlets. After Working Inside Your Computer After you complete ...
CAUTION: Before turning on your computer. • Connect your computer. After Working Inside Your Computer | 9 Failure to their electrical outlets. After Working Inside Your Computer After you complete ...
Owner's Manual (PDF)
Page 11
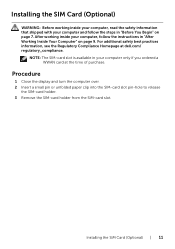
... at the time of purchase. NOTE: The SIM-card slot is available in your computer only if you ordered a WWAN card at dell.com/ regulatory_compliance. Procedure 1 Close the display and turn the computer over. 2 Insert a small pin or unfolded paper clip into the SIM-card slot pin-hole to release the SIM...
... at the time of purchase. NOTE: The SIM-card slot is available in your computer only if you ordered a WWAN card at dell.com/ regulatory_compliance. Procedure 1 Close the display and turn the computer over. 2 Insert a small pin or unfolded paper clip into the SIM-card slot pin-hole to release the SIM...
Owner's Manual (PDF)
Page 13
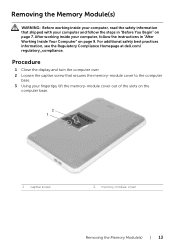
...You Begin" on the computer base. 2 1 1 captive screw 2 memory-module cover Removing the Memory Module(s) | 13 Procedure 1 Close the display and turn the computer over. 2 Loosen the captive screw that shipped with your fingertips, lift the memory-module cover out of the slots on page 7. For additional... safety best practices information, see the Regulatory Compliance Homepage at dell.com/ regulatory_compliance. After working inside your computer, follow the steps in "After Working Inside Your Computer" on page 9.
...You Begin" on the computer base. 2 1 1 captive screw 2 memory-module cover Removing the Memory Module(s) | 13 Procedure 1 Close the display and turn the computer over. 2 Loosen the captive screw that shipped with your fingertips, lift the memory-module cover out of the slots on page 7. For additional... safety best practices information, see the Regulatory Compliance Homepage at dell.com/ regulatory_compliance. After working inside your computer, follow the steps in "After Working Inside Your Computer" on page 9.
Owner's Manual (PDF)
Page 22
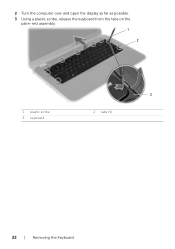
2 Turn the computer over and open the display as far as possible. 3 Using a plastic scribe, release the keyboard from the tabs on the palm-rest assembly. 1 2 1 plastic scribe 3 keyboard 3 2 tabs (9) 22 | Removing the Keyboard
2 Turn the computer over and open the display as far as possible. 3 Using a plastic scribe, release the keyboard from the tabs on the palm-rest assembly. 1 2 1 plastic scribe 3 keyboard 3 2 tabs (9) 22 | Removing the Keyboard
Owner's Manual (PDF)
Page 23
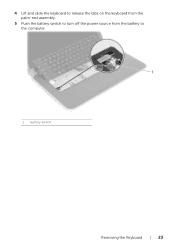
4 Lift and slide the keyboard to release the tabs on the keyboard from the palm-rest assembly. 5 Push the battery switch to turn off the power source from the battery to the computer. 1 1 battery switch Removing the Keyboard | 23
4 Lift and slide the keyboard to release the tabs on the keyboard from the palm-rest assembly. 5 Push the battery switch to turn off the power source from the battery to the computer. 1 1 battery switch Removing the Keyboard | 23

Owner's Manual (PDF)
Page 25
...instructions in "After Working Inside Your Computer" on page 9. For additional safety best practices information, see the Regulatory Compliance Homepage at dell.com/ regulatory_compliance. Procedure 1 Slide the keyboard cable and the keyboard-backlight cable into their connectors and press down on the connector latches... to secure them. 2 Push the battery switch to turn the computer over. 6 Replace the screw that shipped with your computer and follow the instructions in "After Working Inside Your Computer...
...instructions in "After Working Inside Your Computer" on page 9. For additional safety best practices information, see the Regulatory Compliance Homepage at dell.com/ regulatory_compliance. Procedure 1 Slide the keyboard cable and the keyboard-backlight cable into their connectors and press down on the connector latches... to secure them. 2 Push the battery switch to turn the computer over. 6 Replace the screw that shipped with your computer and follow the instructions in "After Working Inside Your Computer...

Owner's Manual (PDF)
Page 28
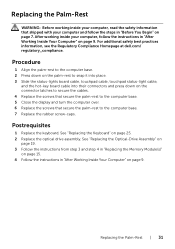
Procedure 1 Close the display and turn the computer over. 2 Gently pry out the rubber screw-caps that cover the screws on the computer base. 3 Remove the screws that secure the palm-rest to the computer base. 1 2 1 screws (8) 2 rubber screw-caps (7) 28 | Removing the Palm-Rest
Procedure 1 Close the display and turn the computer over. 2 Gently pry out the rubber screw-caps that cover the screws on the computer base. 3 Remove the screws that secure the palm-rest to the computer base. 1 2 1 screws (8) 2 rubber screw-caps (7) 28 | Removing the Palm-Rest

Owner's Manual (PDF)
Page 29
4 Turn the computer over and open the display as far as possible. 5 Lift the connector latches and pull the pull-tab to disconnect the status-lights board cable, touchpad cable, touchpad status-light cable, and the hot-key board cable from the system board. 4 1 1 status-lights board cable 3 touchpad cable 2 3 2 touchpad status-lights cable 4 hot-key board cable Removing the Palm-Rest | 29
4 Turn the computer over and open the display as far as possible. 5 Lift the connector latches and pull the pull-tab to disconnect the status-lights board cable, touchpad cable, touchpad status-light cable, and the hot-key board cable from the system board. 4 1 1 status-lights board cable 3 touchpad cable 2 3 2 touchpad status-lights cable 4 hot-key board cable Removing the Palm-Rest | 29
Owner's Manual (PDF)
Page 31
...the connector latches to secure the cables. 4 Replace the screws that secure the palm-rest to the computer base. 5 Close the display and turn the computer over. 6 Replace the screws that shipped with your computer, follow the steps in "Before You Begin" on page 7. Procedure 1 ...palm-rest to the computer base. 7 Replace the rubber screw-caps. For additional safety best practices information, see the Regulatory Compliance Homepage at dell.com/ regulatory_compliance. See "Replacing the Keyboard" on page 9. Replacing the Palm-Rest | 31 After working inside your computer and follow the ...
...the connector latches to secure the cables. 4 Replace the screws that secure the palm-rest to the computer base. 5 Close the display and turn the computer over. 6 Replace the screws that shipped with your computer, follow the steps in "Before You Begin" on page 7. Procedure 1 ...palm-rest to the computer base. 7 Replace the rubber screw-caps. For additional safety best practices information, see the Regulatory Compliance Homepage at dell.com/ regulatory_compliance. See "Replacing the Keyboard" on page 9. Replacing the Palm-Rest | 31 After working inside your computer and follow the ...

Owner's Manual (PDF)
Page 59
Removing the System Board | 59 5 Remove the screw that secures the system board to the computer base. 6 Lift the system board and release the system-board ports from the slots on the computer base. 1 2 1 screw 2 system board 7 Turn the system board over. 8 Follow the instructions from step 1 to step 2 in "Removing the mSATA Card" on page 63. 9 Follow the instructions from step 1 to step 3 in "Removing the Thermal-Cooling Assembly" on page 67.
Removing the System Board | 59 5 Remove the screw that secures the system board to the computer base. 6 Lift the system board and release the system-board ports from the slots on the computer base. 1 2 1 screw 2 system board 7 Turn the system board over. 8 Follow the instructions from step 1 to step 2 in "Removing the mSATA Card" on page 63. 9 Follow the instructions from step 1 to step 3 in "Removing the Thermal-Cooling Assembly" on page 67.
Owner's Manual (PDF)
Page 62
Entering the Service Tag in system setup 1 Turn on the computer. 2 Press during POST to enter the system setup program. 3 Navigate to the Main tab and enter your computer's Service Tag in the Service Tag Input field. 62 | Replacing the System Board
Entering the Service Tag in system setup 1 Turn on the computer. 2 Press during POST to enter the system setup program. 3 Navigate to the Main tab and enter your computer's Service Tag in the Service Tag Input field. 62 | Replacing the System Board

Owner's Manual (PDF)
Page 80
Procedure 1 Remove the screws that secure the display panel to the display back-cover. 2 Gently lift the display panel and turn it over. 3 2 1 1 screws (4) 3 display back cover 2 display panel 80 | Removing the Display Panel
Procedure 1 Remove the screws that secure the display panel to the display back-cover. 2 Gently lift the display panel and turn it over. 3 2 1 1 screws (4) 3 display back cover 2 display panel 80 | Removing the Display Panel
Owner's Manual (PDF)
Page 93
... 10 Double-click the BIOS update file icon and follow the instructions on the screen. 4 A list of all Dell products b Click Continue and follow the instructions that shipped with your download method below window, click For Single File ...Download via Browser, and then click Download Now. b Click Submit and proceed to support.dell.com/support/downloads. 3 Locate the BIOS update file for your computer: NOTE: The Service Tag for me •... latest BIOS file. 6 In the Please select your computer. To flash the BIOS: 1 Turn on the computer. 2 Go to step 4.
... 10 Double-click the BIOS update file icon and follow the instructions on the screen. 4 A list of all Dell products b Click Continue and follow the instructions that shipped with your download method below window, click For Single File ...Download via Browser, and then click Download Now. b Click Submit and proceed to support.dell.com/support/downloads. 3 Locate the BIOS update file for your computer: NOTE: The Service Tag for me •... latest BIOS file. 6 In the Please select your computer. To flash the BIOS: 1 Turn on the computer. 2 Go to step 4.
Quick Start Guide (PDF)
Page 2
... | Ressources | Recursos Getting started Aan de slag Mise en route Primeros pasos My Dell Support Center Mijn Dell Support Center Mon Dell Support Center Mi centro de soporte técnico de Dell Charms sidebar Zijbalk met emoticons | Barre latérale Charms Barra lateral derecha (charms...extern beeldscherm Bascule sur l'écran externe Cambiar a la pantalla externa Draadloos in-/uitschakelen | Active/désactive le sans fil Turn off/on wireless TActivar/desactivar la función inalámbrica Enable/disable touchpad Touchpad in-/uitschakelen Active/désactive le pav&#...
... | Ressources | Recursos Getting started Aan de slag Mise en route Primeros pasos My Dell Support Center Mijn Dell Support Center Mon Dell Support Center Mi centro de soporte técnico de Dell Charms sidebar Zijbalk met emoticons | Barre latérale Charms Barra lateral derecha (charms...extern beeldscherm Bascule sur l'écran externe Cambiar a la pantalla externa Draadloos in-/uitschakelen | Active/désactive le sans fil Turn off/on wireless TActivar/desactivar la función inalámbrica Enable/disable touchpad Touchpad in-/uitschakelen Active/désactive le pav&#...


