Owner's Manual
Page 31
... the battery may need to purchase a new battery during the life of your computer. Using a Battery Battery Performance NOTE: For information about the Dell warranty for advice on operating conditions. Battery operating time varies depending on disposing of batteries with the main battery installed ...the battery bay. When your battery no longer holds a charge, call your Dell™ portable computer with household waste. Do not puncture, incinerate, disassemble, or expose the battery to work with your Dell computer. Do not use a battery from Dell. Damaged batteries may...
... the battery may need to purchase a new battery during the life of your computer. Using a Battery Battery Performance NOTE: For information about the Dell warranty for advice on operating conditions. Battery operating time varies depending on disposing of batteries with the main battery installed ...the battery bay. When your battery no longer holds a charge, call your Dell™ portable computer with household waste. Do not puncture, incinerate, disassemble, or expose the battery to work with your Dell computer. Do not use a battery from Dell. Damaged batteries may...

Owner's Manual
Page 86
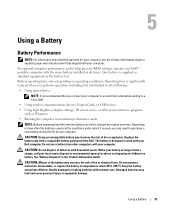
...Guide. NOTICE: To avoid damaging the system board, you must remove the main battery before you begin working inside the computer. 86 Adding and Replacing Parts NOTE: Memory modules purchased from Dell are intended for information on the memory supported by installing memory modules on the ...system board. Memory You can increase your computer memory by your computer. 1 2 3 1 CD/DVD drive 2 drive removal slot 3 securing screw 6 To replace the device, push the new device ...
...Guide. NOTICE: To avoid damaging the system board, you must remove the main battery before you begin working inside the computer. 86 Adding and Replacing Parts NOTE: Memory modules purchased from Dell are intended for information on the memory supported by installing memory modules on the ...system board. Memory You can increase your computer memory by your computer. 1 2 3 1 CD/DVD drive 2 drive removal slot 3 securing screw 6 To replace the device, push the new device ...


