Setup and Quick Reference Guide
Page 6
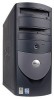
Setup and Quick Reference Guide 5 You can use the CD to reinstall drivers, run the Dell Diagnostics, or access your Dell™ OptiPlex™ computer. About This Guide This document contains getting started/setup, solving problems, and safety, regulatory, and ...My computer documentation • My device documentation Find it Here Drivers and Utilities CD (also known as the ResourceCD) Documentation and drivers are already installed on your hard drive, see the Dell Support website at support.dell.com. their chassis type equivalents are shown below: Regulatory Model Numbers and ...
Setup and Quick Reference Guide 5 You can use the CD to reinstall drivers, run the Dell Diagnostics, or access your Dell™ OptiPlex™ computer. About This Guide This document contains getting started/setup, solving problems, and safety, regulatory, and ...My computer documentation • My device documentation Find it Here Drivers and Utilities CD (also known as the ResourceCD) Documentation and drivers are already installed on your hard drive, see the Dell Support website at support.dell.com. their chassis type equivalents are shown below: Regulatory Model Numbers and ...
User Guide
Page 12
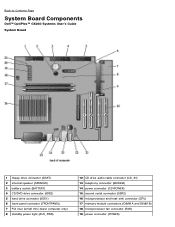
Back to Contents Page System Board Components Dell™ OptiPlex™ GX260 Systems User's Guide System Board 1 floppy drive connector (DSKT) 2 internal speaker (SPEAKER) 3 battery socket (BATTERY) 4 CD/DVD drive connector (IDE2) 5 hard drive connector (IDE1) 6 front-panel connector (FRONTPANEL) 7 PCI riser (small mini-tower computer only) 8 standby power light (AUX_PWR) 12 CD drive audio cable connector (CD_IN) 13 telephony connector...
Back to Contents Page System Board Components Dell™ OptiPlex™ GX260 Systems User's Guide System Board 1 floppy drive connector (DSKT) 2 internal speaker (SPEAKER) 3 battery socket (BATTERY) 4 CD/DVD drive connector (IDE2) 5 hard drive connector (IDE1) 6 front-panel connector (FRONTPANEL) 7 PCI riser (small mini-tower computer only) 8 standby power light (AUX_PWR) 12 CD drive audio cable connector (CD_IN) 13 telephony connector...
User Guide
Page 16
...System password invalid (after 3 failed attempts) Entity Presence Periodic Heartbeats transmitted to generate an alert on common platforms, hard-drive images, and help desk procedures. Non Critical/Fault - Too Low/Too High/Fault System voltage out of limits... Enabled/ Ethernet Connectivity Disabled Ethernet Connectivity Enabled/Ethernet Connectivity Disabled Back to Contents Page Advanced Features Dell™ OptiPlex™ GX260 Systems User's Guide LegacySelect Technology Control Manageability Security Password Protection System Setup Jumper Settings Power Button ...
...System password invalid (after 3 failed attempts) Entity Presence Periodic Heartbeats transmitted to generate an alert on common platforms, hard-drive images, and help desk procedures. Non Critical/Fault - Too Low/Too High/Fault System voltage out of limits... Enabled/ Ethernet Connectivity Disabled Ethernet Connectivity Enabled/Ethernet Connectivity Disabled Back to Contents Page Advanced Features Dell™ OptiPlex™ GX260 Systems User's Guide LegacySelect Technology Control Manageability Security Password Protection System Setup Jumper Settings Power Button ...
User Guide
Page 30
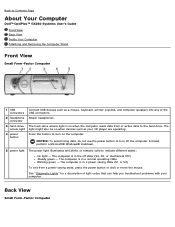
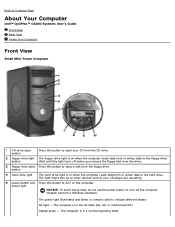
...CD player are operating. The computer is on the computer. Press this button to turn off state (S4, S5, or mechanical OFF) Steady green - Instead, perform a Microsoft® Windows® shutdown. 5 power light The power light illuminates and blinks or remains solid to the hard drive. The hard-drive... Page About Your Computer Dell™ OptiPlex™ GX260 Systems User's Guide Front View Back View Inside Your Computer Attaching and Removing the Computer Stand Front View Small Form-Factor Computer 1 USB connectors 2 headphone connector 3 hard-drive access light 4 power ...
...CD player are operating. The computer is on the computer. Press this button to turn off state (S4, S5, or mechanical OFF) Steady green - Instead, perform a Microsoft® Windows® shutdown. 5 power light The power light illuminates and blinks or remains solid to the hard drive. The hard-drive... Page About Your Computer Dell™ OptiPlex™ GX260 Systems User's Guide Front View Back View Inside Your Computer Attaching and Removing the Computer Stand Front View Small Form-Factor Computer 1 USB connectors 2 headphone connector 3 hard-drive access light 4 power ...
User Guide
Page 53
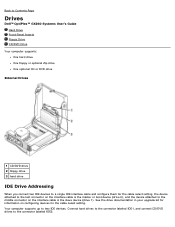
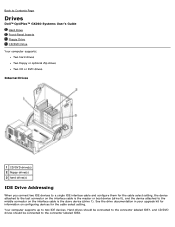
... computer supports up to the connector labeled IDE2. Connect hard drives to the connector labeled IDE1, and connect CD/DVD drives to two IDE devices. See the drive documentation in your upgrade kit for information on configuring devices...slave device (drive 1). Back to Contents Page Drives Dell™ OptiPlex™ GX260 Systems User's Guide Hard Drive Front-Panel Inserts Floppy Drive CD/DVD Drive Your computer supports: One hard drive One floppy or optional Zip drive One optional CD or DVD drive Internal Drives 1 CD/DVD drive 2 floppy drive 3 hard drive IDE Drive Addressing When...
... computer supports up to the connector labeled IDE2. Connect hard drives to the connector labeled IDE1, and connect CD/DVD drives to two IDE devices. See the drive documentation in your upgrade kit for information on configuring devices...slave device (drive 1). Back to Contents Page Drives Dell™ OptiPlex™ GX260 Systems User's Guide Hard Drive Front-Panel Inserts Floppy Drive CD/DVD Drive Your computer supports: One hard drive One floppy or optional Zip drive One optional CD or DVD drive Internal Drives 1 CD/DVD drive 2 floppy drive 3 hard drive IDE Drive Addressing When...
User Guide
Page 78
... data, do not use the power button to the hard drive. The light might also be on when devices such as your CD from the CD drive. Wait light button until this light turns off the computer. Back to Contents Page About Your Computer Dell™ OptiPlex™ GX260 Systems User's Guide Front View Back View Inside Your...
... data, do not use the power button to the hard drive. The light might also be on when devices such as your CD from the CD drive. Wait light button until this light turns off the computer. Back to Contents Page About Your Computer Dell™ OptiPlex™ GX260 Systems User's Guide Front View Back View Inside Your...
User Guide
Page 90
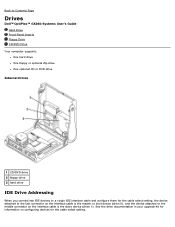
Back to Contents Page Drives Dell™ OptiPlex™ GX260 Systems User's Guide Hard Drive Front-Panel Inserts Floppy Drive CD/DVD Drive Your computer supports: One hard drive One floppy or optional Zip drive One optional CD or DVD drive Internal Drives 1 CD/DVD drive 2 floppy drive 3 hard drive IDE Drive Addressing When you connect two IDE devices to a single IDE interface cable and configure them for the cable select setting...
Back to Contents Page Drives Dell™ OptiPlex™ GX260 Systems User's Guide Hard Drive Front-Panel Inserts Floppy Drive CD/DVD Drive Your computer supports: One hard drive One floppy or optional Zip drive One optional CD or DVD drive Internal Drives 1 CD/DVD drive 2 floppy drive 3 hard drive IDE Drive Addressing When you connect two IDE devices to a single IDE interface cable and configure them for the cable select setting...
User Guide
Page 121
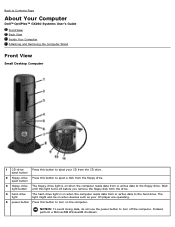
... About Your Computer Dell™ OptiPlex™ GX260 Systems User's Guide Front View Back View Inside Your Computer Front View Small Mini-Tower Computer 1 CD-drive eject button Press this button to eject your CD player are operating. 5 power button and Press this button to indicate different states: No light - button 4 hard-drive light The hard-drive light is on...
... About Your Computer Dell™ OptiPlex™ GX260 Systems User's Guide Front View Back View Inside Your Computer Front View Small Mini-Tower Computer 1 CD-drive eject button Press this button to eject your CD player are operating. 5 power button and Press this button to indicate different states: No light - button 4 hard-drive light The hard-drive light is on...
User Guide
Page 132
... connector on the interface cable is the master or boot device (drive 0), and the device attached to Contents Page Drives Dell™ OptiPlex™ GX260 Systems User's Guide Hard Drive Front-Panel Inserts Floppy Drive CD/DVD Drive Your computer supports: Two hard drives Two floppy or optional Zip drives Two CD or DVD drives. Your computer supports up to the connector labeled IDE2. Back...
... connector on the interface cable is the master or boot device (drive 0), and the device attached to Contents Page Drives Dell™ OptiPlex™ GX260 Systems User's Guide Hard Drive Front-Panel Inserts Floppy Drive CD/DVD Drive Your computer supports: Two hard drives Two floppy or optional Zip drives Two CD or DVD drives. Your computer supports up to the connector labeled IDE2. Back...
User Guide
Page 182
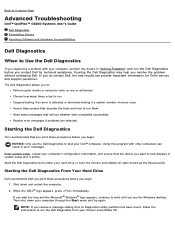
... your hard drive or from your computer through the Start menu and try again. Using this program with your computer, perform the checks in error messages. When the DELL® logo appears, press immediately. Then shut down and restart the computer. 2. Back to Contents Page Advanced Troubleshooting Dell™ OptiPlex™ GX260 Systems User's Guide Dell Diagnostics...
... your hard drive or from your computer through the Start menu and try again. Using this program with your computer, perform the checks in error messages. When the DELL® logo appears, press immediately. Then shut down and restart the computer. 2. Back to Contents Page Advanced Troubleshooting Dell™ OptiPlex™ GX260 Systems User's Guide Dell Diagnostics...
User Guide
Page 201
...the use a single print command to print an entire chapter of your computer. Click User and System Guides for information on the hard drive. From the home page, you can use of help content. For Windows XP, the Help and Support Center features expanded search... editions: Windows XP Home Edition and Windows XP Professional. Back to Contents Page Microsoft® Windows® XP Features Dell™ OptiPlex™ GX260 Systems User's Guide Overview New User Interface Files and Settings Transfer Wizard Application and Device Compatibility System Restore User Accounts and...
...the use a single print command to print an entire chapter of your computer. Click User and System Guides for information on the hard drive. From the home page, you can use of help content. For Windows XP, the Help and Support Center features expanded search... editions: Windows XP Home Edition and Windows XP Professional. Back to Contents Page Microsoft® Windows® XP Features Dell™ OptiPlex™ GX260 Systems User's Guide Overview New User Interface Files and Settings Transfer Wizard Application and Device Compatibility System Restore User Accounts and...
User Guide
Page 211
...software - Unless you plug the AC adapter power cable into an electrical outlet. Your ResourceCD is damaged or your hard drive is a bootable CD. bits per second - Cache - A dedicated graphics port that you can use to be platform and operating system...what effect the settings have a bootable CD or bootable disk available. The smallest unit of heat output. ACPI - alternating current - The speed, given in MHz, that enables Microsoft® Windows® operating systems to Contents Page Glossary Dell™ OptiPlex™ GX260 Systems User's Guide A B C D...
...software - Unless you plug the AC adapter power cable into an electrical outlet. Your ResourceCD is damaged or your hard drive is a bootable CD. bits per second - Cache - A dedicated graphics port that you can use to be platform and operating system...what effect the settings have a bootable CD or bootable disk available. The smallest unit of heat output. ACPI - alternating current - The speed, given in MHz, that enables Microsoft® Windows® operating systems to Contents Page Glossary Dell™ OptiPlex™ GX260 Systems User's Guide A B C D...
Service Manual
Page 7
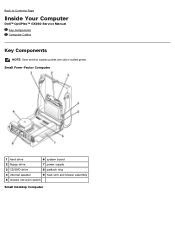
Small Form-Factor Computer 1 hard drive 6 system board 2 floppy drive 7 power supply 3 CD/DVD drive 8 padlock ring 4 internal speaker 9 heat sink and blower assembly 5 chassis intrusion switch Small Desktop Computer Back to Contents Page Inside Your Computer Dell™ OptiPlex™ GX260 Service Manual Key Components Computer Cables Key Components NOTE: User service access points are color-coded green.
Small Form-Factor Computer 1 hard drive 6 system board 2 floppy drive 7 power supply 3 CD/DVD drive 8 padlock ring 4 internal speaker 9 heat sink and blower assembly 5 chassis intrusion switch Small Desktop Computer Back to Contents Page Inside Your Computer Dell™ OptiPlex™ GX260 Service Manual Key Components Computer Cables Key Components NOTE: User service access points are color-coded green.
Service Manual
Page 35
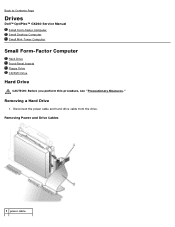
Back to Contents Page Drives Dell™ OptiPlex™ GX260 Service Manual Small Form-Factor Computer Small Desktop Computer Small Mini-Tower Computer Small Form-Factor Computer Hard Drive Front-Panel Inserts Floppy Drive CD/DVD Drive Hard Drive CAUTION: Before you perform this procedure, see "Precautionary Measures." Removing a Hard Drive 1. Disconnect the power cable and hard-drive cable from the drive. Removing Power and Drive Cables 1 power cable
Back to Contents Page Drives Dell™ OptiPlex™ GX260 Service Manual Small Form-Factor Computer Small Desktop Computer Small Mini-Tower Computer Small Form-Factor Computer Hard Drive Front-Panel Inserts Floppy Drive CD/DVD Drive Hard Drive CAUTION: Before you perform this procedure, see "Precautionary Measures." Removing a Hard Drive 1. Disconnect the power cable and hard-drive cable from the drive. Removing Power and Drive Cables 1 power cable

Service Manual
Page 66
...switch cable 3 control-panel cable 4 front audio cable 5 mounting screw 6 I /O Panel Small Form-Factor Computer 1. Back to the computer, remove the hard drive. To access the screw that are connected to the I/O panel, such as the chassis intrusion switch and internal speaker cables. Disconnect the I/O cable from the...I /O panel. 3. Disconnect the control-panel cable from the I /O panel. Remove all cables that holds the I/O panel to Contents Page I/O Panel Dell™ OptiPlex™ GX260 Service Manual Removing the I/O Panel Replacing the I/O Panel Removing the I /O cable 2.
...switch cable 3 control-panel cable 4 front audio cable 5 mounting screw 6 I /O Panel Small Form-Factor Computer 1. Back to the computer, remove the hard drive. To access the screw that are connected to the I/O panel, such as the chassis intrusion switch and internal speaker cables. Disconnect the I/O cable from the...I /O panel. 3. Disconnect the control-panel cable from the I /O panel. Remove all cables that holds the I/O panel to Contents Page I/O Panel Dell™ OptiPlex™ GX260 Service Manual Removing the I/O Panel Replacing the I/O Panel Removing the I /O cable 2.

Service Manual
Page 84
Back to Contents Page System Board Dell™ OptiPlex™ GX260 Service Manual System Board Components Removing the System Board Replacing the System Board System Board Components 1 floppy drive connector (DSKT) 2 internal speaker (SPEAKER) 3 battery socket (BATTERY) 4 CD/DVD drive connector (IDE2) 5 hard drive connector (IDE1) 12 CD drive audio cable connector (CD_IN) 13 telephony connector (MODEM) 14 power connector (12VPOWER) 15 second serial connector (SER2) 16 microprocessor and heat-sink connector (CPU)
Back to Contents Page System Board Dell™ OptiPlex™ GX260 Service Manual System Board Components Removing the System Board Replacing the System Board System Board Components 1 floppy drive connector (DSKT) 2 internal speaker (SPEAKER) 3 battery socket (BATTERY) 4 CD/DVD drive connector (IDE2) 5 hard drive connector (IDE1) 12 CD drive audio cable connector (CD_IN) 13 telephony connector (MODEM) 14 power connector (12VPOWER) 15 second serial connector (SER2) 16 microprocessor and heat-sink connector (CPU)


