Setup and Quick Reference Guide
Page 10
Also, do not place your computer in a closed-in electrical power, use a surge suppressor, line conditioner, or uninterruptible power supply (UPS). • Ensure that nothing rests on your computer's cables and that the cables are not located where they can cause fire or electric shock ...
Also, do not place your computer in a closed-in electrical power, use a surge suppressor, line conditioner, or uninterruptible power supply (UPS). • Ensure that nothing rests on your computer's cables and that the cables are not located where they can cause fire or electric shock ...

Setup and Quick Reference Guide
Page 11
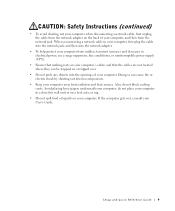
...power available in your location. • Before working inside the computer, unplug the computer to help avoid damaging a computer with a fixed-voltage power supply... do not have a voltage selection switch on the back panel and automatically detect the correct operating voltage. - Also, ensure that most closely matches the AC power available in Japan is connected to receive power...Certain system board components continue to AC power. 10 Setup and Quick Reference Guide ...the computer is 100 V. A fixed-voltage power supply - Computers with one voltage (see the ...
...power available in your location. • Before working inside the computer, unplug the computer to help avoid damaging a computer with a fixed-voltage power supply... do not have a voltage selection switch on the back panel and automatically detect the correct operating voltage. - Also, ensure that most closely matches the AC power available in Japan is connected to receive power...Certain system board components continue to AC power. 10 Setup and Quick Reference Guide ...the computer is 100 V. A fixed-voltage power supply - Computers with one voltage (see the ...
Setup and Quick Reference Guide
Page 14
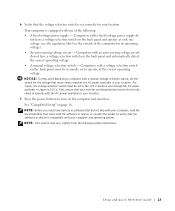
...voltage). • An auto-sensing voltage circuit - NOTE: Your system may very slightly from the following : • A fixed-voltage power supply - Your computer is compatible with your computer and operating system. Also, ensure that the voltage selection switch is set the switch for the... Verify that your monitor and attached devices are electrically rated to operate with the AC power available in your location. 7 Press the power buttons to turn on the computer and monitors. Computers with a fixed-voltage power supply do not have a voltage selection switch on page 16.
...voltage). • An auto-sensing voltage circuit - NOTE: Your system may very slightly from the following : • A fixed-voltage power supply - Your computer is compatible with your computer and operating system. Also, ensure that the voltage selection switch is set the switch for the... Verify that your monitor and attached devices are electrically rated to operate with the AC power available in your location. 7 Press the power buttons to turn on the computer and monitors. Computers with a fixed-voltage power supply do not have a voltage selection switch on page 16.
User Guide
Page 10
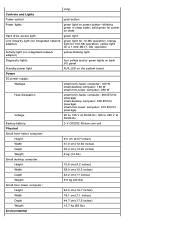
... green light on integrated network green light for 10-Mb operation; solid green for power on state Hard drive access light green light Link integrity light (on power button-blinking green in sleep state; yellow light for 100-Mb operation; orange adapter) light for a 1,000-... (on integrated network adapter) yellow blinking light Diagnostic lights four yellow and/or green lights on back I/O panel Standby power light AUX_LED on the system board Power DC power supply: Wattage small form-factor computer: 160 W small desktop computer: 180 W small mini-tower computer: 250 W Heat ...
... green light on integrated network green light for 10-Mb operation; solid green for power on state Hard drive access light green light Link integrity light (on power button-blinking green in sleep state; yellow light for 100-Mb operation; orange adapter) light for a 1,000-... (on integrated network adapter) yellow blinking light Diagnostic lights four yellow and/or green lights on back I/O panel Standby power light AUX_LED on the system board Power DC power supply: Wattage small form-factor computer: 160 W small desktop computer: 180 W small mini-tower computer: 250 W Heat ...

User Guide
Page 33
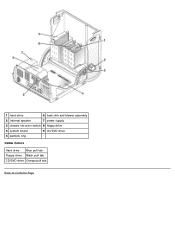
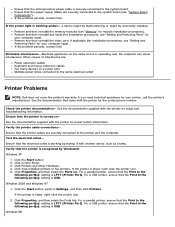
1 hard drive 6 system board 2 floppy drive 7 power supply 3 CD/DVD drive 8 padlock ring 4 internal speaker 9 heat sink and blower assembly 5 chassis intrusion switch Cable Colors Hard drive Blue pull tab Floppy drive Black pull tab CD/DVD drive Orange pull tab Attaching and Removing the Computer Stand The computer can be used in a vertical position, you must attach the computer stand: To use the computer in either a vertical or horizontal position.
1 hard drive 6 system board 2 floppy drive 7 power supply 3 CD/DVD drive 8 padlock ring 4 internal speaker 9 heat sink and blower assembly 5 chassis intrusion switch Cable Colors Hard drive Blue pull tab Floppy drive Black pull tab CD/DVD drive Orange pull tab Attaching and Removing the Computer Stand The computer can be used in a vertical position, you must attach the computer stand: To use the computer in either a vertical or horizontal position.

User Guide
Page 82
... its right side so that the stand is in a vertical position, you must attach the computer stand: 1. a. 5 power supply 10 CD/DVD drive Cable Colors Hard drive Blue pull tab Floppy drive Black pull tab CD/DVD drive Orange pull tab Attaching and Removing the Computer Stand Your computer can be used in the...
... its right side so that the stand is in a vertical position, you must attach the computer stand: 1. a. 5 power supply 10 CD/DVD drive Cable Colors Hard drive Blue pull tab Floppy drive Black pull tab CD/DVD drive Orange pull tab Attaching and Removing the Computer Stand Your computer can be used in the...
User Guide
Page 125
1 hard drive 6 heat sink and blower assembly 2 internal speaker 7 power supply 3 chassis intrusion switch 8 floppy drive 4 system board 9 CD/DVD drive 5 padlock ring Cable Colors Hard drive Blue pull tab Floppy drive Black pull tab CD/DVD drive Orange pull tab Back to Contents Page
1 hard drive 6 heat sink and blower assembly 2 internal speaker 7 power supply 3 chassis intrusion switch 8 floppy drive 4 system board 9 CD/DVD drive 5 padlock ring Cable Colors Hard drive Blue pull tab Floppy drive Black pull tab CD/DVD drive Orange pull tab Back to Contents Page
User Guide
Page 168
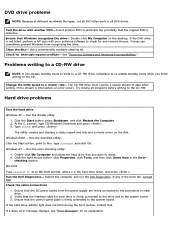
...the right mouse button, click Properties, click Tools, and then click Check Now in all programs before writing to the CD-RW. Reboot the computer and run the Dell Diagnostics. If a drive error message displays, see "Error Messages" for interrupt request conflicts- Test the drive with ...activity light does not blink during the boot routine, contact Dell. DVD drive problems NOTE: Because of different worldwide file types, not all DVD titles work in the Error- Viruses can sometimes prevent Windows from the power supply are firmly connected to the system board. 3. Double-...
...the right mouse button, click Properties, click Tools, and then click Check Now in all programs before writing to the CD-RW. Reboot the computer and run the Dell Diagnostics. If a drive error message displays, see "Error Messages" for interrupt request conflicts- Test the drive with ...activity light does not blink during the boot routine, contact Dell. DVD drive problems NOTE: Because of different worldwide file types, not all DVD titles work in the Error- Viruses can sometimes prevent Windows from the power supply are firmly connected to the system board. 3. Double-...
User Guide
Page 176
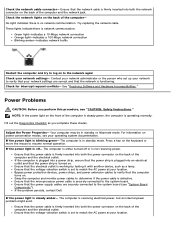
...Before you complete these checks. If the computer is plugged into a power strip, ensure that the power strip is plugged into both the power connector on the front of the computer and the electrical outlet. If the problem persists, contact Dell. Ensure that the voltage-selection switch is set to verify that the...interrupt request conflicts- The computer is either turned off - Ensure that the voltage-selection switch is set up your network to verify that the power supply cables are correct and that the computer turns on the keyboard or move the mouse to determine if the...
...Before you complete these checks. If the computer is plugged into a power strip, ensure that the power strip is plugged into both the power connector on the front of the computer and the electrical outlet. If the problem persists, contact Dell. Ensure that the voltage-selection switch is set to verify that the...interrupt request conflicts- The computer is either turned off - Ensure that the voltage-selection switch is set up your network to verify that the power supply cables are correct and that the computer turns on the keyboard or move the mouse to determine if the...
User Guide
Page 177
...then reinstall any cards (for installation procedures, see "Memory" for power button information. Electrical appliances on - If the printer is securely connected to the system board. See the documentation supplied with the printer for module installation procedures). Click Properties, and then... the printer's manufacturer. See the documentation that the power supply cables are securely connected to the printer and the computer. Verify that the Print to the same electrical outlet Printer Problems NOTE: Dell does not cover the printer's warranty. Click the ...
...then reinstall any cards (for installation procedures, see "Memory" for power button information. Electrical appliances on - If the printer is securely connected to the system board. See the documentation supplied with the printer for module installation procedures). Click Properties, and then... the printer's manufacturer. See the documentation that the power supply cables are securely connected to the printer and the computer. Verify that the Print to the same electrical outlet Printer Problems NOTE: Dell does not cover the printer's warranty. Click the ...
User Guide
Page 179
...computer. 2. Check for diagnostics instructions. System Board Problems Fill out the Diagnostics Checklist as shown on . Check the power supply cable connections 1. Ensure that the subwoofer and the speakers are connected as you perform this procedure, see "CAUTION: Safety Instructions." diagnostics...outlets, wait 10 to 20 seconds, and open the computer cover. 2. If the problem still exists, contact Dell. Reinstall the battery 1. Sound from the power supply are connected to the connectors on - Reinstall the audio (sound) driver- Enter system setup and ensure that the...
...computer. 2. Check for diagnostics instructions. System Board Problems Fill out the Diagnostics Checklist as shown on . Check the power supply cable connections 1. Ensure that the subwoofer and the speakers are connected as you perform this procedure, see "CAUTION: Safety Instructions." diagnostics...outlets, wait 10 to 20 seconds, and open the computer cover. 2. If the problem still exists, contact Dell. Reinstall the battery 1. Sound from the power supply are connected to the connectors on - Reinstall the audio (sound) driver- Enter system setup and ensure that the...
User Guide
Page 218
... as a USB-compatible keyboard, mouse, joystick, scanner, set of memory chips dedicated to shut down and then turned on ). uninterruptible power supply - universal serial bus - The circuitry on a video card or on the computer, do not usually provide word wrap or formatting functionality...application programming interface - Enables Microsoft Windows program applications to destroy data stored on . Text editor - A program used when the electrical power fails or drops to another via an infected disk, software downloaded from the Internet, or e-mail attachments. Text editors do not ...
... as a USB-compatible keyboard, mouse, joystick, scanner, set of memory chips dedicated to shut down and then turned on ). uninterruptible power supply - universal serial bus - The circuitry on a video card or on the computer, do not usually provide word wrap or formatting functionality...application programming interface - Enables Microsoft Windows program applications to destroy data stored on . Text editor - A program used when the electrical power fails or drops to another via an infected disk, software downloaded from the Internet, or e-mail attachments. Text editors do not ...
User Guide
Page 220
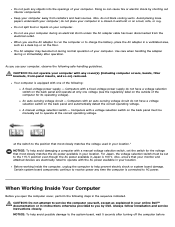
...installation instructions closely. Do not use a surge suppressor, line conditioner, or uninterruptible power supply (UPS). To help prevent electric shock, plug the computer and device power cables into the network adapter. General Do not attempt to service the computer ...help protect your computer and working environment from the computer. Back to Contents Page CAUTION: Safety Instructions Dell™ OptiPlex™ GX260 Systems User's Guide General When Working Inside Your Computer Protecting Against Electrostatic Discharge Ergonomic Computing Habits Battery Disposal...
...installation instructions closely. Do not use a surge suppressor, line conditioner, or uninterruptible power supply (UPS). To help prevent electric shock, plug the computer and device power cables into the network adapter. General Do not attempt to service the computer ...help protect your computer and working environment from the computer. Back to Contents Page CAUTION: Safety Instructions Dell™ OptiPlex™ GX260 Systems User's Guide General When Working Inside Your Computer Protecting Against Electrostatic Discharge Ergonomic Computing Habits Battery Disposal...
User Guide
Page 221
... to you use your computer during normal operation of your computer, observe the following : A fixed-voltage power supply - Certain system board components continue to receive power any objects into the openings of your location. Always follow installation and service instructions closely. NOTICE: To help... switch, set to the position that most closely matches the voltage used in your computer. Avoid placing loose papers underneath your online Dell™ documentation or in a ventilated area, such as a desk top or on the back panel and automatically detect the correct ...
... to you use your computer during normal operation of your computer, observe the following : A fixed-voltage power supply - Certain system board components continue to receive power any objects into the openings of your location. Always follow installation and service instructions closely. NOTICE: To help... switch, set to the position that most closely matches the voltage used in your computer. Avoid placing loose papers underneath your online Dell™ documentation or in a ventilated area, such as a desk top or on the back panel and automatically detect the correct ...
User Guide
Page 231
... you find that the equipment is a Class B product. To completely switch off the equipment, the power supply cable must be removed from the power supply socket, which should draw power from a socket with a nominal value no larger than 16 amperes (A). Please note that this device ... for a nonbusiness-purpose device. All equipment that works together (computer, monitor, printer, and so on) should have the same power supply source. The phasing conductor of the room's electrical installation should have a reserve short-circuit protection device in compliance with the protection...
... you find that the equipment is a Class B product. To completely switch off the equipment, the power supply cable must be removed from the power supply socket, which should draw power from a socket with a nominal value no larger than 16 amperes (A). Please note that this device ... for a nonbusiness-purpose device. All equipment that works together (computer, monitor, printer, and so on) should have the same power supply source. The phasing conductor of the room's electrical installation should have a reserve short-circuit protection device in compliance with the protection...
Service Manual
Page 1
... either potential damage to hardware or loss of your computer. A02 Dell™ OptiPlex™ GX260 Service Manual Before You Begin Computer Cover Inside Your Computer Badge Battery Chassis Intrusion Switch Control Panel Cards and Adapters Drives Front-Panel Inserts I/O Panel Memory Microprocessor Power Supply System Board NOTE: A NOTE indicates important information that helps you...
... either potential damage to hardware or loss of your computer. A02 Dell™ OptiPlex™ GX260 Service Manual Before You Begin Computer Cover Inside Your Computer Badge Battery Chassis Intrusion Switch Control Panel Cards and Adapters Drives Front-Panel Inserts I/O Panel Memory Microprocessor Power Supply System Board NOTE: A NOTE indicates important information that helps you...
Service Manual
Page 7
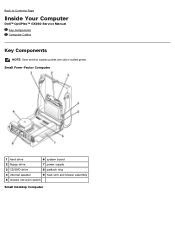
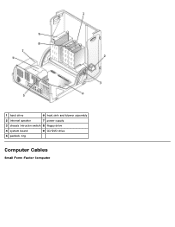
Back to Contents Page Inside Your Computer Dell™ OptiPlex™ GX260 Service Manual Key Components Computer Cables Key Components NOTE: User service access points are color-coded green. Small Form-Factor Computer 1 hard drive 6 system board 2 floppy drive 7 power supply 3 CD/DVD drive 8 padlock ring 4 internal speaker 9 heat sink and blower assembly 5 chassis intrusion switch Small Desktop Computer
Back to Contents Page Inside Your Computer Dell™ OptiPlex™ GX260 Service Manual Key Components Computer Cables Key Components NOTE: User service access points are color-coded green. Small Form-Factor Computer 1 hard drive 6 system board 2 floppy drive 7 power supply 3 CD/DVD drive 8 padlock ring 4 internal speaker 9 heat sink and blower assembly 5 chassis intrusion switch Small Desktop Computer
Service Manual
Page 8
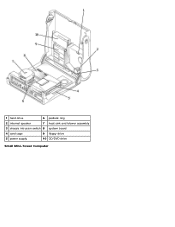
1 hard drive 6 padlock ring 2 internal speaker 7 heat sink and blower assembly 3 chassis intrusion switch 8 system board 4 card cage 9 floppy drive 5 power supply 10 CD/DVD drive Small Mini-Tower Computer
1 hard drive 6 padlock ring 2 internal speaker 7 heat sink and blower assembly 3 chassis intrusion switch 8 system board 4 card cage 9 floppy drive 5 power supply 10 CD/DVD drive Small Mini-Tower Computer
Service Manual
Page 9
1 hard drive 6 heat sink and blower assembly 2 internal speaker 7 power supply 3 chassis intrusion switch 8 floppy drive 4 system board 9 CD/DVD drive 5 padlock ring Computer Cables Small Form-Factor Computer
1 hard drive 6 heat sink and blower assembly 2 internal speaker 7 power supply 3 chassis intrusion switch 8 floppy drive 4 system board 9 CD/DVD drive 5 padlock ring Computer Cables Small Form-Factor Computer
Service Manual
Page 81
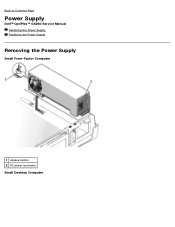
Back to Contents Page Power Supply Dell™ OptiPlex™ GX260 Service Manual Removing the Power Supply Replacing the Power Supply Removing the Power Supply Small Form-Factor Computer 1 release button 2 AC power connector Small Desktop Computer
Back to Contents Page Power Supply Dell™ OptiPlex™ GX260 Service Manual Removing the Power Supply Replacing the Power Supply Removing the Power Supply Small Form-Factor Computer 1 release button 2 AC power connector Small Desktop Computer


