
Owner's Manual
Page 5
...45 If the screen is blank 45 If the screen is difficult to read 45 3 Troubleshooting Tools 47 Diagnostic Lights 47 Dell Diagnostics 50 Dell Diagnostics Main Menu 50 Drivers 51 What Is a Driver 51 Identifying Drivers 52 Reinstalling Drivers 52 Resolving Software and Hardware ...Incompatibilities 53 Restoring Your Operating System 53 Using Microsoft Windows XP System Restore 54 Using Dell PC Restore by Symantec 55 Using the Operating System CD 57 4 Removing and Installing Parts 59 Before You Begin 59 Recommended...
...45 If the screen is blank 45 If the screen is difficult to read 45 3 Troubleshooting Tools 47 Diagnostic Lights 47 Dell Diagnostics 50 Dell Diagnostics Main Menu 50 Drivers 51 What Is a Driver 51 Identifying Drivers 52 Reinstalling Drivers 52 Resolving Software and Hardware ...Incompatibilities 53 Restoring Your Operating System 53 Using Microsoft Windows XP System Restore 54 Using Dell PC Restore by Symantec 55 Using the Operating System CD 57 4 Removing and Installing Parts 59 Before You Begin 59 Recommended...
Owner's Manual
Page 6
... Installing Memory 70 Removing Memory 72 Cards 73 PCI Cards 73 PCI Express Cards 77 Drive Panel 82 Removing the Drive Panel 83 Removing the Drive-Panel Insert 84 Replacing the Drive-Panel Insert 84 Replacing the Drive Panel 85 Drives 86 Connecting Drive Cables 87 Drive Interface Connectors 87 Connecting and Disconnecting Drive Cables...
... Installing Memory 70 Removing Memory 72 Cards 73 PCI Cards 73 PCI Express Cards 77 Drive Panel 82 Removing the Drive Panel 83 Removing the Drive-Panel Insert 84 Replacing the Drive-Panel Insert 84 Replacing the Drive Panel 85 Drives 86 Connecting Drive Cables 87 Drive Interface Connectors 87 Connecting and Disconnecting Drive Cables...

Owner's Manual
Page 17
... current resolution and color depth are using too much memory and preventing DVD playback, adjust the display properties: 1 Click the Start button and click Control Panel. 2 Under Pick a category, click Appearance and Themes. 3 Under Pick a task..., click Change the screen resolution. 4 In the Display Properties window, click and drag the bar...
... current resolution and color depth are using too much memory and preventing DVD playback, adjust the display properties: 1 Click the Start button and click Control Panel. 2 Under Pick a category, click Appearance and Themes. 3 Under Pick a task..., click Change the screen resolution. 4 In the Display Properties window, click and drag the bar...

Owner's Manual
Page 22
... enable your computer has integrated video, do not remove the cap to the DVI (white) connector on page 59. If you are connecting two flat-panel monitors, at least one monitor (VGA or DVI) in the Product Information Guide. If you purchased a graphics card that have VGA connectors, you must have...
... enable your computer has integrated video, do not remove the cap to the DVI (white) connector on page 59. If you are connecting two flat-panel monitors, at least one monitor (VGA or DVI) in the Product Information Guide. If you purchased a graphics card that have VGA connectors, you must have...
Owner's Manual
Page 25
...on the hard drive and then completely turning off the display and the hard drive after a defined period of the computer memory, Dell creates an appropriately sized hibernate mode file before shipping the computer to automatically activate after a time-out. To exit from hibernate mode... mode conserves power by . To activate hibernate mode: 1 Click the Start button and click Control Panel. 2 Under Pick a category, click Performance and Maintenance. 3 Under or pick a Control Panel icon, click Power Options. 4 Define your computer loses power while in hibernate mode. When the computer...
...on the hard drive and then completely turning off the display and the hard drive after a defined period of the computer memory, Dell creates an appropriately sized hibernate mode file before shipping the computer to automatically activate after a time-out. To exit from hibernate mode... mode conserves power by . To activate hibernate mode: 1 Click the Start button and click Control Panel. 2 Under Pick a category, click Performance and Maintenance. 3 Under or pick a Control Panel icon, click Power Options. 4 Define your computer loses power while in hibernate mode. When the computer...
Owner's Manual
Page 26
... schemes: • Always On (default) - To access the Power Options Properties window: 1 Click the Start button and click Control Panel. 2 Under Pick a category, click Performance and Maintenance. 3 Under or pick a Control Panel icon, click Power Options. 4 Define your power settings on the keyboard or click the mouse. To recover, press any key...
... schemes: • Always On (default) - To access the Power Options Properties window: 1 Click the Start button and click Control Panel. 2 Under Pick a category, click Performance and Maintenance. 3 Under or pick a Control Panel icon, click Power Options. 4 Define your power settings on the keyboard or click the mouse. To recover, press any key...

Owner's Manual
Page 34
... a line that the modem is operating properly. A F I L E N A M E C A N N O T C O N T A I N A N Y O F T H E F O L L O W I C S - If all computers.) VERIFY THAT THE MODEM IS COMMUNICATING WITH WINDOWS - 1 Click the Start button and click Control Panel. 2 Click Printers and Other Hardware. 3 Click Phone and Modem Options. 4 Click the Modems tab. 5 Click the COM port for your Internet service provider. Listen for...
... a line that the modem is operating properly. A F I L E N A M E C A N N O T C O N T A I N A N Y O F T H E F O L L O W I C S - If all computers.) VERIFY THAT THE MODEM IS COMMUNICATING WITH WINDOWS - 1 Click the Start button and click Control Panel. 2 Click Printers and Other Hardware. 3 Click Phone and Modem Options. 4 Click the Modems tab. 5 Click the COM port for your Internet service provider. Listen for...
Owner's Manual
Page 35
...the floppy disk from the drive and restart your computer to the I N G S YS T E M N O T F O U N D - O P E R A T I /O panel and to use first. Contact Dell (see "Contacting Dell" on the setup diagram for your computer. Straighten bent pins. • Remove keyboard extension cables and connect the keyboard directly to the... then reinstall the program: 1 Click the Start button, click Control Panel, and then click Add or Remove Programs. 2 Select the program you might have an ultra small formfactor computer, contact Dell (see "Turning Off Your Computer" on page 59), reconnect the ...
...the floppy disk from the drive and restart your computer to the I N G S YS T E M N O T F O U N D - O P E R A T I /O panel and to use first. Contact Dell (see "Contacting Dell" on the setup diagram for your computer. Straighten bent pins. • Remove keyboard extension cables and connect the keyboard directly to the... then reinstall the program: 1 Click the Start button, click Control Panel, and then click Add or Remove Programs. 2 Select the program you might have an ultra small formfactor computer, contact Dell (see "Turning Off Your Computer" on page 59), reconnect the ...
Owner's Manual
Page 40
CHECK THE MOUSE SETTINGS - 1 Click the Start button, click Control Panel, and then click Printers and Other Hardware. 2 Click Mouse. 3 Try adjusting the settings. R U N T H E H A R D W A R E TR O U B L E S H O O T E R - Network Problems CAUTION: Before you begin any of network lights, see "...
CHECK THE MOUSE SETTINGS - 1 Click the Start button, click Control Panel, and then click Printers and Other Hardware. 2 Click Mouse. 3 Try adjusting the settings. R U N T H E H A R D W A R E TR O U B L E S H O O T E R - Network Problems CAUTION: Before you begin any of network lights, see "...
Owner's Manual
Page 41
... instructions in standby mode. Press a key on page 68). I F T H E P O W E R L I G H T I N G G R E E N - R U N T H E H A R D W A R E TR O U B L E S H O O T E R - I F T H E P O W E R L I G H T I N G - A device might exist. • Ensure that the main power cable and front panel cable are securely connected to match the AC power at your location (if applicable). I F T H E P O W E R L I G H T I S G R E E N A N D T H E C O M P U T E R I S N O T R E S P O N D I S O F F - I F T H E P O W E R L I G H T I S B L I N K I N G A M B E R - Solving Problems 41 The computer is securely...
... instructions in standby mode. Press a key on page 68). I F T H E P O W E R L I G H T I N G G R E E N - R U N T H E H A R D W A R E TR O U B L E S H O O T E R - I F T H E P O W E R L I G H T I N G - A device might exist. • Ensure that the main power cable and front panel cable are securely connected to match the AC power at your location (if applicable). I F T H E P O W E R L I G H T I S G R E E N A N D T H E C O M P U T E R I S N O T R E S P O N D I S O F F - I F T H E P O W E R L I G H T I S B L I N K I N G A M B E R - Solving Problems 41 The computer is securely...
Owner's Manual
Page 42
C H E C K T H E P R I N T E R D O C U M E N T A T I C A L O U T L E T - VERIFY THAT THE PRINTER IS RECOGNIZED BY WINDOWS - 1 Click the Start button, click Control Panel, and then click Printers and Other Hardware. 2 Click View installed printers or fax printers. See the printer documentation for setup and troubleshooting information. See the ...
C H E C K T H E P R I N T E R D O C U M E N T A T I C A L O U T L E T - VERIFY THAT THE PRINTER IS RECOGNIZED BY WINDOWS - 1 Click the Start button, click Control Panel, and then click Printers and Other Hardware. 2 Click View installed printers or fax printers. See the printer documentation for setup and troubleshooting information. See the ...

Owner's Manual
Page 43
..., ensure that your scanner is listed, Windows recognizes the scanner. VERIFY THAT THE SCANNER IS RECOGNIZED BY MICROSOFT WINDOWS - 1 Click the Start button, click Control Panel, and then click Printers and Other Hardware. 2 Click Scanners and Cameras. Sound and Speaker Problems CAUTION: Before you begin any of the procedures in this...
..., ensure that your scanner is listed, Windows recognizes the scanner. VERIFY THAT THE SCANNER IS RECOGNIZED BY MICROSOFT WINDOWS - 1 Click the Start button, click Control Panel, and then click Printers and Other Hardware. 2 Click Scanners and Cameras. Sound and Speaker Problems CAUTION: Before you begin any of the procedures in this...

Owner's Manual
Page 44
... of your screen. Ensure that the volume is turned up and that the sound is automatically disabled when headphones are connected to the computer's front-panel headphone connector. See "Resolving Software and Hardware Incompatibilities" on page 53. Ensure that the volume is turned up and that the sound is working by...
... of your screen. Ensure that the volume is turned up and that the sound is automatically disabled when headphones are connected to the computer's front-panel headphone connector. See "Resolving Software and Hardware Incompatibilities" on page 53. Ensure that the volume is turned up and that the sound is working by...

Owner's Manual
Page 46
ADJUST THE WINDOWS DISPLAY SETTINGS - 1 Click the Start button, click Control Panel, and then click Appearance and Themes. 2 Click Display and click the Settings tab. 3 Try different settings for Screen resolution and Color quality. 46 Solving Problems
ADJUST THE WINDOWS DISPLAY SETTINGS - 1 Click the Start button, click Control Panel, and then click Appearance and Themes. 2 Click Display and click the Settings tab. 3 Try different settings for Screen resolution and Color quality. 46 Solving Problems
Owner's Manual
Page 47
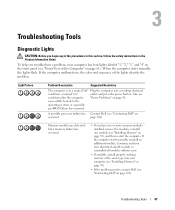
...off" Plug the computer into a working memory of the same type into your computer has four lights labeled "1," "2," "3," and "4" on the front panel (see "Front View of the Computer" on page 61). Memory modules are detected, but a memory failure has occurred. • If you have ...CAUTION: Before you troubleshoot a problem, your computer (see "Installing Memory" on page 70). • If the problem persists, contact Dell (see "Contacting Dell" on page 124). Troubleshooting Tools 47 To help you begin any of the lights identify the problem. If the computer starts normally, ...
...off" Plug the computer into a working memory of the same type into your computer has four lights labeled "1," "2," "3," and "4" on the front panel (see "Front View of the Computer" on page 61). Memory modules are detected, but a memory failure has occurred. • If you have ...CAUTION: Before you troubleshoot a problem, your computer (see "Installing Memory" on page 70). • If the problem persists, contact Dell (see "Contacting Dell" on page 124). Troubleshooting Tools 47 To help you begin any of the lights identify the problem. If the computer starts normally, ...
Owner's Manual
Page 52
... 5 Click Device Manager. 6 Scroll down the list to replace the driver with the previously installed version. 1 Click the Start button and click Control Panel. 2 Under Pick a Category, click Performance and Maintenance. 3 Click System. 4 In the System Properties window, click the Hardware tab. 5 Click Device... Manager. 6 Right-click the device for Dell™ computers. If Device Driver Rollback does not resolve the problem, then use Windows XP Device Driver Rollback to see "Using Microsoft Windows XP...
... 5 Click Device Manager. 6 Scroll down the list to replace the driver with the previously installed version. 1 Click the Start button and click Control Panel. 2 Under Pick a Category, click Performance and Maintenance. 3 Click System. 4 In the System Properties window, click the Hardware tab. 5 Click Device... Manager. 6 Right-click the device for Dell™ computers. If Device Driver Rollback does not resolve the problem, then use Windows XP Device Driver Rollback to see "Using Microsoft Windows XP...
Owner's Manual
Page 55
... computer-including data files-are permanently deleted from the hard drive. To see if System Restore is enabled: 1 Click the Start button and click Control Panel. 2 Click Performance and Maintenance. 3 Click System. 4 Click the System Restore tab. 5 Ensure that appears, click Restore. 4 On the next screen...system restoration is complete. 1 Click the Start button, point to the operating state it was in when you purchased the computer. NOTE: Dell PC Restore by Symantec only as the last method to complete. Data files include documents, spreadsheets, e-mail messages, digital photos, music files,...
... computer-including data files-are permanently deleted from the hard drive. To see if System Restore is enabled: 1 Click the Start button and click Control Panel. 2 Click Performance and Maintenance. 3 Click System. 4 Click the System Restore tab. 5 Ensure that appears, click Restore. 4 On the next screen...system restoration is complete. 1 Click the Start button, point to the operating state it was in when you purchased the computer. NOTE: Dell PC Restore by Symantec only as the last method to complete. Data files include documents, spreadsheets, e-mail messages, digital photos, music files,...

Owner's Manual
Page 63
Back View of the Computer 1 2 3 4 1 voltage selection switch (may not See the safety instructions in the Product Information Guide for any installed PCI and PCI Express cards. See "Back Panel Connectors" on page 64 for more information. 4 card slots Access connectors for more be available on all computers) information. 2 power connector Insert the power cable. 3 back panel connectors Plug USB, audio, and other devices into the appropriate connector. Removing and Installing Parts 63
Back View of the Computer 1 2 3 4 1 voltage selection switch (may not See the safety instructions in the Product Information Guide for any installed PCI and PCI Express cards. See "Back Panel Connectors" on page 64 for more information. 4 card slots Access connectors for more be available on all computers) information. 2 power connector Insert the power cable. 3 back panel connectors Plug USB, audio, and other devices into the appropriate connector. Removing and Installing Parts 63
Owner's Manual
Page 64
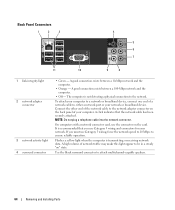
...the network adapter connector on the card. On computers with a network connector card, use the connector on the back panel of network traffic may make this light appear to attach multichannel-capable speakers. 64 Removing and Installing Parts A high .... A click indicates that you must use Category 5 wiring and connectors for your network or broadband device. The computer is transmitting or receiving network data. Back Panel Connectors 1 2 3 4 5 6 7 11 10 9 8 1 link integrity light 2 network adapter connector 3 network activity light 4 surround connector •...
...the network adapter connector on the card. On computers with a network connector card, use the connector on the back panel of network traffic may make this light appear to attach multichannel-capable speakers. 64 Removing and Installing Parts A high .... A click indicates that you must use Category 5 wiring and connectors for your network or broadband device. The computer is transmitting or receiving network data. Back Panel Connectors 1 2 3 4 5 6 7 11 10 9 8 1 link integrity light 2 network adapter connector 3 network activity light 4 surround connector •...

Owner's Manual
Page 65
... sufficient space exists to attach a record/playback device such as printers and keyboards. Removing the Computer Cover CAUTION: Before you are working on the top panel. CAUTION: To guard against electrical shock, always unplug your computer on its side with the computer cover facing up. 3 Pull back the cover latch release...
... sufficient space exists to attach a record/playback device such as printers and keyboards. Removing the Computer Cover CAUTION: Before you are working on the top panel. CAUTION: To guard against electrical shock, always unplug your computer on its side with the computer cover facing up. 3 Pull back the cover latch release...


