Owner's Manual
Page 1
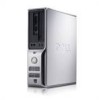
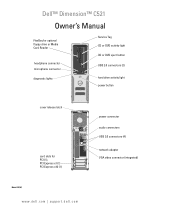
Dell™ Dimension™ C521 Owner's Manual FlexBay for optional floppy drive or Media Card Reader headphone connector microphone connector diagnostic lights Service Tag CD or DVD activity light CD or DVD eject button USB 2.0 connectors (2) hard drive activity light power button cover release latch card slots for PCI (1), PCI Express x1 (1) PCI Express x16 (1) Model DCNE www.dell.com | support.dell.com power connector audio connectors USB 2.0 connectors (4) network adapter VGA video connector (integrated)
Dell™ Dimension™ C521 Owner's Manual FlexBay for optional floppy drive or Media Card Reader headphone connector microphone connector diagnostic lights Service Tag CD or DVD activity light CD or DVD eject button USB 2.0 connectors (2) hard drive activity light power button cover release latch card slots for PCI (1), PCI Express x1 (1) PCI Express x16 (1) Model DCNE www.dell.com | support.dell.com power connector audio connectors USB 2.0 connectors (4) network adapter VGA video connector (integrated)
Owner's Manual
Page 2
..., Inc; EMC is strictly forbidden. Other trademarks and trade names may be used in this text: Dell, the DELL logo, Inspiron, Dell Precision, Dimension, OptiPlex, Latitude, PowerEdge, PowerConnect, PowerVault, PowerApp, XPS, Dell TravelLite, and Dell OpenManage are registered trademarks of Dell Inc. disclaims any proprietary interest in this document is subject to Microsoft® Windows® operating...
..., Inc; EMC is strictly forbidden. Other trademarks and trade names may be used in this text: Dell, the DELL logo, Inspiron, Dell Precision, Dimension, OptiPlex, Latitude, PowerEdge, PowerConnect, PowerVault, PowerApp, XPS, Dell TravelLite, and Dell OpenManage are registered trademarks of Dell Inc. disclaims any proprietary interest in this document is subject to Microsoft® Windows® operating...

Owner's Manual
Page 3
Contents Finding Information 9 1 Setting Up and Using Your Computer 13 Front View of the Computer 13 Back View of the Computer 15 Back Panel I/O Connectors 16 Setting Up a Printer 17 Printer Cable 17 Connecting a USB Printer 18 Connecting to the Internet 18 Setting Up Your Internet Connection 19 Playing CDs and DVDs 20 Adjusting the Volume 21 Adjusting the Picture 22 Copying CDs and DVDs 22 How to Copy a CD or DVD 22 Using Blank CDs and DVDs 23 Helpful Tips 23 Using a Media Card Reader (Optional 24 Setting Up a Home and Office Network 26 Network Setup Wizard 27 Power ...
Contents Finding Information 9 1 Setting Up and Using Your Computer 13 Front View of the Computer 13 Back View of the Computer 15 Back Panel I/O Connectors 16 Setting Up a Printer 17 Printer Cable 17 Connecting a USB Printer 18 Connecting to the Internet 18 Setting Up Your Internet Connection 19 Playing CDs and DVDs 20 Adjusting the Volume 21 Adjusting the Picture 22 Copying CDs and DVDs 22 How to Copy a CD or DVD 22 Using Blank CDs and DVDs 23 Helpful Tips 23 Using a Media Card Reader (Optional 24 Setting Up a Home and Office Network 26 Network Setup Wizard 27 Power ...

Owner's Manual
Page 4
2 Solving Problems 31 Troubleshooting Tips 31 Battery Problems 31 Drive Problems 31 CD and DVD drive problems 32 Hard drive problems 33 E-Mail, Modem, and Internet Problems 33 Error Messages 34 Keyboard Problems 35 Lockups and Software Problems 36 The computer does not start up 36 The computer stops responding 36 A program stops responding 36 A program crashes repeatedly 36 A program is designed for an earlier Windows operating system . . . . . 37 A solid blue screen appears 37 Other software problems 37 Media Card Reader Problems 38 Memory Problems 38 Mouse Problems 39 ...
2 Solving Problems 31 Troubleshooting Tips 31 Battery Problems 31 Drive Problems 31 CD and DVD drive problems 32 Hard drive problems 33 E-Mail, Modem, and Internet Problems 33 Error Messages 34 Keyboard Problems 35 Lockups and Software Problems 36 The computer does not start up 36 The computer stops responding 36 A program stops responding 36 A program crashes repeatedly 36 A program is designed for an earlier Windows operating system . . . . . 37 A solid blue screen appears 37 Other software problems 37 Media Card Reader Problems 38 Memory Problems 38 Mouse Problems 39 ...
Owner's Manual
Page 5
3 Advanced Troubleshooting 47 Power Light and Diagnostic Lights 47 Power Light 47 Diagnostic Lights 48 Dell Diagnostics 50 Dell Diagnostics Main Menu 51 Drivers 52 What Is a Driver 52 Identifying Drivers 52 Reinstalling Drivers 53 Resolving Software and Hardware Incompatibilities... 54 Restoring Your Operating System 54 Using Microsoft® Windows® XP System Restore 54 Using Dell™ PC Restore by Symantec 56 Removing Dell PC Restore 57 4 Removing and Installing Parts 59 Before You Begin 59 Recommended Tools 59 Turning Off Your Computer ...
3 Advanced Troubleshooting 47 Power Light and Diagnostic Lights 47 Power Light 47 Diagnostic Lights 48 Dell Diagnostics 50 Dell Diagnostics Main Menu 51 Drivers 52 What Is a Driver 52 Identifying Drivers 52 Reinstalling Drivers 53 Resolving Software and Hardware Incompatibilities... 54 Restoring Your Operating System 54 Using Microsoft® Windows® XP System Restore 54 Using Dell™ PC Restore by Symantec 56 Removing Dell PC Restore 57 4 Removing and Installing Parts 59 Before You Begin 59 Recommended Tools 59 Turning Off Your Computer ...

Owner's Manual
Page 6
Power Cable Connector 76 Connecting and Disconnecting Drive Cables 76 Hard Drive 77 Removing a Hard Drive 77 Installing a Hard Drive 78 Floppy Drive 81 Removing a Floppy Drive 81 Installing a Floppy Drive 82 Media Card Reader 83 Removing a Media Card Reader 84 Installing a Media Card Reader 85 CD/DVD Drive 86 Removing a CD/DVD Drive 87 Installing a CD/DVD Drive 87 Battery 89 Replacing the Battery 89 Replacing the Computer Cover 90 5 Appendix 93 Specifications 93 System Setup 97 Overview 97 Entering System Setup 97 System Setup Options 98 Boot Menu 102 Clearing ...
Power Cable Connector 76 Connecting and Disconnecting Drive Cables 76 Hard Drive 77 Removing a Hard Drive 77 Installing a Hard Drive 78 Floppy Drive 81 Removing a Floppy Drive 81 Installing a Floppy Drive 82 Media Card Reader 83 Removing a Media Card Reader 84 Installing a Media Card Reader 85 CD/DVD Drive 86 Removing a CD/DVD Drive 87 Installing a CD/DVD Drive 87 Battery 89 Replacing the Battery 89 Replacing the Computer Cover 90 5 Appendix 93 Specifications 93 System Setup 97 Overview 97 Entering System Setup 97 System Setup Options 98 Boot Menu 102 Clearing ...

Owner's Manual
Page 7
Only 107 FCC Class B 107 Contacting Dell 108 Glossary 127 Index 137 Contents 7 Dell Hardware Warranty Support Policy (U.S. Only 107 Definition of "Dell-Installed" Software and Peripherals 107 Definition of "Third-Party" Software and Peripherals 107 FCC Notice (U.S.
Only 107 FCC Class B 107 Contacting Dell 108 Glossary 127 Index 137 Contents 7 Dell Hardware Warranty Support Policy (U.S. Only 107 Definition of "Dell-Installed" Software and Peripherals 107 Definition of "Third-Party" Software and Peripherals 107 FCC Notice (U.S.

Owner's Manual
Page 9
...Drivers and documentation updates can use the CD to reinstall drivers (see "Reinstalling Drivers" on page 53), to run the Dell Diagnostics (see "Dell Diagnostics" on page 50), or to your computer or advanced technical reference material for my computer • My device documentation ...to provide last-minute updates about technical changes to access your documentation. Documentation and drivers are already installed on your computer. Dell™ Product Information Guide Finding Information 9 Readme files may not ship with your computer. NOTE: Additional information may not ship...
...Drivers and documentation updates can use the CD to reinstall drivers (see "Reinstalling Drivers" on page 53), to run the Dell Diagnostics (see "Dell Diagnostics" on page 50), or to your computer or advanced technical reference material for my computer • My device documentation ...to provide last-minute updates about technical changes to access your documentation. Documentation and drivers are already installed on your computer. Dell™ Product Information Guide Finding Information 9 Readme files may not ship with your computer. NOTE: Additional information may not ship...

Owner's Manual
Page 10
What Are You Looking For? • How to set up my computer Find It Here Setup Diagram • Service Tag and Express Service Code • Microsoft Windows License Label Service Tag and Microsoft® Windows® License These labels are located on your computer (see "Front View of the Computer" on page 13). • Use the Service Tag to identify your computer when you use support.dell.com or contact support. • Enter the Express Service Code to direct your call when contacting support. 10 Finding Information
What Are You Looking For? • How to set up my computer Find It Here Setup Diagram • Service Tag and Express Service Code • Microsoft Windows License Label Service Tag and Microsoft® Windows® License These labels are located on your computer (see "Front View of the Computer" on page 13). • Use the Service Tag to identify your computer when you use support.dell.com or contact support. • Enter the Express Service Code to direct your call when contacting support. 10 Finding Information

Owner's Manual
Page 11
...updates • Desktop System Software (DSS)- Troubleshooting hints and tips, articles from technicians, online courses, and frequently asked questions Dell Support Website - Finding Information 11 What Are You Looking For? Find It Here • Solutions - Contact information, service call... status, support history, service contract, and online discussions with other Dell customers • Upgrades - The software automatically detects your computer and operating system and installs the updates appropriate for your ...
...updates • Desktop System Software (DSS)- Troubleshooting hints and tips, articles from technicians, online courses, and frequently asked questions Dell Support Website - Finding Information 11 What Are You Looking For? Find It Here • Solutions - Contact information, service call... status, support history, service contract, and online discussions with other Dell customers • Upgrades - The software automatically detects your computer and operating system and installs the updates appropriate for your ...

Owner's Manual
Page 12
After you reinstall your operating system, use the Operating System CD (see "Restoring Your Operating System" on page 54). NOTE: If you reinstall the operating system for the devices that came with your CD varies based on your computer. What Are You Looking For? • How to reinstall my operating system Find It Here Operating System CD NOTE: The Operating System CD may be optional and may not ship with your computer, you should reinstall the DSS utility prior to reinstall drivers for your computer. NOTE: The color of your computer. To reinstall your computer. The ...
After you reinstall your operating system, use the Operating System CD (see "Restoring Your Operating System" on page 54). NOTE: If you reinstall the operating system for the devices that came with your CD varies based on your computer. What Are You Looking For? • How to reinstall my operating system Find It Here Operating System CD NOTE: The Operating System CD may be optional and may not ship with your computer, you should reinstall the DSS utility prior to reinstall drivers for your computer. NOTE: The color of your computer. To reinstall your computer. The ...

Owner's Manual
Page 13
Setting Up and Using Your Computer 13 Setting Up and Using Your Computer Front View of the Computer" on page 13). Use to remove the cover (see "Front View of the Computer 1 2 3 4 5 6 7 8 9 10 11 12 1 cover release latch 2 Service Tag Use this latch to identify your computer when you access the Dell Support website or call support.
Setting Up and Using Your Computer 13 Setting Up and Using Your Computer Front View of the Computer" on page 13). Use to remove the cover (see "Front View of the Computer 1 2 3 4 5 6 7 8 9 10 11 12 1 cover release latch 2 Service Tag Use this latch to identify your computer when you access the Dell Support website or call support.

Owner's Manual
Page 14
3 FlexBay drive 4 CD or DVD activity light 5 CD or DVD eject button 6 microphone connector 7 headphone connector 8 diagnostic lights (4) 9 USB 2.0 connectors (2) 10 power button 11 hard-drive activity light 12 vents Can contain an optional floppy drive or optional Media Card Reader. Press to turn on page 24. To ensure adequate cooling, do not use the back USB connectors for voice or musical input into a sound or telephony program. For more information on when the computer reads data from the CD or DVD drive. Use the front USB connectors for more ...
3 FlexBay drive 4 CD or DVD activity light 5 CD or DVD eject button 6 microphone connector 7 headphone connector 8 diagnostic lights (4) 9 USB 2.0 connectors (2) 10 power button 11 hard-drive activity light 12 vents Can contain an optional floppy drive or optional Media Card Reader. Press to turn on page 24. To ensure adequate cooling, do not use the back USB connectors for voice or musical input into a sound or telephony program. For more information on when the computer reads data from the CD or DVD drive. Use the front USB connectors for more ...

Owner's Manual
Page 15
Back View of the Computer 1 2 3 4 1 voltage selection switch See the safety instructions in the Product Information Guide for more information. 2 power connector Insert the power cable. 3 back panel I/O connectors Plug serial, USB, and other devices into the appropriate connectors (see "Back Panel I/O Connectors" on page 16). 4 card slots (3) Access connector slots for expansion cards: • SLOT1 PCI Express x16 • SLOT2 PCI Express x1 • SLOT3 PCI Setting Up and Using Your Computer 15
Back View of the Computer 1 2 3 4 1 voltage selection switch See the safety instructions in the Product Information Guide for more information. 2 power connector Insert the power cable. 3 back panel I/O connectors Plug serial, USB, and other devices into the appropriate connectors (see "Back Panel I/O Connectors" on page 16). 4 card slots (3) Access connector slots for expansion cards: • SLOT1 PCI Express x16 • SLOT2 PCI Express x1 • SLOT3 PCI Setting Up and Using Your Computer 15

Owner's Manual
Page 16
A good connection exists between a 100-Mbps network and the computer. • Off - Use the network adapter connector to attach a record/playback device such as a separate intra- If you use Category 5 wiring and connectors for your network or broadband device, and then connect the other end of network traffic may make this light appear to be in connector to attach your computer. Flashes a yellow light when the computer is not detecting a physical connection to the network adapter connector on the card. A high volume of the network cable to the network. Use the (blue) line-...
A good connection exists between a 100-Mbps network and the computer. • Off - Use the network adapter connector to attach a record/playback device such as a separate intra- If you use Category 5 wiring and connectors for your network or broadband device, and then connect the other end of network traffic may make this light appear to be in connector to attach your computer. Flashes a yellow light when the computer is not detecting a physical connection to the network adapter connector on the card. A high volume of the network cable to the network. Use the (blue) line-...

Owner's Manual
Page 17
Printer Cable Your printer connects to the printer owner's manual or contact the printer manufacturer. NOTE: The LFE (Low Frequency Effects) Audio channel, found in the surround sound setup. 9 side surround sound connector Use the (gray) side surround sound connector to the computer. On computers with the printer for devices that typically remain (rear quad) connected, such as joysticks, cameras, or bootable USB devices. 11 VGA video connector If your printer. See the documentation that came with a sound card, use the connector on the card. 7 microphone ...
Printer Cable Your printer connects to the printer owner's manual or contact the printer manufacturer. NOTE: The LFE (Low Frequency Effects) Audio channel, found in the surround sound setup. 9 side surround sound connector Use the (gray) side surround sound connector to the computer. On computers with the printer for devices that typically remain (rear quad) connected, such as joysticks, cameras, or bootable USB devices. 11 VGA video connector If your printer. See the documentation that came with a sound card, use the connector on the card. 7 microphone ...

Owner's Manual
Page 18
The USB connectors only fit into the ports when correctly oriented. 1 2 3 1 USB connector on computer 2 USB printer cable 3 USB connector on printer 3 Turn on the printer and then turn on the computer and the printer. Connecting to the USB connectors on the computer. To connect to the Internet, you have not already done so. 2 Attach the USB printer cable to the Internet NOTE: ISPs and ISP offerings vary by country. If the Add New Hardware Wizard window appears, click Cancel. 4 Install the printer driver, if necessary. See the documentation that provide Internet access ...
The USB connectors only fit into the ports when correctly oriented. 1 2 3 1 USB connector on computer 2 USB printer cable 3 USB connector on printer 3 Turn on the printer and then turn on the computer and the printer. Connecting to the USB connectors on the computer. To connect to the Internet, you have not already done so. 2 Attach the USB printer cable to the Internet NOTE: ISPs and ISP offerings vary by country. If the Add New Hardware Wizard window appears, click Cancel. 4 Install the printer driver, if necessary. See the documentation that provide Internet access ...

Owner's Manual
Page 19
Setting Up Your Internet Connection To set up my connection manually. • If you are using a dial-up connection, connect a telephone line to the modem connector on page 33. Contact your ISP to complete the setup. If you have a CD, click Use the CD I got from an ISP. 5 Click Next. The New Connection Wizard appears. 3 Click Connect to the Internet. 4 In the next window, click the appropriate option: • If you do not have an ISP and want to select one, click Choose from your ISP for setup instructions. Otherwise, follow the instructions on the screen to step 6. If ...
Setting Up Your Internet Connection To set up my connection manually. • If you are using a dial-up connection, connect a telephone line to the modem connector on page 33. Contact your ISP to complete the setup. If you have a CD, click Use the CD I got from an ISP. 5 Click Next. The New Connection Wizard appears. 3 Click Connect to the Internet. 4 In the next window, click the appropriate option: • If you do not have an ISP and want to select one, click Choose from your ISP for setup instructions. Otherwise, follow the instructions on the screen to step 6. If ...

Owner's Manual
Page 20
Keep the tray closed when you are not using the drive. NOTE: Ensure that came with your computer. A CD player includes the following basic buttons: Play Move backward within the current track Pause Move forward within the current track Stop 20 Setting Up and Using Your Computer Playing CDs and DVDs NOTICE: Do not press down on the front of the drive. 2 Place the disc, label side up in the center of the tray. 3 Press the disc into the center of the tray until it . To format CDs for storing data, to create music CDs, or to copy CDs, see the CD software that you follow all ...
Keep the tray closed when you are not using the drive. NOTE: Ensure that came with your computer. A CD player includes the following basic buttons: Play Move backward within the current track Pause Move forward within the current track Stop 20 Setting Up and Using Your Computer Playing CDs and DVDs NOTICE: Do not press down on the front of the drive. 2 Place the disc, label side up in the center of the tray. 3 Press the disc into the center of the tray until it . To format CDs for storing data, to create music CDs, or to copy CDs, see the CD software that you follow all ...

Owner's Manual
Page 21
Adjusting the Volume NOTE: When the speakers are muted, you do not hear the CD or DVD playing. 1 Click the Start button, point to All Programs → Accessories→ Entertainment, and then click Volume Control. 2 In the Volume Control window, click and drag the bar in the Volume Control column up or down to the previous title or chapter Eject For more information on the CD or DVD player (if available). For more information on playing CDs or DVDs, click Help on volume control options, click Help in pause mode Go to the next title or chapter Continuously play the current title or ...
Adjusting the Volume NOTE: When the speakers are muted, you do not hear the CD or DVD playing. 1 Click the Start button, point to All Programs → Accessories→ Entertainment, and then click Volume Control. 2 In the Volume Control window, click and drag the bar in the Volume Control column up or down to the previous title or chapter Eject For more information on the CD or DVD player (if available). For more information on playing CDs or DVDs, click Help on volume control options, click Help in pause mode Go to the next title or chapter Continuously play the current title or ...
