
Owners Manual
Page 1
Dell™ Dimension™ 9200 Owner's Manual Service Tag CD or DVD eject button CD or DVD activity light FlexBays (2) for optional floppy drive or optional Media Card Reader microphone connector headphone connector diagnostic lights hard drive activity light power button USB 2.0 connectors (2) cover release latch power connector audio connectors USB 2.0 connectors (4) (rear quad) USB 2.0 connectors (2) (rear dual) network adapter card slots for PCI Express x1 (1), PCI Express x16 (1), PCI Express x4 (1), PCI (3) Model DCTA www.dell.com | support.dell.com
Dell™ Dimension™ 9200 Owner's Manual Service Tag CD or DVD eject button CD or DVD activity light FlexBays (2) for optional floppy drive or optional Media Card Reader microphone connector headphone connector diagnostic lights hard drive activity light power button USB 2.0 connectors (2) cover release latch power connector audio connectors USB 2.0 connectors (4) (rear quad) USB 2.0 connectors (2) (rear dual) network adapter card slots for PCI Express x1 (1), PCI Express x16 (1), PCI Express x4 (1), PCI (3) Model DCTA www.dell.com | support.dell.com

Owners Manual
Page 3
... Settings Transfer Wizard With the Operating System CD 24 Running the Files and Settings Transfer Wizard Without the Operating System CD 25 Playing CDs and DVDs 26 Playing a CD or DVD 26 Adjusting the Volume 28 Adjusting the Picture 28 Contents 3
... Settings Transfer Wizard With the Operating System CD 24 Running the Files and Settings Transfer Wizard Without the Operating System CD 25 Playing CDs and DVDs 26 Playing a CD or DVD 26 Adjusting the Volume 28 Adjusting the Picture 28 Contents 3

Owners Manual
Page 4
...Cleaning Your Computer 34 Cleaning the Computer, Keyboard, and Monitor 34 Cleaning the Mouse 35 Cleaning the Floppy Drive 35 Cleaning CDs and DVDs 35 2 Optimizing Performance 37 Hyper-Threading 37 About Your RAID Configuration 37 RAID Level 0 Configuration 38 RAID Level 1 Configuration 38 ...Configuring Your Computer for RAID 39 Using the Intel RAID Option ROM Utility 40 Using the Intel Application Accelerator 42 Dell DataSafe (Optional 46 Intel® Viiv™ Technology (Optional 46 Using Intel Viiv Quick Resume Technology (QRT 46 Enabling the QRT...
...Cleaning Your Computer 34 Cleaning the Computer, Keyboard, and Monitor 34 Cleaning the Mouse 35 Cleaning the Floppy Drive 35 Cleaning CDs and DVDs 35 2 Optimizing Performance 37 Hyper-Threading 37 About Your RAID Configuration 37 RAID Level 0 Configuration 38 RAID Level 1 Configuration 38 ...Configuring Your Computer for RAID 39 Using the Intel RAID Option ROM Utility 40 Using the Intel Application Accelerator 42 Dell DataSafe (Optional 46 Intel® Viiv™ Technology (Optional 46 Using Intel Viiv Quick Resume Technology (QRT 46 Enabling the QRT...

Owners Manual
Page 5
3 Solving Problems 49 Troubleshooting Tips 49 Battery Problems 49 Drive Problems 50 CD and DVD drive problems 50 Hard drive problems 51 E-Mail, Modem, and Internet Problems 51 Error Messages 53 Media Card Reader Problems 54 Keyboard Problems 54 Lockups ...
3 Solving Problems 49 Troubleshooting Tips 49 Battery Problems 49 Drive Problems 50 CD and DVD drive problems 50 Hard drive problems 51 E-Mail, Modem, and Internet Problems 51 Error Messages 53 Media Card Reader Problems 54 Keyboard Problems 54 Lockups ...

Owners Manual
Page 7
...Media Card Reader 112 Removing a Media Card Reader 112 Installing a Media Card Reader 115 CD/DVD Drive 116 Removing a CD/DVD Drive 117 Installing a CD/DVD Drive 118 Battery 120 Replacing the Battery 120 Replacing the Computer Cover 121 6 Appendix 123 ...Specifications 123 System Setup 127 Overview 127 Entering System Setup 127 System Setup Options 129 Boot Sequence 132 Clearing Forgotten Passwords 134 Clearing CMOS Settings 135 Dell...
...Media Card Reader 112 Removing a Media Card Reader 112 Installing a Media Card Reader 115 CD/DVD Drive 116 Removing a CD/DVD Drive 117 Installing a CD/DVD Drive 118 Battery 120 Replacing the Battery 120 Replacing the Computer Cover 121 6 Appendix 123 ...Specifications 123 System Setup 127 Overview 127 Entering System Setup 127 System Setup Options 129 Boot Sequence 132 Clearing Forgotten Passwords 134 Clearing CMOS Settings 135 Dell...

Owners Manual
Page 14
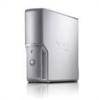
...system shutdown. 8 hard-drive activity light The hard-drive light is on when the computer reads data from or writes data to the CD or DVD drive. NOTICE: Ensure that the system is adequately ventilated. NOTICE: Keep the vent area clean and dust-free to ensure that there is a ...connector to attach a personal computer microphone for voice or musical input into a sound or telephony program. NOTE: It is recommended that you access the Dell Support website or contact support. 14 Setting Up and Using Your Computer For information on using the Media Card Reader, see "Using a Media Card Reader...
...system shutdown. 8 hard-drive activity light The hard-drive light is on when the computer reads data from or writes data to the CD or DVD drive. NOTICE: Ensure that the system is adequately ventilated. NOTICE: Keep the vent area clean and dust-free to ensure that there is a ...connector to attach a personal computer microphone for voice or musical input into a sound or telephony program. NOTE: It is recommended that you access the Dell Support website or contact support. 14 Setting Up and Using Your Computer For information on using the Media Card Reader, see "Using a Media Card Reader...

Owners Manual
Page 26
...been copied, the Completing the Collection Phase screen appears. 8 Click Finish. The wizard reads the collected files and settings and applies them to the Dell™ Knowledge Base document may not be available in the center of the settings and files have been applied, the Finished screen appears. 3 ...new computer, click Next. 2 On the Where are not using the drive. screen, select the items you want to My New Dell Computer Using the Microsoft Windows XP Operating System?). NOTE: Access to your old computer screen on the CD or DVD tray when you are the files and settings?
...been copied, the Completing the Collection Phase screen appears. 8 Click Finish. The wizard reads the collected files and settings and applies them to the Dell™ Knowledge Base document may not be available in the center of the settings and files have been applied, the Finished screen appears. 3 ...new computer, click Next. 2 On the Where are not using the drive. screen, select the items you want to My New Dell Computer Using the Microsoft Windows XP Operating System?). NOTE: Access to your old computer screen on the CD or DVD tray when you are the files and settings?

Owners Manual
Page 27
3 Press the eject button or gently push on the tray to the next track A DVD player includes the following basic buttons: Stop Restart the current chapter Play Fast forward Setting Up and Using Your Computer 27 NOTE: Ensure that came ... storing data, to create music CDs, or to copy CDs, see the CD software that you observe all copyright laws when you create CDs or DVDs.
3 Press the eject button or gently push on the tray to the next track A DVD player includes the following basic buttons: Stop Restart the current chapter Play Fast forward Setting Up and Using Your Computer 27 NOTE: Ensure that came ... storing data, to create music CDs, or to copy CDs, see the CD software that you observe all copyright laws when you create CDs or DVDs.

Owners Manual
Page 28
... the Master Volume column and slide it up or down menu, and then click Medium (16 bit). 6 Click OK. NOTE: The types of CD or DVD drives offered by Dell may vary by 600 pixels. 5 Under Color quality, click the drop-down to increase or decrease the volume. Copying CDs and... DVDs NOTE: Ensure that have a DVD+/-RW, or CD-RW/DVD (combo) drive. This section applies only to computers that you do not hear the CD or DVD playing. 1 Click the...
... the Master Volume column and slide it up or down menu, and then click Medium (16 bit). 6 Click OK. NOTE: The types of CD or DVD drives offered by Dell may vary by 600 pixels. 5 Under Color quality, click the drop-down to increase or decrease the volume. Copying CDs and... DVDs NOTE: Ensure that have a DVD+/-RW, or CD-RW/DVD (combo) drive. This section applies only to computers that you do not hear the CD or DVD playing. 1 Click the...

Owners Manual
Page 29
...if you plan to erase, rewrite, or update information on the disc later. Use blank DVD+/-RWs if you plan to erase, rewrite, or update information on the Sonic support website at www.sonic.com. Dell Edition. Once you have copyright protection and cannot be copied using Roxio Creator Plus - ...Your Computer 29 For help, open Roxio Creator Plus, and then click the question mark icon in Dell computers can write to both CD and DVD recording media. The computer reads your source CD or DVD and copies the data to a temporary folder on your computer or backing up important data. If...
...if you plan to erase, rewrite, or update information on the disc later. Use blank DVD+/-RWs if you plan to erase, rewrite, or update information on the Sonic support website at www.sonic.com. Dell Edition. Once you have copyright protection and cannot be copied using Roxio Creator Plus - ...Your Computer 29 For help, open Roxio Creator Plus, and then click the question mark icon in Dell computers can write to both CD and DVD recording media. The computer reads your source CD or DVD and copies the data to a temporary folder on your computer or backing up important data. If...

Owners Manual
Page 30
...Up and Using Your Computer The CD-RW drive needs 1-2 MB of formats supported by your DVD player, see the documentation provided with your DVD player or contact the manufacturer. • Do not burn a blank CD-R or CD-...Type CD-R CD-RW Read Yes Yes Write Yes Yes Rewritable No Yes DVD-Writable Drives Media Type CD-R CD-RW DVD+R DVD-R DVD+RW DVD-RW DVD+R DL Read Yes Yes Yes Yes Yes Yes Yes Write Yes Yes Yes ... want to play in many home or car stereos. • You cannot create audio DVDs with CD recording techniques. You can erase the data on computers that you record the project permanently to a...
...Up and Using Your Computer The CD-RW drive needs 1-2 MB of formats supported by your DVD player, see the documentation provided with your DVD player or contact the manufacturer. • Do not burn a blank CD-R or CD-...Type CD-R CD-RW Read Yes Yes Write Yes Yes Rewritable No Yes DVD-Writable Drives Media Type CD-R CD-RW DVD+R DVD-R DVD+RW DVD-RW DVD+R DL Read Yes Yes Yes Yes Yes Yes Yes Write Yes Yes Yes ... want to play in many home or car stereos. • You cannot create audio DVDs with CD recording techniques. You can erase the data on computers that you record the project permanently to a...

Owners Manual
Page 35
... 1 Turn the retainer ring on the underside of the disc (the unlabeled side) in a straight line from the swab is not left on DVDs. You might accidentally misalign the heads, which prevents the drive from dust, fingerprints, and scratches. NOTICE: To prevent damaging the surface, do not... gently wipe the bottom of your screen cursor skips or moves abnormally, clean the mouse. Clean your computer or keyboard. Cleaning CDs and DVDs NOTICE: Always use compressed air to remove contaminants that fluff from the center to clean drive heads with a solution of water and mild ...
... 1 Turn the retainer ring on the underside of the disc (the unlabeled side) in a straight line from the swab is not left on DVDs. You might accidentally misalign the heads, which prevents the drive from dust, fingerprints, and scratches. NOTICE: To prevent damaging the surface, do not... gently wipe the bottom of your screen cursor skips or moves abnormally, clean the mouse. Clean your computer or keyboard. Cleaning CDs and DVDs NOTICE: Always use compressed air to remove contaminants that fluff from the center to clean drive heads with a solution of water and mild ...

Owners Manual
Page 50
... worldwide and different disc formats, not all DVD drives. C H E C K T H E S P E A K E R S A N D S U B W O O F E R - C L E A N T H E D R I V E O R D I C S - CHECK THE CABLE CONNECTIONS R U N T H E H A R D W A R E TR O U B L E S H O O T E R - See "Dell Diagnostics" on page 34. This does not indicate a defect in all DVD titles work in the drive or the CD or DVD. TEST THE DRIVE - • Insert another floppy, CD, or DVD to check for and remove viruses. If...
... worldwide and different disc formats, not all DVD drives. C H E C K T H E S P E A K E R S A N D S U B W O O F E R - C L E A N T H E D R I V E O R D I C S - CHECK THE CABLE CONNECTIONS R U N T H E H A R D W A R E TR O U B L E S H O O T E R - See "Dell Diagnostics" on page 34. This does not indicate a defect in all DVD titles work in the drive or the CD or DVD. TEST THE DRIVE - • Insert another floppy, CD, or DVD to check for and remove viruses. If...

Owners Manual
Page 51
... If the stream is connected to a digital telephone network. TU R N O F F S T A N D B Y M O D E I N W I N D O W S B E F O R E W R I T I S C - If you write to remove the checkmark. NOTE: Connect the modem to a CD/DVD-RW drive C L O S E O T H E R P R O G R A M S - Search for and attempt recovery of data when writing. E-Mail, Modem, and Internet Problems CAUTION: Before you perform any of the procedures in...open your e-mail attachments: 1 In Outlook Express, click Tools, click Options, and then click Security. 2 Click Do not allow attachments to the CD/DVD-RW. Solving Problems 51
... If the stream is connected to a digital telephone network. TU R N O F F S T A N D B Y M O D E I N W I N D O W S B E F O R E W R I T I S C - If you write to remove the checkmark. NOTE: Connect the modem to a CD/DVD-RW drive C L O S E O T H E R P R O G R A M S - Search for and attempt recovery of data when writing. E-Mail, Modem, and Internet Problems CAUTION: Before you perform any of the procedures in...open your e-mail attachments: 1 In Outlook Express, click Tools, click Options, and then click Security. 2 Click Do not allow attachments to the CD/DVD-RW. Solving Problems 51
Owners Manual
Page 68
... control • If the problem persists, contact Dell (see "System Setup" on page 127) to wait until you experience a problem with a device (such as the floppy drive or hard drive), check the device to ensure that all hard drive and CD/DVD cables are properly connected to boot from a device... (such as the floppy drive or hard drive), check system setup (see "Contacting Dell" on page 137). Another failure has occurred. • Ensure that it is ...
... control • If the problem persists, contact Dell (see "System Setup" on page 127) to wait until you experience a problem with a device (such as the floppy drive or hard drive), check the device to ensure that all hard drive and CD/DVD cables are properly connected to boot from a device... (such as the floppy drive or hard drive), check system setup (see "Contacting Dell" on page 137). Another failure has occurred. • Ensure that it is ...

Owners Manual
Page 80
Inside View of Your Computer CAUTION: Before you perform any of the procedures in this section, follow the safety instructions in the Product Information Guide. 1 2 9 8 7 6 5 3 4 1 power supply 4 card fan 7 CD or DVD drive 2 system board 3 hard drive 5 media card reader (optional) 6 floppy drive (optional) 8 processor fan 9 processor shroud and processor 80 Removing and Installing Parts
Inside View of Your Computer CAUTION: Before you perform any of the procedures in this section, follow the safety instructions in the Product Information Guide. 1 2 9 8 7 6 5 3 4 1 power supply 4 card fan 7 CD or DVD drive 2 system board 3 hard drive 5 media card reader (optional) 6 floppy drive (optional) 8 processor fan 9 processor shroud and processor 80 Removing and Installing Parts

Owners Manual
Page 103
Replacing the Drive Panel 1 Follow the procedures in "Before You Begin" on page 77. 2 1 3 1 sliding plate 2 sliding plate lever 3 drive panel 2 Align the drive panel tabs with the side-door hinges. 3 Rotate the drive panel toward the computer until the sliding plate lever clicks into place and the drive panel snaps into place on the front panel. Drives Your computer supports: • Two hard drives (Serial ATA) • Two FlexBay drives (can contain an optional floppy drive and an optional Media Card Reader) • Two CD or DVD drives Removing and Installing Parts 103
Replacing the Drive Panel 1 Follow the procedures in "Before You Begin" on page 77. 2 1 3 1 sliding plate 2 sliding plate lever 3 drive panel 2 Align the drive panel tabs with the side-door hinges. 3 Rotate the drive panel toward the computer until the sliding plate lever clicks into place and the drive panel snaps into place on the front panel. Drives Your computer supports: • Two hard drives (Serial ATA) • Two FlexBay drives (can contain an optional floppy drive and an optional Media Card Reader) • Two CD or DVD drives Removing and Installing Parts 103

Owners Manual
Page 104
Serial ATA hard drives and CD/DVD drives are replacing a hard drive that will sufficiently cushion it on a hard surface. CAUTION: To guard against electrical shock, always unplug your files before opening ... and Installing Parts Instead, set it . General Installation Guidelines Connect the hard drives to the connectors labeled "SATA4" or "SATA5", starting with SATA4. Connect CD/DVD drives to the connectors labeled "SATA0" and "SATA1", starting with SATA0. NOTICE: To avoid damage to "SATA5" on a surface, such as a foam pad, that contains...
Serial ATA hard drives and CD/DVD drives are replacing a hard drive that will sufficiently cushion it on a hard surface. CAUTION: To guard against electrical shock, always unplug your files before opening ... and Installing Parts Instead, set it . General Installation Guidelines Connect the hard drives to the connectors labeled "SATA4" or "SATA5", starting with SATA4. Connect CD/DVD drives to the connectors labeled "SATA0" and "SATA1", starting with SATA0. NOTICE: To avoid damage to "SATA5" on a surface, such as a foam pad, that contains...

Owners Manual
Page 116
... Guide. CAUTION: To guard against electrical shock, always unplug your computer from the electrical outlet before opening the cover. 116 Removing and Installing Parts CD/DVD Drive CAUTION: Before you perform any of the Media Card Reader and to ON. Set the USB for FlexBay value to the USB connector on...
... Guide. CAUTION: To guard against electrical shock, always unplug your computer from the electrical outlet before opening the cover. 116 Removing and Installing Parts CD/DVD Drive CAUTION: Before you perform any of the Media Card Reader and to ON. Set the USB for FlexBay value to the USB connector on...

Owners Manual
Page 117
Removing a CD/DVD Drive 1 Follow the procedures in "Before You Begin" on page 77. 2 Remove the computer cover (see "Removing the Computer Cover" on page 78). 3 Remove the drive panel (see "Removing the Drive Panel" on page 100). 4 Disconnect the power cable from the back of the drive and the CD/DVD drive cable from the back of the drive and the system board. 1 2 3 1 CD/DVD drive cable 2 power cable 3 system board Removing and Installing Parts 117
Removing a CD/DVD Drive 1 Follow the procedures in "Before You Begin" on page 77. 2 Remove the computer cover (see "Removing the Computer Cover" on page 78). 3 Remove the drive panel (see "Removing the Drive Panel" on page 100). 4 Disconnect the power cable from the back of the drive and the CD/DVD drive cable from the back of the drive and the system board. 1 2 3 1 CD/DVD drive cable 2 power cable 3 system board Removing and Installing Parts 117


