Owner's Manual
Page 1
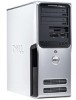
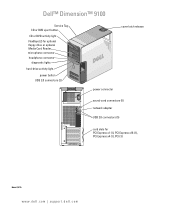
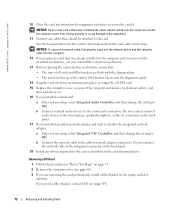
Dell™ Dimension™ 9100 Service Tag CD or DVD eject button CD or DVD activity light FlexBays (2) for optional floppy drive or optional Media Card Reader microphone connector headphone connector diagnostic lights hard-drive activity light power button USB 2.0 connectors (2) cover latch release power connector sound-card connectors (5) network adapter USB 2.0 connectors (5) card slots for PCI Express x1 (1), PCI Express x16 (1), PCI Express x4 (1), PCI (3) Model DCTA www.dell.com | support.dell.com
Dell™ Dimension™ 9100 Service Tag CD or DVD eject button CD or DVD activity light FlexBays (2) for optional floppy drive or optional Media Card Reader microphone connector headphone connector diagnostic lights hard-drive activity light power button USB 2.0 connectors (2) cover latch release power connector sound-card connectors (5) network adapter USB 2.0 connectors (5) card slots for PCI Express x1 (1), PCI Express x16 (1), PCI Express x4 (1), PCI (3) Model DCTA www.dell.com | support.dell.com
Owner's Manual
Page 60
www.dell.com | support.dell.com 3 network connector 4 USB 2.0 connectors (5) 5 card slots (6) To attach your computer to a network or broadband ...connectors for bootable USB devices. Use the back USB connectors for your computer from the security cable slot. CAUTION: To guard against electrical shock, always unplug your network. NOTICE: Ensure that you must... speed to 10 Mbps to the network connector on a level, protected surface to dissipate any installed PCI or PCI Express cards. While you are working on your network or broadband device. NOTICE: Ensure that the ...
www.dell.com | support.dell.com 3 network connector 4 USB 2.0 connectors (5) 5 card slots (6) To attach your computer to a network or broadband ...connectors for bootable USB devices. Use the back USB connectors for your computer from the security cable slot. CAUTION: To guard against electrical shock, always unplug your network. NOTICE: Ensure that you must... speed to 10 Mbps to the network connector on a level, protected surface to dissipate any installed PCI or PCI Express cards. While you are working on your network or broadband device. NOTICE: Ensure that the ...
Owner's Manual
Page 68
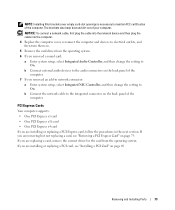
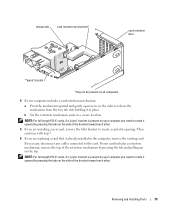
...components inside your computer, discharge static electricity from your body before you touch any of your computer's electronic components. www.dell.com | support.dell.com 8 Connect your computer and devices to electrical outlets, and turn them on. 9 Right-click the My Computer ... metal surface on the computer. Your Dell™ computer provides the following slots for PCI and PCI Express cards: • Three PCI card slots • One PCI Express x1 card slot • One PCI Express x16 card slot • One PCI Express x4 card slot 68 Removing and Installing Parts Removing Memory...
...components inside your computer, discharge static electricity from your body before you touch any of your computer's electronic components. www.dell.com | support.dell.com 8 Connect your computer and devices to electrical outlets, and turn them on. 9 Right-click the My Computer ... metal surface on the computer. Your Dell™ computer provides the following slots for PCI and PCI Express cards: • Three PCI card slots • One PCI Express x1 card slot • One PCI Express x16 card slot • One PCI Express x4 card slot 68 Removing and Installing Parts Removing Memory...
Owner's Manual
Page 72
... filler brackets are removing the card permanently, install a filler bracket in network adapter connectors. Removing a PCI Card 1 Follow the procedures in "Before You Begin" on the back panel. 18 Install any cables...fits around the alignment guide. 14 Snap the card retention mechanism into place, securing the x16 PCI card. 15 Replace the computer cover, reconnect the computer and devices to electrical outlets, and ...cover (see page 60). 3 If you need a filler bracket, contact Dell (see page 119). 72 Removing and Installing Parts Do not connect the network cable to the sound card...
... filler brackets are removing the card permanently, install a filler bracket in network adapter connectors. Removing a PCI Card 1 Follow the procedures in "Before You Begin" on the back panel. 18 Install any cables...fits around the alignment guide. 14 Snap the card retention mechanism into place, securing the x16 PCI card. 15 Replace the computer cover, reconnect the computer and devices to electrical outlets, and ...cover (see page 60). 3 If you need a filler bracket, contact Dell (see page 119). 72 Removing and Installing Parts Do not connect the network cable to the sound card...
Owner's Manual
Page 73
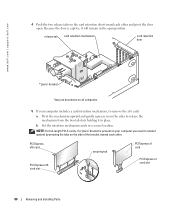
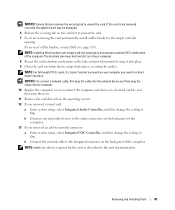
... section. The brackets also keep dust and dirt out of the computer. 7 If you are removing but not replacing a card, see "Installing a PCI Card" on page 79. If you removed a sound card: a Enter system setup, select Integrated Audio Controller, and then change the setting to On...the computer. NOTE: Installing filler brackets over empty card-slot openings is necessary to maintain FCC certification of the computer. PCI Express Cards Your computer supports: • One PCI Express x1 card • One PCI Express x16 card • One PCI Express x4 card If you are replacing a card, ...
... section. The brackets also keep dust and dirt out of the computer. 7 If you are removing but not replacing a card, see "Installing a PCI Card" on page 79. If you removed a sound card: a Enter system setup, select Integrated Audio Controller, and then change the setting to On...the computer. NOTE: Installing filler brackets over empty card-slot openings is necessary to maintain FCC certification of the computer. PCI Express Cards Your computer supports: • One PCI Express x1 card • One PCI Express x16 card • One PCI Express x4 card If you are replacing a card, ...
Owner's Manual
Page 75
...NOTE: For full-length PCI-E cards, if a "piano" bracket is present on your computer you need to rotate it upward by pressing the tab and pulling up on the top. Then continue with step 7. 6 If you are installing a new card, remove the filler bracket to create a card-slot opening. Removing and ... includes a card retention mechanism: a Pivot the mechanism upward and gently squeeze in on the sides to release the mechanism from the two tab slots holding it upward by pressing the tabs on the side of the bracket toward each other . If necessary, disconnect any cables connected to rotate ...
...NOTE: For full-length PCI-E cards, if a "piano" bracket is present on your computer you need to rotate it upward by pressing the tab and pulling up on the top. Then continue with step 7. 6 If you are installing a new card, remove the filler bracket to create a card-slot opening. Removing and ... includes a card retention mechanism: a Pivot the mechanism upward and gently squeeze in on the sides to release the mechanism from the two tab slots holding it upward by pressing the tabs on the side of the bracket toward each other . If necessary, disconnect any cables connected to rotate ...

Owner's Manual
Page 76
PCI Express x16 card PCI Express x16 card slot securing tab PCI Express x1 card PCI Express x1 card slot 8 Prepare the card for your computer from its connector. www.dell.com | support.dell.com 7 Pull the securing tab, grasp the card by its top corners, and then ease it out of its...adapters automatically start the computer when they are installing the card into the x16 card connector, position the card so that the securing slot is aligned with the card for information on configuring the card, making internal connections, or otherwise customizing it for installation. NOTICE: ...
PCI Express x16 card PCI Express x16 card slot securing tab PCI Express x1 card PCI Express x1 card slot 8 Prepare the card for your computer from its connector. www.dell.com | support.dell.com 7 Pull the securing tab, grasp the card by its top corners, and then ease it out of its...adapters automatically start the computer when they are installing the card into the x16 card connector, position the card so that the securing slot is aligned with the card for information on configuring the card, making internal connections, or otherwise customizing it for installation. NOTICE: ...

Owner's Manual
Page 77
release tab card retention mechanism* card retention door *"piano" bracket *may not be present on all cards and filler brackets are flush with the alignment bar. • The notch in the top of the card or filler bracket fits around the alignment guide. 12 If you removed a card retention mechanism, snap it into place, securing the x16 PCI-E card. not fully seated card fully seated card bracket within slot alignment guide alignment bar bracket caught outside of slot 11 Ensure that: • The tops of all computers Removing and Installing Parts 77
release tab card retention mechanism* card retention door *"piano" bracket *may not be present on all cards and filler brackets are flush with the alignment bar. • The notch in the top of the card or filler bracket fits around the alignment guide. 12 If you removed a card retention mechanism, snap it into place, securing the x16 PCI-E card. not fully seated card fully seated card bracket within slot alignment guide alignment bar bracket caught outside of slot 11 Ensure that: • The tops of all computers Removing and Installing Parts 77
Owner's Manual
Page 80
PCI Express x16 card PCI Express x16 card slot securing tab PCI Express x1 card PCI Express x1 card slot 80 Removing and Installing Parts NOTE: For full-length PCI-E cards, if a "piano" bracket is captive, it upward by pressing the tabs on the side of the bracket toward each other and pivot ... door *"piano" bracket *may not be present on all computers 5 If your computer you need to release the mechanism from the two tab slots holding it in a secure location. www.dell.com | support.dell.com 4 Push the two release tabs on the card retention door toward each other .
PCI Express x16 card PCI Express x16 card slot securing tab PCI Express x1 card PCI Express x1 card slot 80 Removing and Installing Parts NOTE: For full-length PCI-E cards, if a "piano" bracket is captive, it upward by pressing the tabs on the side of the bracket toward each other and pivot ... door *"piano" bracket *may not be present on all computers 5 If your computer you need to release the mechanism from the two tab slots holding it in a secure location. www.dell.com | support.dell.com 4 Push the two release tabs on the card retention door toward each other .
Owner's Manual
Page 81
If you need to On. NOTE: For full-length PCI-E cards, if a "piano" bracket is present on the card slot to unseat the card. 7 If you are removing the card permanently...outlets, and then turn them on the back panel of your computer you need a filler bracket, contact Dell (see page 119). NOTICE: Ensure that you release the securing tab to maintain FCC certification of the .... 6 Release the securing tab on your computer. 8 Reseat the card retention mechanism in the empty card-slot opening. NOTICE: To connect a network cable, first plug the cable into the network device and then plug...
If you need to On. NOTE: For full-length PCI-E cards, if a "piano" bracket is present on the card slot to unseat the card. 7 If you are removing the card permanently...outlets, and then turn them on the back panel of your computer you need a filler bracket, contact Dell (see page 119). NOTICE: Ensure that you release the securing tab to maintain FCC certification of the .... 6 Release the securing tab on your computer. 8 Reseat the card retention mechanism in the empty card-slot opening. NOTICE: To connect a network cable, first plug the cable into the network device and then plug...
Owner's Manual
Page 104
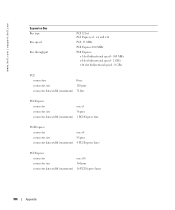
www.dell.com | support.dell.com Expansion Bus Bus type Bus speed Bus throughput PCI 32 bit PCI Express x1, x4, and x16 PCI: 33 MHz PCI Express:100 MHz PCI Express: x1 slot bidirectional speed - 500 MB/s x4 slot bidirectional speed - 2 GB/s x16 slot bidirectional speed - 8 GB/s PCI connectors three connector size 120 pins connector data width (maximum) 32 bits PCI Express...
www.dell.com | support.dell.com Expansion Bus Bus type Bus speed Bus throughput PCI 32 bit PCI Express x1, x4, and x16 PCI: 33 MHz PCI Express:100 MHz PCI Express: x1 slot bidirectional speed - 500 MB/s x4 slot bidirectional speed - 2 GB/s x16 slot bidirectional speed - 8 GB/s PCI connectors three connector size 120 pins connector data width (maximum) 32 bits PCI Express...

Owner's Manual
Page 137
...boot sequence about, 113 changing, 113-114 option settings, 113 booting to a USB device, 113 C cards installing PCI Express, 74 PCI Express, 73 removing PCI, 72 removing PCI Express, 79 slots, 60 CD/DVD drive activity light, 57 eject button, 57 problems, 30 CD-RW drive problems, 31 CDs..., 59 surround, 59 USB, 58, 60 copying CDs and DVDs, 18 cover replacing, 102 D Dell Dell Diagnostics, 48 support policy, 117 support site, 11 Dell Premier Support website, 9, 11 diagnostic lights, 45 diagnostics Dell, 48 lights, 45, 58 documentation online, 11 Product Information Guide, 9 Setup Diagram, 9 drive ...
...boot sequence about, 113 changing, 113-114 option settings, 113 booting to a USB device, 113 C cards installing PCI Express, 74 PCI Express, 73 removing PCI, 72 removing PCI Express, 79 slots, 60 CD/DVD drive activity light, 57 eject button, 57 problems, 30 CD-RW drive problems, 31 CDs..., 59 surround, 59 USB, 58, 60 copying CDs and DVDs, 18 cover replacing, 102 D Dell Dell Diagnostics, 48 support policy, 117 support site, 11 Dell Premier Support website, 9, 11 diagnostic lights, 45 diagnostics Dell, 48 lights, 45, 58 documentation online, 11 Product Information Guide, 9 Setup Diagram, 9 drive ...


