Reference Guide
Page 7
...Dell Dimension 900 system. The chapters and appendixes are possible causes and corrective actions. • Appendix D, "Regulatory Notices," provides regulatory information on the system. tance. Included are summarized as follows: • Chapter 1, "Introduction," provides an overview of the system features and infor- It can refer to upgrade... obtaining technical assis- dures for system components such as installing additional memory. Warranty and Return Policy Information Dell Computer Corporation ("Dell") manufactures its hardware products from parts and components that are new ...
...Dell Dimension 900 system. The chapters and appendixes are possible causes and corrective actions. • Appendix D, "Regulatory Notices," provides regulatory information on the system. tance. Included are summarized as follows: • Chapter 1, "Introduction," provides an overview of the system features and infor- It can refer to upgrade... obtaining technical assis- dures for system components such as installing additional memory. Warranty and Return Policy Information Dell Computer Corporation ("Dell") manufactures its hardware products from parts and components that are new ...

Reference Guide
Page 11
Contents Chapter 1 Chapter 2 Introduction 1-1 Hardware Features 1-1 Software Features 1-2 Available Upgrades 1-3 Padlock Ring 1-3 Installing Upgrades on the System Board 2-1 Safety First-For You and Your Computer 2-1 Installation Guidelines 2-2 Removing and Replacing the Computer ... NVRAM Jumper 2-9 Boot-Block Select Jumper 2-10 Removing and Replacing the Riser-Board Bracket 2-10 PCI Expansion Card Upgrades 2-12 Installing Expansion Cards 2-13 Removing Expansion Cards 2-16 Adding Memory 2-16 Installing a DIMM 2-17 Removing a DIMM 2-18 Replacing the System Battery 2-19 xiii
Contents Chapter 1 Chapter 2 Introduction 1-1 Hardware Features 1-1 Software Features 1-2 Available Upgrades 1-3 Padlock Ring 1-3 Installing Upgrades on the System Board 2-1 Safety First-For You and Your Computer 2-1 Installation Guidelines 2-2 Removing and Replacing the Computer ... NVRAM Jumper 2-9 Boot-Block Select Jumper 2-10 Removing and Replacing the Riser-Board Bracket 2-10 PCI Expansion Card Upgrades 2-12 Installing Expansion Cards 2-13 Removing Expansion Cards 2-16 Adding Memory 2-16 Installing a DIMM 2-17 Removing a DIMM 2-18 Replacing the System Battery 2-19 xiii

Reference Guide
Page 17
.... For example, if the computer has 64 MB of your computer • Available upgrades for video functions. support.dell.com Introduction 1-1 CHAPTER 1 Introduction Dell™ Dimension™ 900 computer systems are high-speed personal computers that memory is 1 or 2 MB less than the memory installed because that include an Intel® Socket 370 Pentium® III microprocessor...
.... For example, if the computer has 64 MB of your computer • Available upgrades for video functions. support.dell.com Introduction 1-1 CHAPTER 1 Introduction Dell™ Dimension™ 900 computer systems are high-speed personal computers that memory is 1 or 2 MB less than the memory installed because that include an Intel® Socket 370 Pentium® III microprocessor...

Reference Guide
Page 18
...in the drive or the CD. • Full compliance with PCI specification 2.2. • Full compliance with Dimension 900 system-specific expansion cards available only from Dell (see "Available Upgrades," found later in this chapter). For your convenience, a USB port connector is located on the front ... for multiple USB-compliant devices. Software Features The following integrated features: • Integrated Intel 810e video controller with Dynamic Video Memory and 4 MB of CD-ROM media may need to obtain its full functionality. PCI expansion-card connector PCI2 is running the...
...in the drive or the CD. • Full compliance with PCI specification 2.2. • Full compliance with Dimension 900 system-specific expansion cards available only from Dell (see "Available Upgrades," found later in this chapter). For your convenience, a USB port connector is located on the front ... for multiple USB-compliant devices. Software Features The following integrated features: • Integrated Intel 810e video controller with Dynamic Video Memory and 4 MB of CD-ROM media may need to obtain its full functionality. PCI expansion-card connector PCI2 is running the...

Reference Guide
Page 19
...sure you have the necessary slots or resources available before purchasing a memory upgrade. Available Upgrades The upgrades Dell offers undergo rigorous testing to determine the supported resolutions and refresh rates. • Dell Diagnostics for evaluating the computer's components and devices (see Appendix ... Accelerator (see "Video Drivers" in Chapter 4 for attaching commercially available theft-deterrent devices. Purchasing memory upgrades from Dell Spare Parts ensures system compatibility; Before changing the resolution, check the monitor documentation to ensure proper operation...
...sure you have the necessary slots or resources available before purchasing a memory upgrade. Available Upgrades The upgrades Dell offers undergo rigorous testing to determine the supported resolutions and refresh rates. • Dell Diagnostics for evaluating the computer's components and devices (see Appendix ... Accelerator (see "Video Drivers" in Chapter 4 for attaching commercially available theft-deterrent devices. Purchasing memory upgrades from Dell Spare Parts ensures system compatibility; Before changing the resolution, check the monitor documentation to ensure proper operation...

Reference Guide
Page 21
...to reduce the potential for personal injury or shock. Disconnect the power cable to your computer. support.dell.com Installing Upgrades on the System Board 2-1 CHAPTER 2 Installing Upgrades on the System Board This chapter describes how to ground the system board. Safety First-For You... and Your Computer Working inside your computer, and then press the power button to install expansion cards and system memory. In addition, Dell recommends that might harm...
...to reduce the potential for personal injury or shock. Disconnect the power cable to your computer. support.dell.com Installing Upgrades on the System Board 2-1 CHAPTER 2 Installing Upgrades on the System Board This chapter describes how to ground the system board. Safety First-For You... and Your Computer Working inside your computer, and then press the power button to install expansion cards and system memory. In addition, Dell recommends that might harm...

Reference Guide
Page 29
...the location of the processor mode jumper (JPX1) in the system Help defines abbreviations and acronyms. support.dell.com Installing Upgrades on the System Board 2-9 NVRAM Jumper Settings Jumper Settings Description Retains current NVRAM settings (default). Enables ...processor safe mode NOTE: The Glossary in the system Help defines abbreviations and acronyms. NVRAM Jumper Figure 2-4 shows the location of the nonvolatile random-access memory...
...the location of the processor mode jumper (JPX1) in the system Help defines abbreviations and acronyms. support.dell.com Installing Upgrades on the System Board 2-9 NVRAM Jumper Settings Jumper Settings Description Retains current NVRAM settings (default). Enables ...processor safe mode NOTE: The Glossary in the system Help defines abbreviations and acronyms. NVRAM Jumper Figure 2-4 shows the location of the nonvolatile random-access memory...

Reference Guide
Page 36
...to their electrical outlets and turn them on. Remove the screw that came with the expansion card for your system warranty. 2-16 Dell Dimension 900 System Reference and Troubleshooting Guide If you removed in this chapter. 10. The brackets also keep dust and dirt out of your ... remove the filler-bracket cap. 5. This system supports only non-error checking and correction (non-ECC), 100-megahertz (MHz) DIMMs. Purchasing memory upgrades from the card-mounting bracket. Remove the computer cover according to the back panel of the system. Replace the filler-bracket cap and screw ...
...to their electrical outlets and turn them on. Remove the screw that came with the expansion card for your system warranty. 2-16 Dell Dimension 900 System Reference and Troubleshooting Guide If you removed in this chapter. 10. The brackets also keep dust and dirt out of your ... remove the filler-bracket cap. 5. This system supports only non-error checking and correction (non-ECC), 100-megahertz (MHz) DIMMs. Purchasing memory upgrades from the card-mounting bracket. Remove the computer cover according to the back panel of the system. Replace the filler-bracket cap and screw ...

Reference Guide
Page 37
... Insert the DIMM straight down into the vertical guides at each end of the socket. support.dell.com securing clips (2) cutouts (2) 1. NOTICE: Do not press near the middle of the ... "Removing Expansion Cards" found earlier in the central groove of the DIMM. Figure 2-11. Installing Upgrades on self-test (POST). Orient the DIMM so that it fits into the socket, making sure...). Doing so could break the module. 6. The system may not recognize other synchronous dynamic random-access memory (SDRAM) DIMMs and may fail power-on the System Board 2-17 NOTE: Your computer is designed...
... Insert the DIMM straight down into the vertical guides at each end of the socket. support.dell.com securing clips (2) cutouts (2) 1. NOTICE: Do not press near the middle of the ... "Removing Expansion Cards" found earlier in the central groove of the DIMM. Figure 2-11. Installing Upgrades on self-test (POST). Orient the DIMM so that it fits into the socket, making sure...). Doing so could break the module. 6. The system may not recognize other synchronous dynamic random-access memory (SDRAM) DIMMs and may fail power-on the System Board 2-17 NOTE: Your computer is designed...
Reference Guide
Page 39
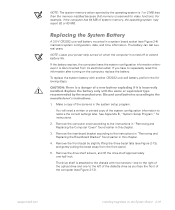
... system board socket (see Figure 2-13). Remove the front bezel by the operating system is 1 or 2 MB less than the memory installed because that memory is reserved for instructions. 2. NOTE: Leave your power strip turned on when the computer is incorrectly installed. CAUTION: There is a...a copy of the computer (see Figure 2-4) maintains system configuration, date, and time information. support.dell.com Installing Upgrades on the computer, replace the battery. NOTE: The system memory value reported by slightly lifting the three bezel tabs (see Figure 2-13), and gently pulling the ...
... system board socket (see Figure 2-13). Remove the front bezel by the operating system is 1 or 2 MB less than the memory installed because that memory is reserved for instructions. 2. NOTE: Leave your power strip turned on when the computer is incorrectly installed. CAUTION: There is a...a copy of the computer (see Figure 2-4) maintains system configuration, date, and time information. support.dell.com Installing Upgrades on the computer, replace the battery. NOTE: The system memory value reported by slightly lifting the three bezel tabs (see Figure 2-13), and gently pulling the ...

Reference Guide
Page 118
..., 2-12 connectors, 2-12 installing, 2-13 removing, 2-16 troubleshooting, 5-1 F filler brackets, 2-14, 2-16 fixing problems, 3-1, 6-1 G getting help tools, 6-2 I IDE support, 1-2 installing expansion cards, 2-13 memory, 2-17 2 Dell Dimension 900 System Reference and Troubleshooting Guide See DIMMs E electrostatic discharge. See upgrade options help , 6-1 grounding procedure, 2-1 H hard-disk drives EIDE support on your system, 4-3 other, 4-3 reinstalling, 4-2 reinstalling from...
..., 2-12 connectors, 2-12 installing, 2-13 removing, 2-16 troubleshooting, 5-1 F filler brackets, 2-14, 2-16 fixing problems, 3-1, 6-1 G getting help tools, 6-2 I IDE support, 1-2 installing expansion cards, 2-13 memory, 2-17 2 Dell Dimension 900 System Reference and Troubleshooting Guide See DIMMs E electrostatic discharge. See upgrade options help , 6-1 grounding procedure, 2-1 H hard-disk drives EIDE support on your system, 4-3 other, 4-3 reinstalling, 4-2 reinstalling from...

Reference Guide
Page 121
...hard-disk drives, 3-9 Internet tools, 6-2 modem, 3-6, 5-3 monitor, 3-4 optical drives, 3-8 power, 3-3 speakers, 3-6 start-up routine, 3-3 system memory, 5-5 where to start, 3-1 typographical conventions, xi U upgrade options available, 1-3 expansion cards, 2-13 memory, 2-16 unpacking, 2-2 V video controller, 1-2 video driver, 4-3 virus-scanning programs temporarily disabling, 4-4 W warranty information, ix warranty repair or credit, ... and hardware incompatibilities, 4-4 Windows NT solving software and hardware incompatibilities, 4-6 World Wide Web help tools, 6-2 support.dell.com Index 5
...hard-disk drives, 3-9 Internet tools, 6-2 modem, 3-6, 5-3 monitor, 3-4 optical drives, 3-8 power, 3-3 speakers, 3-6 start-up routine, 3-3 system memory, 5-5 where to start, 3-1 typographical conventions, xi U upgrade options available, 1-3 expansion cards, 2-13 memory, 2-16 unpacking, 2-2 V video controller, 1-2 video driver, 4-3 virus-scanning programs temporarily disabling, 4-4 W warranty information, ix warranty repair or credit, ... and hardware incompatibilities, 4-4 Windows NT solving software and hardware incompatibilities, 4-6 World Wide Web help tools, 6-2 support.dell.com Index 5


