Owner's Manual
Page 7
Only 121 Class A 122 Class B 122 FCC Identification Information 122 Contacting Dell 123 Index 141 Contents 7 5 Appendix Specifications 107 System Setup 111 Overview 111 Entering System Setup 112 System Setup Options 113 Boot Sequence 116 Clearing Forgotten Passwords 117 Clearing CMOS Settings 119 Cleaning Your Computer 119 Computer, Keyboard, and Monitor 119 Mouse...
Only 121 Class A 122 Class B 122 FCC Identification Information 122 Contacting Dell 123 Index 141 Contents 7 5 Appendix Specifications 107 System Setup 111 Overview 111 Entering System Setup 112 System Setup Options 113 Boot Sequence 116 Clearing Forgotten Passwords 117 Clearing CMOS Settings 119 Cleaning Your Computer 119 Computer, Keyboard, and Monitor 119 Mouse...
Owner's Manual
Page 23
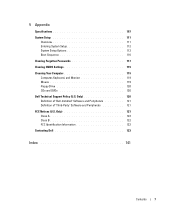
... you want to make up your computer to RAID-enabled mode (see page 22). 2 Press when you want to exit system setup and resume the boot process. and down -arrow keys to highlight Create RAID Volume, and press . Creating a RAID Level 1 Configuration 1 Set your array, and then press . The following procedure...
... you want to make up your computer to RAID-enabled mode (see page 22). 2 Press when you want to exit system setup and resume the boot process. and down -arrow keys to highlight Create RAID Volume, and press . Creating a RAID Level 1 Configuration 1 Set your array, and then press . The following procedure...
Owner's Manual
Page 24
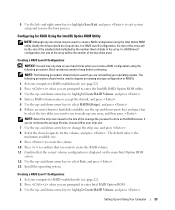
... (see "Migrating to a RAID 0 Volume" on the array that you want to exit the Intel Option ROM utility. NOTE: If your computer currently boots to RAID and you delete the RAID volume in the Intel RAID Option ROM, your array, and then press . 7 Select the desired capacity for RAID... Using the Intel(R) Application Accelerator If you already have some space left on page 26 or "Migrating to make up - www.dell.com | support.dell.com 4 Enter a RAID volume name or accept the default, and press . 5 Use the up - Configuring for the volume, and press . Deleting a RAID ...
... (see "Migrating to a RAID 0 Volume" on the array that you want to exit the Intel Option ROM utility. NOTE: If your computer currently boots to RAID and you delete the RAID volume in the Intel RAID Option ROM, your array, and then press . 7 Select the desired capacity for RAID... Using the Intel(R) Application Accelerator If you already have some space left on page 26 or "Migrating to make up - www.dell.com | support.dell.com 4 Enter a RAID volume name or accept the default, and press . 5 Use the up - Configuring for the volume, and press . Deleting a RAID ...
Owner's Manual
Page 52
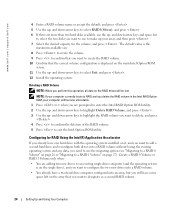
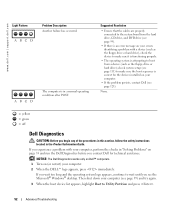
... POST. If you wait too long and the operating system logo appears, continue to make sure the boot sequence is correct for technical assistance. None. = yellow = green = off Dell Diagnostics CAUTION: Before you begin any of the procedures in this section, follow the safety instructions located ... the devices installed on (or restart) your computer. • If the problem persists, contact Dell (see page 59) and try again. 3 When the boot device list appears, highlight Boot to boot from the hard drive, CD drive, and DVD drive (see the Microsoft® Windows® desktop. ABCD...
... POST. If you wait too long and the operating system logo appears, continue to make sure the boot sequence is correct for technical assistance. None. = yellow = green = off Dell Diagnostics CAUTION: Before you begin any of the procedures in this section, follow the safety instructions located ... the devices installed on (or restart) your computer. • If the problem persists, contact Dell (see page 59) and try again. 3 When the boot device list appears, highlight Boot to boot from the hard drive, CD drive, and DVD drive (see the Microsoft® Windows® desktop. ABCD...
Owner's Manual
Page 57
...: 1 Turn on . Advanced Troubleshooting 57 If you received your computer-including data files-are available, click the restore point that appears, click Restore. During the boot process, a blue bar with PC Restore, click Reboot in time, let the computer finish restarting, and then restart the computer again. If a calendar date has... only one restore point, then that restore point is complete. 1 Click the Start button, point to proceed with www.dell.com appears at the top of the screen. 2 Immediately upon seeing the blue bar, press .
...: 1 Turn on . Advanced Troubleshooting 57 If you received your computer-including data files-are available, click the restore point that appears, click Restore. During the boot process, a blue bar with PC Restore, click Reboot in time, let the computer finish restarting, and then restart the computer again. If a calendar date has... only one restore point, then that restore point is complete. 1 Click the Start button, point to proceed with www.dell.com appears at the top of the screen. 2 Immediately upon seeing the blue bar, press .
Owner's Manual
Page 62
... such as joysticks or cameras, or for bootable USB devices (see page 65. 62 Removing and Installing Parts if you access the Dell Support website or call technical support. Instead, perform an operating system shutdown. For instructions on the computer. It is removable; Use ...the front USB connectors for more information on booting to a USB device). www.dell.com | support.dell.com 6 power button 7 Service Tag 8 headphone connector 9 USB 2.0 connectors (2) 10 front-panel door Press to turn off...
... such as joysticks or cameras, or for bootable USB devices (see page 65. 62 Removing and Installing Parts if you access the Dell Support website or call technical support. Instead, perform an operating system shutdown. For instructions on the computer. It is removable; Use ...the front USB connectors for more information on booting to a USB device). www.dell.com | support.dell.com 6 power button 7 Service Tag 8 headphone connector 9 USB 2.0 connectors (2) 10 front-panel door Press to turn off...
Owner's Manual
Page 89
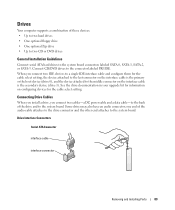
... labeled SATA-0, SATA-1, SATA-2, or SATA-3. See the drive documentation in your upgrade kit for information on the interface cable is the primary or the boot device (drive 0), and the device attached to the middle connector on configuring devices for the cable select setting, the device attached to the last connector...
... labeled SATA-0, SATA-1, SATA-2, or SATA-3. See the drive documentation in your upgrade kit for information on the interface cable is the primary or the boot device (drive 0), and the device attached to the middle connector on configuring devices for the cable select setting, the device attached to the last connector...
Owner's Manual
Page 113
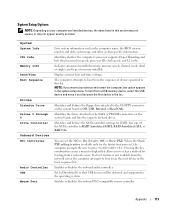
... IDE connectors on the system board as Off, USB, Internal, or Read Only. System System Info CPU Info Memory Info Date/Time Boot Sequence Drives Diskette Drive Drives 0 through 5 Drive Controller Onboard Devices NIC Controller Audio Controller USB Mouse Port Lists system information such as listed... w/ PXE setting is not available from the network server, the computer attempts to press . Displays current date and time settings. If a boot routine is active (available only for RAID. System Setup Options NOTE: Depending on your computer and installed devices, the items listed in this ...
... IDE connectors on the system board as Off, USB, Internal, or Read Only. System System Info CPU Info Memory Info Date/Time Boot Sequence Drives Diskette Drive Drives 0 through 5 Drive Controller Onboard Devices NIC Controller Audio Controller USB Mouse Port Lists system information such as listed... w/ PXE setting is not available from the network server, the computer attempts to press . Displays current date and time settings. If a boot routine is active (available only for RAID. System Setup Options NOTE: Depending on your computer and installed devices, the items listed in this ...
Owner's Manual
Page 115
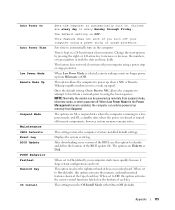
...setting. When Low Power Mode is enabled, the computer can be powered up from a network prior to On (default), your computer using the boot sequence. On is Off. When Low Power Mode (in the Power Management menu) is selected, remote wakeup events no longer power up remotely from...left-arrow key to automatically turn off your computer starts more quickly because it skips certain configurations and tests. On w/ Boot to NIC allows the computer to attempt to boot from Hibernate or Off. NOTE: Normally, the system can only be powered up time by pressing the right- When set...
...setting. When Low Power Mode is enabled, the computer can be powered up from a network prior to On (default), your computer using the boot sequence. On is Off. When Low Power Mode (in the Power Management menu) is selected, remote wakeup events no longer power up remotely from...left-arrow key to automatically turn off your computer starts more quickly because it skips certain configurations and tests. On w/ Boot to NIC allows the computer to attempt to boot from Hibernate or Off. NOTE: Normally, the system can only be powered up time by pressing the right- When set...
Owner's Manual
Page 116
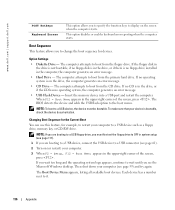
...If you must be bootable. This option disables or enables keyboard error reporting when the computer starts. Boot Sequence This feature allows you wait too long and the operating system logo appears, continue to boot from the CD drive. Option Settings • Diskette Drive - If no CD is in the ...drive, the computer generates an error message. • CD Drive - When F12 = Boot Menu appears in the drive, or if there is in the upper-right corner of the screen, press . www.dell.com | support.dell.com POST Hotkeys Keyboard Errors This option allows you see page 59) and try again...
...If you must be bootable. This option disables or enables keyboard error reporting when the computer starts. Boot Sequence This feature allows you wait too long and the operating system logo appears, continue to boot from the CD drive. Option Settings • Diskette Drive - If no CD is in the ...drive, the computer generates an error message. • CD Drive - When F12 = Boot Menu appears in the drive, or if there is in the upper-right corner of the screen, press . www.dell.com | support.dell.com POST Hotkeys Keyboard Errors This option allows you see page 59) and try again...

Owner's Manual
Page 117
... system setup (see page 112). 2 Use the arrow keys to highlight the Boot Sequence menu option and press to move a selected device up - and down-arrow keys to move through the list of devices. 4 Press the spacebar to ... the menu, enter the number of the device that is bootable, check the device documentation. NOTE: Write down the list. To make sure your current boot sequence in case you begin any of the procedures in this section, follow the safety instructions located in the Product Information Guide. 1 Follow the procedures...
... system setup (see page 112). 2 Use the arrow keys to highlight the Boot Sequence menu option and press to move a selected device up - and down-arrow keys to move through the list of devices. 4 Press the spacebar to ... the menu, enter the number of the device that is bootable, check the device documentation. NOTE: Write down the list. To make sure your current boot sequence in case you begin any of the procedures in this section, follow the safety instructions located in the Product Information Guide. 1 Follow the procedures...
Owner's Manual
Page 141
See sound B battery problems, 33 replacing, 103 BIOS, 111 boot sequence about, 116 changing, 116-117 option settings, 116 booting to a USB device, 116 C card fan installing, 86 problems, 33 cards installing PCI, 76 installing PCI Express, 81 PCI, 76 PCI Express, 81 PCI Express ... sound, 64-65 surround, 64 TV-OUT, 64 USB, 62, 65 VGA, 64 video, 64 copying CDs and DVDs, 17 cover closing, 104 opening, 69 D Dell contacting, 123 Dell Diagnostics, 52 support policy, 119 support site, 10 diagnostic lights, 49 diagnostics Dell, 52 lights, 49, 63 display. See monitor Index 141 Index A audio.
See sound B battery problems, 33 replacing, 103 BIOS, 111 boot sequence about, 116 changing, 116-117 option settings, 116 booting to a USB device, 116 C card fan installing, 86 problems, 33 cards installing PCI, 76 installing PCI Express, 81 PCI, 76 PCI Express, 81 PCI Express ... sound, 64-65 surround, 64 TV-OUT, 64 USB, 62, 65 VGA, 64 video, 64 copying CDs and DVDs, 17 cover closing, 104 opening, 69 D Dell contacting, 123 Dell Diagnostics, 52 support policy, 119 support site, 10 diagnostic lights, 49 diagnostics Dell, 52 lights, 49, 63 display. See monitor Index 141 Index A audio.
Owner's Manual
Page 145
T technical support policy, 119 transferring information to a new computer, 28 troubleshooting Dell Diagnostics, 52 diagnostic lights, 49 Hardware Troubleshooter, 58 Help and Support Center, 10 restore to previous operating state, 56 tips, 33 TV connect to computer, 19-20, 64 U USB booting to devices, 116 connectors, 62, 65 V VGA connector, 64 video connector...
T technical support policy, 119 transferring information to a new computer, 28 troubleshooting Dell Diagnostics, 52 diagnostic lights, 49 Hardware Troubleshooter, 58 Help and Support Center, 10 restore to previous operating state, 56 tips, 33 TV connect to computer, 19-20, 64 U USB booting to devices, 116 connectors, 62, 65 V VGA connector, 64 video connector...


