Owner's Manual
Page 10
... • Use the Service Tag to view the appropriate support site. • Community - DSS is necessary for your Dell computer. support.dell.com NOTE: Select your call when contacting technical support. • Solutions - What Are You Looking For? • Service...papers • Downloads - Certified drivers, patches, and software updates • Desktop System Software (DSS)- Troubleshooting hints and tips, articles from technicians, online courses, frequently asked questions Dell Support Website - The software automatically detects your computer and operating system and ...
... • Use the Service Tag to view the appropriate support site. • Community - DSS is necessary for your Dell computer. support.dell.com NOTE: Select your call when contacting technical support. • Solutions - What Are You Looking For? • Service...papers • Downloads - Certified drivers, patches, and software updates • Desktop System Software (DSS)- Troubleshooting hints and tips, articles from technicians, online courses, frequently asked questions Dell Support Website - The software automatically detects your computer and operating system and ...

Owner's Manual
Page 16
... then gently pull it to ensure that it clicks into a telephone wall jack. 1 Connect the network cable to a network device. The Microsoft® Windows® desktop displays on the back of the network cable to the network adapter connector on the monitor. 2 Enable clone mode or extended... graphics card, see the user's guide in the display settings. • In clone mode, the monitor and TV display the same image. • In extended desktop mode, you connect the TV, turn on computer network device network cable 16 Setting Up and Using Your Computer network adapter connector
... then gently pull it to ensure that it clicks into a telephone wall jack. 1 Connect the network cable to a network device. The Microsoft® Windows® desktop displays on the back of the network cable to the network adapter connector on the monitor. 2 Enable clone mode or extended... graphics card, see the user's guide in the display settings. • In clone mode, the monitor and TV display the same image. • In extended desktop mode, you connect the TV, turn on computer network device network cable 16 Setting Up and Using Your Computer network adapter connector

Owner's Manual
Page 17
...: 1 Save and close any open files, and exit any open programs. 2 Double-click the MSN Explorer or AOL icon on the Microsoft® Windows® desktop. 3 Follow the instructions on your computer and to complete the setup. Network Setup Wizard The Microsoft® Windows® XP operating system provides a Network Setup...
...: 1 Save and close any open files, and exit any open programs. 2 Double-click the MSN Explorer or AOL icon on the Microsoft® Windows® desktop. 3 Follow the instructions on your computer and to complete the setup. Network Setup Wizard The Microsoft® Windows® XP operating system provides a Network Setup...

Owner's Manual
Page 18
.... 6 Click the appropriate option under How do you want to connect to the Internet?, and then click Next. 7 Use the setup information provided by your desktop or if you want to select one, click Choose from a list of the tray until it . If you do not have an MSN Explorer or...
.... 6 Click the appropriate option under How do you want to connect to the Internet?, and then click Next. 7 Use the setup information provided by your desktop or if you want to select one, click Choose from a list of the tray until it . If you do not have an MSN Explorer or...

Owner's Manual
Page 24
... your hibernate settings on the Power Schemes tab, Advanced tab, and Hibernate tab. When the computer exits from a power conservation mode, the Windows desktop is on the keyboard or move the mouse. To exit from standby mode, press a key on and you can use standby mode or hibernate...mode to reduce power to the operating state it was in before it entered standby mode. When the computer exits from hibernate mode, the desktop is connected to a network, different options related to security and networking appear in certain windows. Standby Mode Standby mode conserves power by ...
... your hibernate settings on the Power Schemes tab, Advanced tab, and Hibernate tab. When the computer exits from a power conservation mode, the Windows desktop is on the keyboard or move the mouse. To exit from standby mode, press a key on and you can use standby mode or hibernate...mode to reduce power to the operating state it was in before it entered standby mode. When the computer exits from hibernate mode, the desktop is connected to a network, different options related to security and networking appear in certain windows. Standby Mode Standby mode conserves power by ...

Owner's Manual
Page 48
Dell.... 4 When the Dell Diagnostics Main Menu appears...Dell Diagnostics If you to increase the possibility of the ...Dell Diagnostics Main Menu 1 After the Dell Diagnostics loads and the Main Menu screen appears, click the button for the option you want to run the Dell... Diagnostics before you see page 111). 48 Troubleshooting Tools Performs a thorough check of devices. When to 20 minutes and requires no interaction on (or restart) your part. NOTICE: The Dell Diagnostics works only on Dell...™ computers. 1 Turn on your computer. 2 When the DELL...
Dell.... 4 When the Dell Diagnostics Main Menu appears...Dell Diagnostics If you to increase the possibility of the ...Dell Diagnostics Main Menu 1 After the Dell Diagnostics loads and the Main Menu screen appears, click the button for the option you want to run the Dell... Diagnostics before you see page 111). 48 Troubleshooting Tools Performs a thorough check of devices. When to 20 minutes and requires no interaction on (or restart) your part. NOTICE: The Dell Diagnostics works only on Dell...™ computers. 1 Turn on your computer. 2 When the DELL...

Owner's Manual
Page 100
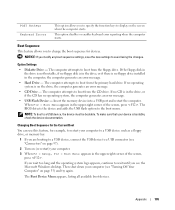
... this program. Then shut down the system setup screen information for your computer. Certain changes can make your computer. 2 When the blue DELL™ logo appears, press immediately. Entering System Setup 1 Turn on the screen is recommended that you write down your computer (see the... Microsoft® Windows® desktop. Before you use system setup, it is divided into three areas: the options list, active options field, and key functions. 100 Appendix ...
... this program. Then shut down the system setup screen information for your computer. Certain changes can make your computer. 2 When the blue DELL™ logo appears, press immediately. Entering System Setup 1 Turn on the screen is recommended that you write down your computer (see the... Microsoft® Windows® desktop. Before you use system setup, it is divided into three areas: the options list, active options field, and key functions. 100 Appendix ...
Owner's Manual
Page 105
... menu. POST Hotkeys Keyboard Errors This option allows you to specify the function keys to display on (or restart) your computer (see the Microsoft Windows desktop. If no CD is no operating system, the computer generates an error message. • USB Flash Device - NOTE: To boot to a USB connector (see "Connectors...
... menu. POST Hotkeys Keyboard Errors This option allows you to specify the function keys to display on (or restart) your computer (see the Microsoft Windows desktop. If no CD is no operating system, the computer generates an error message. • USB Flash Device - NOTE: To boot to a USB connector (see "Connectors...
Owner's Manual
Page 107
... "Replacing the Computer Cover" on page 93). 4 Connect your computer and monitor to electrical outlets, and turn them on. 5 After the Microsoft® Windows® desktop appears on your computer, shut down the computer (see "Turning Off Your Computer" on page 55). 6 Turn off the monitor and disconnect it from the...
... "Replacing the Computer Cover" on page 93). 4 Connect your computer and monitor to electrical outlets, and turn them on. 5 After the Microsoft® Windows® desktop appears on your computer, shut down the computer (see "Turning Off Your Computer" on page 55). 6 Turn off the monitor and disconnect it from the...

Owner's Manual
Page 112
... City Code: 11 Aruba Department Name or Service Area, Website and E-Mail Address General Support General Support Website: www.dell.com.ar E-mail: us_latin_services@dell.com E-mail for desktop and portable computers: la-techsupport@dell.com E-mail for XPS portable computers, you need assistance in determining which they are for use within the country...
... City Code: 11 Aruba Department Name or Service Area, Website and E-Mail Address General Support General Support Website: www.dell.com.ar E-mail: us_latin_services@dell.com E-mail for desktop and portable computers: la-techsupport@dell.com E-mail for XPS portable computers, you need assistance in determining which they are for use within the country...

Owner's Manual
Page 113
...and Country Code: 61 New Zealand): apcustserv@dell.com City Code: 2 Home and Small Business Government and Business Preferred Accounts Division (PAD) Customer Care (after sales) Technical Support (portables and desktops) Technical Support (servers and workstations) Corporate ...Sales Transaction Sales Fax Austria (Vienna) Website: support.euro.dell.com International Access Code: 900 E-mail: tech_support_central_europe@dell.com Country Code: 43 Home/Small Business ...
...and Country Code: 61 New Zealand): apcustserv@dell.com City Code: 2 Home and Small Business Government and Business Preferred Accounts Division (PAD) Customer Care (after sales) Technical Support (portables and desktops) Technical Support (servers and workstations) Corporate ...Sales Transaction Sales Fax Austria (Vienna) Website: support.euro.dell.com International Access Code: 900 E-mail: tech_support_central_europe@dell.com Country Code: 43 Home/Small Business ...
Owner's Manual
Page 123
...: 00 Country Code: 64 Department Name or Service Area, Website and E-Mail Address E-mail (New Zealand): nz_tech_support@dell.com E-mail Customer Care (Australia and New Zealand): apcustserv@dell.com Customer Care Technical Support (for desktop and portable computers) Technical Support (for servers and workstations) Home and Small Business Government and Business Sales Fax...
...: 00 Country Code: 64 Department Name or Service Area, Website and E-Mail Address E-mail (New Zealand): nz_tech_support@dell.com E-mail Customer Care (Australia and New Zealand): apcustserv@dell.com Customer Care Technical Support (for desktop and portable computers) Technical Support (for servers and workstations) Home and Small Business Government and Business Sales Fax...
Owner's Manual
Page 128
... Projectors Technical Support Public (government, education, and healthcare) Customer Service and Technical Support Employee Purchase Program (EPP) Customers Dell Sales U.S. Country (City) International Access Code Country Code City Code Department Name or Service Area, Website and E-Mail Address... U.S.A. (Austin, Texas) Automated Order-Status Service International Access Code: 011 AutoTech (portable and desktop computers) Country Code: 1 Technical Support (Dell TV, Printers, and Projectors) for Relationship customers Consumer (Home and Home Office) Technical Support for the...
... Projectors Technical Support Public (government, education, and healthcare) Customer Service and Technical Support Employee Purchase Program (EPP) Customers Dell Sales U.S. Country (City) International Access Code Country Code City Code Department Name or Service Area, Website and E-Mail Address... U.S.A. (Austin, Texas) Automated Order-Status Service International Access Code: 011 AutoTech (portable and desktop computers) Country Code: 1 Technical Support (Dell TV, Printers, and Projectors) for Relationship customers Consumer (Home and Home Office) Technical Support for the...
Owner's Manual
Page 130
... User License Agreement, 9 ergonomics information, 9 error messages diagnostic lights, 45 F floppy drive installing, 87 removing, 85 H hard drive installing, 77 problems, 31 removing, 76 hardware Dell Diagnostics, 48 Hardware Troubleshooter, 51 Help and Support Center, 11 hibernate mode, 24, 26 Hyper-Threading, 27 I IEEE 1394 problems, 33 installing parts before you... messages error, 32 Microsoft Windows label, 10 modem adding, 89 problems, 31 monitor blank, 42 clone mode, 16 connect TV, 15 display settings, 16 extended desktop mode, 16 hard to read, 43 problems, 42 motherboard.
... User License Agreement, 9 ergonomics information, 9 error messages diagnostic lights, 45 F floppy drive installing, 87 removing, 85 H hard drive installing, 77 problems, 31 removing, 76 hardware Dell Diagnostics, 48 Hardware Troubleshooter, 51 Help and Support Center, 11 hibernate mode, 24, 26 Hyper-Threading, 27 I IEEE 1394 problems, 33 installing parts before you... messages error, 32 Microsoft Windows label, 10 modem adding, 89 problems, 31 monitor blank, 42 clone mode, 16 connect TV, 15 display settings, 16 extended desktop mode, 16 hard to read, 43 problems, 42 motherboard.
Service Manual
Page 17
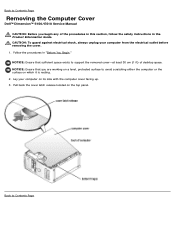
... (1 ft) of the procedures in this section, follow the safety instructions in "Before You Begin." NOTICE: Ensure that you begin any of desktop space. Follow the procedures in the Product Information Guide. Back to Contents Page Pull back the cover latch release located on the top panel.... Back to Contents Page Removing the Computer Cover Dell™ Dimension™ 5150/E510 Service Manual CAUTION: Before you are working on a level, protected surface to avoid scratching either the computer or the...
... (1 ft) of the procedures in this section, follow the safety instructions in "Before You Begin." NOTICE: Ensure that you begin any of desktop space. Follow the procedures in the Product Information Guide. Back to Contents Page Pull back the cover latch release located on the top panel.... Back to Contents Page Removing the Computer Cover Dell™ Dimension™ 5150/E510 Service Manual CAUTION: Before you are working on a level, protected surface to avoid scratching either the computer or the...

Service Manual
Page 21
... this section, follow the safety instructions in the Product Information Guide. To verify that memory size has changed, press to your Microsoft® Windows® desktop and click Properties. 11. If you begin any of the module. 6. Cards CAUTION: Before you insert the module correctly, the securing clips snap into the...
... this section, follow the safety instructions in the Product Information Guide. To verify that memory size has changed, press to your Microsoft® Windows® desktop and click Properties. 11. If you begin any of the module. 6. Cards CAUTION: Before you insert the module correctly, the securing clips snap into the...
Service Manual
Page 60
...setup and is active. NOTE: The Drivers and Utilities CD (ResourceCD) is recommended that the device you want to run the Dell Diagnostics before you begin . Enter system setup to review your computer, perform the checks in this section, follow the safety ...before you see the Microsoft® Windows® desktop. When the boot device list appears, highlight Boot to Contents Page Troubleshooting Dell™ Dimension™ 5150/E510 Service Manual Dell Diagnostics System Lights Diagnostic Lights Beep Codes Dell Diagnostics CAUTION: Before you begin any of the ...
...setup and is active. NOTE: The Drivers and Utilities CD (ResourceCD) is recommended that the device you want to run the Dell Diagnostics before you begin . Enter system setup to review your computer, perform the checks in this section, follow the safety ...before you see the Microsoft® Windows® desktop. When the boot device list appears, highlight Boot to Contents Page Troubleshooting Dell™ Dimension™ 5150/E510 Service Manual Dell Diagnostics System Lights Diagnostic Lights Beep Codes Dell Diagnostics CAUTION: Before you begin any of the ...

Service Manual
Page 61
...of tracing the problem quickly. If multiple versions are having. 2. When the Dell Diagnostics Main Menu appears, select the test you cannot resolve the error condition, contact Dell (see the Windows desktop. This test typically takes 10 to 20 minutes and requires no interaction on... you want to answer Test questions periodically. Option Function Express Performs a quick test of devices. Run Express Test first to start the Dell Diagnostics. 8. You can customize the tests you to run. Your computer's Service Tag is encountered during a test, a message appears with...
...of tracing the problem quickly. If multiple versions are having. 2. When the Dell Diagnostics Main Menu appears, select the test you cannot resolve the error condition, contact Dell (see the Windows desktop. This test typically takes 10 to 20 minutes and requires no interaction on... you want to answer Test questions periodically. Option Function Express Performs a quick test of devices. Run Express Test first to start the Dell Diagnostics. 8. You can customize the tests you to run. Your computer's Service Tag is encountered during a test, a message appears with...
Service Manual
Page 65
NOTICE: Unless you see the Microsoft® Windows® desktop, then shut down the system setup screen information for future reference. Entering System Setup 1. System Setup Screens The system setup screen displays current ... 2. Turn on (or restart) your computer. If you wait too long and the operating system logo appears, continue to Contents Page System Setup Dell™ Dimension™ 5150/E510 Service Manual Overview Entering System Setup System Setup Screens System Setup Options Boot Sequence Clearing Forgotten Passwords Clearing CMOS Settings Overview Use...
NOTICE: Unless you see the Microsoft® Windows® desktop, then shut down the system setup screen information for future reference. Entering System Setup 1. System Setup Screens The system setup screen displays current ... 2. Turn on (or restart) your computer. If you wait too long and the operating system logo appears, continue to Contents Page System Setup Dell™ Dimension™ 5150/E510 Service Manual Overview Entering System Setup System Setup Screens System Setup Options Boot Sequence Clearing Forgotten Passwords Clearing CMOS Settings Overview Use...

Service Manual
Page 70
... key, highlight USB Flash Device and press . If you are booting to a USB device, connect the USB device to a USB connector (see the Microsoft Windows desktop. If there is no CD in the drive, or if the CD in the drive is a non-bootable floppy disk in the upper-right corner...
... key, highlight USB Flash Device and press . If you are booting to a USB device, connect the USB device to a USB connector (see the Microsoft Windows desktop. If there is no CD in the drive, or if the CD in the drive is a non-bootable floppy disk in the upper-right corner...


