Owner's Manual
Page 1
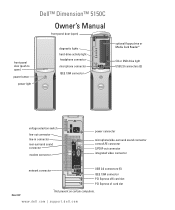
www.dell.com | support.dell.com Dell™ Dimension™ 5150C Owner's Manual front-panel door (open) front-panel door (push to open) power button power light diagnostic lights hard-drive activity light headphone connector microphone connector IEEE 1394 connector optional floppy drive or Media Card Reader* CD or DVD drive light USB 2.0 connectors (2) voltage selection switch line-out connector...
www.dell.com | support.dell.com Dell™ Dimension™ 5150C Owner's Manual front-panel door (open) front-panel door (push to open) power button power light diagnostic lights hard-drive activity light headphone connector microphone connector IEEE 1394 connector optional floppy drive or Media Card Reader* CD or DVD drive light USB 2.0 connectors (2) voltage selection switch line-out connector...

Owner's Manual
Page 4
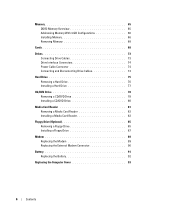
... Setup 27 Enabling the QRT feature in the Operating system 27 Hyper-Threading 27 2 Solving Problems Troubleshooting Tips 29 Battery Problems 29 Drive Problems 29 CD and DVD drive problems 30 Hard drive problems 31 E-Mail, Modem, and Internet Problems 31 Error Messages 32 Media Card Reader Problems 33 IEEE 1394 Device Problems 33...
... Setup 27 Enabling the QRT feature in the Operating system 27 Hyper-Threading 27 2 Solving Problems Troubleshooting Tips 29 Battery Problems 29 Drive Problems 29 CD and DVD drive problems 30 Hard drive problems 31 E-Mail, Modem, and Internet Problems 31 Error Messages 32 Media Card Reader Problems 33 IEEE 1394 Device Problems 33...
Owner's Manual
Page 6
... Configurations 66 Installing Memory 66 Removing Memory 68 Cards 68 Drives 73 Connecting Drive Cables 73 Drive Interface Connectors 74 Power Cable Connector 74 Connecting and Disconnecting Drive Cables 74 Hard Drive 75 Removing a Hard Drive 76 Installing a Hard Drive 77 CD/DVD Drive 78 Removing a CD/DVD Drive 78 Installing a CD/DVD Drive 80 Media Card Reader 81 Removing a Media Card Reader...
... Configurations 66 Installing Memory 66 Removing Memory 68 Cards 68 Drives 73 Connecting Drive Cables 73 Drive Interface Connectors 74 Power Cable Connector 74 Connecting and Disconnecting Drive Cables 74 Hard Drive 75 Removing a Hard Drive 76 Installing a Hard Drive 77 CD/DVD Drive 78 Removing a CD/DVD Drive 78 Installing a CD/DVD Drive 80 Media Card Reader 81 Removing a Media Card Reader...
Owner's Manual
Page 21
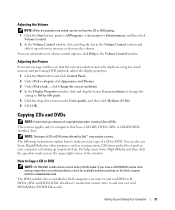
...Ensure that you that have a CD-RW/DVD combo drive and you do not hear the CD or DVD playing. 1 Click the Start button, point to increase or decrease the volume. NOTE: The types of CD or DVD drives offered by Dell™ may not read DVD-RAM or DVD-R DL media. For more information on volume... control options, click Help in the upper-right corner of a CD or DVD. Adjusting the Picture If an error message notifies you observe all...
...Ensure that you that have a CD-RW/DVD combo drive and you do not hear the CD or DVD playing. 1 Click the Start button, point to increase or decrease the volume. NOTE: The types of CD or DVD drives offered by Dell™ may not read DVD-RAM or DVD-R DL media. For more information on volume... control options, click Help in the upper-right corner of a CD or DVD. Adjusting the Picture If an error message notifies you observe all...
Owner's Manual
Page 22
After creating a CD-R, you cannot write to the blank CD or DVD. After you create a DVD+/-R disc, you have created automatically ejects. When prompted, insert a blank CD or DVD into the drive and click OK. • If you have two CD or DVD drives, select the drive into which you may not be able to write to permanently... click the Disc Copy button. Once you have finished copying the source CD or DVD, the CD or DVD that you have one CD or DVD drive, ensure that the settings are correct and click the Disc Copy button. Use blank CD-RWs to write to CDs or to record music or ...
After creating a CD-R, you cannot write to the blank CD or DVD. After you create a DVD+/-R disc, you have created automatically ejects. When prompted, insert a blank CD or DVD into the drive and click OK. • If you have two CD or DVD drives, select the drive into which you may not be able to write to permanently... click the Disc Copy button. Once you have finished copying the source CD or DVD, the CD or DVD that you have one CD or DVD drive, ensure that the settings are correct and click the Disc Copy button. Use blank CD-RWs to write to CDs or to record music or ...
Owner's Manual
Page 29
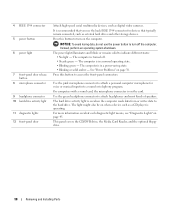
...the procedures in this section, follow the safety instructions located in a program, see the program's documentation. If the floppy, CD, or DVD drive, is incorrectly installed. This message may help technical support personnel diagnose and fix the problem(s). • If an error message occurs in ...review the installation procedures and ensure that the part is correctly installed. • If a peripheral device does not work properly, contact Dell (see page 92). Click the Start button and click My Computer. Solving Problems 29 Solving Problems Troubleshooting Tips Follow these tips when ...
...the procedures in this section, follow the safety instructions located in a program, see the program's documentation. If the floppy, CD, or DVD drive, is incorrectly installed. This message may help technical support personnel diagnose and fix the problem(s). • If an error message occurs in ...review the installation procedures and ensure that the part is correctly installed. • If a peripheral device does not work properly, contact Dell (see page 92). Click the Start button and click My Computer. Solving Problems 29 Solving Problems Troubleshooting Tips Follow these tips when ...
Owner's Manual
Page 30
... of different regions worldwide and different disc formats, not all DVD titles work in the drive or the CD or DVD. NOTE: This system supports an optional USB floppy drive. CHECK THE CABLE CONNECTIONS R U N T H E H A R D W A R E TR O U B L E S H O O T E R - Problems writing to the CD/DVD-RW. Try closing all DVD drives. See "Sound and Speaker Problems" on power management modes. 30...
... of different regions worldwide and different disc formats, not all DVD titles work in the drive or the CD or DVD. NOTE: This system supports an optional USB floppy drive. CHECK THE CABLE CONNECTIONS R U N T H E H A R D W A R E TR O U B L E S H O O T E R - Problems writing to the CD/DVD-RW. Try closing all DVD drives. See "Sound and Speaker Problems" on power management modes. 30...
Owner's Manual
Page 47
... an error message on your computer. • If the problem persists, contact Dell (see page 64). • If there is correct for each card. If the computer starts normally, troubleshoot the last card removed from the hard drive, CD drive, and DVD drive (see page 111). Troubleshooting Tools 47 See "Using Intel® Viiv™...
... an error message on your computer. • If the problem persists, contact Dell (see page 64). • If there is correct for each card. If the computer starts normally, troubleshoot the last card removed from the hard drive, CD drive, and DVD drive (see page 111). Troubleshooting Tools 47 See "Using Intel® Viiv™...

Owner's Manual
Page 57
The drive activity light is recommended that typically remain connected, such as printers and keyboards. Use the ...the back USB connectors for more information on when the computer reads data from the drive. It is on booting to eject a CD/DVD from the CD or DVD drive. Removing and Installing Parts 57 Front and Back View of the Computer Front View NOTE... using certain Flash Media or IEEE 1394, USB, or headphone connectors. 12 11 10 1 2 9 8 3 7 6 5 4 1 CD/DVD drive eject button 2 CD/DVD drive-activity light 3 USB 2.0 connectors (2) Press this button to a USB device).
The drive activity light is recommended that typically remain connected, such as printers and keyboards. Use the ...the back USB connectors for more information on when the computer reads data from the drive. It is on booting to eject a CD/DVD from the CD or DVD drive. Removing and Installing Parts 57 Front and Back View of the Computer Front View NOTE... using certain Flash Media or IEEE 1394, USB, or headphone connectors. 12 11 10 1 2 9 8 3 7 6 5 4 1 CD/DVD drive eject button 2 CD/DVD drive-activity light 3 USB 2.0 connectors (2) Press this button to a USB device).
Owner's Manual
Page 58
.... Press this button to turn off . • Steady green - Press this button to turn on when a device such as external hard drives and other storage devices. Use the green headphone connector to indicate different states: • No light - Instead, perform an operating system shutdown.... This panel covers the CD/DVD drive, the Media Card Reader, and the optional floppy drive. 58 Removing and Installing Parts It is operating. The power light illuminates and blinks or remains solid to ...
.... Press this button to turn off . • Steady green - Press this button to turn on when a device such as external hard drives and other storage devices. Use the green headphone connector to indicate different states: • No light - Instead, perform an operating system shutdown.... This panel covers the CD/DVD drive, the Media Card Reader, and the optional floppy drive. 58 Removing and Installing Parts It is operating. The power light illuminates and blinks or remains solid to ...

Owner's Manual
Page 63
Inside View of Your Computer CAUTION: Before you begin any of the procedures in this section, follow the safety instructions in the Product Information Guide. CAUTION: To guard against electrical shock, always unplug your computer from the electrical outlet before opening the cover. CD/DVD drive drive release latch power supply and fan hard drive front-panel door power button heat sink assembly Removing and Installing Parts 63
Inside View of Your Computer CAUTION: Before you begin any of the procedures in this section, follow the safety instructions in the Product Information Guide. CAUTION: To guard against electrical shock, always unplug your computer from the electrical outlet before opening the cover. CD/DVD drive drive release latch power supply and fan hard drive front-panel door power button heat sink assembly Removing and Installing Parts 63

Owner's Manual
Page 66
...connectors 1 and 2 (white securing clips) matched pair of memory modules in DIMM connectors 3 and 4 (black securing clips) NOTE: Memory purchased from Dell is less than 4 GB. Otherwise, your computer warranty. Installing Memory CAUTION: Before you begin any new modules that you remove your original memory modules... within the computer require address space in "Before You Begin" on page 55. 2 Remove the CD/DVD drive (see page 78). 3 Remove the optional Media Card Reader or optional floppy drive, (see page 82 or page 85) if installed. 66 Removing and Installing Parts NOTICE: If you may...
...connectors 1 and 2 (white securing clips) matched pair of memory modules in DIMM connectors 3 and 4 (black securing clips) NOTE: Memory purchased from Dell is less than 4 GB. Otherwise, your computer warranty. Installing Memory CAUTION: Before you begin any new modules that you remove your original memory modules... within the computer require address space in "Before You Begin" on page 55. 2 Remove the CD/DVD drive (see page 78). 3 Remove the optional Media Card Reader or optional floppy drive, (see page 82 or page 85) if installed. 66 Removing and Installing Parts NOTICE: If you may...
Owner's Manual
Page 73
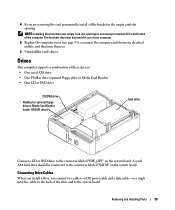
... computer supports a combination of these devices: • One serial ATA drive • One FlexBay drive (optional floppy drive or Media Card Reader) • One CD or DVD drive CD/DVD drive FlexBay for optional floppy drive or Media Card Reader (under CD/DVD drive) hard drive Connect a CD or DVD drive to maintain FCC certification of the computer. The brackets also keep dust...
... computer supports a combination of these devices: • One serial ATA drive • One FlexBay drive (optional floppy drive or Media Card Reader) • One CD or DVD drive CD/DVD drive FlexBay for optional floppy drive or Media Card Reader (under CD/DVD drive) hard drive Connect a CD or DVD drive to maintain FCC certification of the computer. The brackets also keep dust...
Owner's Manual
Page 78
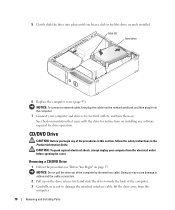
...: Before you hear a click or feel the drive securely installed. Removing a CD/DVD Drive 1 Follow the procedures in the Product Information Guide. 5 Gently slide the drive into the computer. 7 Connect your computer from the computer. 78 Removing and Installing Parts Doing so may cause damage to cables and the cable connectors. 2 ...
...: Before you hear a click or feel the drive securely installed. Removing a CD/DVD Drive 1 Follow the procedures in the Product Information Guide. 5 Gently slide the drive into the computer. 7 Connect your computer from the computer. 78 Removing and Installing Parts Doing so may cause damage to cables and the cable connectors. 2 ...

Owner's Manual
Page 79
interface cable interface cable connector Removing and Installing Parts 79 CD/DVD drive drive release latch NOTE: The interface cable is held in place by the metal drive bracket and does not need to be removed from the drive. 4 Disconnect the interface cable from the interface cable connector on the system board (see page 64).
interface cable interface cable connector Removing and Installing Parts 79 CD/DVD drive drive release latch NOTE: The interface cable is held in place by the metal drive bracket and does not need to be removed from the drive. 4 Disconnect the interface cable from the interface cable connector on the system board (see page 64).

Owner's Manual
Page 80
If you are installing an IDE drive, configure the drive for the cable select setting. 2 Connect the interface cable to verify that accompanied the drive to the interface cable connector on page 64. See "System Board Components" on the system board. Check the documentation that the drive is configured for installation. interface cable 3 Slide the drive into place. Installing a CD/DVD Drive 1 Unpack the drive and prepare it for your computer. interface cable connector 80 Removing and Installing Parts
If you are installing an IDE drive, configure the drive for the cable select setting. 2 Connect the interface cable to verify that accompanied the drive to the interface cable connector on page 64. See "System Board Components" on the system board. Check the documentation that the drive is configured for installation. interface cable 3 Slide the drive into place. Installing a CD/DVD Drive 1 Unpack the drive and prepare it for your computer. interface cable connector 80 Removing and Installing Parts

Owner's Manual
Page 82
Removing a Media Card Reader 1 Follow the procedures in "Before You Begin" on page 55. 2 Remove the CD/DVD drive (see page 78). 3 Remove the hard drive (see page 76). 4 Disconnect the interface cable from the back of the Media Card Reader and from the Media Card Reader connector on the system board (see page 64). interface cable 82 Removing and Installing Parts
Removing a Media Card Reader 1 Follow the procedures in "Before You Begin" on page 55. 2 Remove the CD/DVD drive (see page 78). 3 Remove the hard drive (see page 76). 4 Disconnect the interface cable from the back of the Media Card Reader and from the Media Card Reader connector on the system board (see page 64). interface cable 82 Removing and Installing Parts

Owner's Manual
Page 85
...cable, lift the drive away from the ...DVD drive (see page 93). CAUTION: To ...DVD drive (see page 80). 6 Replace the hard drive (see page 77). 7 Replace the computer cover (see page 78). 3 Pull up on . Removing and Installing Parts 85 See the documentation that came with the drive for drive... operation. 9 Enter system setup (see page 99) and select the appropriate Drive...drive release latch and slide the drive toward the back of the procedures in this section, follow the safety instructions located in the Product Information Guide. Removing a Floppy Drive...
...cable, lift the drive away from the ...DVD drive (see page 93). CAUTION: To ...DVD drive (see page 80). 6 Replace the hard drive (see page 77). 7 Replace the computer cover (see page 78). 3 Pull up on . Removing and Installing Parts 85 See the documentation that came with the drive for drive... operation. 9 Enter system setup (see page 99) and select the appropriate Drive...drive release latch and slide the drive toward the back of the procedures in this section, follow the safety instructions located in the Product Information Guide. Removing a Floppy Drive...

Owner's Manual
Page 88
...correctly by running the Dell Diagnostics (see page 93). cable release tab interface cable edge connector interface cable 4 Check all cable connections, and fold cables out of the way to their electrical outlets, and turn them on installing any software required for drive operation. 8 Enter ...system setup (see page 99) and select the appropriate Diskette Drive option. 9 Verify that came with the drive for the fan and cooling vents. 5 Replace the CD/DVD drive (see page 80). 6 Replace the computer cover (...
...correctly by running the Dell Diagnostics (see page 93). cable release tab interface cable edge connector interface cable 4 Check all cable connections, and fold cables out of the way to their electrical outlets, and turn them on installing any software required for drive operation. 8 Enter ...system setup (see page 99) and select the appropriate Diskette Drive option. 9 Verify that came with the drive for the fan and cooling vents. 5 Replace the CD/DVD drive (see page 80). 6 Replace the computer cover (...
Owner's Manual
Page 96
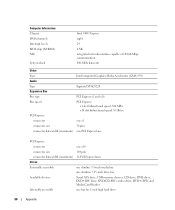
... x16 connector size 164 pins connector data width (maximum) 16 PCI Express lanes Drives Externally accessible one slimline 3.5-inch media bay one slimline 5.25-inch drive bay Available devices Serial ATA drive, USB memory devices, CD drive, DVD drive, DVD+RW drive, DVD/CD-RW combo drive, DVD+/-RW, and Media Card Reader Internally accessible one bay for 1-inch high hard...
... x16 connector size 164 pins connector data width (maximum) 16 PCI Express lanes Drives Externally accessible one slimline 3.5-inch media bay one slimline 5.25-inch drive bay Available devices Serial ATA drive, USB memory devices, CD drive, DVD drive, DVD+RW drive, DVD/CD-RW combo drive, DVD+/-RW, and Media Card Reader Internally accessible one bay for 1-inch high hard...


