Owner's Manual
Page 1
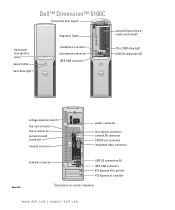
Dell™ Dimension™ 5100C front-panel door (open) front-panel door (push to open) power button hard-drive light diagnostic lights headphone connector microphone connector IEEE 1394 connector optional floppy drive or media card reader* CD or DVD drive light USB 2.0 connectors (2) voltage selection switch line-out connector line-in connector surround sound connector... Model DHP network connector USB 2.0 connectors (5) IEEE 1394 connector PCI Express x16 card slot PCI Express x1 card slot *Not present on certain computers. www.dell.com | support.dell.com
Dell™ Dimension™ 5100C front-panel door (open) front-panel door (push to open) power button hard-drive light diagnostic lights headphone connector microphone connector IEEE 1394 connector optional floppy drive or media card reader* CD or DVD drive light USB 2.0 connectors (2) voltage selection switch line-out connector line-in connector surround sound connector... Model DHP network connector USB 2.0 connectors (5) IEEE 1394 connector PCI Express x16 card slot PCI Express x1 card slot *Not present on certain computers. www.dell.com | support.dell.com

Owner's Manual
Page 3
... the Internet 17 Setting Up Your Internet Connection 17 Playing a CD or DVD 18 Adjusting the Volume 21 Adjusting the Picture 21 Copying CDs and DVDs 21 How to Copy a CD or DVD 21 Using Blank CD-Rs, CD-RWs, DVD+R, and DVD+RW 22 Helpful Tips 22 Power Management 23 Standby Mode 23 Hibernate...
... the Internet 17 Setting Up Your Internet Connection 17 Playing a CD or DVD 18 Adjusting the Volume 21 Adjusting the Picture 21 Copying CDs and DVDs 21 How to Copy a CD or DVD 21 Using Blank CD-Rs, CD-RWs, DVD+R, and DVD+RW 22 Helpful Tips 22 Power Management 23 Standby Mode 23 Hibernate...

Owner's Manual
Page 4
2 Solving Problems Troubleshooting Tips 27 Battery Problems 27 Drive Problems 27 CD and DVD drive problems 28 Hard drive problems 29 E-Mail, Modem, and Internet Problems 29 Error Messages 30 Media Card Reader Problems 31 IEEE 1394 Device Problems ...
2 Solving Problems Troubleshooting Tips 27 Battery Problems 27 Drive Problems 27 CD and DVD drive problems 28 Hard drive problems 29 E-Mail, Modem, and Internet Problems 29 Error Messages 30 Media Card Reader Problems 31 IEEE 1394 Device Problems ...

Owner's Manual
Page 6
... Cable Connector 72 Connecting and Disconnecting Drive Cables 73 Hard Drive 73 Removing a Hard Drive 73 Installing a Hard Drive 75 CD/DVD Drive 76 Removing a CD/DVD Drive 76 Installing a CD/DVD Drive 78 Media Card Reader 79 Removing a Media Card Reader 80 Installing a Media Card Reader 81 Floppy Drive (Optional 83 Removing...
... Cable Connector 72 Connecting and Disconnecting Drive Cables 73 Hard Drive 73 Removing a Hard Drive 73 Installing a Hard Drive 75 CD/DVD Drive 76 Removing a CD/DVD Drive 76 Installing a CD/DVD Drive 78 Media Card Reader 79 Removing a Media Card Reader 80 Installing a Media Card Reader 81 Floppy Drive (Optional 83 Removing...

Owner's Manual
Page 7
Cleaning Your Computer 105 Computer, Keyboard, and Monitor 105 Mouse 105 CDs and DVDs 106 Dell Technical Support Policy (U.S. Only 107 Class A 107 Class B 107 FCC Identification Information 108 Contacting Dell 108 Index 125 Contents 7 Only 106 Definition of "Dell-Installed" Software and Peripherals 106 Definition of "Third-Party" Software and Peripherals 107 FCC Notices (U.S.
Cleaning Your Computer 105 Computer, Keyboard, and Monitor 105 Mouse 105 CDs and DVDs 106 Dell Technical Support Policy (U.S. Only 107 Class A 107 Class B 107 FCC Identification Information 108 Contacting Dell 108 Index 125 Contents 7 Only 106 Definition of "Dell-Installed" Software and Peripherals 106 Definition of "Third-Party" Software and Peripherals 107 FCC Notices (U.S.

Owner's Manual
Page 18
... from a list of the tray 3 Press the disc into place. 18 Setting Up and Using Your Computer Playing a CD or DVD NOTICE: Do not press down on the CD or DVD tray when you open or close any open files, and exit any open programs. 2 Click the Start button and click Internet... it clicks into the center of the drive. 2 Place the disc, label side up in the past, the ISP might have a service outage. www.dell.com | support.dell.com If you do not have an MSN Explorer or AOL icon on your desktop or if you want to complete the setup. NOTE...
... from a list of the tray 3 Press the disc into place. 18 Setting Up and Using Your Computer Playing a CD or DVD NOTICE: Do not press down on the CD or DVD tray when you open or close any open files, and exit any open programs. 2 Click the Start button and click Internet... it clicks into the center of the drive. 2 Place the disc, label side up in the past, the ISP might have a service outage. www.dell.com | support.dell.com If you do not have an MSN Explorer or AOL icon on your desktop or if you want to complete the setup. NOTE...

Owner's Manual
Page 20
Move forward within the current track. A DVD player includes the following basic buttons: Play. Pause. For more information on playing CDs or DVDs, click Help on the CD or DVD player (if available). 20 Setting Up and Using Your Computer Stop. Go to the previous title or chapter. Play. Go to the previous track. Go to the next track. www.dell.com | support.dell.com A CD player includes the following basic buttons: Stop. Move backward within the current track. Fast forward. Fast reverse. Go to the next title or chapter. Pause. Eject.
Move forward within the current track. A DVD player includes the following basic buttons: Play. Pause. For more information on playing CDs or DVDs, click Help on the CD or DVD player (if available). 20 Setting Up and Using Your Computer Stop. Go to the previous title or chapter. Play. Go to the previous track. Go to the next track. www.dell.com | support.dell.com A CD player includes the following basic buttons: Stop. Move backward within the current track. Fast forward. Fast reverse. Go to the next title or chapter. Pause. Eject.

Owner's Manual
Page 21
...Volume Control. 2 In the Volume Control window, click and drag the bar in the Volume Control window. NOTE: The types of CD or DVD drives offered by Dell may vary by 600 pixels. 5 Click the drop-down to computers that came with your computer and creating MP3 CDs. You can also use...click the help or tutorial option. Open Sonic RecordNow, click the question mark icon in Screen resolution to change the setting to Copy a CD or DVD NOTE: If you experience recording problems, check for other purposes, including creating CDs from audio files on volume control options, click Help in the ...
...Volume Control. 2 In the Volume Control window, click and drag the bar in the Volume Control window. NOTE: The types of CD or DVD drives offered by Dell may vary by 600 pixels. 5 Click the drop-down to computers that came with your computer and creating MP3 CDs. You can also use...click the help or tutorial option. Open Sonic RecordNow, click the question mark icon in Screen resolution to change the setting to Copy a CD or DVD NOTE: If you experience recording problems, check for other purposes, including creating CDs from audio files on volume control options, click Help in the ...

Owner's Manual
Page 22
...amounts of recording media-CD-Rs, CD-RWs (including high-speed CD-RWs), DVD+Rs, and DVD+RWs. Use blank DVD+RWs if you have one optical drive, ensure that disc later. However, DVD-writable drives do not play in Dell™ computers can be able to write to that CD-R again (see ...the Sonic documentation for home theater systems might not read DVD-RAM media. Your DVD-writable drive can read all five formats. The computer...
...amounts of recording media-CD-Rs, CD-RWs (including high-speed CD-RWs), DVD+Rs, and DVD+RWs. Use blank DVD+RWs if you have one optical drive, ensure that disc later. However, DVD-writable drives do not play in Dell™ computers can be able to write to that CD-R again (see ...the Sonic documentation for home theater systems might not read DVD-RAM media. Your DVD-writable drive can read all five formats. The computer...

Owner's Manual
Page 23
... played only on MP3 players or on the keyboard or move the mouse. Setting Up and Using Your Computer 23 • You cannot create audio DVDs with CD recording techniques. You can also use standby mode or hibernate mode to reduce power to the entire computer. NOTE: Windows XP Professional includes...
... played only on MP3 players or on the keyboard or move the mouse. Setting Up and Using Your Computer 23 • You cannot create audio DVDs with CD recording techniques. You can also use standby mode or hibernate mode to reduce power to the entire computer. NOTE: Windows XP Professional includes...

Owner's Manual
Page 27
...does not work , ensure that the part is correctly installed. • If a peripheral device does not work properly, contact Dell (see page 108). Click the Start button and click My Computer. Solving Problems 27 Discard used batteries according to repeatedly reset time...section, follow the safety instructions located in the Product Information Guide. R E P L A C E T H E B A T T E R Y - If the floppy, CD, or DVD drive, is incorrectly installed. Replace the battery only with your computer: • If you added or removed a part before the problem started, review the installation...
...does not work , ensure that the part is correctly installed. • If a peripheral device does not work properly, contact Dell (see page 108). Click the Start button and click My Computer. Solving Problems 27 Discard used batteries according to repeatedly reset time...section, follow the safety instructions located in the Product Information Guide. R E P L A C E T H E B A T T E R Y - If the floppy, CD, or DVD drive, is incorrectly installed. Replace the battery only with your computer: • If you added or removed a part before the problem started, review the installation...

Owner's Manual
Page 28
... icon in Windows Help for information on page 39. The CD/DVD-RW drive must receive a steady stream of your screen. •... and different disc formats, not all programs before you write to a CD/DVD-RW drive C L O S E O T H E R P R O G R A M S - See page 105. Problems writing to the CD/DVD-RW. C L E A N T H E D R I V E O R D I S C - C H E C K T H E S P E A K E R S A N D S U B W O O F E R - R W D I S K - www.dell.com | support.dell.com TEST THE DRIVE - • Insert another floppy disk, CD, or DVD to eliminate the possibility that are checked. See page 49. R U ...
... icon in Windows Help for information on page 39. The CD/DVD-RW drive must receive a steady stream of your screen. •... and different disc formats, not all programs before you write to a CD/DVD-RW drive C L O S E O T H E R P R O G R A M S - See page 105. Problems writing to the CD/DVD-RW. C L E A N T H E D R I V E O R D I S C - C H E C K T H E S P E A K E R S A N D S U B W O O F E R - R W D I S K - www.dell.com | support.dell.com TEST THE DRIVE - • Insert another floppy disk, CD, or DVD to eliminate the possibility that are checked. See page 49. R U ...

Owner's Manual
Page 45
...that you removed, remove a different card, and then restart the computer. 3 Repeat this process for resource conflicts (see page 49). 4 If the problem persists, contact Dell (see page 108). Suggested Resolution 1 Determine if a conflict exists by removing a card (not a graphics card) (see page 66) and restarting the computer. 2 ... last card removed from the computer for each card. check system setup (see page 97) to boot from the hard drive, CD drive, and DVD drive (see page 62). • If there is an error message on your screen identifying a problem with a device (such as the floppy ...
...that you removed, remove a different card, and then restart the computer. 3 Repeat this process for resource conflicts (see page 49). 4 If the problem persists, contact Dell (see page 108). Suggested Resolution 1 Determine if a conflict exists by removing a card (not a graphics card) (see page 66) and restarting the computer. 2 ... last card removed from the computer for each card. check system setup (see page 97) to boot from the hard drive, CD drive, and DVD drive (see page 62). • If there is an error message on your screen identifying a problem with a device (such as the floppy ...

Owner's Manual
Page 56
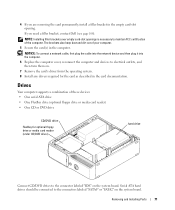
www.dell.com | support.dell.com 1 CD/DVD drive eject button 2 CD/DVD drive-activity light 3 USB 2.0 connectors (2) 4 IEEE 1394 connector 5 power button 6 power light 7 front-panel door release button 8 microphone connector 9 headphone connector 10 diagnostic lights 11 ... into a sound or telephony program. On computers with a sound card, the microphone connector is turned off the computer. Press this button to eject a CD/DVD from the CD or DVD drive. The computer is on the computer. Use the pink microphone connector to turn on the card. This panel covers the CD...
www.dell.com | support.dell.com 1 CD/DVD drive eject button 2 CD/DVD drive-activity light 3 USB 2.0 connectors (2) 4 IEEE 1394 connector 5 power button 6 power light 7 front-panel door release button 8 microphone connector 9 headphone connector 10 diagnostic lights 11 ... into a sound or telephony program. On computers with a sound card, the microphone connector is turned off the computer. Press this button to eject a CD/DVD from the CD or DVD drive. The computer is on the computer. Use the pink microphone connector to turn on the card. This panel covers the CD...

Owner's Manual
Page 61
CD/DVD drive drive release latch power supply and fan hard drive front-panel door power button system board heat sink and blower assembly Removing and Installing Parts 61 CAUTION: To guard against electrical shock, always unplug your computer from the electrical outlet before opening the cover. Inside View of Your Computer CAUTION: Before you begin any of the procedures in this section, follow the safety instructions in the Product Information Guide.
CD/DVD drive drive release latch power supply and fan hard drive front-panel door power button system board heat sink and blower assembly Removing and Installing Parts 61 CAUTION: To guard against electrical shock, always unplug your computer from the electrical outlet before opening the cover. Inside View of Your Computer CAUTION: Before you begin any of the procedures in this section, follow the safety instructions in the Product Information Guide.
Owner's Manual
Page 71
... . 7 Remove the card's driver from the operating system. 8 Install any drivers required for optional floppy drive or media card reader (under CD/DVD drive) hard drive Connect CD/DVD drives to electrical outlets, and then turn them on the system board. The brackets also keep dust and dirt out of your computer... FCC certification of these devices: • One serial ATA drive • One FlexBay drive (optional floppy drive or media card reader) • One CD or DVD drive CD/DVD drive FlexBay for the card as described in the card documentation. 4 If you need a filler bracket, contact...
... . 7 Remove the card's driver from the operating system. 8 Install any drivers required for optional floppy drive or media card reader (under CD/DVD drive) hard drive Connect CD/DVD drives to electrical outlets, and then turn them on the system board. The brackets also keep dust and dirt out of your computer... FCC certification of these devices: • One serial ATA drive • One FlexBay drive (optional floppy drive or media card reader) • One CD or DVD drive CD/DVD drive FlexBay for the card as described in the card documentation. 4 If you need a filler bracket, contact...

Owner's Manual
Page 76
....dell.com | support.dell.com 5 Gently slide the drive into the computer. 7 Connect your computer from the electrical outlet before opening the cover. Doing so may cause damage to electrical outlets, and turn them on page 53. tabs (2) hard drive 6 Replace the computer cover (page 91). CD/DVD ...Drive CAUTION: Before you hear a click or feel the drive securely installed. Removing a CD/DVD Drive 1 Follow the procedures in the Product Information Guide. See the documentation that the system board ...
....dell.com | support.dell.com 5 Gently slide the drive into the computer. 7 Connect your computer from the electrical outlet before opening the cover. Doing so may cause damage to electrical outlets, and turn them on page 53. tabs (2) hard drive 6 Replace the computer cover (page 91). CD/DVD ...Drive CAUTION: Before you hear a click or feel the drive securely installed. Removing a CD/DVD Drive 1 Follow the procedures in the Product Information Guide. See the documentation that the system board ...

Owner's Manual
Page 77
Then, lift up on the drive release latch and slide the drive towards the back of the drive. CD/DVD drive drive release latch 5 Disconnect the power and CD/DVD drive cables from the computer. 4 Pull up to remove the drive from the back of the computer. data cable Removing and Installing Parts 77
Then, lift up on the drive release latch and slide the drive towards the back of the drive. CD/DVD drive drive release latch 5 Disconnect the power and CD/DVD drive cables from the computer. 4 Pull up to remove the drive from the back of the computer. data cable Removing and Installing Parts 77

Owner's Manual
Page 78
www.dell.com | support.dell.com Installing a CD/DVD Drive 1 Unpack the drive and prepare it for your computer. Check the documentation that the drive is configured for installation. If you are installing an IDE drive, configure the drive for the cable select setting. 2 Connect the power and CD/DVD drive cables to verify that accompanied the drive to the drive. data cable 78 Removing and Installing Parts
www.dell.com | support.dell.com Installing a CD/DVD Drive 1 Unpack the drive and prepare it for your computer. Check the documentation that the drive is configured for installation. If you are installing an IDE drive, configure the drive for the cable select setting. 2 Connect the power and CD/DVD drive cables to verify that accompanied the drive to the drive. data cable 78 Removing and Installing Parts

Owner's Manual
Page 80
data cable 6 Pull up to remove the drive from the front-panel connector on the system board. www.dell.com | support.dell.com Removing a Media Card Reader 1 Follow the procedures in "Before You Begin" on page 53." 2 Lay the computer on its side so that the system ...board is on the bottom of the inside of the computer. 3 Remove the computer cover (see page 59). 4 Remove the CD/DVD drive (see page...
data cable 6 Pull up to remove the drive from the front-panel connector on the system board. www.dell.com | support.dell.com Removing a Media Card Reader 1 Follow the procedures in "Before You Begin" on page 53." 2 Lay the computer on its side so that the system ...board is on the bottom of the inside of the computer. 3 Remove the computer cover (see page 59). 4 Remove the CD/DVD drive (see page...


