
Owner's Manual
Page 6
... of "Dell-Installed" Software and Peripherals 87 Definition of "Third-Party" Software and Peripherals 88 FCC Notices (U.S. Hard Drive 64 Removing a Hard Drive 64 Installing a Hard Drive 66 Floppy Drive 67 Removing a Floppy Drive 67 Installing a Floppy Drive 68 CD/DVD Drive 69 Removing a CD/DVD Drive 70 Installing a CD/DVD Drive 71 Adding a Second CD or DVD Drive 71 Battery 73 Replacing the Computer...
... of "Dell-Installed" Software and Peripherals 87 Definition of "Third-Party" Software and Peripherals 88 FCC Notices (U.S. Hard Drive 64 Removing a Hard Drive 64 Installing a Hard Drive 66 Floppy Drive 67 Removing a Floppy Drive 67 Installing a Floppy Drive 68 CD/DVD Drive 69 Removing a CD/DVD Drive 70 Installing a CD/DVD Drive 71 Adding a Second CD or DVD Drive 71 Battery 73 Replacing the Computer...

Owner's Manual
Page 39
If Device Driver Rollback does not resolve the problem, then use Windows XP Device Driver Rollback to replace the driver with the previously installed version. 1 Click the Start button and click Control Panel. 2 Under Pick a Category, click Performance and Maintenance. 3...System Restore returns your computer to an earlier operating state without affecting data files. Manually Reinstalling Drivers 1 After copying the required driver files to your hard drive, click the Start button and right-click My Computer. 2 Click Properties. 3 Click the Hardware tab and click Device Manager. 4 Double-click...
If Device Driver Rollback does not resolve the problem, then use Windows XP Device Driver Rollback to replace the driver with the previously installed version. 1 Click the Start button and click Control Panel. 2 Under Pick a Category, click Performance and Maintenance. 3...System Restore returns your computer to an earlier operating state without affecting data files. Manually Reinstalling Drivers 1 After copying the required driver files to your hard drive, click the Start button and right-click My Computer. 2 Click Properties. 3 Click the Hardware tab and click Device Manager. 4 Double-click...
Owner's Manual
Page 64
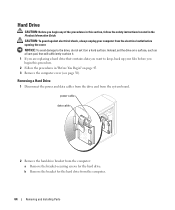
.... 2 Follow the procedures in the Product Information Guide. Instead, set the drive on a surface, such as a foam pad, that will sufficiently cushion it. 1 If you are replacing a hard drive that contains data you want to the drive, do not set it on page 45. 3 Remove the computer cover (...see page 50). Removing a Hard Drive 1 Disconnect the power and data cables from the drive and from the electrical outlet before you begin ...
.... 2 Follow the procedures in the Product Information Guide. Instead, set the drive on a surface, such as a foam pad, that will sufficiently cushion it. 1 If you are replacing a hard drive that contains data you want to the drive, do not set it on page 45. 3 Remove the computer cover (...see page 50). Removing a Hard Drive 1 Disconnect the power and data cables from the drive and from the electrical outlet before you begin ...
Owner's Manual
Page 65
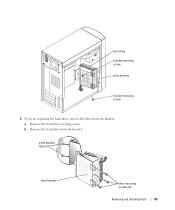
b Remove the hard drive from the bracket: a Remove the hard drive-securing screws. small bracket tabs (2) drive bracket drive-securing screws (3) Removing and Installing Parts 65 hard drive bracket-securing screw drive bracket bracket-securing screw 3 If you are replacing the hard drive, remove the drive from the bracket.
b Remove the hard drive from the bracket: a Remove the hard drive-securing screws. small bracket tabs (2) drive bracket drive-securing screws (3) Removing and Installing Parts 65 hard drive bracket-securing screw drive bracket bracket-securing screw 3 If you are replacing the hard drive, remove the drive from the bracket.
Owner's Manual
Page 66
... the bracket for your computer and devices to the hard drive. See the documentation that it into the drive slots inside the bracket for instructions. 15 Test the hard drive by running the Dell Diagnostics (see page 36). 16 If the drive you proceed to the next step. c Replace the bracket-securing screws. 6 Connect a power cable to the...
... the bracket for your computer and devices to the hard drive. See the documentation that it into the drive slots inside the bracket for instructions. 15 Test the hard drive by running the Dell Diagnostics (see page 36). 16 If the drive you proceed to the next step. c Replace the bracket-securing screws. 6 Connect a power cable to the...


