
Dell Dimension 2100 Solutions Guide
Page 56
... installs additional files, and then restarts the computer. 22 Select Boot From Hard Drive, and then press . 23 Enter a password in the Establish Time Zone window, and then click Next. 15 Click Finish. www.dell.com | support.dell.com 11 Ensure that Typical is selected, and then click Next. 12 ...Network Password window, if desired, and then click Next. 24 Remove the operating system CD from the CD or DVD drive. 56 Solving Pr oblems Windows Setup installs necessary files, and then restarts the computer. 16 Select Boot From Hard Drive, and then press . 17 In the User Information window,...
... installs additional files, and then restarts the computer. 22 Select Boot From Hard Drive, and then press . 23 Enter a password in the Establish Time Zone window, and then click Next. 15 Click Finish. www.dell.com | support.dell.com 11 Ensure that Typical is selected, and then click Next. 12 ...Network Password window, if desired, and then click Next. 24 Remove the operating system CD from the CD or DVD drive. 56 Solving Pr oblems Windows Setup installs necessary files, and then restarts the computer. 16 Select Boot From Hard Drive, and then press . 17 In the User Information window,...

Dell Dimension 2100 Solutions Guide
Page 114
... service, you must ship the products back to Dell, back up the data on the hard drive(s) and any removable media, such as floppy disks, CDs, or PC Cards. Dell will issue a Return Material Authorization Number. If Dell repairs or replaces a product, its warranty term is required, Dell will ship the repaired or replacement products to you...
... service, you must ship the products back to Dell, back up the data on the hard drive(s) and any removable media, such as floppy disks, CDs, or PC Cards. Dell will issue a Return Material Authorization Number. If Dell repairs or replaces a product, its warranty term is required, Dell will ship the repaired or replacement products to you...

Dell Dimension 2100 Solutions Guide
Page 116
...) are not covered. To request warranty service, you must ship the products back to Dell, back up the data on the hard drive(s) and any removable media, such as specifically noted); Dell does not accept liability for obtaining customer assistance. Dell owns all other storage device(s) in performing warranty repairs and building replacement products. or DellWare...
...) are not covered. To request warranty service, you must ship the products back to Dell, back up the data on the hard drive(s) and any removable media, such as specifically noted); Dell does not accept liability for obtaining customer assistance. Dell owns all other storage device(s) in performing warranty repairs and building replacement products. or DellWare...
Dell Dimension 2100 Solutions Guide
Page 120
... request warranty service, you use an address in effect on the hard drive(s) and any removable media, such as floppy disks, CDs, or PC Cards. Refer to the section titled "Getting Help" or "Contacting Dell" in your use in returning the replaced part to Dell's Exchange Policy in the continental U.S., where applicable. NOTE: Before you...
... request warranty service, you use an address in effect on the hard drive(s) and any removable media, such as floppy disks, CDs, or PC Cards. Refer to the section titled "Getting Help" or "Contacting Dell" in your use in returning the replaced part to Dell's Exchange Policy in the continental U.S., where applicable. NOTE: Before you...
Dell Dimension 2100 Solutions Guide
Page 123
... the shipment or accept the risk of loss or damage during shipment. NOTE: Before you must ship the products back to Dell, back up the data on the hard drive(s) and any removable media, such as floppy disks, CDs, or PC Cards. If warranty service is not extended. THESE WARRANTIES GIVE YOU SPECIFIC LEGAL...
... the shipment or accept the risk of loss or damage during shipment. NOTE: Before you must ship the products back to Dell, back up the data on the hard drive(s) and any removable media, such as floppy disks, CDs, or PC Cards. If warranty service is not extended. THESE WARRANTIES GIVE YOU SPECIFIC LEGAL...
Dell Dimension 2100 Solutions Guide
Page 125
...of loss or damage during the initial one or more of this limited warranty; all parts removed from Dell; Coverage During Year One During the one-year period beginning on the hard drive(s) and any other locations will repair or replace products covered under this limited warranty. To ...request warranty service, you must ship the products back to Dell's facility. If warranty service is not extended. Appendix 125...
...of loss or damage during the initial one or more of this limited warranty; all parts removed from Dell; Coverage During Year One During the one-year period beginning on the hard drive(s) and any other locations will repair or replace products covered under this limited warranty. To ...request warranty service, you must ship the products back to Dell's facility. If warranty service is not extended. Appendix 125...
Dell Dimension 2100 Solutions Guide
Page 128
...titled "Getting Help" or "Contacting Dell" in the product(s). external devices (except as floppy disks, CDs, or PC Cards. 128 Appendix Monitors, keyboards, and mice that are Dell-branded or that are included on the hard drive(s) and any removable media, such as specifically noted);... or DellWare products. To request warranty service, you must contact Dell's Customer Technical Support within the warranty period. www.dell.com | support.dell.com Damage due ...
...titled "Getting Help" or "Contacting Dell" in the product(s). external devices (except as floppy disks, CDs, or PC Cards. 128 Appendix Monitors, keyboards, and mice that are Dell-branded or that are included on the hard drive(s) and any removable media, such as specifically noted);... or DellWare products. To request warranty service, you must contact Dell's Customer Technical Support within the warranty period. www.dell.com | support.dell.com Damage due ...
Dell Dimension 2100 Solutions Guide
Page 136
... return policy, 131 S safety instructions, 7 ScanDisk, 38 screen. 136 I n d e x H hard drive fixing problems, 38 help file accessing, 24 I installing cards, 73 installing drives, 67 installing memory, 78 Internet fixing problems, 41 IRQ conflicts, 46 K keyboard fixing problems, 35 M memory adding, 78 connectors, 66 removing, 78 messages start-up , 14 troubleshooting, 29 programs fixing problems...
... return policy, 131 S safety instructions, 7 ScanDisk, 38 screen. 136 I n d e x H hard drive fixing problems, 38 help file accessing, 24 I installing cards, 73 installing drives, 67 installing memory, 78 Internet fixing problems, 41 IRQ conflicts, 46 K keyboard fixing problems, 35 M memory adding, 78 connectors, 66 removing, 78 messages start-up , 14 troubleshooting, 29 programs fixing problems...
System Reference
Page 31
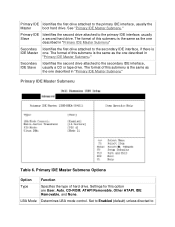
... primary IDE interface, usually Slave a second hard drive. Primary IDE Identifies the second drive attached to the secondary IDE interface, usually a CD or tape drive. Primary IDE Master Submenu Options Option Function Type Specifies the type of this option are User, Auto, CD-ROM, ATAPI Removable, Other ATAPI, IDE Removable, and None. Primary IDE Identifies the...
... primary IDE interface, usually Slave a second hard drive. Primary IDE Identifies the second drive attached to the secondary IDE interface, usually a CD or tape drive. Primary IDE Master Submenu Options Option Function Type Specifies the type of this option are User, Auto, CD-ROM, ATAPI Removable, Other ATAPI, IDE Removable, and None. Primary IDE Identifies the...

System Reference
Page 46
... 1 Open PCI Slot 2 Audio PCI Slot 3 Network adapter PCI Slot 4 Modem Removing and Replacing Parts: Dell™ Dimension™ 2100 System Reference Overview Precautionary Measures Recommended Tools Cover Rotating the Power Supply Front panel 3.5-Inch Front Panel Insert Upper 3.5-Inch Drive Lower 3.5-Inch Floppy Drive Hard Drive Power Supply and Fan Assembly Control Panel Cards Memory Heat Sink...
... 1 Open PCI Slot 2 Audio PCI Slot 3 Network adapter PCI Slot 4 Modem Removing and Replacing Parts: Dell™ Dimension™ 2100 System Reference Overview Precautionary Measures Recommended Tools Cover Rotating the Power Supply Front panel 3.5-Inch Front Panel Insert Upper 3.5-Inch Drive Lower 3.5-Inch Floppy Drive Hard Drive Power Supply and Fan Assembly Control Panel Cards Memory Heat Sink...
System Reference
Page 56
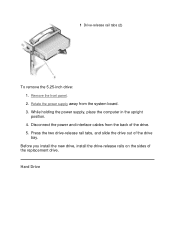
Remove the front panel. 2. Hard Drive While holding the power supply, place the computer in the upright position. 4. Press the two drive-release rail tabs, and slide the drive out of the drive. 5. Rotate the power supply away from the back of the drive bay. Disconnect the power and interface cables from the system board. 3. 1 Drive-release rail tabs (2) To remove the 5.25-inch drive: 1. Before you install the new drive, install the drive-release rails on the sides of the replacement drive.
Remove the front panel. 2. Hard Drive While holding the power supply, place the computer in the upright position. 4. Press the two drive-release rail tabs, and slide the drive out of the drive. 5. Rotate the power supply away from the back of the drive bay. Disconnect the power and interface cables from the system board. 3. 1 Drive-release rail tabs (2) To remove the 5.25-inch drive: 1. Before you install the new drive, install the drive-release rails on the sides of the replacement drive.
System Reference
Page 57
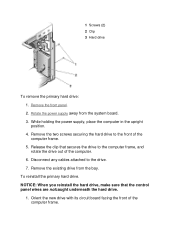
1 Screws (2) 2 Clip 3 Hard drive To remove the primary hard drive: 1. To reinstall the primary hard drive. Remove the front panel. 2. While holding the power supply, place the computer in the upright position. 4. Remove the two screws securing the hard drive to the front of the computer. 6. Disconnect any cables attached to the computer frame, and rotate the drive out of the computer frame...
1 Screws (2) 2 Clip 3 Hard drive To remove the primary hard drive: 1. To reinstall the primary hard drive. Remove the front panel. 2. While holding the power supply, place the computer in the upright position. 4. Remove the two screws securing the hard drive to the front of the computer. 6. Disconnect any cables attached to the computer frame, and rotate the drive out of the computer frame...

System Reference
Page 58
... 1 Power-supply retaining clips 2 Power supply and fan assembly To remove the power supply and fan assembly: 1. Disconnect the DC power cables from the system board. 4. Connect a power supply cable and the hard drive interface cable to the front of the computer frame with the two ...screws you removed. 4. Remove the computer cover. 3. Press the drive between the two brackets until the drive is secured by the clip. 3. Secure the drive to the new drive. Rotate the power supply away...
... 1 Power-supply retaining clips 2 Power supply and fan assembly To remove the power supply and fan assembly: 1. Disconnect the DC power cables from the system board. 4. Connect a power supply cable and the hard drive interface cable to the front of the computer frame with the two ...screws you removed. 4. Remove the computer cover. 3. Press the drive between the two brackets until the drive is secured by the clip. 3. Secure the drive to the new drive. Rotate the power supply away...


