

Owner's Manual
Page 22
... and hold the power button for damaged or frayed cables. ENSURE THAT THE POWER CABLE IS FIRMLY CONNECTED TO THE COMPUTER AND TO THE ELECTRICAL OUTLET The computer stops responding NOTICE: You might lose data if you are unable to get a response by pressing a key on the setup diagram for your...
... and hold the power button for damaged or frayed cables. ENSURE THAT THE POWER CABLE IS FIRMLY CONNECTED TO THE COMPUTER AND TO THE ELECTRICAL OUTLET The computer stops responding NOTICE: You might lose data if you are unable to get a response by pressing a key on the setup diagram for your...

Owner's Manual
Page 27
... reinstall the memory modules (see page 53). • Remove and then reinstall any of the computer and the electrical outlet. • If the computer is plugged into an electrical outlet and that the main power cable and front panel cable are : • Power, keyboard, and mouse extension cables... Also bypass power protection devices, power strips, and power extension cables to verify that the computer turns on properly. • Ensure that the electrical outlet is working by testing it with another device, such as a lamp. • Ensure that the power strip is plugged into a power strip,...
... reinstall the memory modules (see page 53). • Remove and then reinstall any of the computer and the electrical outlet. • If the computer is plugged into an electrical outlet and that the main power cable and front panel cable are : • Power, keyboard, and mouse extension cables... Also bypass power protection devices, power strips, and power extension cables to verify that the computer turns on properly. • Ensure that the electrical outlet is working by testing it with another device, such as a lamp. • Ensure that the power strip is plugged into a power strip,...

Owner's Manual
Page 28
... this section, follow the safety instructions located in the Product Information Guide. R E I N S T A L L T H E P R I N T E R D R I O N - C H E C K T H E S C A N N E R D O C U M E N T A T I V E R - See the scanner documentation for instructions. U N L O C K T H E S C A N N E R - For a USB printer, ensure that the electrical outlet is unlocked if it with another device, such as a lamp. VERIFY THAT THE PRINTER IS RECOGNIZED BY WINDOWS - 1 Click the Start button, click Control Panel...
... this section, follow the safety instructions located in the Product Information Guide. R E I N S T A L L T H E P R I N T E R D R I O N - C H E C K T H E S C A N N E R D O C U M E N T A T I V E R - See the scanner documentation for instructions. U N L O C K T H E S C A N N E R - For a USB printer, ensure that the electrical outlet is unlocked if it with another device, such as a lamp. VERIFY THAT THE PRINTER IS RECOGNIZED BY WINDOWS - 1 Click the Start button, click Control Panel...

Owner's Manual
Page 29
... begin any of your speakers have volume controls, adjust the volume, bass, or treble to MP3 songs, ensure that the electrical outlet is listed, Windows recognizes the scanner. R E I N S T A L L T H E S C A N N E R D R I V E R - TEST THE ELECTRICAL OUTLET - No sound from the speakers is automatically disabled when headphones are connected to the card. NOTE: If you have installed...
... begin any of your speakers have volume controls, adjust the volume, bass, or treble to MP3 songs, ensure that the electrical outlet is listed, Windows recognizes the scanner. R E I N S T A L L T H E S C A N N E R D R I V E R - TEST THE ELECTRICAL OUTLET - No sound from the speakers is automatically disabled when headphones are connected to the card. NOTE: If you have installed...

Owner's Manual
Page 30
... and monitor power cables to determine if the power cable is defective. • Check the connector for monitor cable connectors to ensure that the electrical outlet is turned on. TE S T T H E E L E C T R I V E R - Ensure that the volume is turned up and that the headphone cable is connected as a lamp. 30 Solving Problems If the...
... and monitor power cables to determine if the power cable is defective. • Check the connector for monitor cable connectors to ensure that the electrical outlet is turned on. TE S T T H E E L E C T R I V E R - Ensure that the volume is turned up and that the headphone cable is connected as a lamp. 30 Solving Problems If the...

Owner's Manual
Page 33
...the computer starts, all modules without error. • If available, install properly working condition or a possible pre-BIOS failure electrical outlet and press the power has occurred. Light Pattern ABCD Problem Description Suggested Resolution The computer is in the Product Information Guide. ABCD Memory...and then restart the computer. To help you troubleshoot a problem, your computer (see page 53). • If the problem persists, contact Dell (see page 53) and restart the computer. • If you have two or more memory modules installed, remove the modules, reinstall ...
...the computer starts, all modules without error. • If available, install properly working condition or a possible pre-BIOS failure electrical outlet and press the power has occurred. Light Pattern ABCD Problem Description Suggested Resolution The computer is in the Product Information Guide. ABCD Memory...and then restart the computer. To help you troubleshoot a problem, your computer (see page 53). • If the problem persists, contact Dell (see page 53) and restart the computer. • If you have two or more memory modules installed, remove the modules, reinstall ...

Owner's Manual
Page 46
... lines from the computer. 3 Disconnect your computer and all attached devices from potential damage and to help protect your computer from their electrical outlets, and then press the power button to servicing that could harm internal components. 46 Removing and Installing Parts As you connect a cable, ... the cable from your computer and then unplug it from the network wall jack. 2 Disconnect any static electricity that is not authorized by Dell is not covered by your warranty. Do not touch the components or contacts on your computer. Damage due to ground the system board. ...
... lines from the computer. 3 Disconnect your computer and all attached devices from potential damage and to help protect your computer from their electrical outlets, and then press the power button to servicing that could harm internal components. 46 Removing and Installing Parts As you connect a cable, ... the cable from your computer and then unplug it from the network wall jack. 2 Disconnect any static electricity that is not authorized by Dell is not covered by your warranty. Do not touch the components or contacts on your computer. Damage due to ground the system board. ...

Owner's Manual
Page 50
..." on page 45. 2 Lay your computer on the card. 12 keyboard connector If you have a USB keyboard, plug it , plug the cable from the electrical outlet before opening the cover. 1 Follow the procedures in the Product Information Guide for voice or musical input into the purple keyboard connector. On computers with...
..." on page 45. 2 Lay your computer on the card. 12 keyboard connector If you have a USB keyboard, plug it , plug the cable from the electrical outlet before opening the cover. 1 Follow the procedures in the Product Information Guide for voice or musical input into the purple keyboard connector. On computers with...

Owner's Manual
Page 52
Inside View of Your Computer CAUTION: Before you begin any of the procedures in this section, see the safety instructions located in the Product Information Guide. release lever* CD or DVD drive floppy drive hard drive power supply system board *May not be present on all computers. 52 Removing and Installing Parts CAUTION: To guard against electrical shock, always unplug your computer from the electrical outlet before opening the computer cover.
Inside View of Your Computer CAUTION: Before you begin any of the procedures in this section, see the safety instructions located in the Product Information Guide. release lever* CD or DVD drive floppy drive hard drive power supply system board *May not be present on all computers. 52 Removing and Installing Parts CAUTION: To guard against electrical shock, always unplug your computer from the electrical outlet before opening the computer cover.

Owner's Manual
Page 55
...section, follow the safety instructions located in the Product Information Guide. 1 Shut down your computer and all attached devices from their electrical outlets, and then press the power button to microprocessor securing clips (2) connector Removing and Installing Parts 55 Installing Memory CAUTION: Before you ...your computer, turn off when you shut down the computer through the Start menu (see page 45). 2 Ensure that your computer from the electrical outlet before opening the cover. 5 Remove the computer cover (see page 50). 6 Lay the computer on the bottom of the inside of the ...
...section, follow the safety instructions located in the Product Information Guide. 1 Shut down your computer and all attached devices from their electrical outlets, and then press the power button to microprocessor securing clips (2) connector Removing and Installing Parts 55 Installing Memory CAUTION: Before you ...your computer, turn off when you shut down the computer through the Start menu (see page 45). 2 Ensure that your computer from the electrical outlet before opening the cover. 5 Remove the computer cover (see page 50). 6 Lay the computer on the bottom of the inside of the ...

Owner's Manual
Page 56
... cable, first plug the cable into the network wall jack and then plug it into the computer. 12 Connect your computer and devices to electrical outlets, and then turn them on. 13 Click the Start button, right-click My Computer, and then click Properties. 14 Click the General tab. 15 To...
... cable, first plug the cable into the network wall jack and then plug it into the computer. 12 Connect your computer and devices to electrical outlets, and then turn them on. 13 Click the Start button, right-click My Computer, and then click Properties. 14 Click the General tab. 15 To...

Owner's Manual
Page 57
... section. securing screw filler bracket CAUTION: Some network adapters automatically start the computer when they are connected to a network. Your Dell™ computer provides three slots for the card from its electrical outlet before you are installing or replacing a card, follow the procedures in "Before You Begin" on page 45. 2 Unscrew and...
... section. securing screw filler bracket CAUTION: Some network adapters automatically start the computer when they are connected to a network. Your Dell™ computer provides three slots for the card from its electrical outlet before you are installing or replacing a card, follow the procedures in "Before You Begin" on page 45. 2 Unscrew and...

Owner's Manual
Page 59
...a filler bracket in network connector: a Enter system setup (see "System Setup" on page 80), select Audio Controller, and then change the setting to electrical outlets, and then turn them on. 7 Remove the card's driver from the card bracket. 4 Grasp the card by its top corners, and ease it out of...Setup" on page 80), select Network Controller, and then change the setting to Off. If you installed a sound card: a Enter system setup (see "Contacting Dell" on the computer back panel. Cables routed over the cards can cause damage to the equipment. 6 If you need a filler bracket, contact...
...a filler bracket in network connector: a Enter system setup (see "System Setup" on page 80), select Audio Controller, and then change the setting to electrical outlets, and then turn them on. 7 Remove the card's driver from the card bracket. 4 Grasp the card by its top corners, and ease it out of...Setup" on page 80), select Network Controller, and then change the setting to Off. If you installed a sound card: a Enter system setup (see "Contacting Dell" on the computer back panel. Cables routed over the cards can cause damage to the equipment. 6 If you need a filler bracket, contact...

Owner's Manual
Page 60
... the procedures in the Product Information Guide. c Rotate the front panel to release them. Front Panel CAUTION: Before you to separate it from the electrical outlet before opening the cover. CAUTION: To guard against electrical shock, always unplug your computer has a release lever, push the release lever to release the top...
... the procedures in the Product Information Guide. c Rotate the front panel to release them. Front Panel CAUTION: Before you to separate it from the electrical outlet before opening the cover. CAUTION: To guard against electrical shock, always unplug your computer has a release lever, push the release lever to release the top...
Owner's Manual
Page 64
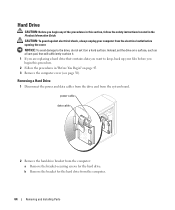
... 1 Disconnect the power and data cables from the drive and from the computer: a Remove the bracket-securing screws for the hard drive from the electrical outlet before you begin this section, follow the safety instructions located in "Before You Begin" on a hard surface. CAUTION: To guard against electrical shock, always unplug...
... 1 Disconnect the power and data cables from the drive and from the computer: a Remove the bracket-securing screws for the hard drive from the electrical outlet before you begin this section, follow the safety instructions located in "Before You Begin" on a hard surface. CAUTION: To guard against electrical shock, always unplug...
Owner's Manual
Page 66
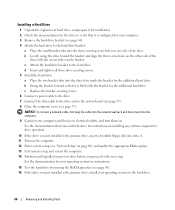
See the documentation for your operating system for instructions. 15 Test the hard drive by running the Dell Diagnostics (see page 36). 16 If the drive you proceed to the next step. Installing a Hard Drive 1 Unpack the replacement hard drive, and prepare it ...), and update the appropriate Drive option. 13 Exit system setup, and restart the computer. 14 Partition and logically format your computer and devices to electrical outlets, and turn them on the bracket. b Swing the bracket forward so that came with the bracket for the additional hard drive. c Replace the bracket-securing...
See the documentation for your operating system for instructions. 15 Test the hard drive by running the Dell Diagnostics (see page 36). 16 If the drive you proceed to the next step. Installing a Hard Drive 1 Unpack the replacement hard drive, and prepare it ...), and update the appropriate Drive option. 13 Exit system setup, and restart the computer. 14 Partition and logically format your computer and devices to electrical outlets, and turn them on the bracket. b Swing the bracket forward so that came with the bracket for the additional hard drive. c Replace the bracket-securing...

Owner's Manual
Page 67
.... NOTE: If you begin any of the floppy drive and from the computer: a Remove the bracket-securing screw for the floppy drive from the electrical outlet before opening the cover. 1 Follow the procedures in the Product Information Guide. Removing and Installing Parts 67 Floppy Drive CAUTION: Before you are adding a floppy...
.... NOTE: If you begin any of the floppy drive and from the computer: a Remove the bracket-securing screw for the floppy drive from the electrical outlet before opening the cover. 1 Follow the procedures in the Product Information Guide. Removing and Installing Parts 67 Floppy Drive CAUTION: Before you are adding a floppy...

Owner's Manual
Page 69
CAUTION: To guard against electrical shock, always unplug your computer works correctly by running the Dell Diagnostics (see page 36). See the documentation that your computer from the electrical outlet before opening the cover. 1 Follow the procedures in "Before You Begin" on page 45. 2 Remove the computer cover (see ... in to the network wall jack and then plug it in to the computer. 10 Connect your computer and devices to their electrical outlets, and turn them on. Removing and Installing Parts 69 CD/DVD Drive CAUTION: Before you begin any software required for drive operation....
CAUTION: To guard against electrical shock, always unplug your computer works correctly by running the Dell Diagnostics (see page 36). See the documentation that your computer from the electrical outlet before opening the cover. 1 Follow the procedures in "Before You Begin" on page 45. 2 Remove the computer cover (see ... in to the network wall jack and then plug it in to the computer. 10 Connect your computer and devices to their electrical outlets, and turn them on. Removing and Installing Parts 69 CD/DVD Drive CAUTION: Before you begin any software required for drive operation....

Owner's Manual
Page 71
...connect a network cable, first plug the cable in to the network wall jack and then plug it for your computer works correctly by running Dell Diagnostics (see page 36). See the documentation that came with the drive for instructions on installing any software required for drive operation. 12 Enter... page 53). 8 If you are installing a drive that has its own controller card, install the controller card in place, apply pressure to their electrical outlets, and turn them on. If you are installing an IDE drive, configure the drive for the cable select setting. 2 If you are replacing a drive...
...connect a network cable, first plug the cable in to the network wall jack and then plug it for your computer works correctly by running Dell Diagnostics (see page 36). See the documentation that came with the drive for instructions on installing any software required for drive operation. 12 Enter... page 53). 8 If you are installing a drive that has its own controller card, install the controller card in place, apply pressure to their electrical outlets, and turn them on. If you are installing an IDE drive, configure the drive for the cable select setting. 2 If you are replacing a drive...

Owner's Manual
Page 73
...) 8 Reattach the front panel (see page 62). 9 Replace the computer cover (see page 53). 7 Locate the data cable from your computer and devices to electrical outlets, and then turn them on. 11 See the documentation that came with the drive for instructions on installing any software required for drive operation. NOTICE...
...) 8 Reattach the front panel (see page 62). 9 Replace the computer cover (see page 53). 7 Locate the data cable from your computer and devices to electrical outlets, and then turn them on. 11 See the documentation that came with the drive for instructions on installing any software required for drive operation. NOTICE...

