
Dell Color Laser Printer Quick Reference Guide
Page 1
...Make sure to press the (Set) button to a previous screen cancels the current entry or setting. Dell™ C2660dn Color Laser Printer Quick Reference Guide Front and Rear View 1 14 12 13 11 10 9 15 16 2 3 8 7 5 6 1 Transfer Belt Unit 2 Drum Cartridges 3 Waste Toner Box 4 Right Side Cover 5 Power Switch 6 Tray1 7 ... Extension 13 Top Cover 14 Ethernet Port 15 USB Port 16 Wireless Adapter Socket 17 Left Side Cover 18 Duplex Unit 19 2nd Belt Transfer Roller (2nd BTR) 20 Fusing Unit 21 Power Connector 22 Rear Cover Service Tag Express Service Code xxxxxxx 000 000 000 00 ...
...Make sure to press the (Set) button to a previous screen cancels the current entry or setting. Dell™ C2660dn Color Laser Printer Quick Reference Guide Front and Rear View 1 14 12 13 11 10 9 15 16 2 3 8 7 5 6 1 Transfer Belt Unit 2 Drum Cartridges 3 Waste Toner Box 4 Right Side Cover 5 Power Switch 6 Tray1 7 ... Extension 13 Top Cover 14 Ethernet Port 15 USB Port 16 Wireless Adapter Socket 17 Left Side Cover 18 Duplex Unit 19 2nd Belt Transfer Roller (2nd BTR) 20 Fusing Unit 21 Power Connector 22 Rear Cover Service Tag Express Service Code xxxxxxx 000 000 000 00 ...
Dell Color Laser Printer Users Guide
Page 13
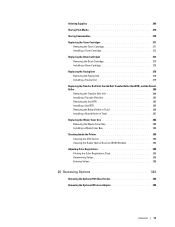
... 275 Replacing the Fusing Unit 278 Removing the Fusing Unit 278 Installing a Fusing Unit 279 Replacing the Transfer Belt Unit, the 2nd Belt Transfer Roller (2nd BTR), and the Retard Roller 280 Removing the Transfer Belt Unit 280 Installing a Transfer Belt Unit 283 Removing the 2nd BTR 285 Installing a 2nd BTR 285 Removing the Retard Roller in Tray1...
... 275 Replacing the Fusing Unit 278 Removing the Fusing Unit 278 Installing a Fusing Unit 279 Replacing the Transfer Belt Unit, the 2nd Belt Transfer Roller (2nd BTR), and the Retard Roller 280 Removing the Transfer Belt Unit 280 Installing a Transfer Belt Unit 283 Removing the 2nd BTR 285 Installing a 2nd BTR 285 Removing the Retard Roller in Tray1...

Dell Color Laser Printer Users Guide
Page 23
...: Moving to a different menu or returning to save the current entry or setting. Quick Reference Guide Dell ™ C2660dn Color Laser Printer Quick Reference Guide Front and Rear View 1 14 12 13 11 10 9 15 2 16 3 8 7 5 6 1 Transfer Belt Unit 2 Drum Cartridges 3 Waste Toner Box 4 Right Side Cover 5 Power Switch 6 Tray1 7... Cover 14 Ethernet Port 15 Wireless Adapter Socket 16 USB Port 17 Left Side Cover 18 Control Board 19 Duplex Unit 20 2nd Belt Transfer Roller (2nd BTR) 21 Fusing Unit 22 Power Connector 23 Rear Cover Service Tag Express Service Code xxxxxxx 000 000 000 00 ...
...: Moving to a different menu or returning to save the current entry or setting. Quick Reference Guide Dell ™ C2660dn Color Laser Printer Quick Reference Guide Front and Rear View 1 14 12 13 11 10 9 15 2 16 3 8 7 5 6 1 Transfer Belt Unit 2 Drum Cartridges 3 Waste Toner Box 4 Right Side Cover 5 Power Switch 6 Tray1 7... Cover 14 Ethernet Port 15 Wireless Adapter Socket 16 USB Port 17 Left Side Cover 18 Control Board 19 Duplex Unit 20 2nd Belt Transfer Roller (2nd BTR) 21 Fusing Unit 22 Power Connector 23 Rear Cover Service Tag Express Service Code xxxxxxx 000 000 000 00 ...

Dell Color Laser Printer Users Guide
Page 29
About the Printer This chapter provides an overview of your Dell™ C2660dn Color Laser Printer. Front and Rear View Front View 1 12 13 11 9 10 4 2 3 4 8 7 5 6 1 Transfer Belt Unit 2 Drum Cartridges 3 Waste Toner Box 4 Right Side Cover 5 Power Switch 6 Tray1 7 Optional 550-Sheet Feeder (Tray2) 8 Multipurpose Feeder (MPF) 9 Toner Cartridges 10 Front Cover 11 Operator Panel 12 Output Tray Extension 13 Top Cover About the Printer 27
About the Printer This chapter provides an overview of your Dell™ C2660dn Color Laser Printer. Front and Rear View Front View 1 12 13 11 9 10 4 2 3 4 8 7 5 6 1 Transfer Belt Unit 2 Drum Cartridges 3 Waste Toner Box 4 Right Side Cover 5 Power Switch 6 Tray1 7 Optional 550-Sheet Feeder (Tray2) 8 Multipurpose Feeder (MPF) 9 Toner Cartridges 10 Front Cover 11 Operator Panel 12 Output Tray Extension 13 Top Cover About the Printer 27
Dell Color Laser Printer Users Guide
Page 109
..." "Network Settings" "USB Settings" "PCL Settings" "PS Settings" "PDF Settings" "Secure Settings" "Paper Density" "Adjust Transfer Belt Unit" "Adjust 2nd BTR" "Adjust Fusing Unit" "Auto Registration Adjustment" "Color Registration Adjustments" "Reset Defaults" "Initialize PrintMeter" "Storage"*1 "Non-Dell Toner" "Adjust Altitude" "Clock Settings" "Web Link Customization" "Print Server Setup Page" "E-Mail Server Setup Page...
..." "Network Settings" "USB Settings" "PCL Settings" "PS Settings" "PDF Settings" "Secure Settings" "Paper Density" "Adjust Transfer Belt Unit" "Adjust 2nd BTR" "Adjust Fusing Unit" "Auto Registration Adjustment" "Color Registration Adjustments" "Reset Defaults" "Initialize PrintMeter" "Storage"*1 "Non-Dell Toner" "Adjust Altitude" "Clock Settings" "Web Link Customization" "Print Server Setup Page" "E-Mail Server Setup Page...
Dell Color Laser Printer Users Guide
Page 115
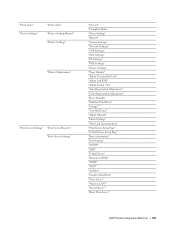
...set the available time period for thick coated paper. Print Set Available Time Start Time End Time Recurrence Paper Density Plain Label Adjust Transfer Belt Unit K Offset YMC Offset Adjust 2nd BTR Plain Plain Thick*3 Covers (106-163g/m2) Covers Thick*3 (164-216g/m2) Coated... paper. Displays the temperature setting of the transfer roller (-5 to 3) for coated paper. Dell™ Printer Configuration Web Tool 113 Displays the voltage setting of the fusing unit (-3 to 10) for envelopes. Displays the day of the transfer roller (-5 to repeat the setting. Displays ...
...set the available time period for thick coated paper. Print Set Available Time Start Time End Time Recurrence Paper Density Plain Label Adjust Transfer Belt Unit K Offset YMC Offset Adjust 2nd BTR Plain Plain Thick*3 Covers (106-163g/m2) Covers Thick*3 (164-216g/m2) Coated... paper. Displays the temperature setting of the transfer roller (-5 to 3) for coated paper. Dell™ Printer Configuration Web Tool 113 Displays the voltage setting of the fusing unit (-3 to 10) for envelopes. Displays the day of the transfer roller (-5 to repeat the setting. Displays ...
Dell Color Laser Printer Users Guide
Page 121
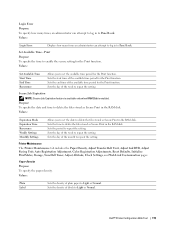
...function. Printer Maintenance The Printer Maintenance tab includes the Paper Density, Adjust Transfer Belt Unit, Adjust 2nd BTR, Adjust Fusing Unit, Auto Registration Adjustment, Color Registration Adjustments, Reset Defaults, Initialize PrintMeter, Storage, Non-Dell Toner, Adjust Altitude, Clock Settings, and Web Link Customization pages. ...delete the files stored as Secure Print in the RAM disk. Sets the day of plain paper to Light or Normal. Dell™ Printer Configuration Web Tool 119 Login Error Purpose: To specify how many times an administrator can attempt to log in...
...function. Printer Maintenance The Printer Maintenance tab includes the Paper Density, Adjust Transfer Belt Unit, Adjust 2nd BTR, Adjust Fusing Unit, Auto Registration Adjustment, Color Registration Adjustments, Reset Defaults, Initialize PrintMeter, Storage, Non-Dell Toner, Adjust Altitude, Clock Settings, and Web Link Customization pages. ...delete the files stored as Secure Print in the RAM disk. Sets the day of plain paper to Light or Normal. Dell™ Printer Configuration Web Tool 119 Login Error Purpose: To specify how many times an administrator can attempt to log in...

Dell Color Laser Printer Users Guide
Page 122
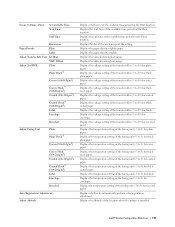
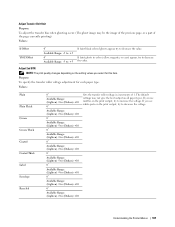
...try to lower the temperature. Sets the temperature settings for the fusing unit for thick cover paper within the range of -5 to 3. 120 Dell™ Printer Configuration Web Tool Sets the temperature settings for the fusing unit for thick plain paper within the range of -5 to 3. To...envelopes within the range of -5 to 10. Sets the reference voltage setting for the transfer roller for plain paper within the range of -5 to decrease the value. Adjust Transfer Belt Unit Purpose: To adjust the transfer bias when ghosting occur. (The ghost image may be the image of the previous ...
...try to lower the temperature. Sets the temperature settings for the fusing unit for thick cover paper within the range of -5 to 3. 120 Dell™ Printer Configuration Web Tool Sets the temperature settings for the fusing unit for thick plain paper within the range of -5 to 3. To...envelopes within the range of -5 to 10. Sets the reference voltage setting for the transfer roller for plain paper within the range of -5 to decrease the value. Adjust Transfer Belt Unit Purpose: To adjust the transfer bias when ghosting occur. (The ghost image may be the image of the previous ...
Dell Color Laser Printer Users Guide
Page 189
... the print output, try to decrease the voltage. Understanding the Printer Menus 187 Purpose: To specify the transfer roller voltage adjustment for this item. Adjust Transfer Belt Unit Purpose: To adjust the transfer bias when ghosting occur. (The ghost image may not give the best output on all paper types....-5 to (Darken) +10 0* Available Range: (Lighten) -5 to (Darken) +10 0* Available Range: (Lighten) -5 to (Darken) +10 0* Available Range: (Lighten) -5 to (Darken) +10 Sets the transfer roller voltage in color (yellow, magenta, or cyan) appear, try to decrease the value.
... the print output, try to decrease the voltage. Understanding the Printer Menus 187 Purpose: To specify the transfer roller voltage adjustment for this item. Adjust Transfer Belt Unit Purpose: To adjust the transfer bias when ghosting occur. (The ghost image may not give the best output on all paper types....-5 to (Darken) +10 0* Available Range: (Lighten) -5 to (Darken) +10 0* Available Range: (Lighten) -5 to (Darken) +10 0* Available Range: (Lighten) -5 to (Darken) +10 Sets the transfer roller voltage in color (yellow, magenta, or cyan) appear, try to decrease the value.

Dell Color Laser Printer Users Guide
Page 191
... are reset to their default values. Reset Fusing Unit Purpose: To initialize the life counter of yellow, magenta, and cyan lines. Reset Transfer Belt Unit Purpose: To initialize the life counter of the printer. NOTE: The Color Reg Adjust feature can be configured when Auto Reg Adjust ...the three colors. Enter a number in Enter Number. After replacing the fusing unit, be sure to initialize its life counter. After replacing the transfer belt unit, be sure to initialize its life counter. If the value for this line is set to paper feed direction) and process (paper ...
... are reset to their default values. Reset Fusing Unit Purpose: To initialize the life counter of yellow, magenta, and cyan lines. Reset Transfer Belt Unit Purpose: To initialize the life counter of the printer. NOTE: The Color Reg Adjust feature can be configured when Auto Reg Adjust ...the three colors. Enter a number in Enter Number. After replacing the fusing unit, be sure to initialize its life counter. After replacing the transfer belt unit, be sure to initialize its life counter. If the value for this line is set to paper feed direction) and process (paper ...
Dell Color Laser Printer Users Guide
Page 264
... black toner cartridge, and install a new cartridge. For more information about installing the toner cartridge, see "Replacing the Transfer Belt Unit, the 2nd Belt Transfer Roller (2nd BTR), and the Retard Roller." Remove the unsupported black toner cartridge, and install a supported toner cartridge....change the Non-Dell Toner setting to disable using the Dell Printer Configuration Web Tool or the Tool Box. 262 Understanding Printer Messages For more information about installing the toner cartridge, see "Replacing the Toner Cartridges." Make sure that the transfer belt unit is ...
... black toner cartridge, and install a new cartridge. For more information about installing the toner cartridge, see "Replacing the Transfer Belt Unit, the 2nd Belt Transfer Roller (2nd BTR), and the Retard Roller." Remove the unsupported black toner cartridge, and install a supported toner cartridge....change the Non-Dell Toner setting to disable using the Dell Printer Configuration Web Tool or the Tool Box. 262 Understanding Printer Messages For more information about installing the toner cartridge, see "Replacing the Toner Cartridges." Make sure that the transfer belt unit is ...
Dell Color Laser Printer Users Guide
Page 282
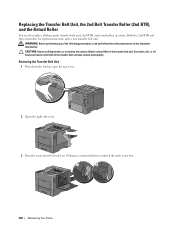
... in the Important Information. WARNING: Before performing any of the transfer belt unit may reduce print quality. Both the 2nd BTR and the retard roller for replacement come with a new transfer belt unit. Removing the Transfer Belt Unit 1 Push down the latch to open the rear cover....degrees counterclockwise to replace all three parts (transfer belt unit, 2nd BTR, and retard roller) at a time. CAUTION: Ensure nothing touches or scratches the surface (black-colored film) of the transfer belt unit. Replacing the Transfer Belt Unit, the 2nd Belt Transfer Roller (2nd BTR), and the Retard ...
... in the Important Information. WARNING: Before performing any of the transfer belt unit may reduce print quality. Both the 2nd BTR and the retard roller for replacement come with a new transfer belt unit. Removing the Transfer Belt Unit 1 Push down the latch to open the rear cover....degrees counterclockwise to replace all three parts (transfer belt unit, 2nd BTR, and retard roller) at a time. CAUTION: Ensure nothing touches or scratches the surface (black-colored film) of the transfer belt unit. Replacing the Transfer Belt Unit, the 2nd Belt Transfer Roller (2nd BTR), and the Retard ...
Dell Color Laser Printer Users Guide
Page 284
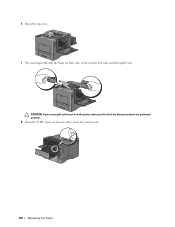
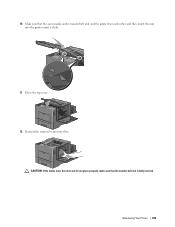
CAUTION: If you cannot pull out the unit from the printer, make sure that all of the transfer belt unit, and then pull it out. 6 Open the top cover. 7 Put your fingers through the loops on both sides of the above procedures are performed properly. 8 Clean the CTD sensor (as shown) with a clean, dry cotton swab. 282 Maintaining Your Printer
CAUTION: If you cannot pull out the unit from the printer, make sure that all of the transfer belt unit, and then pull it out. 6 Open the top cover. 7 Put your fingers through the loops on both sides of the above procedures are performed properly. 8 Clean the CTD sensor (as shown) with a clean, dry cotton swab. 282 Maintaining Your Printer
Dell Color Laser Printer Users Guide
Page 285
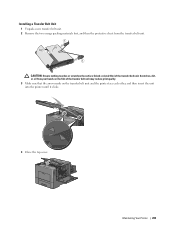
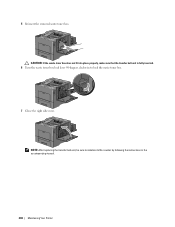
CAUTION: Ensure nothing touches or scratches the surface (black-colored film) of the transfer belt unit may reduce print quality. 3 Make sure that the arrow marks on the transfer belt unit and the printer face each other, and then insert the unit into the printer until it clicks. 4 Close the top cover. Scratches, dirt, or oil from the transfer belt unit. Installing a Transfer Belt Unit 1 Unpack a new transfer belt unit. 2 Remove the two orange packing materials first, and then the protective sheet from your hands on the film of the transfer belt unit. Maintaining Your Printer 283
CAUTION: Ensure nothing touches or scratches the surface (black-colored film) of the transfer belt unit may reduce print quality. 3 Make sure that the arrow marks on the transfer belt unit and the printer face each other, and then insert the unit into the printer until it clicks. 4 Close the top cover. Scratches, dirt, or oil from the transfer belt unit. Installing a Transfer Belt Unit 1 Unpack a new transfer belt unit. 2 Remove the two orange packing materials first, and then the protective sheet from your hands on the film of the transfer belt unit. Maintaining Your Printer 283
Dell Color Laser Printer Users Guide
Page 286
NOTE: After replacing the transfer belt unit, be sure to lock the waste toner box. 7 Close the right side cover. CAUTION: If the waste toner box does not fit into place properly, make sure that the transfer belt unit is fully inserted. 6 Turn the waste toner box lock lever 90-degrees clockwise to initialize its life counter by following the instructions in the accompanying manual. 284 Maintaining Your Printer 5 Reinsert the removed waste toner box.
NOTE: After replacing the transfer belt unit, be sure to lock the waste toner box. 7 Close the right side cover. CAUTION: If the waste toner box does not fit into place properly, make sure that the transfer belt unit is fully inserted. 6 Turn the waste toner box lock lever 90-degrees clockwise to initialize its life counter by following the instructions in the accompanying manual. 284 Maintaining Your Printer 5 Reinsert the removed waste toner box.
Dell Color Laser Printer Users Guide
Page 294
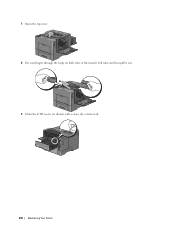
7 Open the top cover. 8 Put your fingers through the loops on both sides of the transfer belt unit, and then pull it out. 9 Clean the CTD sensor (as shown) with a clean, dry cotton swab. 292 Maintaining Your Printer
7 Open the top cover. 8 Put your fingers through the loops on both sides of the transfer belt unit, and then pull it out. 9 Clean the CTD sensor (as shown) with a clean, dry cotton swab. 292 Maintaining Your Printer
Dell Color Laser Printer Users Guide
Page 295
Maintaining Your Printer 293 10 Make sure that the transfer belt unit is fully inserted. CAUTION: If the waste toner box does not fit into place properly, make sure that the arrow marks on the transfer belt unit and the printer face each other, and then insert the unit into the printer until it clicks. 11 Close the top cover. 12 Reinsert the removed waste toner box.
Maintaining Your Printer 293 10 Make sure that the transfer belt unit is fully inserted. CAUTION: If the waste toner box does not fit into place properly, make sure that the arrow marks on the transfer belt unit and the printer face each other, and then insert the unit into the printer until it clicks. 11 Close the top cover. 12 Reinsert the removed waste toner box.
Dell Color Laser Printer Users Guide
Page 329
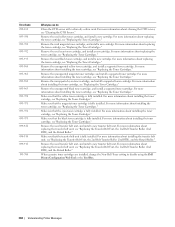
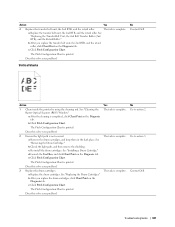
...replace the fusing unit, click Chart Print on the Diagnosis tab. See "Replacing the Transfer Belt Unit, the 2nd Belt Transfer Roller (2nd BTR), and the Retard Roller." The Pitch Configuration Chart is complete. Contact Dell. See "Installing a Toner Cartridge." Does this solve your problem? c Click Pitch... 3 Replace the drum cartridges. No Go to action 5. Contact Dell. and the retard roller. b After you replace the drum cartridges, click Chart Print on the Diagnosis tab. b After you replace the transfer belt unit, the 2nd BTR, and the retard roller, click Chart ...
...replace the fusing unit, click Chart Print on the Diagnosis tab. See "Replacing the Transfer Belt Unit, the 2nd Belt Transfer Roller (2nd BTR), and the Retard Roller." The Pitch Configuration Chart is complete. Contact Dell. See "Installing a Toner Cartridge." Does this solve your problem? c Click Pitch... 3 Replace the drum cartridges. No Go to action 5. Contact Dell. and the retard roller. b After you replace the drum cartridges, click Chart Print on the Diagnosis tab. b After you replace the transfer belt unit, the 2nd BTR, and the retard roller, click Chart ...
Dell Color Laser Printer Users Guide
Page 332
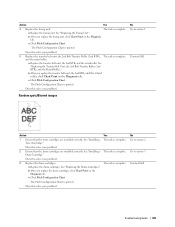
... On the Graphics tab, ensure that on your output with that Output Color is set to action 3. The task is complete. Contact Dell. c Click Pitch Configuration Chart. The task is complete. See "Replacing the Fusing Unit." b After you replace the drum cartridges, ... - 2 Pitch Configuration Chart, and locate the cause of the problem. • Fusing unit - 3 Is the cause of the problem located? • Transfer belt unit - 4 2 Replace the drum cartridges. a Replace the fusing unit. Does this solve your problem? 3 Replace the drum cartridges. Does this solve your...
... On the Graphics tab, ensure that on your output with that Output Color is set to action 3. The task is complete. Contact Dell. c Click Pitch Configuration Chart. The task is complete. See "Replacing the Fusing Unit." b After you replace the drum cartridges, ... - 2 Pitch Configuration Chart, and locate the cause of the problem. • Fusing unit - 3 Is the cause of the problem located? • Transfer belt unit - 4 2 Replace the drum cartridges. a Replace the fusing unit. Does this solve your problem? 3 Replace the drum cartridges. Does this solve your...
Dell Color Laser Printer Users Guide
Page 333
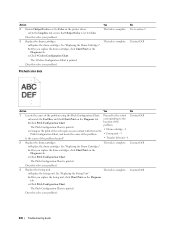
...in the dark place. b Check the light path, and then remove the shielding. a Replace the drum cartridges. b After you replace the transfer belt unit, the 2nd BTR, and the retard roller, click Chart Print on the Diagnosis tab. Troubleshooting Guide 331 No Go to action 3. See... "Replacing the Transfer Belt Unit, the 2nd Belt Transfer Roller (2nd BTR), and the Retard Roller." b After you replace the drum cartridges, click Chart Print on the Diagnosis tab. No Contact Dell. See "Cleaning the Raster Optical Scanner (ROS) Window." Does...
...in the dark place. b Check the light path, and then remove the shielding. a Replace the drum cartridges. b After you replace the transfer belt unit, the 2nd BTR, and the retard roller, click Chart Print on the Diagnosis tab. Troubleshooting Guide 331 No Go to action 3. See... "Replacing the Transfer Belt Unit, the 2nd Belt Transfer Roller (2nd BTR), and the Retard Roller." b After you replace the drum cartridges, click Chart Print on the Diagnosis tab. No Contact Dell. See "Cleaning the Raster Optical Scanner (ROS) Window." Does...


