
Dell Color Laser Printer Quick Reference Guide
Page 1
...) button Confirms the entry of values. When the Power Saver mode is being received. Dell™ C2660dn Color Laser Printer Quick Reference Guide Front and Rear View 1 14 12 13 11 10 9 15 16 2 3 8 7 5 6 1 Transfer Belt Unit 2 Drum Cartridges 3 Waste Toner Box 4 Right Side Cover 5 Power Switch 6 Tray1 7 Optional 550-Sheet Feeder (Tray2) 8 Multipurpose Feeder...
...) button Confirms the entry of values. When the Power Saver mode is being received. Dell™ C2660dn Color Laser Printer Quick Reference Guide Front and Rear View 1 14 12 13 11 10 9 15 16 2 3 8 7 5 6 1 Transfer Belt Unit 2 Drum Cartridges 3 Waste Toner Box 4 Right Side Cover 5 Power Switch 6 Tray1 7 Optional 550-Sheet Feeder (Tray2) 8 Multipurpose Feeder...
Dell Color Laser Printer Users Guide
Page 13
Ordering Supplies 269 Storing Print Media 270 Storing Consumables 270 Replacing the Toner Cartridges 271 Removing the Toner Cartridge 271 Installing a Toner Cartridge 272 Replacing the Drum Cartridges 273 Removing the Drum Cartridge 273 Installing a Drum Cartridge ... 2nd BTR 285 Removing the Retard Roller in Tray1 286 Installing a Retard Roller in Tray1 287 Replacing the Waste Toner Box 288 Removing the Waste Toner Box 288 Installing a Waste Toner Box 289 Cleaning Inside the Printer 290 Cleaning the CTD Sensor 290 Cleaning the Raster Optical Scanner (ROS) Window...
Ordering Supplies 269 Storing Print Media 270 Storing Consumables 270 Replacing the Toner Cartridges 271 Removing the Toner Cartridge 271 Installing a Toner Cartridge 272 Replacing the Drum Cartridges 273 Removing the Drum Cartridge 273 Installing a Drum Cartridge ... 2nd BTR 285 Removing the Retard Roller in Tray1 286 Installing a Retard Roller in Tray1 287 Replacing the Waste Toner Box 288 Removing the Waste Toner Box 288 Installing a Waste Toner Box 289 Cleaning Inside the Printer 290 Cleaning the CTD Sensor 290 Cleaning the Raster Optical Scanner (ROS) Window...

Dell Color Laser Printer Users Guide
Page 23
... is ready and a blinking green light when data is being received. Quick Reference Guide Dell ™ C2660dn Color Laser Printer Quick Reference Guide Front and Rear View 1 14 12 13 11 10 9 15 2 16 3 8 7 5 6 1 Transfer Belt Unit 2 Drum Cartridges 3 Waste Toner Box 4 Right Side Cover 5 Power Switch 6 Tray1 7 Optional 550-Sheet Feeder (Tray2) 8 Multipurpose Feeder...
... is ready and a blinking green light when data is being received. Quick Reference Guide Dell ™ C2660dn Color Laser Printer Quick Reference Guide Front and Rear View 1 14 12 13 11 10 9 15 2 16 3 8 7 5 6 1 Transfer Belt Unit 2 Drum Cartridges 3 Waste Toner Box 4 Right Side Cover 5 Power Switch 6 Tray1 7 Optional 550-Sheet Feeder (Tray2) 8 Multipurpose Feeder...

Dell Color Laser Printer Users Guide
Page 29
About the Printer This chapter provides an overview of your Dell™ C2660dn Color Laser Printer. Front and Rear View Front View 1 12 13 11 9 10 4 2 3 4 8 7 5 6 1 Transfer Belt Unit 2 Drum Cartridges 3 Waste Toner Box 4 Right Side Cover 5 Power Switch 6 Tray1 7 Optional 550-Sheet Feeder (Tray2) 8 Multipurpose Feeder (MPF) 9 Toner Cartridges 10 Front Cover 11 Operator Panel 12 Output Tray Extension 13 Top Cover About the Printer 27
About the Printer This chapter provides an overview of your Dell™ C2660dn Color Laser Printer. Front and Rear View Front View 1 12 13 11 9 10 4 2 3 4 8 7 5 6 1 Transfer Belt Unit 2 Drum Cartridges 3 Waste Toner Box 4 Right Side Cover 5 Power Switch 6 Tray1 7 Optional 550-Sheet Feeder (Tray2) 8 Multipurpose Feeder (MPF) 9 Toner Cartridges 10 Front Cover 11 Operator Panel 12 Output Tray Extension 13 Top Cover About the Printer 27

Dell Color Laser Printer Users Guide
Page 110
... to be replaced soon. Indicates that the cover is enough amount of the drum cartridge and/or waste toner box is unknown. Indicates that the drum cartridge and/or waste toner box needs to be replaced soon. "Print Server Settings" "Security" "Set Password" "SSL/TLS" "...IPsec" "802.1x"*3 "IP Filter (IPv4)" "Copy Printer Settings" "Copy Printer Settings" "Copy Printer Settings" "Copy Printer Settings Report" "Print Volume" "Print Volume" "Print Volume" "Dell ...
... to be replaced soon. Indicates that the cover is enough amount of the drum cartridge and/or waste toner box is unknown. Indicates that the drum cartridge and/or waste toner box needs to be replaced soon. "Print Server Settings" "Security" "Set Password" "SSL/TLS" "...IPsec" "802.1x"*3 "IP Filter (IPv4)" "Copy Printer Settings" "Copy Printer Settings" "Copy Printer Settings" "Copy Printer Settings Report" "Print Volume" "Print Volume" "Print Volume" "Dell ...

Dell Color Laser Printer Users Guide
Page 263
...the drum cartridge, see "Replacing the Drum Cartridges." If the message remains, replace the cartridge. Remove the used waste toner box, and install a new toner box. If the message remains, replace the cartridge. For more information about replacing the drum cartridge, see "Replacing ... drum cartridge. For more information about replacing the drum cartridge, see "Replacing the Waste Toner Box." Close the right side cover. For more information about replacing the waste toner box, see "Replacing the Drum Cartridges." Make sure that the cyan drum cartridge is ...
...the drum cartridge, see "Replacing the Drum Cartridges." If the message remains, replace the cartridge. Remove the used waste toner box, and install a new toner box. If the message remains, replace the cartridge. For more information about replacing the drum cartridge, see "Replacing ... drum cartridge. For more information about replacing the drum cartridge, see "Replacing the Waste Toner Box." Close the right side cover. For more information about replacing the waste toner box, see "Replacing the Drum Cartridges." Make sure that the cyan drum cartridge is ...

Dell Color Laser Printer Users Guide
Page 271
... quality will be lower when this information. The Dell Supplies Management System window appears. 2 Select your Dell printer Service Tag in the General tab Function This check box allows the users to conserve toner cartridge and paper. Your Service Tag number is ...feature that require attention replacing (However, the printer can order consumables (toner cartridges, drum cartridges, and waste toner box) from the Select Reorder URL list. Maintaining Your Printer 269 b Click Visit Dell printer supplies ordering web site. Ordering Supplies You can only display information ...
... quality will be lower when this information. The Dell Supplies Management System window appears. 2 Select your Dell printer Service Tag in the General tab Function This check box allows the users to conserve toner cartridge and paper. Your Service Tag number is ...feature that require attention replacing (However, the printer can order consumables (toner cartridges, drum cartridges, and waste toner box) from the Select Reorder URL list. Maintaining Your Printer 269 b Click Visit Dell printer supplies ordering web site. Ordering Supplies You can only display information ...

Dell Color Laser Printer Users Guide
Page 275
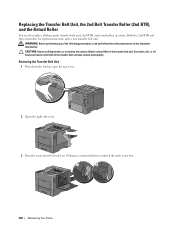
CAUTION: Protect the drum cartridges against bright light. Replacing the Drum Cartridges You need to unlock the waste toner box. Removing the Drum Cartridge 1 Open the right side cover. 2 Turn the waste toner box lock lever 90-degrees counterclockwise to replace all drum cartridges (yellow, magenta, cyan, and black) at a time. WARNING: Before performing any of the following procedures, read and follow the safety instructions in the Important Information. If the right side cover remains open for more than three minutes, print quality may deteriorate. Maintaining Your Printer 273
CAUTION: Protect the drum cartridges against bright light. Replacing the Drum Cartridges You need to unlock the waste toner box. Removing the Drum Cartridge 1 Open the right side cover. 2 Turn the waste toner box lock lever 90-degrees counterclockwise to replace all drum cartridges (yellow, magenta, cyan, and black) at a time. WARNING: Before performing any of the following procedures, read and follow the safety instructions in the Important Information. If the right side cover remains open for more than three minutes, print quality may deteriorate. Maintaining Your Printer 273

Dell Color Laser Printer Users Guide
Page 276
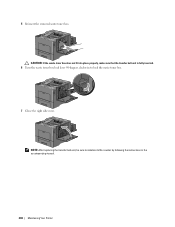
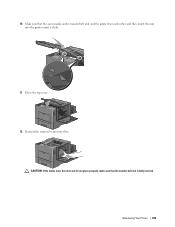
WARNING: Never lay the waste toner box on a level surface. CAUTION: After removing the waste toner box, do not touch the parts shown in the illustration. Toner can dirty or stain your hands. 4 Stand the removed waste toner box upright on its side as this may cause its malfunction or toner spills. 274 Maintaining Your Printer CAUTION: Take care not to hold it . 3 Grasp the handle on the waste toner box and pull it out making sure to drop the waste toner box while you are removing it upright so that the waste toner does not spill out.
WARNING: Never lay the waste toner box on a level surface. CAUTION: After removing the waste toner box, do not touch the parts shown in the illustration. Toner can dirty or stain your hands. 4 Stand the removed waste toner box upright on its side as this may cause its malfunction or toner spills. 274 Maintaining Your Printer CAUTION: Take care not to hold it . 3 Grasp the handle on the waste toner box and pull it out making sure to drop the waste toner box while you are removing it upright so that the waste toner does not spill out.

Dell Color Laser Printer Users Guide
Page 279
9 Insert the cleaning rod fully into one of the four holes until it out. 10 Repeat step 9 also on the other three holes. One time insertion is fully inserted in the previous step. Maintaining Your Printer 277 CAUTION: If the waste toner box does not fit into the interior of the printer as illustrated below, and then pull it clicks into place properly, make sure that the drum cartridge is enough for each hole. 11 Return the cleaning rod to its original location. 12 Reinsert the removed waste toner box.
9 Insert the cleaning rod fully into one of the four holes until it out. 10 Repeat step 9 also on the other three holes. One time insertion is fully inserted in the previous step. Maintaining Your Printer 277 CAUTION: If the waste toner box does not fit into the interior of the printer as illustrated below, and then pull it clicks into place properly, make sure that the drum cartridge is enough for each hole. 11 Return the cleaning rod to its original location. 12 Reinsert the removed waste toner box.

Dell Color Laser Printer Users Guide
Page 280
Replacing the Fusing Unit WARNING: Before performing any of the following procedures, read and follow the safety instructions in the Important Information. Removing the Fusing Unit 1 Turn off the printer and wait for 30 minutes. 2 Push down the latch to lock the waste toner box. 14 Close the right side cover. 13 Turn the waste toner box lock lever 90-degrees clockwise to open the rear cover. 278 Maintaining Your Printer
Replacing the Fusing Unit WARNING: Before performing any of the following procedures, read and follow the safety instructions in the Important Information. Removing the Fusing Unit 1 Turn off the printer and wait for 30 minutes. 2 Push down the latch to lock the waste toner box. 14 Close the right side cover. 13 Turn the waste toner box lock lever 90-degrees clockwise to open the rear cover. 278 Maintaining Your Printer
Dell Color Laser Printer Users Guide
Page 282
...Information. Removing the Transfer Belt Unit 1 Push down the latch to open the rear cover. 2 Open the right side cover. 3 Turn the waste toner box lock lever 90-degrees counterclockwise to replace all three parts (transfer belt unit, 2nd BTR, and retard roller) at a time. Replacing the ...Transfer Belt Unit, the 2nd Belt Transfer Roller (2nd BTR), and the Retard Roller You need to unlock the waste toner box. 280 Maintaining Your Printer WARNING: Before performing any of the transfer belt unit may reduce print quality. CAUTION: Ensure nothing touches or scratches ...
...Information. Removing the Transfer Belt Unit 1 Push down the latch to open the rear cover. 2 Open the right side cover. 3 Turn the waste toner box lock lever 90-degrees counterclockwise to replace all three parts (transfer belt unit, 2nd BTR, and retard roller) at a time. Replacing the ...Transfer Belt Unit, the 2nd Belt Transfer Roller (2nd BTR), and the Retard Roller You need to unlock the waste toner box. 280 Maintaining Your Printer WARNING: Before performing any of the transfer belt unit may reduce print quality. CAUTION: Ensure nothing touches or scratches ...

Dell Color Laser Printer Users Guide
Page 283
CAUTION: After removing the waste toner box, do not touch the parts shown in the illustration. 4 Grasp the handle on its side as this may cause its malfunction or toner spills. WARNING: Never lay the waste toner box on the waste toner box and pull it out making sure to drop the waste toner box while you are removing it upright so that the waste toner does not spill out. Toner can dirty or stain your hands. 5 Stand the removed waste toner box upright on a level surface. Maintaining Your Printer 281 CAUTION: Take care not to hold it .
CAUTION: After removing the waste toner box, do not touch the parts shown in the illustration. 4 Grasp the handle on its side as this may cause its malfunction or toner spills. WARNING: Never lay the waste toner box on the waste toner box and pull it out making sure to drop the waste toner box while you are removing it upright so that the waste toner does not spill out. Toner can dirty or stain your hands. 5 Stand the removed waste toner box upright on a level surface. Maintaining Your Printer 281 CAUTION: Take care not to hold it .
Dell Color Laser Printer Users Guide
Page 286
NOTE: After replacing the transfer belt unit, be sure to lock the waste toner box. 7 Close the right side cover. 5 Reinsert the removed waste toner box. CAUTION: If the waste toner box does not fit into place properly, make sure that the transfer belt unit is fully inserted. 6 Turn the waste toner box lock lever 90-degrees clockwise to initialize its life counter by following the instructions in the accompanying manual. 284 Maintaining Your Printer
NOTE: After replacing the transfer belt unit, be sure to lock the waste toner box. 7 Close the right side cover. 5 Reinsert the removed waste toner box. CAUTION: If the waste toner box does not fit into place properly, make sure that the transfer belt unit is fully inserted. 6 Turn the waste toner box lock lever 90-degrees clockwise to initialize its life counter by following the instructions in the accompanying manual. 284 Maintaining Your Printer

Dell Color Laser Printer Users Guide
Page 290
CAUTION: Take care not to hold it . 288 Maintaining Your Printer Replacing the Waste Toner Box WARNING: Before performing any of the following procedures, read and follow the safety instructions in the Important Information. Removing the Waste Toner Box 1 Open the right side cover. 2 Turn the waste toner box lock lever 90-degrees counterclockwise to unlock the waste toner box. 3 Grasp the handle on the waste toner box and pull it out making sure to drop the waste toner box while you are removing it upright so that the waste toner does not spill out.
CAUTION: Take care not to hold it . 288 Maintaining Your Printer Replacing the Waste Toner Box WARNING: Before performing any of the following procedures, read and follow the safety instructions in the Important Information. Removing the Waste Toner Box 1 Open the right side cover. 2 Turn the waste toner box lock lever 90-degrees counterclockwise to unlock the waste toner box. 3 Grasp the handle on the waste toner box and pull it out making sure to drop the waste toner box while you are removing it upright so that the waste toner does not spill out.

Dell Color Laser Printer Users Guide
Page 291
CAUTION: After removing the waste toner box, do not touch the parts shown in the illustration. Toner can dirty or stain your hands. 4 Insert the used waste toner box into the plastic bag that came with the new waste toner box and seal the bag. Installing a Waste Toner Box 1 Unpack a new waste toner box. 2 Insert the waste toner box. 3 Turn the waste toner box lock lever 90-degrees clockwise to lock the waste toner box. 4 Close the right side cover. Maintaining Your Printer 289
CAUTION: After removing the waste toner box, do not touch the parts shown in the illustration. Toner can dirty or stain your hands. 4 Insert the used waste toner box into the plastic bag that came with the new waste toner box and seal the bag. Installing a Waste Toner Box 1 Unpack a new waste toner box. 2 Insert the waste toner box. 3 Turn the waste toner box lock lever 90-degrees clockwise to lock the waste toner box. 4 Close the right side cover. Maintaining Your Printer 289

Dell Color Laser Printer Users Guide
Page 292
Cleaning Inside the Printer Cleaning the CTD Sensor Clean the Color Toner Density (CTD) sensor only when an alert for the CTD sensor is shown on the Status Monitor or LCD panel screen. 1 Ensure that the printer is turned off. 2 Push down the latch to open the rear cover. 3 Open the right side cover. 4 Turn the waste toner box lock lever 90-degrees counterclockwise to unlock the waste toner box. 290 Maintaining Your Printer
Cleaning Inside the Printer Cleaning the CTD Sensor Clean the Color Toner Density (CTD) sensor only when an alert for the CTD sensor is shown on the Status Monitor or LCD panel screen. 1 Ensure that the printer is turned off. 2 Push down the latch to open the rear cover. 3 Open the right side cover. 4 Turn the waste toner box lock lever 90-degrees counterclockwise to unlock the waste toner box. 290 Maintaining Your Printer

Dell Color Laser Printer Users Guide
Page 293
WARNING: Never lay the waste toner box on a level surface. CAUTION: Take care not to hold it . Toner can dirty or stain your hands. 6 Stand the removed waste toner box upright on its side as this may cause its malfunction or toner spills. CAUTION: After removing the waste toner box, do not touch the parts shown in the illustration. Maintaining Your Printer 291 5 Grasp the handle on the waste toner box and pull it out making sure to drop the waste toner box while you are removing it upright so that the waste toner does not spill out.
WARNING: Never lay the waste toner box on a level surface. CAUTION: Take care not to hold it . Toner can dirty or stain your hands. 6 Stand the removed waste toner box upright on its side as this may cause its malfunction or toner spills. CAUTION: After removing the waste toner box, do not touch the parts shown in the illustration. Maintaining Your Printer 291 5 Grasp the handle on the waste toner box and pull it out making sure to drop the waste toner box while you are removing it upright so that the waste toner does not spill out.
Dell Color Laser Printer Users Guide
Page 295
CAUTION: If the waste toner box does not fit into the printer until it clicks. 11 Close the top cover. 12 Reinsert the removed waste toner box. 10 Make sure that the arrow marks on the transfer belt unit and the printer face each other, and then insert the unit into place properly, make sure that the transfer belt unit is fully inserted. Maintaining Your Printer 293
CAUTION: If the waste toner box does not fit into the printer until it clicks. 11 Close the top cover. 12 Reinsert the removed waste toner box. 10 Make sure that the arrow marks on the transfer belt unit and the printer face each other, and then insert the unit into place properly, make sure that the transfer belt unit is fully inserted. Maintaining Your Printer 293

Dell Color Laser Printer Users Guide
Page 296
13 Turn the waste toner box lock lever 90-degrees clockwise to stains inside the printer, clean inside the printer regularly by using the cleaning rod whenever you replace drum cartridges. 1 Open the right side cover. 294 Maintaining Your Printer Cleaning the Raster Optical Scanner (ROS) Window To prevent deterioration of printing quality due to lock the waste toner box. 14 Close the right side cover. 15 Close the rear cover.
13 Turn the waste toner box lock lever 90-degrees clockwise to stains inside the printer, clean inside the printer regularly by using the cleaning rod whenever you replace drum cartridges. 1 Open the right side cover. 294 Maintaining Your Printer Cleaning the Raster Optical Scanner (ROS) Window To prevent deterioration of printing quality due to lock the waste toner box. 14 Close the right side cover. 15 Close the rear cover.


