Access Gateway Administrator's Guide 7.1.0
Page 9
... device mapping to an N_Port 24 Example of adding an external F_Port (F9) on an embedded switch 30 Port grouping behavior 41 Port group 1 (PG1) setup 42 Failover behavior 52 Failback behavior 56 Starting point for QoS 66 Direct target attachment to switch operating in AG mode 74 Target aggregation 75...
... device mapping to an N_Port 24 Example of adding an external F_Port (F9) on an embedded switch 30 Port grouping behavior 41 Port group 1 (PG1) setup 42 Failover behavior 52 Failback behavior 56 Starting point for QoS 66 Direct target attachment to switch operating in AG mode 74 Target aggregation 75...

Access Gateway Administrator's Guide 7.1.0
Page 62
... the ag --pgremove command with a semicolon. In the following example, port group 3 is deleted from a port group. 1. switch:admin> ag --pgremove 3 42 Access Gateway Administrator's Guide 53-1002743-01 Removing a port group 1. Enter the ag --pgshow command to a port group 1. Note that if you add more than one N_Port, you must... an N_Port from port group 3. 3 Port Grouping policy F_Port1 F_Port2 F_Port3 F_Port4 N_Port1 AG PG1 N_Port2 Fabric-1 Fabric-2 Storage Array FIGURE 10 Port group 1 (PG1) setup Adding an N_Port to verify the N_Port was deleted from port group 3 3.
... the ag --pgremove command with a semicolon. In the following example, port group 3 is deleted from a port group. 1. switch:admin> ag --pgremove 3 42 Access Gateway Administrator's Guide 53-1002743-01 Removing a port group 1. Enter the ag --pgshow command to a port group 1. Note that if you add more than one N_Port, you must... an N_Port from port group 3. 3 Port Grouping policy F_Port1 F_Port2 F_Port3 F_Port4 N_Port1 AG PG1 N_Port2 Fabric-1 Fabric-2 Storage Array FIGURE 10 Port group 1 (PG1) setup Adding an N_Port to verify the N_Port was deleted from port group 3 3.
Access Gateway Administrator's Guide 7.1.0
Page 105
... mapping, example, 16 maximum number mapped to N_Port, 30 settings, Edge switch, 77 shared area ports, 60 trunking setup, 59 fabric compatibility, 77 inband queries, 77 join, 79 logins, 77 management server platform, 77 zoning scheme, 77... monitoring disabling, 45 displaying current timeout value, 46 enabling, 45 setting timeout values, 46 management server, 62 mapping Brocade 8000 differences, 19 considerations, 28 device, 15 device to port groups, 24 devices to ports, 25 example, 16...queries, 77 initiator and target port considerations, 19 Access Gateway Administrator's Guide 85 53-1002743-01
... mapping, example, 16 maximum number mapped to N_Port, 30 settings, Edge switch, 77 shared area ports, 60 trunking setup, 59 fabric compatibility, 77 inband queries, 77 join, 79 logins, 77 management server platform, 77 zoning scheme, 77... monitoring disabling, 45 displaying current timeout value, 46 enabling, 45 setting timeout values, 46 management server, 62 mapping Brocade 8000 differences, 19 considerations, 28 device, 15 device to port groups, 24 devices to ports, 25 example, 16...queries, 77 initiator and target port considerations, 19 Access Gateway Administrator's Guide 85 53-1002743-01
Brocade 6510 QuickStart Guide
Page 1
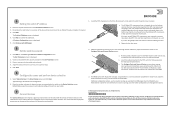
... starting EZSwitchSetup 1. This option uses the Ethernet LAN connection you click OK. 3. See the Brocade 6510 Hardware Reference Manual and the Fabric OS Administrator's Guide (located on the Brocade Family Documentation CD) if you want to use for setup, connect your setup computer COM port (7) to the serial port on the Discover Switch screen. The power...
... starting EZSwitchSetup 1. This option uses the Ethernet LAN connection you click OK. 3. See the Brocade 6510 Hardware Reference Manual and the Fabric OS Administrator's Guide (located on the Brocade Family Documentation CD) if you want to use for setup, connect your setup computer COM port (7) to the serial port on the Discover Switch screen. The power...
Brocade 6510 QuickStart Guide
Page 2
...the physical connections shown on the Device Selection screen. b. Verify that you entered when you cable the switch. See the EZSwitchSetup Administrator's Guide for the other ports. 5 Set the switch password 1. Other brands, products, or service names mentioned are using 16 Gbps SFP+ ...valid, and invalid connections as missing until it can remove the serial cable. If you 've successfully completed the setup!" All Rights Reserved. 53-1002135-01 *53-1002135-01* Brocade, the B-wing symbol, BigIron, DCFM, DCX, Fabric OS, FastIron, IronView, NetIron, SAN Health, ServerIron,...
...the physical connections shown on the Device Selection screen. b. Verify that you entered when you cable the switch. See the EZSwitchSetup Administrator's Guide for the other ports. 5 Set the switch password 1. Other brands, products, or service names mentioned are using 16 Gbps SFP+ ...valid, and invalid connections as missing until it can remove the serial cable. If you 've successfully completed the setup!" All Rights Reserved. 53-1002135-01 *53-1002135-01* Brocade, the B-wing symbol, BigIron, DCFM, DCX, Fabric OS, FastIron, IronView, NetIron, SAN Health, ServerIron,...

Brocade 6510 QuickStart Guide
Page 1
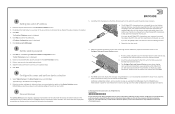
...On the EZSwitchSetup Introduction screen, choose the option that allows pop-up windows Ethernet and Fibre Channel Cables Setup computer Disk array Optical transceivers (SFPs) 3 Powering up your Brocade 6510 switch in the space provided. Most users will autostart in about a minute. 2. After completing switch discovery... it more convenient to use the Ethernet connection, the Discover Switch screen is immediately displayed. Brocade 6510 QuickStart Guide ® Complete the steps in this guide to install and set up and connecting cables to the switch The Connect Cables screen shows...
...On the EZSwitchSetup Introduction screen, choose the option that allows pop-up windows Ethernet and Fibre Channel Cables Setup computer Disk array Optical transceivers (SFPs) 3 Powering up your Brocade 6510 switch in the space provided. Most users will autostart in about a minute. 2. After completing switch discovery... it more convenient to use the Ethernet connection, the Discover Switch screen is immediately displayed. Brocade 6510 QuickStart Guide ® Complete the steps in this guide to install and set up and connecting cables to the switch The Connect Cables screen shows...
Brocade 6510 QuickStart Guide
Page 2
...SFP+ first, and then insert them into the SFP+ until you specified. © 2011 Brocade Communications Systems, Inc. Click Next. 6 Configure the zones and perform device selection 1. EZSwitchSetup...row of the switch with EZManager. 1. Adjust the date and time for setup, you 've successfully completed the setup!" Remove plastic protector caps from EZManager. The Configure Ports and Connect Devices screen...screen. b. Click Next to display as a valid connection. See the EZSwitchSetup Administrator's Guide for the other countries. you can take up in the top row of ports ...
...SFP+ first, and then insert them into the SFP+ until you specified. © 2011 Brocade Communications Systems, Inc. Click Next. 6 Configure the zones and perform device selection 1. EZSwitchSetup...row of the switch with EZManager. 1. Adjust the date and time for setup, you 've successfully completed the setup!" Remove plastic protector caps from EZManager. The Configure Ports and Connect Devices screen...screen. b. Click Next to display as a valid connection. See the EZSwitchSetup Administrator's Guide for the other countries. you can take up in the top row of ports ...
EZSwitchSetup Administrator's Guide 7.1.0
Page 3
... the switch 17 Setting switch parameters 18 Zoning selection options 19 Configuring zones on the switch 20 Specifying devices 20 Connecting devices and completing the setup 21 EZSwitchSetup Administrator's Guide iii 53-1002744-01
... the switch 17 Setting switch parameters 18 Zoning selection options 19 Configuring zones on the switch 20 Specifying devices 20 Connecting devices and completing the setup 21 EZSwitchSetup Administrator's Guide iii 53-1002744-01
EZSwitchSetup Administrator's Guide 7.1.0
Page 17
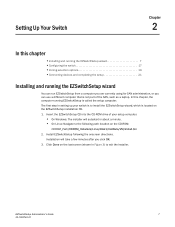
...in about a minute. • On Linux: Navigate to exit the installer. Click Done on the last screen (shown in setting up your setup computer. • On Windows: The installer will take a few minutes after you can run EZSwitchSetup from a computer you are currently using for... SAN administration, or you click OK. 3. EZSwitchSetup Administrator's Guide 7 53-1002744-01 Setting Up Your Switch Chapter 2 In this chapter, the computer running the EZSwitchSetup wizard You can use a different ...
...in about a minute. • On Linux: Navigate to exit the installer. Click Done on the last screen (shown in setting up your setup computer. • On Windows: The installer will take a few minutes after you can run EZSwitchSetup from a computer you are currently using for... SAN administration, or you click OK. 3. EZSwitchSetup Administrator's Guide 7 53-1002744-01 Setting Up Your Switch Chapter 2 In this chapter, the computer running the EZSwitchSetup wizard You can use a different ...
EZSwitchSetup Administrator's Guide 7.1.0
Page 20
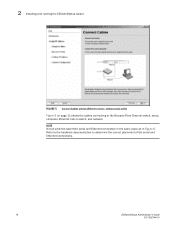
NOTE Not all switches have their serial and Ethernet connectors in the same place as in Figure 6. Refer to the hardware documentation to the Brocade Fibre Channel switch, setup computer, Ethernet hub or switch, and network. 2 Installing and running the EZSwitchSetup wizard FIGURE 5 Connect Cables window (Ethernet version, without serial cable) Figure 6 on page 11 shows the cables connecting to determine the correct placement of the serial and Ethernet connections. 10 EZSwitchSetup Administrator's Guide 53-1002744-01
NOTE Not all switches have their serial and Ethernet connectors in the same place as in Figure 6. Refer to the hardware documentation to the Brocade Fibre Channel switch, setup computer, Ethernet hub or switch, and network. 2 Installing and running the EZSwitchSetup wizard FIGURE 5 Connect Cables window (Ethernet version, without serial cable) Figure 6 on page 11 shows the cables connecting to determine the correct placement of the serial and Ethernet connections. 10 EZSwitchSetup Administrator's Guide 53-1002744-01
EZSwitchSetup Administrator's Guide 7.1.0
Page 21
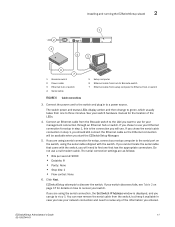
... start the EZSwitchSetup Manager. 5. If you are using a serial connection for setup, connect your setup computer to the serial port on how to discover the switch. EZSwitchSetup Administrator's Guide 11 53-1002744-01 If you are as follows: • Bits per second...3 4 5 6 7 8 9 10 11 12 13 14 15 4 C5 6 7 1 Brocade switch 2 Power cable 3 Ethernet hub or switch 4 Serial cable FIGURE 6 Cable connections 5 Setup computer 6 Ethernet cable from hub to Brocade switch 7 Ethernet cable from the Brocade switch to the LAN you want to use for your management connection through an...
... start the EZSwitchSetup Manager. 5. If you are using a serial connection for setup, connect your setup computer to the serial port on how to discover the switch. EZSwitchSetup Administrator's Guide 11 53-1002744-01 If you are as follows: • Bits per second...3 4 5 6 7 8 9 10 11 12 13 14 15 4 C5 6 7 1 Brocade switch 2 Power cable 3 Ethernet hub or switch 4 Serial cable FIGURE 6 Cable connections 5 Setup computer 6 Ethernet cable from hub to Brocade switch 7 Ethernet cable from the Brocade switch to the LAN you want to use for your management connection through an...
EZSwitchSetup Administrator's Guide 7.1.0
Page 27
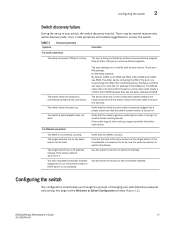
... to recover the switch. There may fail. The target switch is secured. EZSwitchSetup Administrator's Guide 17 53-1002744-01 Configuring the switch 2 Switch discovery failure During the setup of your IRQ settings. The port settings are in an environment where a DHCP server is...on . Use the serial connection to Switch Configuration window (Figure 12). TABLE 2 Symptom Discovery recovery Correction For serial connections: The setup computer COM port is not available. Stop all other third-party communications programs. The switch does not respond to do so, use...
... to recover the switch. There may fail. The target switch is secured. EZSwitchSetup Administrator's Guide 17 53-1002744-01 Configuring the switch 2 Switch discovery failure During the setup of your IRQ settings. The port settings are in an environment where a DHCP server is...on . Use the serial connection to Switch Configuration window (Figure 12). TABLE 2 Symptom Discovery recovery Correction For serial connections: The setup computer COM port is not available. Stop all other third-party communications programs. The switch does not respond to do so, use...
EZSwitchSetup Administrator's Guide 7.1.0
Page 28
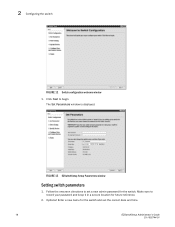
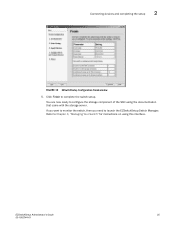
2 Configuring the switch FIGURE 12 Switch configuration welcome window 1. FIGURE 13 EZSwitchSetup Setup Parameters window Setting switch parameters 1. Make sure to record your password and keep it in a secure location for the switch. Optional: Enter a new name for the switch and set a new admin password for future reference. 2. Click Next to set the correct date and time. 18 EZSwitchSetup Administrator's Guide 53-1002744-01 The Set Parameters window is displayed. Follow the onscreen directions to begin.
2 Configuring the switch FIGURE 12 Switch configuration welcome window 1. FIGURE 13 EZSwitchSetup Setup Parameters window Setting switch parameters 1. Make sure to record your password and keep it in a secure location for the switch. Optional: Enter a new name for the switch and set a new admin password for future reference. 2. Click Next to set the correct date and time. 18 EZSwitchSetup Administrator's Guide 53-1002744-01 The Set Parameters window is displayed. Follow the onscreen directions to begin.
EZSwitchSetup Administrator's Guide 7.1.0
Page 30
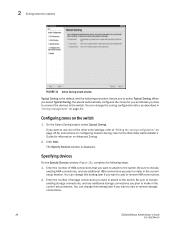
... Typical Zoning, the wizard automatically configures the zones for you and shows you how to connect the devices to make in the current setup session. The Specify Devices window is the default and the following steps. 1. Be sure to include existing storage connections, and any additional...setting later if you plan to the switch. You can change the zoning configuration later, as described in the current setup session. If you to the Web Tools Administrator's Guide for instructions on Advanced Zoning. 2. Configuring zones on page 43. refer to select Typical Zoning. Click Next. FIGURE...
... Typical Zoning, the wizard automatically configures the zones for you and shows you how to connect the devices to make in the current setup session. The Specify Devices window is the default and the following steps. 1. Be sure to include existing storage connections, and any additional...setting later if you plan to the switch. You can change the zoning configuration later, as described in the current setup session. If you to the Web Tools Administrator's Guide for instructions on Advanced Zoning. 2. Configuring zones on page 43. refer to select Typical Zoning. Click Next. FIGURE...
EZSwitchSetup Administrator's Guide 7.1.0
Page 31
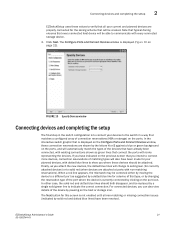
...solid red (when devices are attached at ports with every connected storage device. 3. Connecting devices and completing the setup 2 EZSwitchSetup uses these values to verify that all non-matching or missing connection issues (indicated by the letters... be replaced by pausing on the ports. FIGURE 15 Specify Devices window Connecting devices and completing the setup The final step in a way that every connected host device will be able to communicate with non... green line to indicate the correct connection. EZSwitchSetup Administrator's Guide 21 53-1002744-01 Click Next.
...solid red (when devices are attached at ports with every connected storage device. 3. Connecting devices and completing the setup 2 EZSwitchSetup uses these values to verify that all non-matching or missing connection issues (indicated by the letters... be replaced by pausing on the ports. FIGURE 15 Specify Devices window Connecting devices and completing the setup The final step in a way that every connected host device will be able to communicate with non... green line to indicate the correct connection. EZSwitchSetup Administrator's Guide 21 53-1002744-01 Click Next.
EZSwitchSetup Administrator's Guide 7.1.0
Page 32
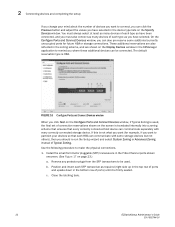
...onscreen. (See Figure 17 on the Configure Ports and Connect Devices window, if Typical Zoning is used . 2 Connecting devices and completing the setup If you change your devices so that every correctly connected host device can communicate separately with some additional currently unoccupied ports for example, if ...and select Custom Zoning or Advanced Zoning instead of ports) until it is HBA. Close the latching bale. 22 EZSwitchSetup Administrator's Guide 53-1002744-01 On the Configure Ports and Connect Devices window, you can also pre-reserve some storage devices but not others...
...onscreen. (See Figure 17 on the Configure Ports and Connect Devices window, if Typical Zoning is used . 2 Connecting devices and completing the setup If you change your devices so that every correctly connected host device can communicate separately with some additional currently unoccupied ports for example, if ...and select Custom Zoning or Advanced Zoning instead of ports) until it is HBA. Close the latching bale. 22 EZSwitchSetup Administrator's Guide 53-1002744-01 On the Configure Ports and Connect Devices window, you can also pre-reserve some storage devices but not others...
EZSwitchSetup Administrator's Guide 7.1.0
Page 33
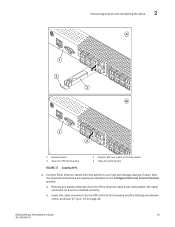
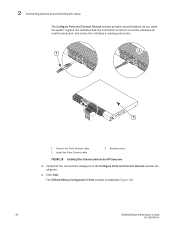
Connecting devices and completing the setup 2 A IOIOI ! 1 2 3 scale: 1/2" = 1" B IOIOI 1 ! 4 4-01 1 Brocade switch 2 Open the SFP latching bale FIGURE 17 Installing SFPs 3 Position SFP and insert until it is firmly seated and the latching mechanism clicks, as ... the cable connector so that the physical connections are exactly as shown in Figure 18 on the Configure Ports and Connect Devices window. EZSwitchSetup Administrator's Guide 23 53-1002744-01
Connecting devices and completing the setup 2 A IOIOI ! 1 2 3 scale: 1/2" = 1" B IOIOI 1 ! 4 4-01 1 Brocade switch 2 Open the SFP latching bale FIGURE 17 Installing SFPs 3 Position SFP and insert until it is firmly seated and the latching mechanism clicks, as ... the cable connector so that the physical connections are exactly as shown in Figure 18 on the Configure Ports and Connect Devices window. EZSwitchSetup Administrator's Guide 23 53-1002744-01
EZSwitchSetup Administrator's Guide 7.1.0
Page 34
...= 1" AMmoaTuxTnimEtinuNgmTtosIcObreewN5lm:enmgtohrfo1r3r/a6c4k in. 3 1 Position the Fibre Channel cable 2 Install the Fibre Channel cable 3 Brocade switch FIGURE 18 Installing Fibre Channel cable into an SFP transceiver 3. A green line indicates that the connections displayed... a blue line indicates a missing connection. 2 1 IOIOI ! Verify that the connection is displayed (Figure 19). 24 EZSwitchSetup Administrator's Guide 53-1002744-01 2 Connecting devices and completing the setup The Configure Ports and Connect Devices window provides visual feedback as you cable the switch.
...= 1" AMmoaTuxTnimEtinuNgmTtosIcObreewN5lm:enmgtohrfo1r3r/a6c4k in. 3 1 Position the Fibre Channel cable 2 Install the Fibre Channel cable 3 Brocade switch FIGURE 18 Installing Fibre Channel cable into an SFP transceiver 3. A green line indicates that the connections displayed... a blue line indicates a missing connection. 2 1 IOIOI ! Verify that the connection is displayed (Figure 19). 24 EZSwitchSetup Administrator's Guide 53-1002744-01 2 Connecting devices and completing the setup The Configure Ports and Connect Devices window provides visual feedback as you cable the switch.
EZSwitchSetup Administrator's Guide 7.1.0
Page 35
Refer to configure the storage component of the SAN using this interface. If you want to monitor the switch, then you need to complete the switch setup. Click Finish to launch the EZSwitchSetup Switch Manager. EZSwitchSetup Administrator's Guide 25 53-1002744-01 Connecting devices and completing the setup 2 FIGURE 19 EZSwitchSetup Configuration Finish window 5. You are now ready to Chapter 3, "Managing Your Switch" for instructions on using the documentation that came with the storage server.
Refer to configure the storage component of the SAN using this interface. If you want to monitor the switch, then you need to complete the switch setup. Click Finish to launch the EZSwitchSetup Switch Manager. EZSwitchSetup Administrator's Guide 25 53-1002744-01 Connecting devices and completing the setup 2 FIGURE 19 EZSwitchSetup Configuration Finish window 5. You are now ready to Chapter 3, "Managing Your Switch" for instructions on using the documentation that came with the storage server.

EZSwitchSetup Administrator's Guide 7.1.0
Page 36
2 Connecting devices and completing the setup 26 EZSwitchSetup Administrator's Guide 53-1002744-01
2 Connecting devices and completing the setup 26 EZSwitchSetup Administrator's Guide 53-1002744-01


