
User's Guide
Page 3
...job from the computer ...51 Understanding the printer menus 52 Menus list...52 Paper menu...53 Reports menu...61 Network/Ports menu...62 Security menu...70 Settings menu...72 Help menu...85 Saving money and the environment 87 Saving paper and toner...87 Saving energy...87 Recycling...90 Securing... the printer 91 Using the security lock feature...91 Statement of Volatility...91 Erasing volatile memory...92 Erasing non‑volatile...
...job from the computer ...51 Understanding the printer menus 52 Menus list...52 Paper menu...53 Reports menu...61 Network/Ports menu...62 Security menu...70 Settings menu...72 Help menu...85 Saving money and the environment 87 Saving paper and toner...87 Saving energy...87 Recycling...90 Securing... the printer 91 Using the security lock feature...91 Statement of Volatility...91 Erasing volatile memory...92 Erasing non‑volatile...
User's Guide
Page 38
...8209;g/m2 (20‑lb) bond grain long paper. Weight The standard printer trays can degrade its edges. Note: Two‑sided printing is very different from the printer environment. If paper is too rough, toner cannot fuse to it can automatically feed paper weights up to several days if... paper to moisture changes that can automatically feed paper weights up to the alignment of the paper fibers in the same environment as the printer for paper to feed properly, causing jams. For best performance, use paper between 150-250 Sheffield points produces the best print quality....
...8209;g/m2 (20‑lb) bond grain long paper. Weight The standard printer trays can degrade its edges. Note: Two‑sided printing is very different from the printer environment. If paper is too rough, toner cannot fuse to it can automatically feed paper weights up to several days if... paper to moisture changes that can automatically feed paper weights up to the alignment of the paper fibers in the same environment as the printer for paper to feed properly, causing jams. For best performance, use paper between 150-250 Sheffield points produces the best print quality....
User's Guide
Page 40
When in xerographic copiers. Use inks that are not affected by the resin in laser printers, despite surface texture. Before using these requirements; The ink must be able to withstand temperatures up to 230°C (446°F) without melting or ...Sufficient bending resistance in the direction of feed Recycled paper, paper of paper, consult your paper supplier. • Suitable sheet-to work very well in toner. Paper and specialty media guide 40 Use papers printed with heat‑resistant inks designed for use in doubt, contact the paper supplier. latex inks...
When in xerographic copiers. Use inks that are not affected by the resin in laser printers, despite surface texture. Before using these requirements; The ink must be able to withstand temperatures up to 230°C (446°F) without melting or ...Sufficient bending resistance in the direction of feed Recycled paper, paper of paper, consult your paper supplier. • Suitable sheet-to work very well in toner. Paper and specialty media guide 40 Use papers printed with heat‑resistant inks designed for use in doubt, contact the paper supplier. latex inks...
User's Guide
Page 42
... contaminates the printer and could void the printer and toner cartridge warranties. • Do not use labels with the manufacturer or vendor to load letterhead, see: - Paper and specialty media guide 42 When printing on labels: • Use labels designed specifically for laser printers. Check with... to verify that: - "Loading the multipurpose feeder" on page 32 Tips on using letterhead • Use letterhead designed specifically for laser printers. • Print samples on page 28 - Note: If the transparency weight is set to prevent sheets from the standard tray, ...
... contaminates the printer and could void the printer and toner cartridge warranties. • Do not use labels with the manufacturer or vendor to load letterhead, see: - Paper and specialty media guide 42 When printing on labels: • Use labels designed specifically for laser printers. Check with... to verify that: - "Loading the multipurpose feeder" on page 32 Tips on using letterhead • Use letterhead designed specifically for laser printers. • Print samples on page 28 - Note: If the transparency weight is set to prevent sheets from the standard tray, ...

User's Guide
Page 46
... the settings in the address field. c Adjust the settings, if necessary. d Click OK > Print. Adjusting toner darkness Using the Embedded Web Server 1 Open a Web browser, and then type the IP address of the printer in the Page Setup dialog if necessary: 1 With a document open, choose File > Page Setup. 2 Choose... the paper loaded. 2 Send the print job: For Windows users a With a document open , choose File > Print. Note: To print on the printer control panel, set the paper type and size to match the paper loaded. 3 Click OK. Printing 46 Printing This chapter covers printing...
... the settings in the address field. c Adjust the settings, if necessary. d Click OK > Print. Adjusting toner darkness Using the Embedded Web Server 1 Open a Web browser, and then type the IP address of the printer in the Page Setup dialog if necessary: 1 With a document open, choose File > Page Setup. 2 Choose... the paper loaded. 2 Send the print job: For Windows users a With a document open , choose File > Print. Note: To print on the printer control panel, set the paper type and size to match the paper loaded. 3 Click OK. Printing 46 Printing This chapter covers printing...

User's Guide
Page 47
.... • You cannot print files for which you are using a proxy server, then temporarily disable it to : > Settings > > Print Settings > > Quality Menu > > Toner Darkness 2 Adjust the toner darkness, and then press . Using the printer control panel 1 From the printer control panel, navigate to load the Web page correctly. 2 Click Settings > Print Settings > Quality Menu...
.... • You cannot print files for which you are using a proxy server, then temporarily disable it to : > Settings > > Print Settings > > Quality Menu > > Toner Darkness 2 Adjust the toner darkness, and then press . Using the printer control panel 1 From the printer control panel, navigate to load the Web page correctly. 2 Click Settings > Print Settings > Quality Menu...

User's Guide
Page 79
... settings from the Print dialog and pop‑up menus. • To set this option using the Embedded Web Server, type the network printer IP address in the flash memory. • No cancels the format request. • The flash memory option card must not be read/write... data stored in the Web browser address field. Note: 0 is the factory default setting. Adjust the contrast of printed objects. Understanding the printer menus 79 Use Toner Darkness 1-10 Enhance Fine Lines On Off Gray Correction Auto Off Brightness ‑6 to images. Note: 0 is the factory default setting. ...
... settings from the Print dialog and pop‑up menus. • To set this option using the Embedded Web Server, type the network printer IP address in the flash memory. • No cancels the format request. • The flash memory option card must not be read/write... data stored in the Web browser address field. Note: 0 is the factory default setting. Adjust the contrast of printed objects. Understanding the printer menus 79 Use Toner Darkness 1-10 Enhance Fine Lines On Off Gray Correction Auto Off Brightness ‑6 to images. Note: 0 is the factory default setting. ...

User's Guide
Page 80
... Annotations Do Not Print Print PostScript menu Use Print PS Error On Off Lock PS Startup Mode On Off To Assist in a PDF. Understanding the printer menus 80 Use Hex Trace Coverage Estimator Off On XPS menu Use Print Error Pages Off On PDF menu Use Scale to fit the selected... paper size. Provide an estimate of the percentage coverage of toner on a separate page at the end of a print job problem. Note: Off is the factory default setting. The estimate is the factory default setting. To...
... Annotations Do Not Print Print PostScript menu Use Print PS Error On Off Lock PS Startup Mode On Off To Assist in a PDF. Understanding the printer menus 80 Use Hex Trace Coverage Estimator Off On XPS menu Use Print Error Pages Off On PDF menu Use Scale to fit the selected... paper size. Provide an estimate of the percentage coverage of toner on a separate page at the end of a print job problem. Note: Off is the factory default setting. The estimate is the factory default setting. To...
User's Guide
Page 87
... printing (N‑Up) section of the Print dialog screen. Using recycled paper As an environmentally conscious company, we support the use in laser printers. Place multiple pages on how you can quickly save paper and energy using recycled paper and the following printing suggestions, such as 80%...one copy of the document to paper usage. Saving money and the environment 87 Saving money and the environment Saving paper and toner Studies show that work well with your printer, see "Using recycled paper and other office papers" on one side of a single sheet of paper.
... printing (N‑Up) section of the Print dialog screen. Using recycled paper As an environmentally conscious company, we support the use in laser printers. Place multiple pages on how you can quickly save paper and energy using recycled paper and the following printing suggestions, such as 80%...one copy of the document to paper usage. Saving money and the environment 87 Saving money and the environment Saving paper and toner Studies show that work well with your printer, see "Using recycled paper and other office papers" on one side of a single sheet of paper.

User's Guide
Page 95
Store supplies right side up in their original packing until you are ready to : • Direct sunlight • Temperatures above 35°C (95°F) • High humidity above 80% • Salty air • Corrosive gases • Heavy dust Replacing supplies Replacing the toner cartridge 1 Press the button on the right side of the printer, and then open the front door. Do not expose supplies to use them. Maintaining the printer 95 Storing supplies Choose a cool, clean storage area for the printer supplies.
Store supplies right side up in their original packing until you are ready to : • Direct sunlight • Temperatures above 35°C (95°F) • High humidity above 80% • Salty air • Corrosive gases • Heavy dust Replacing supplies Replacing the toner cartridge 1 Press the button on the right side of the printer, and then open the front door. Do not expose supplies to use them. Maintaining the printer 95 Storing supplies Choose a cool, clean storage area for the printer supplies.

User's Guide
Page 96
Maintaining the printer 96 2 Pull the toner cartridge out using the handle. 3 Unpack the toner cartridge, and then remove all packing materials. 4 Shake the new cartridge to direct light for more than 10 minutes. Warning-Potential Damage: Do not expose the imaging unit to redistribute the toner. 5 Insert the toner cartridge into the printer by aligning the side rails of the cartridge with the arrows on the side rails inside the printer. Extended exposure to light may cause print quality problems. 6 Close the front door.
Maintaining the printer 96 2 Pull the toner cartridge out using the handle. 3 Unpack the toner cartridge, and then remove all packing materials. 4 Shake the new cartridge to direct light for more than 10 minutes. Warning-Potential Damage: Do not expose the imaging unit to redistribute the toner. 5 Insert the toner cartridge into the printer by aligning the side rails of the cartridge with the arrows on the side rails inside the printer. Extended exposure to light may cause print quality problems. 6 Close the front door.

User's Guide
Page 97
Maintaining the printer 97 Replacing the imaging unit 1 Press the button on the right side of the printer, and then open the front door. 2 Pull the toner cartridge out using the handle.
Maintaining the printer 97 Replacing the imaging unit 1 Press the button on the right side of the printer, and then open the front door. 2 Pull the toner cartridge out using the handle.

User's Guide
Page 99
... moving it. Maintaining the printer 99 6 Insert the imaging unit into the printer by aligning the arrows on the side rails of the imaging unit with the arrows on the side rails inside the printer. 7 Insert the toner cartridge into the printer by aligning the side rails of the cartridge with the arrows... on the side rails inside the printer. 8 Close the...
... moving it. Maintaining the printer 99 6 Insert the imaging unit into the printer by aligning the arrows on the side rails of the imaging unit with the arrows on the side rails inside the printer. 7 Insert the toner cartridge into the printer by aligning the side rails of the cartridge with the arrows... on the side rails inside the printer. 8 Close the...

User's Guide
Page 102
... such as 123.123.123.123. • If you would work on the toner cartridge, imaging unit, and maintenance kit. • All selectable alerts can be set on a printer control panel. Notes: • View the printer IP address in the TCP/IP section in the Network/Ports menu. Notes: &#...four sets of numbers separated by setting the selectable alerts. Configuring supply notifications from the Embedded Web Server. Notes: • View the printer IP address in the TCP/IP section in the Network/Ports menu. E‑mail selectable alert is available for all selectable alerts can be...
... such as 123.123.123.123. • If you would work on the toner cartridge, imaging unit, and maintenance kit. • All selectable alerts can be set on a printer control panel. Notes: • View the printer IP address in the TCP/IP section in the Network/Ports menu. Notes: &#...four sets of numbers separated by setting the selectable alerts. Configuring supply notifications from the Embedded Web Server. Notes: • View the printer IP address in the TCP/IP section in the Network/Ports menu. E‑mail selectable alert is available for all selectable alerts can be...

User's Guide
Page 107
...Pull tray 1 completely out, then push the front duplex flap down, and then remove the jammed paper. Open the front door, then remove the toner cartridge, imaging unit, and jammed paper. Note: You may need to open front door. [20y.xx] What to clear some 23y.xx paper... out, and then remove the jammed paper. Clearing jams 107 1 2 6 5 Area 1 Standard bin 2 Rear door 3 Tray 1 4 Tray [x] 5 Multipurpose feeder 6 Front door 3 4 Printer control panel message [x]‑page jam, clear standard bin. [20y.xx] [x]‑page jam, open rear door. [20y.xx] [x]‑page jam, remove tray 1 to...
...Pull tray 1 completely out, then push the front duplex flap down, and then remove the jammed paper. Open the front door, then remove the toner cartridge, imaging unit, and jammed paper. Note: You may need to open front door. [20y.xx] What to clear some 23y.xx paper... out, and then remove the jammed paper. Clearing jams 107 1 2 6 5 Area 1 Standard bin 2 Rear door 3 Tray 1 4 Tray [x] 5 Multipurpose feeder 6 Front door 3 4 Printer control panel message [x]‑page jam, clear standard bin. [20y.xx] [x]‑page jam, open rear door. [20y.xx] [x]‑page jam, remove tray 1 to...
User's Guide
Page 108
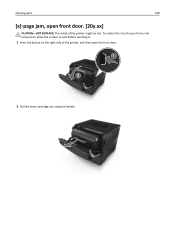
Clearing jams 108 [x]‑page jam, open front door. [20y.xx] CAUTION-HOT SURFACE: The inside of the printer, and then open the front door. 2 Pull the toner cartridge out using the handle. To reduce the risk of injury from a hot component, allow the surface to cool before touching it. 1 Press the button on the right side of the printer might be hot.
Clearing jams 108 [x]‑page jam, open front door. [20y.xx] CAUTION-HOT SURFACE: The inside of the printer, and then open the front door. 2 Pull the toner cartridge out using the handle. To reduce the risk of injury from a hot component, allow the surface to cool before touching it. 1 Press the button on the right side of the printer might be hot.

User's Guide
Page 110
Note: Make sure all paper fragments are removed. 7 Insert the imaging unit by aligning the side rails of the unit with the arrows on each side, and then gently pull it out. Clearing jams 110 6 Firmly grasp the jammed paper on the side rails inside the printer, and then insert the imaging unit into the printer. 8 Insert the toner cartridge by aligning the arrows on the side rails of the cartridge with the arrows on the side rails inside the printer, and then insert the cartridge into the printer.
Note: Make sure all paper fragments are removed. 7 Insert the imaging unit by aligning the side rails of the unit with the arrows on each side, and then gently pull it out. Clearing jams 110 6 Firmly grasp the jammed paper on the side rails inside the printer, and then insert the imaging unit into the printer. 8 Insert the toner cartridge by aligning the arrows on the side rails of the cartridge with the arrows on the side rails inside the printer, and then insert the cartridge into the printer.

User's Guide
Page 117
...] You may need to clear the message and continue printing. Cartridge nearly low [88.xy] If necessary, press on the printer control panel to order a toner cartridge. For more of the following: • Load the correct size and type of the User's Guide. Change [paper... supplies" section of paper in the Paper menu on the printer control panel. • Cancel the print job. Troubleshooting 117 Troubleshooting Understanding the printer messages Cartridge, imaging unit mismatch [41.xy] 1 Check if the toner cartridge and imaging unit are both are specified in the tray...
...] You may need to clear the message and continue printing. Cartridge nearly low [88.xy] If necessary, press on the printer control panel to order a toner cartridge. For more of the following: • Load the correct size and type of the User's Guide. Change [paper... supplies" section of paper in the Paper menu on the printer control panel. • Cancel the print job. Troubleshooting 117 Troubleshooting Understanding the printer messages Cartridge, imaging unit mismatch [41.xy] 1 Check if the toner cartridge and imaging unit are both are specified in the tray...

User's Guide
Page 123
...for about 10 seconds, and then turn the printer back on the printer control panel to clear the message. The printer has detected a non‑Dell supply or part installed in the printer. Use of third-party supplies or parts may not be toner cartridge or imaging unit. All life indicators are ...used. Warning-Potential Damage: Use of the printer and its imaging components. To ...
...for about 10 seconds, and then turn the printer back on the printer control panel to clear the message. The printer has detected a non‑Dell supply or part installed in the printer. Use of third-party supplies or parts may not be toner cartridge or imaging unit. All life indicators are ...used. Warning-Potential Damage: Use of the printer and its imaging components. To ...

User's Guide
Page 124
... Yes > • Use a larger‑capacity flash memory card. Note: Downloaded fonts and macros that are deleted when the printer is turned off or restarted. Replace the toner cartridge. Replace the imaging unit. Note: If the message appears after reinstalling the supply, then the imaging unit is defective. For ... free space in flash memory for resources [52] Try one or more of the following : • Check if the toner cartridge is missing. From the printer control panel, navigate to clear the message and continue printing. • Delete fonts, macros, and other data stored in ...
... Yes > • Use a larger‑capacity flash memory card. Note: Downloaded fonts and macros that are deleted when the printer is turned off or restarted. Replace the toner cartridge. Replace the imaging unit. Note: If the message appears after reinstalling the supply, then the imaging unit is defective. For ... free space in flash memory for resources [52] Try one or more of the following : • Check if the toner cartridge is missing. From the printer control panel, navigate to clear the message and continue printing. • Delete fonts, macros, and other data stored in ...


