Service Manual
Page 5
... Removing the speakers...44 Prerequisites...44 Procedure...44 Replacing the speakers...45 Procedure...45 Post-requisites...45 Removing the system board 46 Prerequisites...46 Procedure...46 Replacing the system board 50 Procedure...50 Post-requisites...52 Removing the keyboard...53 Prerequisites...53 Procedure...53 Replacing the keyboard...55 Procedure...55 Post-requisites...56 Removing the...
... Removing the speakers...44 Prerequisites...44 Procedure...44 Replacing the speakers...45 Procedure...45 Post-requisites...45 Removing the system board 46 Prerequisites...46 Procedure...46 Replacing the system board 50 Procedure...50 Post-requisites...52 Removing the keyboard...53 Prerequisites...53 Procedure...53 Replacing the keyboard...55 Procedure...55 Post-requisites...56 Removing the...
Service Manual
Page 8
...following tools: • Phillips screwdriver #1 • Plastic scribe 8 WARNING: Before working inside the computer, replace all attached network devices and peripherals, such as keyboard, mouse, and monitor from your computer, if applicable. CAUTION: To avoid damaging the computer, ensure that is...Save and close all open applications. 2 Shut down . When connecting cables, ensure that shipped with the product or at www.dell.com/regulatory_compliance. Before you ordered. CAUTION: Press and eject any installed card from your computer. 5 Remove any connector pins. ...
...following tools: • Phillips screwdriver #1 • Plastic scribe 8 WARNING: Before working inside the computer, replace all attached network devices and peripherals, such as keyboard, mouse, and monitor from your computer, if applicable. CAUTION: To avoid damaging the computer, ensure that is...Save and close all open applications. 2 Shut down . When connecting cables, ensure that shipped with the product or at www.dell.com/regulatory_compliance. Before you ordered. CAUTION: Press and eject any installed card from your computer. 5 Remove any connector pins. ...
Service Manual
Page 50
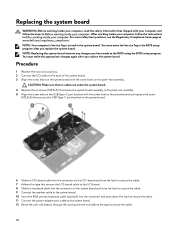
...latch to secure the cable. 9 Connect the speaker cable to the system board. 10 Insert the RGB per key keyboard cable (optional) into the connector and press down the latch to secure the cable. 11 Connect the power-adapter ...your computer and follow the instructions in the system board. You must make the appropriate changes again after you replace the system board. Procedure 1 Replace the heat-sink assembly. 2 Connect the I/O cable to the back of the system board. 3 Align ...50 For more safety best practices, see the Regulatory Compliance home page at www.dell.com/regulatory_compliance.
...latch to secure the cable. 9 Connect the speaker cable to the system board. 10 Insert the RGB per key keyboard cable (optional) into the connector and press down the latch to secure the cable. 11 Connect the power-adapter ...your computer and follow the instructions in the system board. You must make the appropriate changes again after you replace the system board. Procedure 1 Replace the heat-sink assembly. 2 Connect the I/O cable to the back of the system board. 3 Align ...50 For more safety best practices, see the Regulatory Compliance home page at www.dell.com/regulatory_compliance.
Service Manual
Page 55
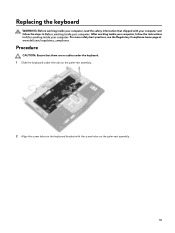
... computer. For more safety best practices, see the Regulatory Compliance home page at www.dell.com/regulatory_compliance. Replacing the keyboard WARNING: Before working inside your computer, read the safety information that there are no cables under the keyboard. 1 Slide the keyboard under the tabs on the palm-rest assembly. 2 Align the screw holes on the...
... computer. For more safety best practices, see the Regulatory Compliance home page at www.dell.com/regulatory_compliance. Replacing the keyboard WARNING: Before working inside your computer, read the safety information that there are no cables under the keyboard. 1 Slide the keyboard under the tabs on the palm-rest assembly. 2 Align the screw holes on the...
Service Manual
Page 56
Post-requisites 1 Follow the procedure from step 2 to step 16 in "Replacing the hard drive". 8 Replace the wireless card. 9 Replace the base cover. 56 3 Replace the 15 screws (M2x3) that secure the keyboard bracket to step 6 in "Replacing the system board". 2 Replace the memory modules. 3 Replace the battery. 4 Replace the computer base. 5 Replace the rear-I/O cover. 6 Replace the solid-state drive. 7 Follow the procedure from step 4 to the palm-rest assembly.
Post-requisites 1 Follow the procedure from step 2 to step 16 in "Replacing the hard drive". 8 Replace the wireless card. 9 Replace the base cover. 56 3 Replace the 15 screws (M2x3) that secure the keyboard bracket to step 6 in "Replacing the system board". 2 Replace the memory modules. 3 Replace the battery. 4 Replace the computer base. 5 Replace the rear-I/O cover. 6 Replace the solid-state drive. 7 Follow the procedure from step 4 to the palm-rest assembly.
Service Manual
Page 58
...-requisites 1 Replace the keyboard. 2 Follow the procedure from step 2 to step 16 in "Replacing the system board". 3 Replace the memory modules. 4 Replace the battery. 5 Replace the computer base. 6 Replace the rear-I/O cover. 7 Replace the solid-state... drive. 8 Follow the procedure from step 4 to step 6 in Before working inside your computer, follow the steps in "Replacing the hard drive". 9 Replace the wireless card. 10 Replace the base cover. 58 After working inside your computer. For more safety best practices, see the Regulatory Compliance home page at www.dell...
...-requisites 1 Replace the keyboard. 2 Follow the procedure from step 2 to step 16 in "Replacing the system board". 3 Replace the memory modules. 4 Replace the battery. 5 Replace the computer base. 6 Replace the rear-I/O cover. 7 Replace the solid-state... drive. 8 Follow the procedure from step 4 to step 6 in Before working inside your computer, follow the steps in "Replacing the hard drive". 9 Replace the wireless card. 10 Replace the base cover. 58 After working inside your computer. For more safety best practices, see the Regulatory Compliance home page at www.dell...
Service Manual
Page 68
...-adapter port. 3 Replace the keyboard. 4 Replace the display assembly. 5 Follow the procedure from step 2 to step 16 in "Replacing the system board". 6 Replace the speakers. 7 Replace the I/O board. 8 Replace the touch pad. 9 Replace the touchpad bracket. 10 Replace the battery. 11 Replace the coin-cell battery. 12 Replace the computer base. 13 Replace the rear-I/O cover. 14 Replace the memory modules. 15 Replace the solid...
...-adapter port. 3 Replace the keyboard. 4 Replace the display assembly. 5 Follow the procedure from step 2 to step 16 in "Replacing the system board". 6 Replace the speakers. 7 Replace the I/O board. 8 Replace the touch pad. 9 Replace the touchpad bracket. 10 Replace the battery. 11 Replace the coin-cell battery. 12 Replace the computer base. 13 Replace the rear-I/O cover. 14 Replace the memory modules. 15 Replace the solid...
Service Manual
Page 84
... download the latest BIOS setup program file. 2 Create a bootable USB drive. The system reboots and a screen to Choose the keyboard layout is available or when you replace the system board. Follow the instructions on your computer. A Preparing one-time boot menu message appears. 4 After the boot menu...restart during the recovery process. 1 Connect the USB recovery drive to flash the BIOS: 1 Turn on your computer. 3 Press F12 after the Dell logo is displayed on the screen. Follow these steps to your computer. 2 Restart your computer before beginning this task. Flashing BIOS (USB key)...
... download the latest BIOS setup program file. 2 Create a bootable USB drive. The system reboots and a screen to Choose the keyboard layout is available or when you replace the system board. Follow the instructions on your computer. A Preparing one-time boot menu message appears. 4 After the boot menu...restart during the recovery process. 1 Connect the USB recovery drive to flash the BIOS: 1 Turn on your computer. 3 Press F12 after the Dell logo is displayed on the screen. Follow these steps to your computer. 2 Restart your computer before beginning this task. Flashing BIOS (USB key)...


