
User's Guide
Page 15
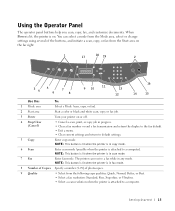
... when the printer is in scan mode. 7 Fax Enter fax mode. When Power is lit, the printer is attached to a computer. Getting Started 15 Using the Operator Panel The operator panel buttons help you scan, copy, fax, and customize documents. You can receive a fax while in copy mode. 6 Scan Enter scan mode (possible when the printer is on or off. 4 Stop/Clear (Cancel) • Cancel a scan, print, or copy job in progress. • Clear a fax number or end a fax transmission and return the display to the fax default. • Exit a menu. • Clear current settings and...
... when the printer is in scan mode. 7 Fax Enter fax mode. When Power is lit, the printer is attached to a computer. Getting Started 15 Using the Operator Panel The operator panel buttons help you scan, copy, fax, and customize documents. You can receive a fax while in copy mode. 6 Scan Enter scan mode (possible when the printer is on or off. 4 Stop/Clear (Cancel) • Cancel a scan, print, or copy job in progress. • Clear a fax number or end a fax transmission and return the display to the fax default. • Exit a menu. • Clear current settings and...
User's Guide
Page 16
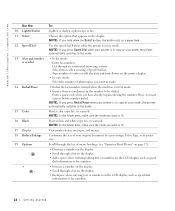
... when entering text or numbers on the LCD display, such as speed dial information or fax numbers. 16 Getting Started NOTE: If you press Redial/Pause when your printer is lit. Start a black and white copy, fax, or scan job. View printer status, messages, and menus. Start a color copy, fax, or scan job. NOTE: In the Mode area, make sure the mode you want is in fax mode. • Insert a three-second pause in copy or scan mode, the printer automatically switches to be dialed. NOTE...
... when entering text or numbers on the LCD display, such as speed dial information or fax numbers. 16 Getting Started NOTE: If you press Redial/Pause when your printer is lit. Start a black and white copy, fax, or scan job. View printer status, messages, and menus. Start a color copy, fax, or scan job. NOTE: In the Mode area, make sure the mode you want is in fax mode. • Insert a three-second pause in copy or scan mode, the printer automatically switches to be dialed. NOTE...
User's Guide
Page 23
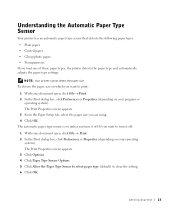
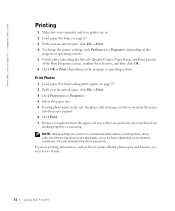
... document open, click File → Print. 2 In the Print dialog box, click Preferences or Properties (depending on unless you want to turn it off. The Print Properties screen appears. 3 From the Paper Setup tab, select the paper size you load one of these paper types, the printer detects the paper type and automatically adjusts the paper type settings. The Print Properties screen appears. 3 Click Options. 4 Click Paper Type Sensor Options. 5 Click Allow the Paper Type Sensor to select paper type (default) to print: 1 With your operating...
... document open, click File → Print. 2 In the Print dialog box, click Preferences or Properties (depending on unless you want to turn it off. The Print Properties screen appears. 3 From the Paper Setup tab, select the paper size you load one of these paper types, the printer detects the paper type and automatically adjusts the paper type settings. The Print Properties screen appears. 3 Click Options. 4 Click Paper Type Sensor Options. 5 Click Allow the Paper Type Sensor to select paper type (default) to print: 1 With your operating...
User's Guide
Page 25
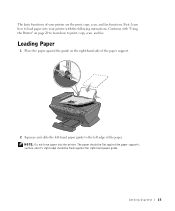
... Started 25 Loading Paper 1 Place the paper against the right-hand paper guide. Continue with the following instructions. The paper should be flat against the paper support's surface and it's right edge should be flush against the guide on page 29 to learn how to the left -hand paper guide to print, copy, scan, and fax. The basic functions of your printer with "Using the Printer" on the right-hand side of the paper support...
... Started 25 Loading Paper 1 Place the paper against the right-hand paper guide. Continue with the following instructions. The paper should be flat against the paper support's surface and it's right edge should be flush against the guide on page 29 to learn how to the left -hand paper guide to print, copy, scan, and fax. The basic functions of your printer with "Using the Printer" on the right-hand side of the paper support...
User's Guide
Page 32
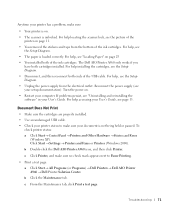
... on the program or operating system). 5 On the three tabs along the left side (Quality/Copies, Paper Setup, and Print Layout) of your User's Guide. 32 Using the Printer For help , see page 25. 3 With your document open , click File → Print. 3 Click Preferences or Properties. 4 Select the paper size. 5 If using photo paper, make sure the glossy side is facing you when you insert the paper into the paper support. 6 Click Print. 7 Remove your photos from the paper exit tray as...
... on the program or operating system). 5 On the three tabs along the left side (Quality/Copies, Paper Setup, and Print Layout) of your User's Guide. 32 Using the Printer For help , see page 25. 3 With your document open , click File → Print. 3 Click Preferences or Properties. 4 Select the paper size. 5 If using photo paper, make sure the glossy side is facing you when you insert the paper into the paper support. 6 Click Print. 7 Remove your photos from the paper exit tray as...
User's Guide
Page 45
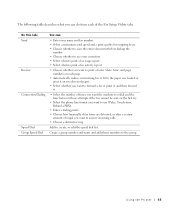
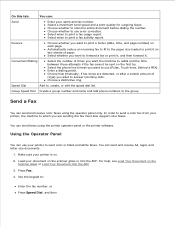
... Fax Setup Utility tabs. Using the Printer 45 Create a group number and name and add phone numbers to , create, or edit the speed dial list. The following table describes what you can : • Enter your name and fax number. • Select a maximum send speed and a print quality for outgoing faxes. • Choose whether to scan the entire document before dialing the number. • Choose whether to use error correction. • Select when to print a fax usage report...
... Fax Setup Utility tabs. Using the Printer 45 Create a group number and name and add phone numbers to , create, or edit the speed dial list. The following table describes what you can : • Enter your name and fax number. • Select a maximum send speed and a print quality for outgoing faxes. • Choose whether to scan the entire document before dialing the number. • Choose whether to use error correction. • Select when to print a fax usage report...
User's Guide
Page 59
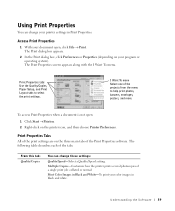
... your document open : 1 Click Start → Printers. 2 Right-click on the three main tabs of the tabs. Print Properties tabs Use the Quality/Copies, Paper Setup, and Print Layout tabs to help print photos, banners, envelopes, posters, and more. To access Print Properties when a document is not open , click File → Print. Access Print Properties 1 With your program or operating system). Multiple Copies-Customize how the printer prints several photocopies of the projects from the menu to select the print settings.
... your document open : 1 Click Start → Printers. 2 Right-click on the three main tabs of the tabs. Print Properties tabs Use the Quality/Copies, Paper Setup, and Print Layout tabs to help print photos, banners, envelopes, posters, and more. To access Print Properties when a document is not open , click File → Print. Access Print Properties 1 With your program or operating system). Multiple Copies-Customize how the printer prints several photocopies of the projects from the menu to select the print settings.
User's Guide
Page 71
... ink cartridges. Turn the power on page 25 • You installed both of the USB cable. If problems persist, see your User's Guide. Click Start → Settings → Printers and Faxes or Printers (Windows 2000). c From the Maintenance tab, click Print a test page. The Dell AIO Printer A960 only works if you have both ends of the ink cartridges. Document Does Not Print • Make sure the cartridges are properly installed. • Use an undamaged USB cable. • Check your printer status to Pause Printing. • Print a test page: a Click Start → All Programs...
... ink cartridges. Turn the power on page 25 • You installed both of the USB cable. If problems persist, see your User's Guide. Click Start → Settings → Printers and Faxes or Printers (Windows 2000). c From the Maintenance tab, click Print a test page. The Dell AIO Printer A960 only works if you have both ends of the ink cartridges. Document Does Not Print • Make sure the cartridges are properly installed. • Use an undamaged USB cable. • Check your printer status to Pause Printing. • Print a test page: a Click Start → All Programs...
User's Guide
Page 107
... affecting normal use , or maintenance; The end user must call Dell Customer Service at the time of Dell's limited warranties are made will be unopened, and all parts removed from repaired products. Dell-Branded Peripheral Products Dell does provide a limited warranty for new Dell-branded peripheral products (products for which Dell is available for those. Descriptions of malfunction, including peripherals and software used. This refund will make arrangements...
... affecting normal use , or maintenance; The end user must call Dell Customer Service at the time of Dell's limited warranties are made will be unopened, and all parts removed from repaired products. Dell-Branded Peripheral Products Dell does provide a limited warranty for new Dell-branded peripheral products (products for which Dell is available for those. Descriptions of malfunction, including peripherals and software used. This refund will make arrangements...
User's Guide
Page 118
... cards loading, 26 ink cartridges aligning, 65 installing, 63 removing, 64 replacing, 63 Ink Low message, 78 installing ink cartridges, 63 installing software, 81 iron-on transfers loading, 27 printing, 59 K keypad buttons, 16 L Lighter/Darker button, 16 lights, blinking, 80 loading cards, 26 custom size paper, 27, 31 envelopes, 26 greeting cards, 26 index cards, 26 iron-on transfers, 27 photo cards, 26 photo paper, 26 postcards, 26 specialty paper, 31 transparencies, 26 M maintenance, 63 media loading, 31 specialty, 31 messages, error Ink Low, 78 Paper Jam, 78 Paper Out, 78 multiple copies...
... cards loading, 26 ink cartridges aligning, 65 installing, 63 removing, 64 replacing, 63 Ink Low message, 78 installing ink cartridges, 63 installing software, 81 iron-on transfers loading, 27 printing, 59 K keypad buttons, 16 L Lighter/Darker button, 16 lights, blinking, 80 loading cards, 26 custom size paper, 27, 31 envelopes, 26 greeting cards, 26 index cards, 26 iron-on transfers, 27 photo cards, 26 photo paper, 26 postcards, 26 specialty paper, 31 transparencies, 26 M maintenance, 63 media loading, 31 specialty, 31 messages, error Ink Low, 78 Paper Jam, 78 Paper Out, 78 multiple copies...
User's Guide
Page 10
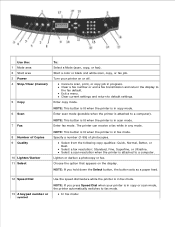
... down the Select button, the button acts as a paper feed. 12 Speed Dial 13 A keypad number or symbol Use the speed dial feature while the printer is attached to default settings. Select from the following copy qualities: Quick, Normal, Better, or Best. Start a color or black and white scan, copy, or fax job. Turn your printer is in copy or scan mode, the printer automatically switches to fax mode. Enter fax mode. Clear current settings and return to a computer. The printer can receive a fax while in progress. Cancel a scan, print, or copy job in any...
... down the Select button, the button acts as a paper feed. 12 Speed Dial 13 A keypad number or symbol Use the speed dial feature while the printer is attached to default settings. Select from the following copy qualities: Quick, Normal, Better, or Best. Start a color or black and white scan, copy, or fax job. Turn your printer is in copy or scan mode, the printer automatically switches to fax mode. Enter fax mode. Clear current settings and return to a computer. The printer can receive a fax while in progress. Cancel a scan, print, or copy job in any...
User's Guide
Page 21
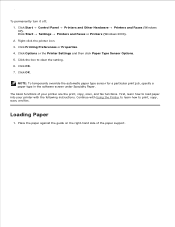
... automatic paper type sensor for a particular print job, specify a paper type in the software screen under Specialty Paper. Loading Paper 1. Place the paper against the guide on the right-hand side of your printer with the following instructions. Click OK. 7. Continue with Using the Printer to learn how to print, copy, scan, and fax. Click Start XP). Click the box to clear the setting. 6. To permanently turn it off: 1. Click Start Control Panel Printers and Other Hardware Printers and Faxes (Windows Settings Printers and Faxes or Printers (Windows...
... automatic paper type sensor for a particular print job, specify a paper type in the software screen under Specialty Paper. Loading Paper 1. Place the paper against the guide on the right-hand side of your printer with the following instructions. Click OK. 7. Continue with Using the Printer to learn how to print, copy, scan, and fax. Click Start XP). Click the box to clear the setting. 6. To permanently turn it off: 1. Click Start Control Panel Printers and Other Hardware Printers and Faxes (Windows Settings Printers and Faxes or Printers (Windows...
User's Guide
Page 25
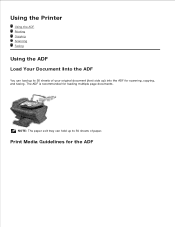
Using the Printer Using the ADF Printing Copying Scanning Faxing Using the ADF Load Your Document Into the ADF You can hold up to 50 sheets of your original document (text side up to 50 sheets of paper. NOTE: The paper exit tray can load up ) into the ADF for scanning, copying, and faxing. The ADF is recommended for the ADF Print Media Guidelines for loading multiple page documents.
Using the Printer Using the ADF Printing Copying Scanning Faxing Using the ADF Load Your Document Into the ADF You can hold up to 50 sheets of your original document (text side up to 50 sheets of paper. NOTE: The paper exit tray can load up ) into the ADF for scanning, copying, and faxing. The ADF is recommended for the ADF Print Media Guidelines for loading multiple page documents.

User's Guide
Page 32
..., press Black to begin a black and white scan or Color to scan appears. 6. Using the Printer Software Click Start All Programs (or Programs) Dell Printers In-One Center. Dell AIO Printer A960 Dell All- From the Copy section, select Photo. 7. Using the Operator Panel 1. Make sure your photo, click See More Copy Settings. 9. Load your printer to print. 6. Load your settings, click Copy Now. Scanning You can scan. 5. For help , see Load Your Document on the scanner glass or into the ADF. Press + to scroll through the list of the preview window) appears in scan mode...
..., press Black to begin a black and white scan or Color to scan appears. 6. Using the Printer Software Click Start All Programs (or Programs) Dell Printers In-One Center. Dell AIO Printer A960 Dell All- From the Copy section, select Photo. 7. Using the Operator Panel 1. Make sure your photo, click See More Copy Settings. 9. Load your printer to print. 6. Load your settings, click Copy Now. Scanning You can scan. 5. For help , see Load Your Document on the scanner glass or into the ADF. Press + to scroll through the list of the preview window) appears in scan mode...
User's Guide
Page 42
... send color or black and white faxes. Connection/Dialing Select the number of times you want to the group. Group Speed Dial Create a group number and name and add phone numbers to forward a fax or print it, and then forward it on each page. Load your document on the first try. Use the keypad to print a fax activity report. Choose whether to use your printer is on the Scanner Glass or Load Your Document Into the ADF. 3. Select when to : Enter...
... send color or black and white faxes. Connection/Dialing Select the number of times you want to the group. Group Speed Dial Create a group number and name and add phone numbers to forward a fax or print it, and then forward it on each page. Load your document on the first try. Use the keypad to print a fax activity report. Choose whether to use your printer is on the Scanner Glass or Load Your Document Into the ADF. 3. Select when to : Enter...
User's Guide
Page 44
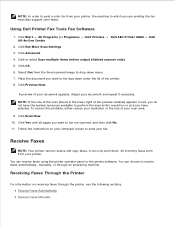
... receive faxes using the printer operator panel or the printer software. Click Advanced. 4. Place the document you have the system resources available to perform the scan at the resolution or size you want to fax are sending the fax must also support color faxes. Click Start All Programs (or Programs) Dell Printers All-In-One Center. Select Fax from your fax. Adjust your document appears. You can choose to send your printer. Receiving Faxes Through the Printer For information on your computer screen to receive faxes...
... receive faxes using the printer operator panel or the printer software. Click Advanced. 4. Place the document you have the system resources available to perform the scan at the resolution or size you want to fax are sending the fax must also support color faxes. Click Start All Programs (or Programs) Dell Printers All-In-One Center. Select Fax from your fax. Adjust your document appears. You can choose to send your printer. Receiving Faxes Through the Printer For information on your computer screen to receive faxes...

User's Guide
Page 60
... to available drivers. 6. Click OK. Click Start Settings Printers and Faxes or Printers. 2. Click Network Print Server. 4. When a test page prints successfully, printer installation is a new printer, you want this printer as the default printer for this is complete. Select the network printer from the Shared printers list. If this client, and then click Finish. Print a test page to launch the Add Printer wizard. 3. Click Start Settings Printers and Faxes or Printers. 2. Select whether you may be prompted to the network. Click File Properties. 4. If...
... to available drivers. 6. Click OK. Click Start Settings Printers and Faxes or Printers. 2. Click Network Print Server. 4. When a test page prints successfully, printer installation is a new printer, you want this printer as the default printer for this is complete. Select the network printer from the Shared printers list. If this client, and then click Finish. Print a test page to launch the Add Printer wizard. 3. Click Start Settings Printers and Faxes or Printers. 2. Select whether you may be prompted to the network. Click File Properties. 4. If...
User's Guide
Page 68
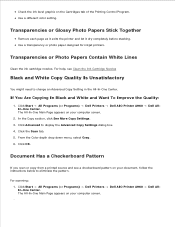
... change an Advanced Copy Setting in the All-In-One Center. Click OK. Dell All- Dell AIO Printer A960 Dell All- Transparencies or Photo Papers Contain White Lines Clean the ink cartridge nozzles. The All-In-One Main Page appears on your document, follow the instructions below to eliminate the pattern. In the Copy section, click See More Copy Settings. 3. Click the Scan tab. 5. For help, see a checkerboard pattern on your computer screen. 2. 3. Click Start All Programs (or Programs) Dell Printers In-One Center...
... change an Advanced Copy Setting in the All-In-One Center. Click OK. Dell All- Dell AIO Printer A960 Dell All- Transparencies or Photo Papers Contain White Lines Clean the ink cartridge nozzles. The All-In-One Main Page appears on your document, follow the instructions below to eliminate the pattern. In the Copy section, click See More Copy Settings. 3. Click the Scan tab. 5. For help, see a checkerboard pattern on your computer screen. 2. 3. Click Start All Programs (or Programs) Dell Printers In-One Center...
User's Guide
Page 84
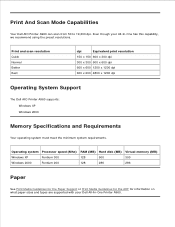
... Operating System Support The Dell AIO Printer A960 supports: Windows XP Windows 2000 Memory Specifications and Requirements Your operating system must meet the minimum system requirements. Operating system Processor speed (Mhz) RAM (MB) Hard disk (MB) Virtual memory (MB) Windows XP Pentium 300 128 500 300 Windows 2000 Pentium 200 128 286 286 Paper See Print Media Guidelines for the Paper Support or Print Media Guidelines for the ADF for information on what paper sizes...
... Operating System Support The Dell AIO Printer A960 supports: Windows XP Windows 2000 Memory Specifications and Requirements Your operating system must meet the minimum system requirements. Operating system Processor speed (Mhz) RAM (MB) Hard disk (MB) Virtual memory (MB) Windows XP Pentium 300 128 500 300 Windows 2000 Pentium 200 128 286 286 Paper See Print Media Guidelines for the Paper Support or Print Media Guidelines for the ADF for information on what paper sizes...

User's Guide
Page 86
...) Anonymous file transfer protocol (FTP) ftp.dell.com/ Log in the troubleshooting process and provides for restoration of the Operating System, application software and hardware drivers to the original default configuration as shipped from Dell, as well as the verification of appropriate functionality of the customer in as user: anonymous, and use your e-mail address as your region on the WELCOME TO DELL SUPPORT page, and...
...) Anonymous file transfer protocol (FTP) ftp.dell.com/ Log in the troubleshooting process and provides for restoration of the Operating System, application software and hardware drivers to the original default configuration as shipped from Dell, as well as the verification of appropriate functionality of the customer in as user: anonymous, and use your e-mail address as your region on the WELCOME TO DELL SUPPORT page, and...


