Owner's Manual
Page 1
Dell™ Photo All-In-One Printer 964 Owner's Manual Look Inside For: • Ordering Supplies • About Your Printer • Using the Printer • Understanding the Printer Software • Maintenance and Troubleshooting Photo 964 www.dell.com/supplies | support.dell.com
Dell™ Photo All-In-One Printer 964 Owner's Manual Look Inside For: • Ordering Supplies • About Your Printer • Using the Printer • Understanding the Printer Software • Maintenance and Troubleshooting Photo 964 www.dell.com/supplies | support.dell.com
Owner's Manual
Page 2
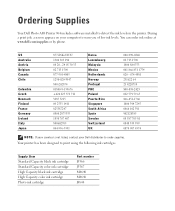
...High Capacity black ink cartridge High Capacity color ink cartridge Photo ink cartridge Part number J5566 J5567 M4640 M4646 J4844 Ordering Supplies Your Dell Photo AIO Printer 964 includes software installed to print using the following ink cartridges. You can order ink online at www....dell.com/supplies or by phone. Your printer has been designed to detect the ink levels in the printer. During a print job, a screen appears on your Dell distributor to warn you of low ...
...High Capacity black ink cartridge High Capacity color ink cartridge Photo ink cartridge Part number J5566 J5567 M4640 M4646 J4844 Ordering Supplies Your Dell Photo AIO Printer 964 includes software installed to print using the following ink cartridges. You can order ink online at www....dell.com/supplies or by phone. Your printer has been designed to detect the ink levels in the printer. During a print job, a screen appears on your Dell distributor to warn you of low ...

Owner's Manual
Page 3
... used in any proprietary interest in this document to refer to either potential damage to hardware or loss of your printer. disclaims any manner whatsoever without the written permission of the Rights in Technical Data and Computer Software clause at DFARS...marks and names or their products. is subject to restrictions as set forth in subparagraph (c)(1)(ii) of Dell Inc. Reproduction in this text: Dell and the DELL logo, Dell Picture Studio, and Dell Ink Management System are trademarks of Microsoft Corporation. Microsoft and Windows are provided with RESTRICTED RIGHTS. Notes...
... used in any proprietary interest in this document to refer to either potential damage to hardware or loss of your printer. disclaims any manner whatsoever without the written permission of the Rights in Technical Data and Computer Software clause at DFARS...marks and names or their products. is subject to restrictions as set forth in subparagraph (c)(1)(ii) of Dell Inc. Reproduction in this text: Dell and the DELL logo, Dell Picture Studio, and Dell Ink Management System are trademarks of Microsoft Corporation. Microsoft and Windows are provided with RESTRICTED RIGHTS. Notes...
Owner's Manual
Page 5
Contents 1 About Your Printer Understanding the Printer Parts 14 Setting Up Your Printer 17 Initial Setup Menu 17 Understanding the Operator Panel 18 Using the Operator Panel 18 Operator Panel Menus 20 Understanding the Automatic Paper Type Sensor ...
Contents 1 About Your Printer Understanding the Printer Parts 14 Setting Up Your Printer 17 Initial Setup Menu 17 Understanding the Operator Panel 18 Using the Operator Panel 18 Operator Panel Menus 20 Understanding the Automatic Paper Type Sensor ...
Owner's Manual
Page 6
... Copying Photos Using Your Computer 40 Collating Copies Using the Operator Panel 41 Changing Copy Settings 42 4 Scanning Using the Operator Panel 43 Using the Printer Software 43 Scanning Photos 44 Scanning to Your Computer Over a Network 45 Scanning Multiple Pages or Images 46 Editing Scanned Text Using Optical Character Recognition...
... Copying Photos Using Your Computer 40 Collating Copies Using the Operator Panel 41 Changing Copy Settings 42 4 Scanning Using the Operator Panel 43 Using the Printer Software 43 Scanning Photos 44 Scanning to Your Computer Over a Network 45 Scanning Multiple Pages or Images 46 Editing Scanned Text Using Optical Character Recognition...
Owner's Manual
Page 7
... Image on Your Computer 48 E-mailing a Scanned Image or Document 49 Enlarging or Reducing Images or Documents 50 5 Faxing Setting Up the Printer With Equipment 51 Connecting directly to a telephone wall jack 52 Connecting to a telephone 52 Connecting to an answering machine 53 Connecting to a... computer modem 54 What if I Have a Digital Subscriber Line (DSL 54 Faxing Using the Printer Operator Panel 55 Send a Fax 55 Send a Broadcast Fax 56 Receive a Fax Automatically 57 Receive a Fax Manually 58 Receive a Fax With an...
... Image on Your Computer 48 E-mailing a Scanned Image or Document 49 Enlarging or Reducing Images or Documents 50 5 Faxing Setting Up the Printer With Equipment 51 Connecting directly to a telephone wall jack 52 Connecting to a telephone 52 Connecting to an answering machine 53 Connecting to a... computer modem 54 What if I Have a Digital Subscriber Line (DSL 54 Faxing Using the Printer Operator Panel 55 Send a Fax 55 Send a Broadcast Fax 56 Receive a Fax Automatically 57 Receive a Fax Manually 58 Receive a Fax With an...
Owner's Manual
Page 8
... 71 Using Auto Fax Convert 72 6 Understanding the Software Using the Dell All-In-One Center 73 Using Printing Preferences 76 Using Dell Picture Studio 78 Using the Memory Card Manager 78 Dell Ink Management System 79 Removing and Reinstalling Software 81 7 Ink Cartridge ...Maintenance Replacing Ink Cartridges 83 Aligning Ink Cartridges 87 Cleaning the Ink Cartridge Nozzles 88 8 Troubleshooting Setup Problems 89 Computer Problems 89 Printer ...
... 71 Using Auto Fax Convert 72 6 Understanding the Software Using the Dell All-In-One Center 73 Using Printing Preferences 76 Using Dell Picture Studio 78 Using the Memory Card Manager 78 Dell Ink Management System 79 Removing and Reinstalling Software 81 7 Ink Cartridge ...Maintenance Replacing Ink Cartridges 83 Aligning Ink Cartridges 87 Cleaning the Ink Cartridge Nozzles 88 8 Troubleshooting Setup Problems 89 Computer Problems 89 Printer ...

Owner's Manual
Page 9
... Dell™ Printer Consumables Limited Warranties 128 Export Regulations 129 Dell™ Software License Agreement 129 Regulatory Notices 130 Index 133 Contents 9 General Problems 92 Fax Problems 92 Paper Problems 93 Network Problems 96 Error Messages and Lights 97 Improving Print Quality 99 9 Contacting Dell Technical Assistance 101 Automated Order-Status Service 102 Contacting Dell...
... Dell™ Printer Consumables Limited Warranties 128 Export Regulations 129 Dell™ Software License Agreement 129 Regulatory Notices 130 Index 133 Contents 9 General Problems 92 Fax Problems 92 Paper Problems 93 Network Problems 96 Error Messages and Lights 97 Improving Print Quality 99 9 Contacting Dell Technical Assistance 101 Automated Order-Status Service 102 Contacting Dell...
Owner's Manual
Page 11
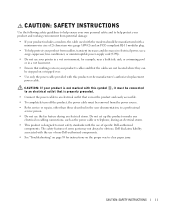
... increases and decreases in electrical power, use a surge suppressor, line conditioner, or uninterruptible power supply cord (UPS). • Do not use your printer in a wet environment, for instructions on or tripped over. • Use only the power cable provided with this symbol , it must be connected... outlet that is properly grounded. • Connect the power cable to an electrical outlet that is not marked with the use of specific Dell-authorized components. The safety features of some parts may not always be obvious. CAUTION: If your product is near a bath tub, sink...
... increases and decreases in electrical power, use a surge suppressor, line conditioner, or uninterruptible power supply cord (UPS). • Do not use your printer in a wet environment, for instructions on or tripped over. • Use only the power cable provided with this symbol , it must be connected... outlet that is properly grounded. • Connect the power cable to an electrical outlet that is not marked with the use of specific Dell-authorized components. The safety features of some parts may not always be obvious. CAUTION: If your product is near a bath tub, sink...
Owner's Manual
Page 13
... my Computer function. • You do a variety of things. About Your Printer 13 NOTE: If you use the Dell Photo AIO Printer 964 to do not need to connect your printer to a computer to a computer, you can use either the printer operator panel or the printer software to produce quality documents quickly. • You do need to...
... my Computer function. • You do a variety of things. About Your Printer 13 NOTE: If you use the Dell Photo AIO Printer 964 to do not need to connect your printer to a computer to a computer, you can use either the printer operator panel or the printer software to produce quality documents quickly. • You do need to...
Owner's Manual
Page 14
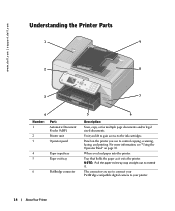
... page 18. NOTE: Pull the paper exit tray stop straight out to control copying, scanning, faxing, and printing. www.dell.com | support.dell.com Understanding the Printer Parts 1 9 2 8 Photo 964 3 7 4 Number: 1 2 3 Part: Automatic Document Feeder (ADF) Printer unit Operator panel 4 Paper input tray 5 Paper exit tray 6 PictBridge connector 5 6 Description: Scan, copy, or fax multiple page...
... page 18. NOTE: Pull the paper exit tray stop straight out to control copying, scanning, faxing, and printing. www.dell.com | support.dell.com Understanding the Printer Parts 1 9 2 8 Photo 964 3 7 4 Number: 1 2 3 Part: Automatic Document Feeder (ADF) Printer unit Operator panel 4 Paper input tray 5 Paper exit tray 6 PictBridge connector 5 6 Description: Scan, copy, or fax multiple page...

Owner's Manual
Page 15
... Code is not available in the printer. Recommended for scanning, copying, or faxing multiple-page documents. 10 11 10 Supplies Reorder Label To order ink cartridges or paper, visit www.dell.com/supplies. 11 Express Service Code • Identify your printer when you insert a media card ...containing digital pictures. About Your Printer 15 Load original documents in all countries. NOTE: The LCD only displays...
... Code is not available in the printer. Recommended for scanning, copying, or faxing multiple-page documents. 10 11 10 Supplies Reorder Label To order ink cartridges or paper, visit www.dell.com/supplies. 11 Express Service Code • Identify your printer when you insert a media card ...containing digital pictures. About Your Printer 15 Load original documents in all countries. NOTE: The LCD only displays...
Owner's Manual
Page 16
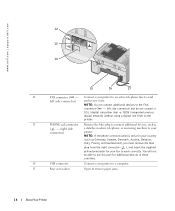
...send left side connector) and do not connect a DSL (digital subscriber line) or ISDN (integrated services digital network) without using a digital line filter to the printer. 13 PHONE jack connector Remove the blue plug to the FAX connector ( - NOTE: If the phone communication is serial in these countries. 14 USB connector..., Denmark, Austria, Belgium, Italy, France, and Switzerland), you must remove the blue plug from the right connector ( ), and insert the supplied yellow terminator for your printer. www.dell.com | support.dell.com 12 13 14 15 16 17 12 FAX connector ( -
...send left side connector) and do not connect a DSL (digital subscriber line) or ISDN (integrated services digital network) without using a digital line filter to the printer. 13 PHONE jack connector Remove the blue plug to the FAX connector ( - NOTE: If the phone communication is serial in these countries. 14 USB connector..., Denmark, Austria, Belgium, Italy, France, and Switzerland), you must remove the blue plug from the right connector ( ), and insert the supplied yellow terminator for your printer. www.dell.com | support.dell.com 12 13 14 15 16 17 12 FAX connector ( -

Owner's Manual
Page 17
NOTE: The Dell Photo AIO Printer 964 is removable. Other devices such as ISDN, DSL, or ADSL, a digital line filter is required. Initial Setup Menu The printer automatically displays the Initial Setup menu when you power on the printer for details. About Your Printer 17 NOTE: The power ...country settings after initial setup by accessing the Setup menu. Press Select to the printer. If you plug it back in the setup steps. Setting Up Your Printer NOTE: The Dell Photo All-In-One Printer 964 supports Microsoft® Windows® 2000, Windows XP, and Windows XP Professional...
NOTE: The Dell Photo AIO Printer 964 is removable. Other devices such as ISDN, DSL, or ADSL, a digital line filter is required. Initial Setup Menu The printer automatically displays the Initial Setup menu when you power on the printer for details. About Your Printer 17 NOTE: The power ...country settings after initial setup by accessing the Setup menu. Press Select to the printer. If you plug it back in the setup steps. Setting Up Your Printer NOTE: The Dell Photo All-In-One Printer 964 supports Microsoft® Windows® 2000, Windows XP, and Windows XP Professional...
Owner's Manual
Page 18
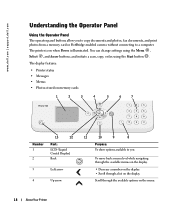
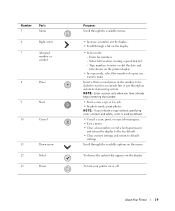
.... • Decrease a number on the display. • Scroll through the available options on the display. The display features: • Printer status • Messages • Menus • Photos stored on when Power is illuminated. and initiate a scan, copy, or fax using... the Menu , Select , and Arrow buttons; www.dell.com | support.dell.com Understanding the Operator Panel Using the Operator Panel The operator panel buttons allow you . The printer is on memory cards 1 2 3 4 5 6 7 Photo 964 , Number 1 2 13 12 Part: LCD (Liquid Crystal Display) Back...
.... • Decrease a number on the display. • Scroll through the available options on the display. The display features: • Printer status • Messages • Menus • Photos stored on when Power is illuminated. and initiate a scan, copy, or fax using... the Menu , Select , and Arrow buttons; www.dell.com | support.dell.com Understanding the Operator Panel Using the Operator Panel The operator panel buttons allow you . The printer is on memory cards 1 2 3 4 5 6 7 Photo 964 , Number 1 2 13 12 Part: LCD (Liquid Crystal Display) Back...
Owner's Manual
Page 19
Scroll through the available options on the display. • In fax mode: - About Your Printer 19 NOTE: If you initiate a copy without specifying color or black and white, color is used by default. • Cancel a scan, print, or copy job ... return to wait for an outside line or get through an automated answering system. To turn your printer on the display. Type numbers to enter or edit the date and time shown on the printer display. • In copy mode, select the number of copies you have already begun entering the number...
Scroll through the available options on the display. • In fax mode: - About Your Printer 19 NOTE: If you initiate a copy without specifying color or black and white, color is used by default. • Cancel a scan, print, or copy job ... return to wait for an outside line or get through an automated answering system. To turn your printer on the display. Type numbers to enter or edit the date and time shown on the printer display. • In copy mode, select the number of copies you have already begun entering the number...
Owner's Manual
Page 20
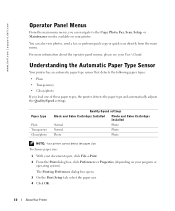
... Glossy/photo Quality/Speed settings Black and Color Cartridges Installed Photo and Color Cartridges Installed Normal Photo Normal Photo Photo Photo NOTE: Your printer cannot detect the paper size. To choose paper size: 1 With your document open, click File→ Print. 2 From the Print... dialog box, click Preferences or Properties (depending on your printer. For more information about the operator panel menus, please see your program or operating system). www.dell.com | support.dell.com Operator Panel Menus From the main menu menu, you load one of these...
... Glossy/photo Quality/Speed settings Black and Color Cartridges Installed Photo and Color Cartridges Installed Normal Photo Normal Photo Photo Photo NOTE: Your printer cannot detect the paper size. To choose paper size: 1 With your document open, click File→ Print. 2 From the Print... dialog box, click Preferences or Properties (depending on your printer. For more information about the operator panel menus, please see your program or operating system). www.dell.com | support.dell.com Operator Panel Menus From the main menu menu, you load one of these...
Owner's Manual
Page 21
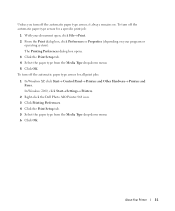
In Windows 2000, click Start→ Settings→ Printers. 2 Right-click the Dell Photo AIO Printer 964 icon. 3 Click Printing Preferences. 4 Click the Print Setup tab. 5 Select the paper type from the Media Type drop-down menu. 6 Click OK. To turn off ...the automatic paper type sensor for all print jobs: 1 In Windows XP, click Start→ Control Panel→ Printers and Other Hardware...
In Windows 2000, click Start→ Settings→ Printers. 2 Right-click the Dell Photo AIO Printer 964 icon. 3 Click Printing Preferences. 4 Click the Print Setup tab. 5 Select the paper type from the Media Type drop-down menu. 6 Click OK. To turn off ...the automatic paper type sensor for all print jobs: 1 In Windows XP, click Start→ Control Panel→ Printers and Other Hardware...
Owner's Manual
Page 22
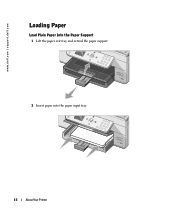
www.dell.com | support.dell.com Loading Paper Load Plain Paper Into the Paper Support 1 Lift the paper exit tray, and extend the paper support. 2 Insert paper into the paper input tray. 22 About Your Printer
www.dell.com | support.dell.com Loading Paper Load Plain Paper Into the Paper Support 1 Lift the paper exit tray, and extend the paper support. 2 Insert paper into the paper input tray. 22 About Your Printer
Owner's Manual
Page 23
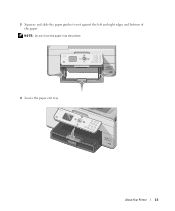
3 Squeeze and slide the paper guides to rest against the left and right edges and bottom of the paper. About Your Printer 23 NOTE: Do not force the paper into the printer. 4 Lower the paper exit tray.
3 Squeeze and slide the paper guides to rest against the left and right edges and bottom of the paper. About Your Printer 23 NOTE: Do not force the paper into the printer. 4 Lower the paper exit tray.


