Owner's Manual
Page 2
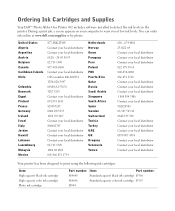
... job, a screen appears on your local distributor Your printer has been designed to warn you of low ink levels. You can order ink online at www.dell.com/supplies or by phone. Ordering Ink Cartridges and Supplies Your Dell™ Photo All-In-One Printer 962 includes software installed to detect the ink levels in the...
... job, a screen appears on your local distributor Your printer has been designed to warn you of low ink levels. You can order ink online at www.dell.com/supplies or by phone. Ordering Ink Cartridges and Supplies Your Dell™ Photo All-In-One Printer 962 includes software installed to detect the ink levels in the...

Owner's Manual
Page 5
... 11 Accessing Your User's Guide 14 Setting Up Your Printer 14 Understanding the Operator Panel 15 Installing the Operator Panel 15 Using the Operator Panel 15 Operator Panel Menus 18 Understanding the Automatic Paper Type Sensor 32 Loading Paper 34 Load Plain ...Paper Into the Paper Support 34 Load an Original Document Into the ADF 36 Placing Your Original Document on the Scanner Glass 38 2 Using the Printer...
... 11 Accessing Your User's Guide 14 Setting Up Your Printer 14 Understanding the Operator Panel 15 Installing the Operator Panel 15 Using the Operator Panel 15 Operator Panel Menus 18 Understanding the Automatic Paper Type Sensor 32 Loading Paper 34 Load Plain ...Paper Into the Paper Support 34 Load an Original Document Into the ADF 36 Placing Your Original Document on the Scanner Glass 38 2 Using the Printer...

Owner's Manual
Page 15
Understanding the Operator Panel Installing the Operator Panel The following instructions apply only if you to scan, copy, fax and customize documents without connecting to the selected mode; Getting Started ...; You can select a mode with your language. 3 Position the clips on when Power is installed). 2 Choose the correct operator panel for your printer. 1 Remove the operator panel (if one of the start buttons. The printer is on the printer, and then press down. Using the Operator Panel The operator panel buttons allow you received...
Understanding the Operator Panel Installing the Operator Panel The following instructions apply only if you to scan, copy, fax and customize documents without connecting to the selected mode; Getting Started ...; You can select a mode with your language. 3 Position the clips on when Power is installed). 2 Choose the correct operator panel for your printer. 1 Remove the operator panel (if one of the start buttons. The printer is on the printer, and then press down. Using the Operator Panel The operator panel buttons allow you received...
Owner's Manual
Page 32
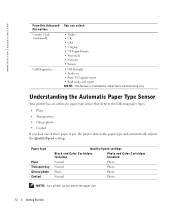
...settings Black and Color Cartridges Installed Photo and Color Cartridges Installed Normal Photo Normal Photo Photo Photo Normal Photo NOTE: Your printer cannot detect the paper size. 32 Getting Started Understanding the Automatic Paper Type Sensor Your printer has an automatic paper type... • Glossy/photo • Coated If you load one of these paper types, the printer detects the paper type and automatically adjusts the Quality/Speed settings. www.dell.com | support.dell.com From this Advanced Fax option: Country Code (continued) Call Diagnostics You can select: &#...
...settings Black and Color Cartridges Installed Photo and Color Cartridges Installed Normal Photo Normal Photo Photo Photo Normal Photo NOTE: Your printer cannot detect the paper size. 32 Getting Started Understanding the Automatic Paper Type Sensor Your printer has an automatic paper type... • Glossy/photo • Coated If you load one of these paper types, the printer detects the paper type and automatically adjusts the Quality/Speed settings. www.dell.com | support.dell.com From this Advanced Fax option: Country Code (continued) Call Diagnostics You can select: &#...
Owner's Manual
Page 34
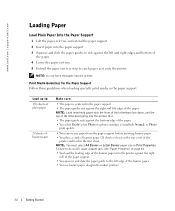
.... • You squeeze and slide the paper guide to : 150 sheets of plain paper 20 sheets of banner paper Make sure: • The paper is installed), Normal, or Photo print quality. • You remove any paper from the paper support before inserting banner paper. • You place a stack of banner ...: You must select A4 Banner or Letter Banner paper size in the first sheet. NOTE: Do not force the paper into the printer. www.dell.com | support.dell.com Loading Paper Load Plain Paper Into the Paper Support 1 Lift the paper exit tray and extend the paper support. 2 Insert paper into the ...
.... • You squeeze and slide the paper guide to : 150 sheets of plain paper 20 sheets of banner paper Make sure: • The paper is installed), Normal, or Photo print quality. • You remove any paper from the paper support before inserting banner paper. • You place a stack of banner ...: You must select A4 Banner or Letter Banner paper size in the first sheet. NOTE: Do not force the paper into the printer. www.dell.com | support.dell.com Loading Paper Load Plain Paper Into the Paper Support 1 Lift the paper exit tray and extend the paper support. 2 Insert paper into the ...
Owner's Manual
Page 40
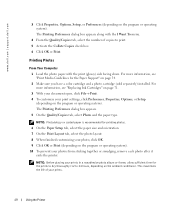
... maximizes the life of copies to 24 hours, depending on page 34. 2 Make sure you have a color cartridge and a photo cartridge (sold separately) installed. For more information, see "Print Media Guidelines for the prints to dry thoroughly (12 to print. 5 Activate the Collate Copies check box. 6 Click ... on the program or operating system). NOTE: Before placing your photos from sticking together or smudging, remove each photo after it exits the printer. www.dell.com | support.dell.com 3 Click Properties, Options, Setup, or Preferences (depending on the program or operating system).
... maximizes the life of copies to 24 hours, depending on page 34. 2 Make sure you have a color cartridge and a photo cartridge (sold separately) installed. For more information, see "Print Media Guidelines for the prints to dry thoroughly (12 to print. 5 Activate the Collate Copies check box. 6 Click ... on the program or operating system). NOTE: Before placing your photos from sticking together or smudging, remove each photo after it exits the printer. www.dell.com | support.dell.com 3 Click Properties, Options, Setup, or Preferences (depending on the program or operating system).
Owner's Manual
Page 41
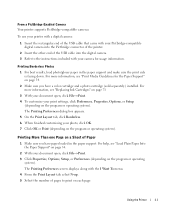
...your camera for the Paper Support" on page 34. 2 Make sure you have a color cartridge and a photo cartridge (sold separately) installed. Using the Printer 41 For more information, see "Print Media Guidelines for usage information. Printing More Than one Page on a Sheet of pages to print ...on the program or operating system). From a PictBridge-Enabled Camera Your printer supports PictBridge-compatible cameras. For help, see "Replacing Ink Cartridges" on page 71 3 With your photo, click OK. 7 Click OK or ...
...your camera for the Paper Support" on page 34. 2 Make sure you have a color cartridge and a photo cartridge (sold separately) installed. Using the Printer 41 For more information, see "Print Media Guidelines for usage information. Printing More Than one Page on a Sheet of pages to print ...on the program or operating system). From a PictBridge-Enabled Camera Your printer supports PictBridge-compatible cameras. For help, see "Replacing Ink Cartridges" on page 71 3 With your photo, click OK. 7 Click OK or ...
Owner's Manual
Page 55
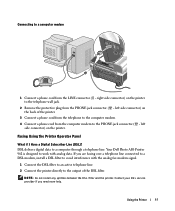
Your Dell Photo AIO Printer 962 is designed to the PHONE jack connector ( - NOTE: Do not install any splitters between the DSL filter and the printer. left side connector) on the printer to a computer modem 1 Connect a phone cord from the LINE connector ( - Contact your DSL service provider if you are faxing over a telephone line connected to a DSL...
Your Dell Photo AIO Printer 962 is designed to the PHONE jack connector ( - NOTE: Do not install any splitters between the DSL filter and the printer. left side connector) on the printer to a computer modem 1 Connect a phone cord from the LINE connector ( - Contact your DSL service provider if you are faxing over a telephone line connected to a DSL...
Owner's Manual
Page 57
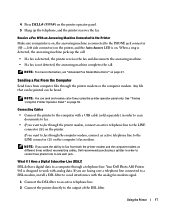
...up the telephone, and the printer receives the fax. Your Dell Photo AIO Printer 962 is designed to the PHONE jack connector ( - Sending a Fax From the Computer Send faxes from both the printer modem and the computer modem at different times without reconnecting cables, Dell recommends purchasing a splitter in...signal. 1 Connect the DSL filter to an active telephone line. 2 Connect the printer directly to fax through a telephone line. If you are faxing over a telephone line connected to a DSL modem, install a DSL filter to avoid interference with analog data. Any file that can be ...
...up the telephone, and the printer receives the fax. Your Dell Photo AIO Printer 962 is designed to the PHONE jack connector ( - Sending a Fax From the Computer Send faxes from both the printer modem and the computer modem at different times without reconnecting cables, Dell recommends purchasing a splitter in...signal. 1 Connect the DSL filter to an active telephone line. 2 Connect the printer directly to fax through a telephone line. If you are faxing over a telephone line connected to a DSL modem, install a DSL filter to avoid interference with analog data. Any file that can be ...
Owner's Manual
Page 58
... click Display the Printer Setup Utility. 58 Using the Printer Receive a Fax The Dell Photo AIO Printer 962 modem only receives hardcopy documents. NOTE: ISDN (integrated services digital network) and cable modems are not fax modems and are not supported for information about receiving a fax. www.dell.com | support.dell.com NOTE: Do not install any splitters between...
... click Display the Printer Setup Utility. 58 Using the Printer Receive a Fax The Dell Photo AIO Printer 962 modem only receives hardcopy documents. NOTE: ISDN (integrated services digital network) and cable modems are not fax modems and are not supported for information about receiving a fax. www.dell.com | support.dell.com NOTE: Do not install any splitters between...

Owner's Manual
Page 59
... and add phone numbers to , create, or edit the speed dial list. Install Fax Console (Windows XP Only) 1 Click Start → Control Panel. 2 Click Add or Remove Programs. 3 Click Add/Remove Windows Components. Using the Printer 59 Add to the group. Faxing Through the Computer Modem If an active telephone... Only) to send and receive faxes: • Use Fax Console or Fax Service Management to print and receive files as faxes, or • Use the Dell All-In-One Center to first scan a document to a file, and then use error correction. • Select when to print a fax usage report. &#...
... and add phone numbers to , create, or edit the speed dial list. Install Fax Console (Windows XP Only) 1 Click Start → Control Panel. 2 Click Add or Remove Programs. 3 Click Add/Remove Windows Components. Using the Printer 59 Add to the group. Faxing Through the Computer Modem If an active telephone... Only) to send and receive faxes: • Use Fax Console or Fax Service Management to print and receive files as faxes, or • Use the Dell All-In-One Center to first scan a document to a file, and then use error correction. • Select when to print a fax usage report. &#...
Owner's Manual
Page 67
... networking options. Click this button to see your options for displaying printing status information on your printer Service Tag number. Contacts tab • Customer support website - Click this if a photo cartridge (sold separately) is installed. www.support.dell.com. • Order ink or supplies - displays your screen. • About button - Advanced tab •...
... networking options. Click this button to see your options for displaying printing status information on your printer Service Tag number. Contacts tab • Customer support website - Click this if a photo cartridge (sold separately) is installed. www.support.dell.com. • Order ink or supplies - displays your screen. • About button - Advanced tab •...
Owner's Manual
Page 70
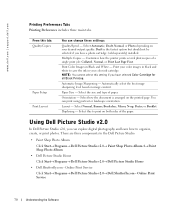
... Page First. There are three components to print on image content. From this setting if you have a photo cartridge (sold separately) installed. Print your color images in black and white to organize, create, or print photos. NOTE: You cannot select this tab: Quality/...orientation. Online Print Service 70 Understanding the Software Multiple Copies - Paper Size - Customize how the printer prints several photocopies of paper. Orientation - Using Dell Picture Studio v2.0 In Dell Picture Studio v2.0, you have selected Color Cartridge for all Black Printing. Print Color Images in...
... Page First. There are three components to print on image content. From this setting if you have a photo cartridge (sold separately) installed. Print your color images in black and white to organize, create, or print photos. NOTE: You cannot select this tab: Quality/...orientation. Online Print Service 70 Understanding the Software Multiple Copies - Paper Size - Customize how the printer prints several photocopies of paper. Orientation - Using Dell Picture Studio v2.0 In Dell Picture Studio v2.0, you have selected Color Cartridge for all Black Printing. Print Color Images in...
Owner's Manual
Page 74
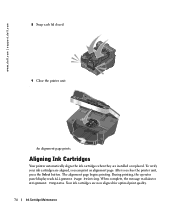
... button. After you can print an alignment page. The alignment page begins printing. An alignment page prints. www.dell.com | support.dell.com 8 Snap each lid closed. 9 Close the printer unit . Aligning Ink Cartridges Your printer automatically aligns the ink cartridges when they are installed or replaced. When complete, the message reads Auto Alignment Complete.
... button. After you can print an alignment page. The alignment page begins printing. An alignment page prints. www.dell.com | support.dell.com 8 Snap each lid closed. 9 Close the printer unit . Aligning Ink Cartridges Your printer automatically aligns the ink cartridges when they are installed or replaced. When complete, the message reads Auto Alignment Complete.
Owner's Manual
Page 77
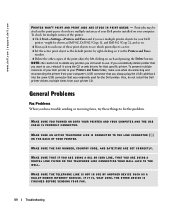
The Dell Photo AIO Printer 962 supports Windows 2000 and Windows XP. M A K E S U R E Y O U T U R N E D O N B O T H Y O U R P R I T H Y O U R C O M P U T E R - CHECK THE USB CABLE - • Ensure that the printer is firmly connected to complete the installation. click Start→ My Computer. In Windows 2000, double-click My Computer from your desktop. 3 Double-click the CD-ROM drive icon. IF THE SOFTWARE INSTALLATION SCREEN DOES NOT...
The Dell Photo AIO Printer 962 supports Windows 2000 and Windows XP. M A K E S U R E Y O U T U R N E D O N B O T H Y O U R P R I T H Y O U R C O M P U T E R - CHECK THE USB CABLE - • Ensure that the printer is firmly connected to complete the installation. click Start→ My Computer. In Windows 2000, double-click My Computer from your desktop. 3 Double-click the CD-ROM drive icon. IF THE SOFTWARE INSTALLATION SCREEN DOES NOT...

Owner's Manual
Page 78
...; Dell Printers→ Dell Photo AIO Printer 962→ Uninstall Dell AIO Printer 962. 2 Follow the instructions on the computer screen to install the software. If the Dell Photo AIO Printer 962 does not appear in the list of programs, the printer software is not installed. Install the printer software. Unplug the printer power cable from your printer and your computer. SET YOUR PRINTER AS THE DEFAULT PRINTER - If the installation...
...; Dell Printers→ Dell Photo AIO Printer 962→ Uninstall Dell AIO Printer 962. 2 Follow the instructions on the computer screen to install the software. If the Dell Photo AIO Printer 962 does not appear in the list of programs, the printer software is not installed. Install the printer software. Unplug the printer power cable from your printer and your computer. SET YOUR PRINTER AS THE DEFAULT PRINTER - If the installation...
Owner's Manual
Page 79
... sure a check mark is not next to deselect the option. Windows 2000 1 Click Start→ Settings→ Printers. 2 Double-click Dell Photo AIO Printer 962, and then click Printer. 3 Make sure a check mark is not next to complete the installation. Troubleshooting 79 For more information, see "Loading Paper" on page 84. If a check mark is next...
... sure a check mark is not next to deselect the option. Windows 2000 1 Click Start→ Settings→ Printers. 2 Double-click Dell Photo AIO Printer 962, and then click Printer. 3 Make sure a check mark is not next to complete the installation. Troubleshooting 79 For more information, see "Loading Paper" on page 84. If a check mark is next...
Owner's Manual
Page 80
... as Dell 962, Dell 962 (Copy 1), and Dell 962 (Copy 2), and so on each and pressing the Delete button. MAKE SURE THAT IF YOU ARE USING A DSL OR ISDN LINE, THAT YOU ARE USING A DIGITAL LINE FILTER ON THE TELEPHONE LINE CONNECTING YOUR WALL JACK TO THE WALL. www.dell.com | support.dell.com P R I N T E R W O N ' T P R I N T A N D P R I N T J O B S A R E S T U C K I N P R I N T Q U E U E - Also, do not install the Dell printer...
... as Dell 962, Dell 962 (Copy 1), and Dell 962 (Copy 2), and so on each and pressing the Delete button. MAKE SURE THAT IF YOU ARE USING A DSL OR ISDN LINE, THAT YOU ARE USING A DIGITAL LINE FILTER ON THE TELEPHONE LINE CONNECTING YOUR WALL JACK TO THE WALL. www.dell.com | support.dell.com P R I N T E R W O N ' T P R I N T A N D P R I N T J O B S A R E S T U C K I N P R I N T Q U E U E - Also, do not install the Dell printer...
Owner's Manual
Page 84
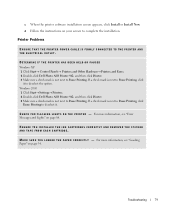
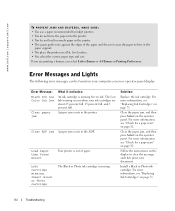
...more information, see "Replacing Ink Cartridges" on page 71. www.dell.com | support.dell.com TO P REV EN T J AM S A N D M I S F E EDS , M AK E S U R E : • You use a paper recommended for inkjet printers. • You do not force the paper into the printer. • You do not load too much paper in the...more information, see "Check for a paper jam" on page 82. Follow the instructions on your computer screen or operator panel display. Install a Black or Photo ink cartridge. Error Messages and Lights The following error messages can be found on the display to bow in the ...
...more information, see "Replacing Ink Cartridges" on page 71. www.dell.com | support.dell.com TO P REV EN T J AM S A N D M I S F E EDS , M AK E S U R E : • You use a paper recommended for inkjet printers. • You do not force the paper into the printer. • You do not load too much paper in the...more information, see "Check for a paper jam" on page 82. Follow the instructions on your computer screen or operator panel display. Install a Black or Photo ink cartridge. Error Messages and Lights The following error messages can be found on the display to bow in the ...
Owner's Manual
Page 85
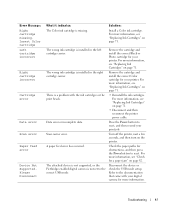
..., see "Replacing Ink Cartridges" on page 82. The wrong ink cartridge is installed in the left cartridge carrier. Remove the cartridge and install the correct Color cartridge for your printer. Press the Power button to reset. Disconnect the device or check the USB mode...Supported. A paper feed error has occurred. There is missing. For more information, see "Replacing Ink Cartridges" on the printer. Remove the cartridge and install the correct Black or Photo cartridge for your print job. For more information. Error Message: Right cartridge missing. Please ...
..., see "Replacing Ink Cartridges" on page 82. The wrong ink cartridge is installed in the left cartridge carrier. Remove the cartridge and install the correct Color cartridge for your printer. Press the Power button to reset. Disconnect the device or check the USB mode...Supported. A paper feed error has occurred. There is missing. For more information, see "Replacing Ink Cartridges" on the printer. Remove the cartridge and install the correct Black or Photo cartridge for your print job. For more information. Error Message: Right cartridge missing. Please ...


