Owner's Manual
Page 1
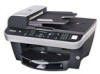
Dell™ Photo All-in-One Printer 962 Owner's Manual Look Inside For: • Ordering Supplies • Getting Started • Using Your Printer • Understanding the Software • Maintenance and Troubleshooting www.dell.com/supplies | support.dell.com
Dell™ Photo All-in-One Printer 962 Owner's Manual Look Inside For: • Ordering Supplies • Getting Started • Using Your Printer • Understanding the Software • Maintenance and Troubleshooting www.dell.com/supplies | support.dell.com
Owner's Manual
Page 2
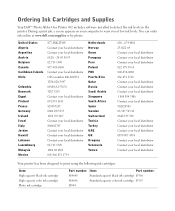
... a print job, a screen appears on your local distributor Your printer has been designed to warn you of low ink levels. Item: High capacity black ink cartridge High capacity color ink cartridge Photo ink cartridge Part number: Item: Part number: M4640 Standard capacity black... ink cartridge J5566 M4646 Standard capacity color ink cartridge J5567 J4844 Ordering Ink Cartridges and Supplies Your Dell™ Photo All-In-One Printer 962 includes software installed to ...
... a print job, a screen appears on your local distributor Your printer has been designed to warn you of low ink levels. Item: High capacity black ink cartridge High capacity color ink cartridge Photo ink cartridge Part number: Item: Part number: M4640 Standard capacity black... ink cartridge J5566 M4646 Standard capacity color ink cartridge J5567 J4844 Ordering Ink Cartridges and Supplies Your Dell™ Photo All-In-One Printer 962 includes software installed to ...

Owner's Manual
Page 5
... 11 Accessing Your User's Guide 14 Setting Up Your Printer 14 Understanding the Operator Panel 15 Installing the Operator Panel 15 Using the Operator Panel 15 Operator Panel Menus 18 Understanding the Automatic Paper Type ... Load an Original Document Into the ADF 36 Placing Your Original Document on the Scanner Glass 38 2 Using the Printer Printing 39 Printing a Document 39 Printing Collated Copies of Your Document 39 Printing Photos 40 Printing More Than one Page on a Sheet of Paper 41 Printing an Image as a Multi-page Poster...
... 11 Accessing Your User's Guide 14 Setting Up Your Printer 14 Understanding the Operator Panel 15 Installing the Operator Panel 15 Using the Operator Panel 15 Operator Panel Menus 18 Understanding the Automatic Paper Type ... Load an Original Document Into the ADF 36 Placing Your Original Document on the Scanner Glass 38 2 Using the Printer Printing 39 Printing a Document 39 Printing Collated Copies of Your Document 39 Printing Photos 40 Printing More Than one Page on a Sheet of Paper 41 Printing an Image as a Multi-page Poster...

Owner's Manual
Page 6
... Your Computer 44 Collating Copies Using the Operator Panel 45 Changing Copy Settings 45 Scanning 46 Using the Operator Panel 46 Using the Printer Software 47 Scanning Photos 47 Scanning to Your Computer Over a Network 48 Scanning Multiple Pages or Images 48 Editing Scanned Text Using Optical Character Recognition (OCR 49 Editing... Hook Dial 64 Broadcast Send 64 Adding Fax Numbers From Which to Block Faxes 65 Using Auto Fax Convert 65 3 Understanding the Software Using the Dell Printer Solution Center 67 Using the Dell All-In-One Center 68 6 Contents
... Your Computer 44 Collating Copies Using the Operator Panel 45 Changing Copy Settings 45 Scanning 46 Using the Operator Panel 46 Using the Printer Software 47 Scanning Photos 47 Scanning to Your Computer Over a Network 48 Scanning Multiple Pages or Images 48 Editing Scanned Text Using Optical Character Recognition (OCR 49 Editing... Hook Dial 64 Broadcast Send 64 Adding Fax Numbers From Which to Block Faxes 65 Using Auto Fax Convert 65 3 Understanding the Software Using the Dell Printer Solution Center 67 Using the Dell All-In-One Center 68 6 Contents
Owner's Manual
Page 12
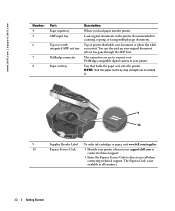
... Getting Started Tray that holds your document or photo flat while you scan it . 9 10 9 Supplies Reorder Label To order ink cartridges or paper, visit www.dell.com/supplies. 10 Express Service Code • Identify your printer when you load paper into the printer. Top of printer that holds the paper as it has gone...
... Getting Started Tray that holds your document or photo flat while you scan it . 9 10 9 Supplies Reorder Label To order ink cartridges or paper, visit www.dell.com/supplies. 10 Express Service Code • Identify your printer when you load paper into the printer. Top of printer that holds the paper as it has gone...

Owner's Manual
Page 14
...If your Drivers and Utilities CD. Other devices such as a telephone or answering machine can use the Dell Photo AIO Printer 962 to a wall jack. NOTE: The printer (whether it is an analog device that only works when directly connected to do a variety of ...Printer NOTE: The Dell Photo All-In-One Printer 962 supports Microsoft® Windows® 2000 and Windows XP. www.dell.com | support.dell.com Accessing Your User's Guide Click Start→ Programs or All Programs→ Dell Printers→ Dell Photo AIO Printer 962→ View Dell User's Guide. Please contact your printer...
...If your Drivers and Utilities CD. Other devices such as a telephone or answering machine can use the Dell Photo AIO Printer 962 to a wall jack. NOTE: The printer (whether it is an analog device that only works when directly connected to do a variety of ...Printer NOTE: The Dell Photo All-In-One Printer 962 supports Microsoft® Windows® 2000 and Windows XP. www.dell.com | support.dell.com Accessing Your User's Guide Click Start→ Programs or All Programs→ Dell Printers→ Dell Photo AIO Printer 962→ View Dell User's Guide. Please contact your printer...

Owner's Manual
Page 17
... Enter fax numbers. - You can: • Select from the following copy qualities: Draft, Normal, or Photo. • Select a fax resolution: Standard, Fine, Superfine, or Ultrafine. • Select a scan resolution when the printer is lit. NOTE: Enter a pause only when you want to make. Select letters when creating a speed ... Started 17 Press to choose the option that appears on the display. Type numbers to enter or edit the date and time shown on the printer display. • In copy mode: Select the number of copies you have already begun entering the number. • In fax mode: -...
... Enter fax numbers. - You can: • Select from the following copy qualities: Draft, Normal, or Photo. • Select a fax resolution: Standard, Fine, Superfine, or Ultrafine. • Select a scan resolution when the printer is lit. NOTE: Enter a pause only when you want to make. Select letters when creating a speed ... Started 17 Press to choose the option that appears on the display. Type numbers to enter or edit the date and time shown on the printer display. • In copy mode: Select the number of copies you have already begun entering the number. • In fax mode: -...
Owner's Manual
Page 24
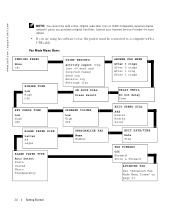
...SPEAKER VOLUME Low High Off EDIT SPEED DIAL Add Remove Modify Print BLANK PAPER SIZE Letter A4 Legal BLANK PAPER TYPE Auto Detect Plain Coated Photo Transparency PERSONALIZE FAX Name Number EDIT DATE/TIME Date Time FAX FORWARD Off Forward Print & Forward ADVANCED FAX See "Advanced Fax Mode Menu Items..." on page 27. 24 Getting Started www.dell.com | support.dell.com NOTE: You cannot fax with a USB cable. Contact your Internet Service Provider for more details. • If you are using fax ...
...SPEAKER VOLUME Low High Off EDIT SPEED DIAL Add Remove Modify Print BLANK PAPER SIZE Letter A4 Legal BLANK PAPER TYPE Auto Detect Plain Coated Photo Transparency PERSONALIZE FAX Name Number EDIT DATE/TIME Date Time FAX FORWARD Off Forward Print & Forward ADVANCED FAX See "Advanced Fax Mode Menu Items..." on page 27. 24 Getting Started www.dell.com | support.dell.com NOTE: You cannot fax with a USB cable. Contact your Internet Service Provider for more details. • If you are using fax ...
Owner's Manual
Page 32
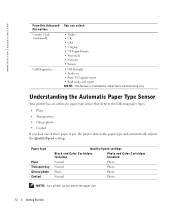
... Quality/Speed settings Black and Color Cartridges Installed Photo and Color Cartridges Installed Normal Photo Normal Photo Photo Photo Normal Photo NOTE: Your printer cannot detect the paper size. 32 Getting Started www.dell.com | support.dell.com From this Advanced Fax option: Country Code (continued) Call Diagnostics You can select: • Turkey • UK • USA • Uruguay...
... Quality/Speed settings Black and Color Cartridges Installed Photo and Color Cartridges Installed Normal Photo Normal Photo Photo Photo Normal Photo NOTE: Your printer cannot detect the paper size. 32 Getting Started www.dell.com | support.dell.com From this Advanced Fax option: Country Code (continued) Call Diagnostics You can select: • Turkey • UK • USA • Uruguay...
Owner's Manual
Page 34
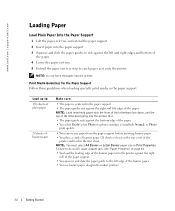
...the paper support. • The paper guides rest against the bottom edge of the paper. • You select Draft (select Photo if a photo cartridge is installed), Normal, or Photo print quality. • You remove any paper from the paper support before inserting banner paper. • You place a stack ...guide rests against the right and left edges of the paper. Print Media Guidelines for inkjet printers. 34 Getting Started Failure to catch paper as it exits the printer. www.dell.com | support.dell.com Loading Paper Load Plain Paper Into the Paper Support 1 Lift the paper exit tray and...
...the paper support. • The paper guides rest against the bottom edge of the paper. • You select Draft (select Photo if a photo cartridge is installed), Normal, or Photo print quality. • You remove any paper from the paper support before inserting banner paper. • You place a stack ...guide rests against the right and left edges of the paper. Print Media Guidelines for inkjet printers. 34 Getting Started Failure to catch paper as it exits the printer. www.dell.com | support.dell.com Loading Paper Load Plain Paper Into the Paper Support 1 Lift the paper exit tray and...

Owner's Manual
Page 35
...transfer packaging. • The print side of the transfer faces down into the paper support. • The top of the labels feeds into the printer first. • The paper guides rest against the right and left edges of the envelopes. • The paper guide rests against the bottom edge...feeder at a time. NOTE: Only one envelope can load a single transparency into the paper support without removing plain paper. • You select Normal or Photo print quality. • The transparencies are centered in the paper support. • The print side of the labels faces down . • The paper ...
...transfer packaging. • The print side of the transfer faces down into the paper support. • The top of the labels feeds into the printer first. • The paper guides rest against the right and left edges of the envelopes. • The paper guide rests against the bottom edge...feeder at a time. NOTE: Only one envelope can load a single transparency into the paper support without removing plain paper. • You select Normal or Photo print quality. • The transparencies are centered in the paper support. • The print side of the labels faces down . • The paper ...
Owner's Manual
Page 36
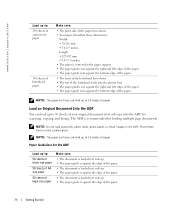
NOTE: Do not load postcards, photo cards, photo paper, or small images in the paper support. • The paper guides rest against the right and left edges of the paper. • The paper ... of the paper faces down. • Your paper fits within these items on the scanner glass. www.dell.com | support.dell.com Load up to 50 sheets of your original document (text side up) into the printer first. • The paper guides rest against the right and left edges of the paper. •...
NOTE: Do not load postcards, photo cards, photo paper, or small images in the paper support. • The paper guides rest against the right and left edges of the paper. • The paper ... of the paper faces down. • Your paper fits within these items on the scanner glass. www.dell.com | support.dell.com Load up to 50 sheets of your original document (text side up) into the printer first. • The paper guides rest against the right and left edges of the paper. •...
Owner's Manual
Page 40
...your prints. 40 Using the Printer www.dell.com | support.dell.com 3 Click Properties, Options, Setup, or Preferences (depending on page 34. 2 Make sure you have a color cartridge and a photo cartridge (sold separately) installed. NOTE: Photo/glossy or coated paper is recommended for printing photos. 6 On the Paper Setup... with the I Want To menu. 4 From the Quality/Copies tab, select the number of your photos from sticking together or smudging, remove each photo after it exits the printer. This maximizes the life of copies to 24 hours, depending on page 71. 3 With your document open, ...
...your prints. 40 Using the Printer www.dell.com | support.dell.com 3 Click Properties, Options, Setup, or Preferences (depending on page 34. 2 Make sure you have a color cartridge and a photo cartridge (sold separately) installed. NOTE: Photo/glossy or coated paper is recommended for printing photos. 6 On the Paper Setup... with the I Want To menu. 4 From the Quality/Copies tab, select the number of your photos from sticking together or smudging, remove each photo after it exits the printer. This maximizes the life of copies to 24 hours, depending on page 71. 3 With your document open, ...
Owner's Manual
Page 41
... page 34. 2 Make sure you have a color cartridge and a photo cartridge (sold separately) installed. From a PictBridge-Enabled Camera Your printer supports PictBridge-compatible cameras. Using the Printer 41 Printing Borderless Photos 1 For best results, load photo/glossy paper in the paper support. To use your printer with a digital camera: 1 Insert the rectangular end of the USB...
... page 34. 2 Make sure you have a color cartridge and a photo cartridge (sold separately) installed. From a PictBridge-Enabled Camera Your printer supports PictBridge-compatible cameras. Using the Printer 41 Printing Borderless Photos 1 For best results, load photo/glossy paper in the paper support. To use your printer with a digital camera: 1 Insert the rectangular end of the USB...
Owner's Manual
Page 44
... 36. 5 Close the top cover. 6 Click Start→ Programs or All Programs→ Dell Printers→ Dell Photo AIO Printer 962→ Dell All-In-One Center. Copying Photos Using the Operator Panel 1 Load photo paper. For more information, see "Operator Panel Menus" on the printer. For more information, see "Print Media Guidelines for the Paper Support" on page 34...
... 36. 5 Close the top cover. 6 Click Start→ Programs or All Programs→ Dell Printers→ Dell Photo AIO Printer 962→ Dell All-In-One Center. Copying Photos Using the Operator Panel 1 Load photo paper. For more information, see "Operator Panel Menus" on the printer. For more information, see "Print Media Guidelines for the Paper Support" on page 34...
Owner's Manual
Page 45
... Now. Changing Copy Settings 1 Click Start→ Programs or All Programs→ Dell Printers→ Dell Photo AIO Printer 962→ Dell All-In-One Center. Choose a copy quality. - Select the original document size. - 4 Click Start→ Programs or All Programs→ Dell Printers→ Dell Photo AIO Printer 962→ Dell All-In-One Center. For help , see "Load Plain Paper Into the...
... Now. Changing Copy Settings 1 Click Start→ Programs or All Programs→ Dell Printers→ Dell Photo AIO Printer 962→ Dell All-In-One Center. Choose a copy quality. - Select the original document size. - 4 Click Start→ Programs or All Programs→ Dell Printers→ Dell Photo AIO Printer 962→ Dell All-In-One Center. For help , see "Load Plain Paper Into the...
Owner's Manual
Page 47
...Adjust the dotted lines to fit around the part of the photo you want to view your scanned image. The Dell All-In-One Center appears. 4 Click Preview Now to use is not listed, select Search for more... Using the Printer 47 The Dell All-In-One Center appears on your computer screen. 4 ...Click Preview Now to use . On the next screen, click Add to locate and add your program to drop-down menu, select the photo program you have selected. For help , see...
...Adjust the dotted lines to fit around the part of the photo you want to view your scanned image. The Dell All-In-One Center appears. 4 Click Preview Now to use is not listed, select Search for more... Using the Printer 47 The Dell All-In-One Center appears on your computer screen. 4 ...Click Preview Now to use . On the next screen, click Add to locate and add your program to drop-down menu, select the photo program you have selected. For help , see...
Owner's Manual
Page 48
...to fax or e-mail multiple pages to someone. 4 In the Scan section, click See More Scan Settings. 48 Using the Printer For help , see "Using the Dell All-In-One Center" on page 68. 9 Press Select. 10 Press Select. Scanning Multiple Pages or Images NOTE: This ...Placing Your Original Document on the Scanner Glass" on page 38. 2 Click Start→ Programs or All Programs→ Dell Printers→ Dell Photo AIO Printer 962→ Dell All-In-One Center. www.dell.com | support.dell.com 7 To further customize your scan job, click See More Scan Settings. 8 Change any settings. 9 When you ...
...to fax or e-mail multiple pages to someone. 4 In the Scan section, click See More Scan Settings. 48 Using the Printer For help , see "Using the Dell All-In-One Center" on page 68. 9 Press Select. 10 Press Select. Scanning Multiple Pages or Images NOTE: This ...Placing Your Original Document on the Scanner Glass" on page 38. 2 Click Start→ Programs or All Programs→ Dell Printers→ Dell Photo AIO Printer 962→ Dell All-In-One Center. www.dell.com | support.dell.com 7 To further customize your scan job, click See More Scan Settings. 8 Change any settings. 9 When you ...
Owner's Manual
Page 49
...prompt appears requesting the next page. 10 Place the next sheet on page 38. 2 Click Start→ Programs or All Programs→ Dell Printers→ Dell Photo AIO Printer 962→ Dell All-In-One Center. For help, see "Load an Original Document Into the ADF" on page 36 or "Placing Your Original Document ... 7 On the Scan tab, click the Scan multiple items before output box. 8 Click OK. 9 When you finish customizing your original document. The Dell All-In-One Center appears. 3 In the Send scanned images to change advanced options. The scanned text appears. 6 Edit your document. 7 Save your ...
...prompt appears requesting the next page. 10 Place the next sheet on page 38. 2 Click Start→ Programs or All Programs→ Dell Printers→ Dell Photo AIO Printer 962→ Dell All-In-One Center. For help, see "Load an Original Document Into the ADF" on page 36 or "Placing Your Original Document ... 7 On the Scan tab, click the Scan multiple items before output box. 8 Click OK. 9 When you finish customizing your original document. The Dell All-In-One Center appears. 3 In the Send scanned images to change advanced options. The scanned text appears. 6 Edit your document. 7 Save your ...
Owner's Manual
Page 50
...; Programs or All Programs→ Dell Printers→ Dell Photo AIO Printer 962→ Dell All-In-One Center. You may be able to save an image on Your Computer 1 Click Start→ Programs or All Programs→ Dell Printers→ Dell Photo AIO Printer 962→ Dell All-In-One Center. Saving an...Edit the image using the tools available in your image. 1 Click Start→ Programs or All Programs→ Dell Printers→ Dell Photo AIO Printer 962→ Dell All-In-One Center. The Dell All-In-One Center appears. 2 From the Send scanned image to your image - Remove red eye - ...
...; Programs or All Programs→ Dell Printers→ Dell Photo AIO Printer 962→ Dell All-In-One Center. You may be able to save an image on Your Computer 1 Click Start→ Programs or All Programs→ Dell Printers→ Dell Photo AIO Printer 962→ Dell All-In-One Center. Saving an...Edit the image using the tools available in your image. 1 Click Start→ Programs or All Programs→ Dell Printers→ Dell Photo AIO Printer 962→ Dell All-In-One Center. The Dell All-In-One Center appears. 2 From the Send scanned image to your image - Remove red eye - ...


