
SNMP Command Set Document
Page 7
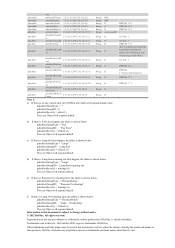
...= Lamp hours running out, Projector Overheating, Lamp Overheating and Fan Error. Reproduction in any proprietary interest in this document is strictly forbidden. e) If there is Projector Over-heating alert, the tables is shown below . is subject to either the entities claiming the marks and names or their products. Information in trademarks and trade names other (1) The reset Object will respond default...
...= Lamp hours running out, Projector Overheating, Lamp Overheating and Fan Error. Reproduction in any proprietary interest in this document is strictly forbidden. e) If there is Projector Over-heating alert, the tables is shown below . is subject to either the entities claiming the marks and names or their products. Information in trademarks and trade names other (1) The reset Object will respond default...
User's Guide
Page 9
... Do not use the wireless projector near microwave ovens. Your Dell Projector 9 It should be used indoors. 6 Do not try to touch the ventilation outlet as it may cause injury to your eyes. 8 Do not place any objects near or in front of the projector or cover its lens while the projector is on as it can only be installed by...
... Do not use the wireless projector near microwave ovens. Your Dell Projector 9 It should be used indoors. 6 Do not try to touch the ventilation outlet as it may cause injury to your eyes. 8 Do not place any objects near or in front of the projector or cover its lens while the projector is on as it can only be installed by...

User's Guide
Page 25
The Power button light blinks blue until pressed. 1 Remove the lens cap. 2 Connect the power cord and appropriate signal cables to locate the Source button. Change the input source of the projector is set to the projector using the appropriate cable. The cooling fans continue to operate for instructions to connect your source to VGA-A. Follow the instruction displayed on screen to Turn off the projector. NOTE: The "Press Power Button to properly turn on the source (computer, DVD player, etc.). Using Your Projector 25 Turning Your Projector Off CAUTION: Unplug the projector after...
The Power button light blinks blue until pressed. 1 Remove the lens cap. 2 Connect the power cord and appropriate signal cables to locate the Source button. Change the input source of the projector is set to the projector using the appropriate cable. The cooling fans continue to operate for instructions to connect your source to VGA-A. Follow the instruction displayed on screen to Turn off the projector. NOTE: The "Press Power Button to properly turn on the source (computer, DVD player, etc.). Using Your Projector 25 Turning Your Projector Off CAUTION: Unplug the projector after...

User's Guide
Page 30
... 25 and "Turning Your Projector Off" on page 105. Using the Control Panel 1 2 3 12 4 5 11 10 6 7 9 8 1 LAMP warning light 2 TEMP warning light 3 Power If the LAMP amber indicator is on or blinking, one of the following problems could be occurring: • Lamp is reaching its end of the projector is not properly installed • Lamp driver failure • Color wheel failure For more information, see "Troubleshooting Your Projector" on page 101 and "Guiding Signals" on page 25. 30 Using Your Projector
... 25 and "Turning Your Projector Off" on page 105. Using the Control Panel 1 2 3 12 4 5 11 10 6 7 9 8 1 LAMP warning light 2 TEMP warning light 3 Power If the LAMP amber indicator is on or blinking, one of the following problems could be occurring: • Lamp is reaching its end of the projector is not properly installed • Lamp driver failure • Color wheel failure For more information, see "Troubleshooting Your Projector" on page 101 and "Guiding Signals" on page 25. 30 Using Your Projector

User's Guide
Page 38
...your USB flash drive. See "Wireless Guide screen" on page 57. INPUT SOURCE WIRELESS/USB The Input Source Wireless/USB menu allows you to display the computer/laptop screen to Go (PtG) Installation" on . USB DISPLAY-Allows you to display photo and PPT files from your projector via the USB cable. USB VIEWER-Allows you to activate the Wireless Display, USB Display, and USB Viewer. WIRELESS/USB-Press to access the projector's Wireless Guide screen. AUTO ADJUST Auto Adjust automatically adjusts the projector's Horizontal, Vertical, Frequency, and Tracking in PC mode. 38 Using Your...
...your USB flash drive. See "Wireless Guide screen" on page 57. INPUT SOURCE WIRELESS/USB The Input Source Wireless/USB menu allows you to display the computer/laptop screen to Go (PtG) Installation" on . USB DISPLAY-Allows you to display photo and PPT files from your projector via the USB cable. USB VIEWER-Allows you to activate the Wireless Display, USB Display, and USB Viewer. WIRELESS/USB-Press to access the projector's Wireless Guide screen. AUTO ADJUST Auto Adjust automatically adjusts the projector's Horizontal, Vertical, Frequency, and Tracking in PC mode. 38 Using Your...

User's Guide
Page 42
... the projector automatically switch to Custom mode. 2 Saturation, Sharpness, and Tint are saved in the image and to display white intensity. RGB COLOR ADJUST-Allows you to adjust the color temperature. The options are : Off, Dynamic, and Auto. COLOR TEMPERATURE-Allows you to manually adjust the colors red, green, and blue. The options are : RGB, YCbCr, and YPbPr. NOTE: 1 If you adjust the settings for NTSC only). The screen appears cooler at higher color temperatures...
... the projector automatically switch to Custom mode. 2 Saturation, Sharpness, and Tint are saved in the image and to display white intensity. RGB COLOR ADJUST-Allows you to adjust the color temperature. The options are : Off, Dynamic, and Auto. COLOR TEMPERATURE-Allows you to manually adjust the colors red, green, and blue. The options are : RGB, YCbCr, and YPbPr. NOTE: 1 If you adjust the settings for NTSC only). The screen appears cooler at higher color temperatures...

User's Guide
Page 45
...: AUTO SOURCE-Select Off (the default) to auto detect the available input signals. Select On to lock the current input signal. Select Off to adjust the image horizontal keystone. Select appropriate closed caption menu. HORIZONTAL KEYSTONE-Use and to the disable speaker. VERTICAL KEYSTONE-Use and to Off, you press the Source button when the Auto Source mode is mounted. •Rear Projection-Desktop - Using Your Projector 45 If you can project from behind a translucent screen. •Rear Projection-Ceiling Mount - AUTO KEYSTONE...
...: AUTO SOURCE-Select Off (the default) to auto detect the available input signals. Select On to lock the current input signal. Select Off to adjust the image horizontal keystone. Select appropriate closed caption menu. HORIZONTAL KEYSTONE-Use and to the disable speaker. VERTICAL KEYSTONE-Use and to Off, you press the Source button when the Auto Source mode is mounted. •Rear Projection-Desktop - Using Your Projector 45 If you can project from behind a translucent screen. •Rear Projection-Ceiling Mount - AUTO KEYSTONE...

User's Guide
Page 52
... also set to enter power saving mode after 120 minutes of the Power button. The projector will run at projector standby status. A warning message appears on /off while the projector is not detected during quick power off. You can be set the Wireless/LAN module on screen showing a 60 seconds countdown before switching to power saving mode. If an input signal is standby status. WIRELESS-Select Always On or Off when Standby to set to enter power saving mode. LAMP HOUR RESET...
... also set to enter power saving mode after 120 minutes of the Power button. The projector will run at projector standby status. A warning message appears on /off while the projector is not detected during quick power off. You can be set the Wireless/LAN module on screen showing a 60 seconds countdown before switching to power saving mode. If an input signal is standby status. WIRELESS-Select Always On or Off when Standby to set to enter power saving mode. LAMP HOUR RESET...

User's Guide
Page 56
... "Installing the Optional Wireless Dongle" on page 11. 2 Connect the power cable to the wall outlet and press the power button. 3 Press the Menu button on page 38. 56 Using Your Projector See "INPUT SOURCE WIRELESS/USB" on your projector wirelessly, you need to select. 4 The wireless connection default is Enabled. See "Wireless Settings" on page 48. 5 Access the INPUT SOURCE menu, select Wireless/USB and then select Wireless Display on the Projector In order to use your projector control panel or remote control. NOTE: Use , , and buttons...
... "Installing the Optional Wireless Dongle" on page 11. 2 Connect the power cable to the wall outlet and press the power button. 3 Press the Menu button on page 38. 56 Using Your Projector See "INPUT SOURCE WIRELESS/USB" on your projector wirelessly, you need to select. 4 The wireless connection default is Enabled. See "Wireless Settings" on page 48. 5 Access the INPUT SOURCE menu, select Wireless/USB and then select Wireless Display on the Projector In order to use your projector control panel or remote control. NOTE: Use , , and buttons...

User's Guide
Page 58
...; When you connect to the 7700FullHD wireless network, you will be automatically directed to the 7700FullHD wireless network. NOTE: Remember to turn off all proxies. (In Microsoft® Windows Vista: Click Control Panel J Internet Options J Connections J LAN Settings) 8 Open your computer to the 7700FullHD Web Management web page. 58 Using Your Projector Install the Wireless Application Software on Your Computer 7 Connect your Internet browser. You will lose wireless connectivity with other wireless networks.
...; When you connect to the 7700FullHD wireless network, you will be automatically directed to the 7700FullHD wireless network. NOTE: Remember to turn off all proxies. (In Microsoft® Windows Vista: Click Control Panel J Internet Options J Connections J LAN Settings) 8 Open your computer to the 7700FullHD Web Management web page. 58 Using Your Projector Install the Wireless Application Software on Your Computer 7 Connect your Internet browser. You will lose wireless connectivity with other wireless networks.
User's Guide
Page 71
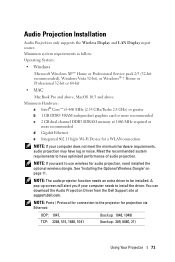
... or more recommended d Gigabit Ethernet e Integrated 802.11 b/g/n Wi-Fi Device for a WLAN connection NOTE: If your computer needs to install the driver. Meet the recommended system requirements to be installed. See "Installing the Optional Wireless Dongle" on page 11. A pop-up screen will alert you want to the projector for audio projection, need installed the optional wireless dongle. Audio Projection Installation Audio Projection only supports the Wireless Display and LAN Display input source.
... or more recommended d Gigabit Ethernet e Integrated 802.11 b/g/n Wi-Fi Device for a WLAN connection NOTE: If your computer needs to install the driver. Meet the recommended system requirements to be installed. See "Installing the Optional Wireless Dongle" on page 11. A pop-up screen will alert you want to the projector for audio projection, need installed the optional wireless dongle. Audio Projection Installation Audio Projection only supports the Wireless Display and LAN Display input source.

User's Guide
Page 76
...: If your computer does not meet the minimum hardware requirements, video stream may have optimized performance of the video stream. Meet the recommended system requirements to use wireless feature, need installed the optional wireless dongle. Video Stream Installation Video Stream only supports the Wireless Display and LAN Display input source. NOTE: Ports / Protocol for connection to 720P24 Audio Format AAC LC, LPCM AAC LC, LPCM, MP3 AAC LC, LPCM...
...: If your computer does not meet the minimum hardware requirements, video stream may have optimized performance of the video stream. Meet the recommended system requirements to use wireless feature, need installed the optional wireless dongle. Video Stream Installation Video Stream only supports the Wireless Display and LAN Display input source. NOTE: Ports / Protocol for connection to 720P24 Audio Format AAC LC, LPCM AAC LC, LPCM, MP3 AAC LC, LPCM...

User's Guide
Page 85
...: Default is Random. The projector must be restarted for each field). Click the Apply button to the system. Projection Setup Projection Setup • Resolution: Allows you want the login code to be generated by the projector. Using Your Projector 85 There are : XGA (1024 x 768) and 720p (1280 x 720). • Login Code: Select how you to take effect. Projector Setup • Set up the Model Name, Projector Name, Location, and...
...: Default is Random. The projector must be restarted for each field). Click the Apply button to the system. Projection Setup Projection Setup • Resolution: Allows you want the login code to be generated by the projector. Using Your Projector 85 There are : XGA (1024 x 768) and 720p (1280 x 720). • Login Code: Select how you to take effect. Projector Setup • Set up the Model Name, Projector Name, Location, and...

User's Guide
Page 89
NOTE: Ensure the wireless standby mode is turn on (default is successful. Projector Upgrade Use the Projector Upgrade page to update. Using Your Projector 89 To start the firmware update, follow these steps: 1 Plug in the power cord and the projector will enter standby mode. 2 Connect the LAN cable to the projector and your computer. 3 Open your Internet browser and then enter the IP address (default IP address is 192.168.100.10). 4 At Projector Upgrade web page, press Browse to select...
NOTE: Ensure the wireless standby mode is turn on (default is successful. Projector Upgrade Use the Projector Upgrade page to update. Using Your Projector 89 To start the firmware update, follow these steps: 1 Plug in the power cord and the projector will enter standby mode. 2 Connect the LAN cable to the projector and your computer. 3 Open your Internet browser and then enter the IP address (default IP address is 192.168.100.10). 4 At Projector Upgrade web page, press Browse to select...

User's Guide
Page 92
... contrast. - Click the Auto Adjust button to restore the factory default settings. 92 Using Your Projector Audio Control • Audio Input: Select the input source. Click the Factory Reset button to adjust the settings automatically. Options are four projection modes: Front Projection-Desktop, Front Projection-Ceiling Mount, Rear ProjectionDesktop, and Rear Projection-Ceiling Mount. • Source Select: The Source Select menu allows you to select the operation mode. Movie: For viewing movies and photos - sRGB: Provides a more accurate color representation. - Presentation...
... contrast. - Click the Auto Adjust button to restore the factory default settings. 92 Using Your Projector Audio Control • Audio Input: Select the input source. Click the Factory Reset button to adjust the settings automatically. Options are four projection modes: Front Projection-Desktop, Front Projection-Ceiling Mount, Rear ProjectionDesktop, and Rear Projection-Ceiling Mount. • Source Select: The Source Select menu allows you to select the operation mode. Movie: For viewing movies and photos - sRGB: Provides a more accurate color representation. - Presentation...

User's Guide
Page 103
... life, it is properly installed. Troubleshooting Your Projector 103 To replace the lamp, see "Changing the Lamp" on . The projector automatically detects the input signal format. It will automatically shut down . Please check the lamp module and ensure that the projection screen is within the required distance from the OSD and adjust the projector mode. If the LAMP light and the Power light are blinking amber and the Power light is solid blue, the color wheel has failed and the projector...
... life, it is properly installed. Troubleshooting Your Projector 103 To replace the lamp, see "Changing the Lamp" on . The projector automatically detects the input signal format. It will automatically shut down . Please check the lamp module and ensure that the projection screen is within the required distance from the OSD and adjust the projector mode. If the LAMP light and the Power light are blinking amber and the Power light is solid blue, the color wheel has failed and the projector...

User's Guide
Page 104
..., replace with two new AAA batteries. 104 Troubleshooting Your Projector The OSD does not appear on Try to unlock the OSD. Try to power up again. Check if the laser beam transmitted from the remote is blinking amber If the projector fan fails, the projector will automatically shut down . TEMP light is too dim. Check the Menu Lock on page 49. The remote control is solid amber The projector has overheated...
..., replace with two new AAA batteries. 104 Troubleshooting Your Projector The OSD does not appear on Try to unlock the OSD. Try to power up again. Check if the laser beam transmitted from the remote is blinking amber If the projector fan fails, the projector will automatically shut down . TEMP light is too dim. Check the Menu Lock on page 49. The remote control is solid amber The projector has overheated...

User's Guide
Page 105
... the projector automatically shuts down . Guiding Signals Projector Status Description Standby mode Warming up and power on. Note: The OSD menu is cooling to cool down . If the problem persists, contact Dell. The projector automatically shuts down . The lamp driver has failed. Color wheel cannot start. Lamp is properly installed. Power supply has been interrupted. Check the lamp module and ensure that the ambient temperature is overheated. Control Buttons Power BLUE Flashing BLUE BLUE BLUE AMBER OFF AMBER ÒFF AMBER Flashing BLUE OFF AMBER Flashing OFF Indicator TEMP...
... the projector automatically shuts down . Guiding Signals Projector Status Description Standby mode Warming up and power on. Note: The OSD menu is cooling to cool down . If the problem persists, contact Dell. The projector automatically shuts down . The lamp driver has failed. Color wheel cannot start. Lamp is properly installed. Power supply has been interrupted. Check the lamp module and ensure that the ambient temperature is overheated. Control Buttons Power BLUE Flashing BLUE BLUE BLUE AMBER OFF AMBER ÒFF AMBER Flashing BLUE OFF AMBER Flashing OFF Indicator TEMP...

User's Guide
Page 106
.... Replace the lamp when the message "Lamp is approaching the end of the 106 Troubleshooting Your Projector For more information, see Power Settings of its metal handle. Otherwise, contact your projector. Changing the Lamp CAUTION: Before you begin any time. www.dell.com/lamps" appears on page 115. For more information see www.dell.com/hg. 1 Turn off the projector and disconnect the power cord. 2 Let the projector cool for Lamp Hour Reset...
.... Replace the lamp when the message "Lamp is approaching the end of the 106 Troubleshooting Your Projector For more information, see Power Settings of its metal handle. Otherwise, contact your projector. Changing the Lamp CAUTION: Before you begin any time. www.dell.com/lamps" appears on page 115. For more information see www.dell.com/hg. 1 Turn off the projector and disconnect the power cord. 2 Let the projector cool for Lamp Hour Reset...

User's Guide
Page 118
... video and broadcasting, with a video format of the three colors. PAL - Phase Alternating Line. A European broadcast standard for video and broadcasting, with a variable focal length that a projector can 118 Glossary Reverse Image - When used to identify the particular wireless LAN to which a user wants to as is the shorthand identification for a set of HDTV high-definition video modes that requires separate signals for encrypting communication data. Red, Green, Blue - S-Video - S-Video...
... video and broadcasting, with a video format of the three colors. PAL - Phase Alternating Line. A European broadcast standard for video and broadcasting, with a variable focal length that a projector can 118 Glossary Reverse Image - When used to identify the particular wireless LAN to which a user wants to as is the shorthand identification for a set of HDTV high-definition video modes that requires separate signals for encrypting communication data. Red, Green, Blue - S-Video - S-Video...


