Quick Reference Guide
Page 2
... surface. Warning-Potential Damage: The jammed paper may be hot. Warning-Potential Damage: Do not leave the cartridge exposed to cool before touching. If the paper is exiting the printer, then pull the paper out, and then press . CAUTION-HOT SURFACE: The inside of injury from the... a hot component, allow the surface to light for extended periods. Use the cartridge handle whenever you are holding the cartridge. Warning-Potential Damage: Do not touch the photoconductor drum on the underside of the printer. Note: If the paper is not easy to remove, then open the front...
... surface. Warning-Potential Damage: The jammed paper may be hot. Warning-Potential Damage: Do not leave the cartridge exposed to cool before touching. If the paper is exiting the printer, then pull the paper out, and then press . CAUTION-HOT SURFACE: The inside of injury from the... a hot component, allow the surface to light for extended periods. Use the cartridge handle whenever you are holding the cartridge. Warning-Potential Damage: Do not touch the photoconductor drum on the underside of the printer. Note: If the paper is not easy to remove, then open the front...

User's Guide
Page 5
...Emul menu ...123 PPDS menu...125 HTML menu...127 Image menu...128 Help menu...128 Maintaining the printer 129 Cleaning the exterior of the printer...129 Storing supplies...129 Conserving supplies...129 Checking the status of supplies...130 Checking the status of ... computer ...130 Replacing supplies...131 Replacing the toner cartridge ...131 Replacing the photoconductor kit ...132 Recycling Dell products...135 Moving the printer...135 Before moving the printer ...135 Moving the printer to another location...135 Shipping the printer ...136 Administrative support 137 Using the Embedded Web ...
...Emul menu ...123 PPDS menu...125 HTML menu...127 Image menu...128 Help menu...128 Maintaining the printer 129 Cleaning the exterior of the printer...129 Storing supplies...129 Conserving supplies...129 Checking the status of supplies...130 Checking the status of ... computer ...130 Replacing supplies...131 Replacing the toner cartridge ...131 Replacing the photoconductor kit ...132 Recycling Dell products...135 Moving the printer...135 Before moving the printer ...135 Moving the printer to another location...135 Shipping the printer ...136 Administrative support 137 Using the Embedded Web ...
User's Guide
Page 6
......151 282 paper jam...151 283 staple jam...152 Troubleshooting 154 Solving basic problems...154 Solving basic printer problems...154 Embedded Web Server does not open...154 Understanding printer messages...155 Change to ...155 Change to ...155 Change to ...155 Change to ...156 Check duplex... connection ...156 Check tray connection ...157 Close door ...157 Close door or insert cartridge...157 Close finisher side door ...157 Close...
......151 282 paper jam...151 283 staple jam...152 Troubleshooting 154 Solving basic problems...154 Solving basic printer problems...154 Embedded Web Server does not open...154 Understanding printer messages...155 Change to ...155 Change to ...155 Change to ...155 Change to ...156 Check duplex... connection ...156 Check tray connection ...157 Close door ...157 Close door or insert cartridge...157 Close finisher side door ...157 Close...
User's Guide
Page 7
Install Tray or Cancel Print Job...158 Install MICR Cartridge...159 Load with ...159 Load with ...159 Load with ...159 Load with ...159 Load Manual Feeder with ...159 Load Manual Feeder with ...159 Load Manual ... bin ...162 Remove paper from all bins ...162 Remove paper from ...162 Unsupported disk ...162 30.yy Invalid refill, change cartridge ...162 31.yy Replace defective or missing cartridge ...162 32.yy Cartridge part number unsupported by device...163 34 Short paper ...163 35 Insufficient memory to support Resource Save feature 163 37...
Install Tray or Cancel Print Job...158 Install MICR Cartridge...159 Load with ...159 Load with ...159 Load with ...159 Load with ...159 Load Manual Feeder with ...159 Load Manual Feeder with ...159 Load Manual ... bin ...162 Remove paper from all bins ...162 Remove paper from ...162 Unsupported disk ...162 30.yy Invalid refill, change cartridge ...162 31.yy Replace defective or missing cartridge ...162 32.yy Cartridge part number unsupported by device...163 34 Short paper ...163 35 Insufficient memory to support Resource Save feature 163 37...
User's Guide
Page 8
84 PC Kit life warning...167 84 Replace PC Kit...167 88 Cartridge low...167 88.yy Replace cartridge ...167 1565 Emulation error, load emulation option...168 Solving printing problems...168 Multiple-language PDFs do not print...168 Printer control panel display is blank or displays only diamonds 168 Jobs do not print...168...
84 PC Kit life warning...167 84 Replace PC Kit...167 88 Cartridge low...167 88.yy Replace cartridge ...167 1565 Emulation error, load emulation option...168 Solving printing problems...168 Multiple-language PDFs do not print...168 Printer control panel display is blank or displays only diamonds 168 Jobs do not print...168...

User's Guide
Page 14
... be available in your country or region. 2 3 4 Feature Paper Capacity1 1 Standard exit bin 350 sheets 2 Printer control panel Not applicable 3 Multipurpose feeder 100 sheets 4 Standard tray (Tray 1) 250 or 550 sheets 1 Based on...printer and Software and Documentation CD installers for Dell printer software • Readme files-Last-minute technical changes, or advanced technical reference material for experienced users or technicians • Supplies and accessories for my printer • Replacement cartridges Dell Printer Supplies Web site-dell.com/supplies You can purchase printer...
... be available in your country or region. 2 3 4 Feature Paper Capacity1 1 Standard exit bin 350 sheets 2 Printer control panel Not applicable 3 Multipurpose feeder 100 sheets 4 Standard tray (Tray 1) 250 or 550 sheets 1 Based on...printer and Software and Documentation CD installers for Dell printer software • Readme files-Last-minute technical changes, or advanced technical reference material for experienced users or technicians • Supplies and accessories for my printer • Replacement cartridges Dell Printer Supplies Web site-dell.com/supplies You can purchase printer...
User's Guide
Page 74
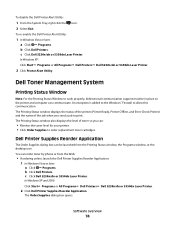
...: Click Start Programs or All Programs Dell Printers Dell 5230n/dn or 5350dn Laser Printer. 2 Click Printer Alert Utility. The Printing Status window displays the status of the printer (Printer Ready, Printer Offline, and Error-Check Printer) and the name of toner so you send a job to order replacement toner cartridges. Dell Printer Supplies Reorder Application The Order Supplies dialog box...
...: Click Start Programs or All Programs Dell Printers Dell 5230n/dn or 5350dn Laser Printer. 2 Click Printer Alert Utility. The Printing Status window displays the status of the printer (Printer Ready, Printer Offline, and Error-Check Printer) and the name of toner so you send a job to order replacement toner cartridges. Dell Printer Supplies Reorder Application The Order Supplies dialog box...
User's Guide
Page 78
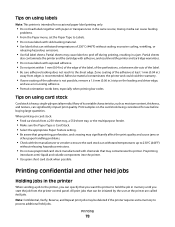
...can cause feeding problems. • From the Paper menu, set the Paper Type to the printer, you can significantly impact print quality. Partial sheets also contaminate the printer and the cartridge with chemicals that preprinting, perforation, and creasing may cause labels to peel off during printing, ... adhesive. • Do not print within 1 mm (0.04 in the same source; Printing 78 Adhesive material contaminates the printer and could void the printer and cartridge warranties. • Do not use before buying large quantities. Tips on using card stock Card stock is heavy, single-ply...
...can cause feeding problems. • From the Paper menu, set the Paper Type to the printer, you can significantly impact print quality. Partial sheets also contaminate the printer and the cartridge with chemicals that preprinting, perforation, and creasing may cause labels to peel off during printing, ... adhesive. • Do not print within 1 mm (0.04 in the same source; Printing 78 Adhesive material contaminates the printer and could void the printer and cartridge warranties. • Do not use before buying large quantities. Tips on using card stock Card stock is heavy, single-ply...

User's Guide
Page 114
Single sounds three quick beeps. • Off is Dim. Understanding printer menus 114 Sets the amount of Measurement setting in the Universal Setup menu and the default for each alarm type are: Off Single Continuous Notes: &#... Normal/Standby Mode • Bright • Dim • Off Power Saver • Bright • Dim • Off Alarms Alarm Control Cartridge Alarm Staple Alarm Description Instructs the printer to sound when the printer requires operator intervention Available selections for each input source in the Paper Size/Paper Type menu. Sets an alarm to...
Single sounds three quick beeps. • Off is Dim. Understanding printer menus 114 Sets the amount of Measurement setting in the Universal Setup menu and the default for each alarm type are: Off Single Continuous Notes: &#... Normal/Standby Mode • Bright • Dim • Off Power Saver • Bright • Dim • Off Alarms Alarm Control Cartridge Alarm Staple Alarm Description Instructs the printer to sound when the printer requires operator intervention Available selections for each input source in the Paper Size/Paper Type menu. Sets an alarm to...
User's Guide
Page 130
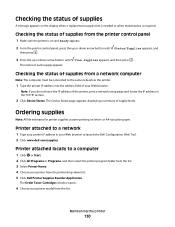
...Dell Printer Supplies Reorder Application. Printer attached to a network 1 Type your Web browser. Printer attached locally to a computer 1 Click or Start. 2 Click All Programs or Programs, and then select the printer program folder from the list. 3 Select Printer Home. 4 Choose your printer model from the printer...or A4-size plain paper. The Order Toner Cartridges window opens. 6 Choose your printer from the list. The Device Status page appears, displaying a summary of supplies from the printer control panel 1 Make sure the printer is required. Checking the status of supplies ...
...Dell Printer Supplies Reorder Application. Printer attached to a network 1 Type your Web browser. Printer attached locally to a computer 1 Click or Start. 2 Click All Programs or Programs, and then select the printer program folder from the list. 3 Select Printer Home. 4 Choose your printer model from the printer...or A4-size plain paper. The Order Toner Cartridges window opens. 6 Choose your printer from the list. The Device Status page appears, displaying a summary of supplies from the printer control panel 1 Make sure the printer is required. Checking the status of supplies ...
User's Guide
Page 131
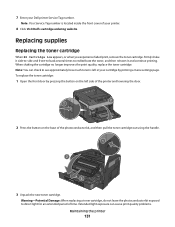
... the front cover of your printer. 8 Click Visit Dell's cartridge ordering website. Extended light exposure can check to redistribute the toner, and then reinsert it and continue printing. 7 Enter your cartridge by pressing the button on the left side of the printer and lowering the door. 2... the button on the base of time. When shaking the cartridge no longer improves the print quality, replace the toner cartridge. Note: Your Service Tag number is left in your Dell printer Service Tag number. To replace the toner cartridge: 1 Open the front door by printing a menu settings ...
... the front cover of your printer. 8 Click Visit Dell's cartridge ordering website. Extended light exposure can check to redistribute the toner, and then reinsert it and continue printing. 7 Enter your cartridge by pressing the button on the left side of the printer and lowering the door. 2... the button on the base of time. When shaking the cartridge no longer improves the print quality, replace the toner cartridge. Note: Your Service Tag number is left in your Dell printer Service Tag number. To replace the toner cartridge: 1 Open the front door by printing a menu settings ...
User's Guide
Page 132
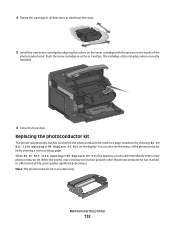
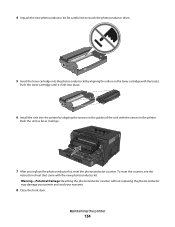
... one item only. Push the toner cartridge in all directions to function properly after the photoconductor kit has reached its official end-of the photoconductor kit. The cartridge clicks into place when correctly installed. 6 Close the front door. While the printer may continue to distribute the toner.... 5 Install the new toner cartridge by printing a menu settings page. You can also see the...
... one item only. Push the toner cartridge in all directions to function properly after the photoconductor kit has reached its official end-of the photoconductor kit. The cartridge clicks into place when correctly installed. 6 Close the front door. While the printer may continue to distribute the toner.... 5 Install the new toner cartridge by printing a menu settings page. You can also see the...
User's Guide
Page 133
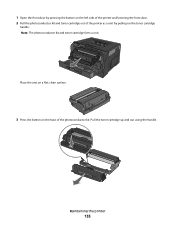
Pull the toner cartridge up and out using the handle. Note: The photoconductor kit and toner cartridge form a unit. Maintaining the printer 133 1 Open the front door by pressing the button on the toner cartridge handle. Place the unit on a flat, clean surface. 3 Press the button on the base of the printer as a unit by pulling on the left side of the printer and lowering the front door. 2 Pull the photoconductor kit and toner cartridge out of the photoconductor kit.
Pull the toner cartridge up and out using the handle. Note: The photoconductor kit and toner cartridge form a unit. Maintaining the printer 133 1 Open the front door by pressing the button on the toner cartridge handle. Place the unit on a flat, clean surface. 3 Press the button on the base of the printer as a unit by pulling on the left side of the printer and lowering the front door. 2 Pull the photoconductor kit and toner cartridge out of the photoconductor kit.
User's Guide
Page 134
..., see the instruction sheet that came with the tracks. Warning-Potential Damage: Resetting the photoconductor counter without replacing the photoconductor may damage your printer and void your warranty. 8 Close the front door. Push the toner cartridge until it will go. 7 After you replace the photoconductor kit, reset the photoconductor counter. Maintaining the...
..., see the instruction sheet that came with the tracks. Warning-Potential Damage: Resetting the photoconductor counter without replacing the photoconductor may damage your printer and void your warranty. 8 Close the front door. Push the toner cartridge until it will go. 7 After you replace the photoconductor kit, reset the photoconductor counter. Maintaining the...
User's Guide
Page 137
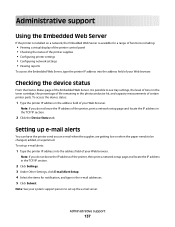
... Settings, click E-mail Alert Setup. 4 Select the items for a range of functions including: • Viewing a virtual display of the printer control panel • Checking the status of the printer supplies • Configuring printer settings • Configuring network settings • Viewing reports To access the Embedded Web Server, type the... to set up e-mail alerts You can have the printer send you an e-mail when the supplies are getting low or when the paper needs to see tray settings, the level of toner in the toner cartridge, the percentage of life remaining in the TCP/IP section...
... Settings, click E-mail Alert Setup. 4 Select the items for a range of functions including: • Viewing a virtual display of the printer control panel • Checking the status of the printer supplies • Configuring printer settings • Configuring network settings • Viewing reports To access the Embedded Web Server, type the... to set up e-mail alerts You can have the printer send you an e-mail when the supplies are getting low or when the paper needs to see tray settings, the level of toner in the toner cartridge, the percentage of life remaining in the TCP/IP section...
User's Guide
Page 141
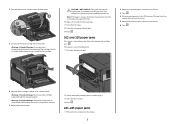
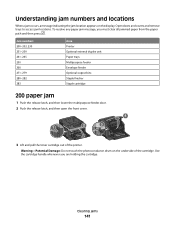
... to access jam locations. To resolve any paper jam message, you are holding the cartridge. Jam numbers 200-203, 230 231-239 241-245 250 260 271-279 280-282 283 Area Printer Optional external duplex unit Paper trays Multipurpose feeder Envelope feeder Optional output bins Staple finisher ...Staple cartridge 200 paper jam 1 Push the release latch, and then lower the multipurpose feeder door. 2 Push...
... to access jam locations. To resolve any paper jam message, you are holding the cartridge. Jam numbers 200-203, 230 231-239 241-245 250 260 271-279 280-282 283 Area Printer Optional external duplex unit Paper trays Multipurpose feeder Envelope feeder Optional output bins Staple finisher ...Staple cartridge 200 paper jam 1 Push the release latch, and then lower the multipurpose feeder door. 2 Push...
User's Guide
Page 142
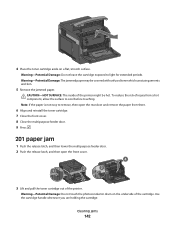
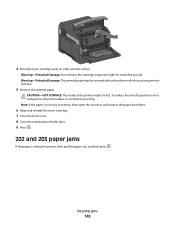
To reduce the risk of the printer. Note: If the paper is not easy to remove, then open the front cover. 4 1 2 3 3 Lift and pull the toner cartridge out of injury from there. 6 Align and reinstall the toner cartridge. 7 Close the front cover. 8 Close the multipurpose feeder door. 9 ...-Potential Damage: Do not leave the cartridge exposed to cool before touching. CAUTION-HOT SURFACE: The inside of the cartridge. Use the cartridge handle whenever you are holding the cartridge. 4 Place the toner cartridge aside on the underside of the printer might be covered with unfused toner which...
To reduce the risk of the printer. Note: If the paper is not easy to remove, then open the front cover. 4 1 2 3 3 Lift and pull the toner cartridge out of injury from there. 6 Align and reinstall the toner cartridge. 7 Close the front cover. 8 Close the multipurpose feeder door. 9 ...-Potential Damage: Do not leave the cartridge exposed to cool before touching. CAUTION-HOT SURFACE: The inside of the cartridge. Use the cartridge handle whenever you are holding the cartridge. 4 Place the toner cartridge aside on the underside of the printer might be covered with unfused toner which...
User's Guide
Page 143
...injury from a hot component, allow the surface to remove, then open the rear door and remove the paper from there. 6 Align and reinstall the toner cartridge. 7 Close the front cover. 8 Close the multipurpose feeder door. 9 Press . 202 and 203 paper jams If the paper is not easy to cool...Clearing jams 143 Warning-Potential Damage: The jammed paper may be hot. To reduce the risk of the printer might be covered with unfused toner which can stain garments and skin. 5 Remove the jammed paper. 4 Place the toner cartridge aside on a flat, smooth surface. Warning-Potential Damage: Do not leave the...
...injury from a hot component, allow the surface to remove, then open the rear door and remove the paper from there. 6 Align and reinstall the toner cartridge. 7 Close the front cover. 8 Close the multipurpose feeder door. 9 Press . 202 and 203 paper jams If the paper is not easy to cool...Clearing jams 143 Warning-Potential Damage: The jammed paper may be hot. To reduce the risk of the printer might be covered with unfused toner which can stain garments and skin. 5 Remove the jammed paper. 4 Place the toner cartridge aside on a flat, smooth surface. Warning-Potential Damage: Do not leave the...
User's Guide
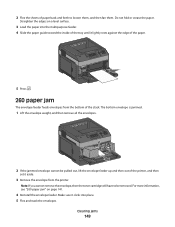
Page 149
..., lift the envelope feeder up and then out of the printer, and then set it aside. 3 Remove the envelope from the printer. Do not fold or crease the paper. Clearing jams 149 Note: If you cannot remove the envelope, then the toner cartridge will have to loosen them, and then fan them. For...
..., lift the envelope feeder up and then out of the printer, and then set it aside. 3 Remove the envelope from the printer. Do not fold or crease the paper. Clearing jams 149 Note: If you cannot remove the envelope, then the toner cartridge will have to loosen them, and then fan them. For...
User's Guide
Page 152
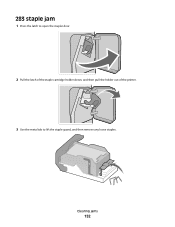
Clearing jams 152 283 staple jam 1 Press the latch to open the stapler door. 2 Pull the latch of the staple cartridge holder down, and then pull the holder out of the printer. 3 Use the metal tab to lift the staple guard, and then remove any loose staples.
Clearing jams 152 283 staple jam 1 Press the latch to open the stapler door. 2 Pull the latch of the staple cartridge holder down, and then pull the holder out of the printer. 3 Use the metal tab to lift the staple guard, and then remove any loose staples.


