Quick Reference Guide
Page 1
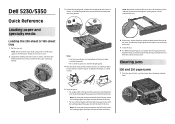
... 5 Load the paper: 2 1 • For single-sided printing, load the paper print side facedown with the leading edge of the paper toward the front of the tray. 1 Do not fold or crease the paper. Dell 5230/5350 Quick Reference Loading paper and specialty media ...paper. Straighten the edges on a level surface. 6 If necessary, adjust the paper guides to the correct position for the paper size being loaded. 1 2 Note: Notice the maximum fill line on the tray. 7 Insert the tray. 8 If a different type of the tray which indicates the maximum height for the tray from the printer...
... 5 Load the paper: 2 1 • For single-sided printing, load the paper print side facedown with the leading edge of the paper toward the front of the tray. 1 Do not fold or crease the paper. Dell 5230/5350 Quick Reference Loading paper and specialty media ...paper. Straighten the edges on a level surface. 6 If necessary, adjust the paper guides to the correct position for the paper size being loaded. 1 2 Note: Notice the maximum fill line on the tray. 7 Insert the tray. 8 If a different type of the tray which indicates the maximum height for the tray from the printer...
Quick Reference Guide
Page 2
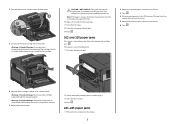
... Damage: Do not leave the cartridge exposed to cool before touching. To reduce the risk of the printer. If the paper is not exiting the printer: 1 Pull down the top rear door. 2 Remove any jammed paper, and then insert the tray. 3 Press . 4 If the jam message persists for extended periods....CAUTION-HOT SURFACE: The inside of the cartridge. Note: If the paper is exiting the printer, then pull the paper out, and then press . Warning-Potential Damage: Do not touch the photoconductor drum on the underside of the printer might be covered with unfused toner which can stain garments and skin....
... Damage: Do not leave the cartridge exposed to cool before touching. To reduce the risk of the printer. If the paper is not exiting the printer: 1 Pull down the top rear door. 2 Remove any jammed paper, and then insert the tray. 3 Press . 4 If the jam message persists for extended periods....CAUTION-HOT SURFACE: The inside of the cartridge. Note: If the paper is exiting the printer, then pull the paper out, and then press . Warning-Potential Damage: Do not touch the photoconductor drum on the underside of the printer might be covered with unfused toner which can stain garments and skin....
User's Guide
Page 2
... a memory card ...21 Installing a flash memory or firmware card...22 Installing an Internal Solutions Port...25 Installing a printer hard disk ...31 Installing hardware options...35 Order of installation ...35 Installing paper drawers...35 Attaching cables...36 Verifying printer setup...37 Printing a menu settings page...37 Printing a network setup page ...38 Setting up the...
... a memory card ...21 Installing a flash memory or firmware card...22 Installing an Internal Solutions Port...25 Installing a printer hard disk ...31 Installing hardware options...35 Order of installation ...35 Installing paper drawers...35 Attaching cables...36 Verifying printer setup...37 Printing a menu settings page...37 Printing a network setup page ...38 Setting up the...
User's Guide
Page 3
... Paper guidelines...67 Paper characteristics...67 Unacceptable paper ...68 Selecting paper...68 Selecting preprinted forms and letterhead...68 Using recycled paper and other office papers ...69 Storing paper...69 Supported paper sizes, types, and weights...70 Paper sizes supported by the printer ...70 Paper types and weights supported by the printer ...72 Software overview 73 Status Monitor Center...73 Driver Profiler...73 Dell Printer...
... Paper guidelines...67 Paper characteristics...67 Unacceptable paper ...68 Selecting paper...68 Selecting preprinted forms and letterhead...68 Using recycled paper and other office papers ...69 Storing paper...69 Supported paper sizes, types, and weights...70 Paper sizes supported by the printer ...70 Paper types and weights supported by the printer ...72 Software overview 73 Status Monitor Center...73 Driver Profiler...73 Dell Printer...
User's Guide
Page 4
...82 Canceling a print job...83 Canceling a print job from the printer control panel ...83 Canceling a print job from the computer ...83 Understanding printer menus 85 Menus list...85 Paper menu...86 Default Source menu...86 Paper Size/Type menu ...86 Configure MP menu...89 Envelope Enhance ...90... Substitute Size menu...90 Paper Texture menu ...90 Paper Weight menu ...92 Paper Loading menu ...94 Custom Types menu...
...82 Canceling a print job...83 Canceling a print job from the printer control panel ...83 Canceling a print job from the computer ...83 Understanding printer menus 85 Menus list...85 Paper menu...86 Default Source menu...86 Paper Size/Type menu ...86 Configure MP menu...89 Envelope Enhance ...90... Substitute Size menu...90 Paper Texture menu ...90 Paper Weight menu ...92 Paper Loading menu ...94 Custom Types menu...
User's Guide
Page 6
... 203 paper jams...143 230 paper jam...144 231-239 paper jams (optional external duplex unit 146 241-245 paper jams...148 250 paper jam...148 260 paper jam...149 271-279 paper jams...150 280 paper jams...150 281 paper jam...151 282 paper jam...151 283 staple jam...152 Troubleshooting 154 Solving basic problems...154 Solving basic printer problems...
... 203 paper jams...143 230 paper jam...144 231-239 paper jams (optional external duplex unit 146 241-245 paper jams...148 250 paper jam...148 260 paper jam...149 271-279 paper jams...150 280 paper jams...150 281 paper jam...151 282 paper jam...151 283 staple jam...152 Troubleshooting 154 Solving basic problems...154 Solving basic printer problems...
User's Guide
Page 7
...Load staples ...160 Reattach bin ...160 Reattach bin - ...161 Reattach envelope feeder...161 Remove paper from standard output bin...162 Remove paper from bin ...162 Remove paper from all bins ...162 Remove paper from ...162 Unsupported disk ...162 30.yy Invalid refill, change cartridge ...162 31.yy ...Replace defective or missing cartridge ...162 32.yy Cartridge part number unsupported by device...163 34 Short paper ...163 35 Insufficient memory to support Resource Save feature 163 37 Insufficient memory to collate job ...163 37 Insufficient memory for Flash...
...Load staples ...160 Reattach bin ...160 Reattach bin - ...161 Reattach envelope feeder...161 Remove paper from standard output bin...162 Remove paper from bin ...162 Remove paper from all bins ...162 Remove paper from ...162 Unsupported disk ...162 30.yy Invalid refill, change cartridge ...162 31.yy ...Replace defective or missing cartridge ...162 32.yy Cartridge part number unsupported by device...163 34 Short paper ...163 35 Insufficient memory to support Resource Save feature 163 37 Insufficient memory to collate job ...163 37 Insufficient memory for Flash...
User's Guide
Page 8
...88.yy Replace cartridge ...167 1565 Emulation error, load emulation option...168 Solving printing problems...168 Multiple-language PDFs do not print...168 Printer control panel display is blank or displays only diamonds 168 Jobs do not print...168 Confidential and other held jobs do not print ... feeder ...173 Memory card ...173 Flash memory card...173 Hard disk with adapter...173 Internal Solutions Port ...173 Solving paper feed problems...174 Paper frequently jams ...174 Paper jam message remains after jam is cleared ...174 Page that jammed does not reprint after you clear the jam 174 Solving...
...88.yy Replace cartridge ...167 1565 Emulation error, load emulation option...168 Solving printing problems...168 Multiple-language PDFs do not print...168 Printer control panel display is blank or displays only diamonds 168 Jobs do not print...168 Confidential and other held jobs do not print ... feeder ...173 Memory card ...173 Flash memory card...173 Hard disk with adapter...173 Internal Solutions Port ...173 Solving paper feed problems...174 Paper frequently jams ...174 Paper jam message remains after jam is cleared ...174 Page that jammed does not reprint after you clear the jam 174 Solving...

User's Guide
Page 13
... CD. For updates, check our Web site at support.dell.com. Notes: • The Help installs automatically with the printer. Dell Support Web site-support.dell.com Support telephone numbers and hours of operation for ? ...printer Finding information about the printer 13 Initial setup instructions: • Connecting the printer • Installing the printer software Additional setup and instructions for using the printer: • Selecting and storing paper and specialty media • Loading paper • Performing printing depending on your printer model • Configuring printer...
... CD. For updates, check our Web site at support.dell.com. Notes: • The Help installs automatically with the printer. Dell Support Web site-support.dell.com Support telephone numbers and hours of operation for ? ...printer Finding information about the printer 13 Initial setup instructions: • Connecting the printer • Installing the printer software Additional setup and instructions for using the printer: • Selecting and storing paper and specialty media • Loading paper • Performing printing depending on your printer model • Configuring printer...

User's Guide
Page 14
... sheets 4 Standard tray (Tray 1) 250 or 550 sheets 1 Based on 75 g/m2 (20 lb.) paper. Learning about the printer 14 Find it here • Software and Drivers-Certified drivers for my printer and Software and Documentation CD installers for Dell printer software • Readme files-Last-minute technical changes, or advanced technical reference material for...
... sheets 4 Standard tray (Tray 1) 250 or 550 sheets 1 Based on 75 g/m2 (20 lb.) paper. Learning about the printer 14 Find it here • Software and Drivers-Certified drivers for my printer and Software and Documentation CD installers for Dell printer software • Readme files-Last-minute technical changes, or advanced technical reference material for...
User's Guide
Page 15
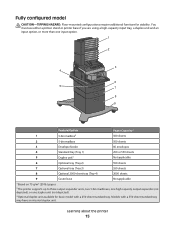
... a 250-sheet standard tray. You must use either a printer stand or printer base if you are using a high-capacity input tray, a duplex unit and an input option, or more than one input option. 1 2 3 4 6 5 7 8 9 Feature/Option Paper Capacity1 1 5-bin mailbox2 500 sheets 2 5-bin mailbox 500... 3) 550 sheets 8 Optional 2000-sheet tray (Tray 4) 2000 sheets 9 Caster base Not applicable 1 Based on 75 g/m2 (20 lb.) paper. 2 The printer supports up to three output expander units, two 5-bin mailboxes, one high capacity output expander (not depicted), or one stapler unit (not depicted)....
... a 250-sheet standard tray. You must use either a printer stand or printer base if you are using a high-capacity input tray, a duplex unit and an input option, or more than one input option. 1 2 3 4 6 5 7 8 9 Feature/Option Paper Capacity1 1 5-bin mailbox2 500 sheets 2 5-bin mailbox 500... 3) 550 sheets 8 Optional 2000-sheet tray (Tray 4) 2000 sheets 9 Caster base Not applicable 1 Based on 75 g/m2 (20 lb.) paper. 2 The printer supports up to three output expander units, two 5-bin mailboxes, one high capacity output expander (not depicted), or one stapler unit (not depicted)....
User's Guide
Page 35
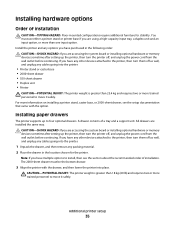
... hardware or memory devices sometime after setting up the printer, then turn the printer off , and unplug the power cord from the wall outlet before continuing. Installing paper drawers The printer supports up the printer, then turn the printer off , and unplug the power cord from the wall... outlet before continuing. CAUTION-POTENTIAL INJURY: The printer weight is greater than 23.4 kg and requires two ...
... hardware or memory devices sometime after setting up the printer, then turn the printer off , and unplug the power cord from the wall outlet before continuing. Installing paper drawers The printer supports up the printer, then turn the printer off , and unplug the power cord from the wall... outlet before continuing. CAUTION-POTENTIAL INJURY: The printer weight is greater than 23.4 kg and requires two ...
User's Guide
Page 52
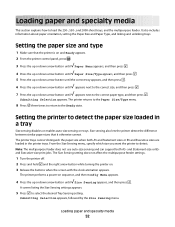
... select the desired Tray Sensing setting. The printer performs a power-on trays. Setting the paper size and type 1 Make sure that it otherwise cannot. The printer trays cannot distinguish the paper size when both A5- Size sensing also lets the printer detect the difference between similar paper sizes that the printer is on . 3 Release the buttons when...
... select the desired Tray Sensing setting. The printer performs a power-on trays. Setting the paper size and type 1 Make sure that it otherwise cannot. The printer trays cannot distinguish the paper size when both A5- Size sensing also lets the printer detect the difference between similar paper sizes that the printer is on . 3 Release the buttons when...
User's Guide
Page 53
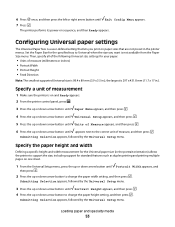
... support for standard features such as duplex printing and printing multiple pages on and Ready appears. 2 From the printer control panel, press . 3 Press the up or down arrow button until Paper Menu appears, and then press . 4 Press the up or down arrow button until Universal Setup appears, and... specific height and width measurement for the specified tray to the correct unit of measurement 1 Make sure the printer is not available from the Paper Size menu. The printer performs its power-on paper sizes that lets you want is on one sheet. 1 From the Universal Setup menu, press the up...
... support for standard features such as duplex printing and printing multiple pages on and Ready appears. 2 From the printer control panel, press . 3 Press the up or down arrow button until Paper Menu appears, and then press . 4 Press the up or down arrow button until Universal Setup appears, and... specific height and width measurement for the specified tray to the correct unit of measurement 1 Make sure the printer is not available from the Paper Size menu. The printer performs its power-on paper sizes that lets you want is on one sheet. 1 From the Universal Setup menu, press the up...
User's Guide
Page 54
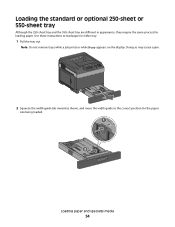
Note: Do not remove trays while a job prints or while Busy appears on the display. Use these instructions to the correct position for loading paper. Doing so may cause a jam. 2 Squeeze the width guide tab inward as shown, and move the width guide to load paper in appearance, they require the same process for the paper size being loaded. 1 2 Loading paper and specialty media 54 Loading the standard or optional 250-sheet or 550-sheet tray Although the 250-sheet tray and the 550-sheet tray are different in either tray: 1 Pull the tray out.
Note: Do not remove trays while a job prints or while Busy appears on the display. Use these instructions to the correct position for loading paper. Doing so may cause a jam. 2 Squeeze the width guide tab inward as shown, and move the width guide to load paper in appearance, they require the same process for the paper size being loaded. 1 2 Loading paper and specialty media 54 Loading the standard or optional 250-sheet or 550-sheet tray Although the 250-sheet tray and the 550-sheet tray are different in either tray: 1 Pull the tray out.
User's Guide
Page 55
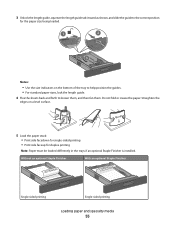
... forth to loosen them, and then fan them. Do not fold or crease the paper. 3 Unlock the length guide, squeeze the length guide tab inward as shown, and slide the guide to the correct position for the paper size being loaded. 1 2 3 Notes: • Use the size indicators on a level ...surface. 5 Load the paper stack: • Print side facedown for single-sided printing • Print side faceup for duplex printing...
... forth to loosen them, and then fan them. Do not fold or crease the paper. 3 Unlock the length guide, squeeze the length guide tab inward as shown, and slide the guide to the correct position for the paper size being loaded. 1 2 3 Notes: • Use the size indicators on a level ...surface. 5 Load the paper stack: • Print side facedown for single-sided printing • Print side faceup for duplex printing...
User's Guide
Page 56
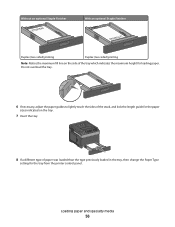
... loading paper. Without an optional Staple Finisher LETTERHEAD With an optional Staple Finisher LETTERHEAD Duplex (two-sided) printing Duplex (two-sided) printing Note: Notice the maximum fill line on the tray. 7 Insert the tray. 8 If a different type of the tray which indicates the maximum height for the tray from the printer control... panel. Loading paper and specialty media 56
... loading paper. Without an optional Staple Finisher LETTERHEAD With an optional Staple Finisher LETTERHEAD Duplex (two-sided) printing Duplex (two-sided) printing Note: Notice the maximum fill line on the tray. 7 Insert the tray. 8 If a different type of the tray which indicates the maximum height for the tray from the printer control... panel. Loading paper and specialty media 56
User's Guide
Page 57
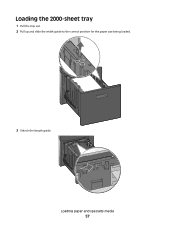
Loading paper and specialty media 57 Loading the 2000-sheet tray 1 Pull the tray out. 2 Pull up and slide the width guide to the correct position for the paper size being loaded. 3 Unlock the length guide.
Loading paper and specialty media 57 Loading the 2000-sheet tray 1 Pull the tray out. 2 Pull up and slide the width guide to the correct position for the paper size being loaded. 3 Unlock the length guide.
User's Guide
Page 58
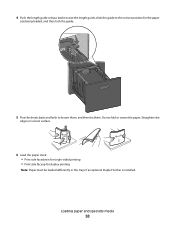
Straighten the edges on a level surface. 6 Load the paper stack: • Print side facedown for single-sided printing • Print side faceup for the paper size being loaded, and then lock the guide. 5 Flex the sheets back and forth to the correct position for duplex printing Note: Paper must be loaded differently in the trays if an optional Staple Finisher is installed. 4 Push the length guide release latch to raise the length guide, slide the guide to loosen them, and then fan them. Do not fold or crease the paper. Loading paper and specialty media 58
Straighten the edges on a level surface. 6 Load the paper stack: • Print side facedown for single-sided printing • Print side faceup for the paper size being loaded, and then lock the guide. 5 Flex the sheets back and forth to the correct position for duplex printing Note: Paper must be loaded differently in the trays if an optional Staple Finisher is installed. 4 Push the length guide release latch to raise the length guide, slide the guide to loosen them, and then fan them. Do not fold or crease the paper. Loading paper and specialty media 58
User's Guide
Page 59
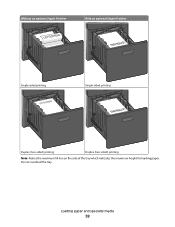
Loading paper and specialty media 59 Do not overload the tray. LETTERHEAD LETTERHEAD Without an optional Staple Finisher LETTERHEAD With an optional Staple Finisher Single-sided printing LETTERHEAD Single-sided printing Duplex (two-sided) printing Duplex (two-sided) printing Note: Notice the maximum fill line on the side of the tray which indicates the maximum height for loading paper.
Loading paper and specialty media 59 Do not overload the tray. LETTERHEAD LETTERHEAD Without an optional Staple Finisher LETTERHEAD With an optional Staple Finisher Single-sided printing LETTERHEAD Single-sided printing Duplex (two-sided) printing Duplex (two-sided) printing Note: Notice the maximum fill line on the side of the tray which indicates the maximum height for loading paper.


