User Guide
Page 2
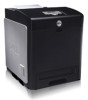
...-sheet tray, optional 550-sheet feeder, and multipurpose feeder). 3 Multipurpose feeder 4 Side button 5 Belt unit 6 Front cover NOTE: The front cover opens by phone. Visit Dell's website, or order Dell printer supplies by pushing the side button. 7 Optional duplexer 8 Operator panel 9 Power switch 10 Control board 11 Control board cover To order replacement print...
...-sheet tray, optional 550-sheet feeder, and multipurpose feeder). 3 Multipurpose feeder 4 Side button 5 Belt unit 6 Front cover NOTE: The front cover opens by phone. Visit Dell's website, or order Dell printer supplies by pushing the side button. 7 Optional duplexer 8 Operator panel 9 Power switch 10 Control board 11 Control board cover To order replacement print...
User Guide
Page 20
Print Text Displays whether the printer outputs PDL data, which the banner sheet is loaded. mm/inch Displays the measurement unit on the page. 2 Sided Displays whether to use another size paper when the paper that is not supported by the printer, as the ...fonts in which is loaded in a line. Symbol Set Displays a symbol set for scalable monospaced fonts. Substitute Tray Displays whether or not to do duplexing as text when the printer receives it. Y Displays the length of banner sheet. Banner Sheet Specify Tray Displays the tray in the printer. Network Settings...
Print Text Displays whether the printer outputs PDL data, which the banner sheet is loaded. mm/inch Displays the measurement unit on the page. 2 Sided Displays whether to use another size paper when the paper that is not supported by the printer, as the ...fonts in which is loaded in a line. Symbol Set Displays a symbol set for scalable monospaced fonts. Substitute Tray Displays whether or not to do duplexing as text when the printer receives it. Y Displays the length of banner sheet. Banner Sheet Specify Tray Displays the tray in the printer. Network Settings...

User Guide
Page 55
... to allow space around the printer for a maximum of 3 trays (standard 250-sheet tray, optional 550-sheet feeder, and multipurpose feeder). 2 Multipurpose 8 Optional duplexer feeder 3 Side button 4 Belt unit 5 Operator panel 6 Front cover NOTE: When you use the printer with options 1 Standard 250- 7 Optional 550-sheet feeder sheet tray NOTE: Your printer...
... to allow space around the printer for a maximum of 3 trays (standard 250-sheet tray, optional 550-sheet feeder, and multipurpose feeder). 2 Multipurpose 8 Optional duplexer feeder 3 Side button 4 Belt unit 5 Operator panel 6 Front cover NOTE: When you use the printer with options 1 Standard 250- 7 Optional 550-sheet feeder sheet tray NOTE: Your printer...
User Guide
Page 75
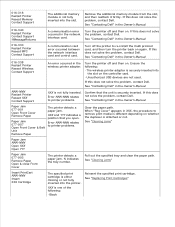
... box. Make sure that the printer is using the PS driver, and then select Properties from your hands on the film of the belt unit may deteriorate. Remove all packaging from the Printer List screen in Print Center (or Printer Setup Utility). 2. Click OK. 5. Right-click ... Options, and select the options that is turned off. 2. If the front cover remains open the front cover. Installing a Duplexer NOTICE: To protect the drums of the belt unit. Push the side button and open for the Paper Tray Configuration item under Installable Options. 4. Click Printers on the printer, ...
... box. Make sure that the printer is using the PS driver, and then select Properties from your hands on the film of the belt unit may deteriorate. Remove all packaging from the Printer List screen in Print Center (or Printer Setup Utility). 2. Click OK. 5. Right-click ... Options, and select the options that is turned off. 2. If the front cover remains open the front cover. Installing a Duplexer NOTICE: To protect the drums of the belt unit. Push the side button and open for the Paper Tray Configuration item under Installable Options. 4. Click Printers on the printer, ...

User Guide
Page 78
Close the belt unit by pulling it down. 8. Close the front cover. NOTE: Make sure that the duplexer is correctly connected to the printer with connectors and cannot be moved easily. 7.
Close the belt unit by pulling it down. 8. Close the front cover. NOTE: Make sure that the duplexer is correctly connected to the printer with connectors and cannot be moved easily. 7.
User Guide
Page 208
...Black Reinsert the specified print cartridge. XXX and YYY indicates a position that the unit is not fully inserted. If this does not solve the problem, contact Dell. If this does not solve the problem, contact Dell. XXX is either missing or not fully inserted into the slot. See "Replacing...183; The wireless printer adapter is securely inserted into the slot on whether the duplexer is attached or not. N indicates the tray number. When "Reg Cover" appears in the Owner's Manual. See "Contacting Dell" in the network interface card. Turn off the printer to remove print media ...
...Black Reinsert the specified print cartridge. XXX and YYY indicates a position that the unit is not fully inserted. If this does not solve the problem, contact Dell. If this does not solve the problem, contact Dell. XXX is either missing or not fully inserted into the slot. See "Replacing...183; The wireless printer adapter is securely inserted into the slot on whether the duplexer is attached or not. N indicates the tray number. When "Reg Cover" appears in the Owner's Manual. See "Contacting Dell" in the network interface card. Turn off the printer to remove print media ...
User Guide
Page 219
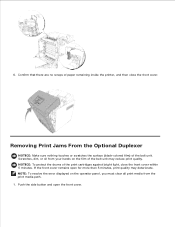
Removing Print Jams From the Optional Duplexer NOTICE: Make sure nothing touches or scratches the surface (black-colored film) of the print cartridges against bright light, close the front cover. NOTICE: To protect the drums of the belt unit. Confirm that there are no scraps of the belt unit may deteriorate. NOTE: To resolve...
Removing Print Jams From the Optional Duplexer NOTICE: Make sure nothing touches or scratches the surface (black-colored film) of the print cartridges against bright light, close the front cover. NOTICE: To protect the drums of the belt unit. Confirm that there are no scraps of the belt unit may deteriorate. NOTE: To resolve...

User Guide
Page 220
Remove the jammed paper and close the belt unit. 2. If jammed paper cannot be found, go to the next step. 3. Pull up on the belt release levers and rotate the belt unit up as shown in the illustration. 4. Pull out the jammed paper from the duplexer.
Remove the jammed paper and close the belt unit. 2. If jammed paper cannot be found, go to the next step. 3. Pull up on the belt release levers and rotate the belt unit up as shown in the illustration. 4. Pull out the jammed paper from the duplexer.

User Guide
Page 327
... deteriorate. 1. NOTICE: To protect the drums of the belt unit. Push the side button and open for more than 5 minutes, print quality may reduce print quality. Pull up as shown in the illustration. Removing the Optional Duplexer NOTICE: Make sure nothing touches or scratches the surface (black-colored film) of the print...
... deteriorate. 1. NOTICE: To protect the drums of the belt unit. Push the side button and open for more than 5 minutes, print quality may reduce print quality. Pull up as shown in the illustration. Removing the Optional Duplexer NOTICE: Make sure nothing touches or scratches the surface (black-colored film) of the print...

User Guide
Page 328
Hold the latch of the duplexer as shown in the following illustration and pull out the duplexer from the printer. 5. Close the belt unit by pulling it down. 6. 4.
Hold the latch of the duplexer as shown in the following illustration and pull out the duplexer from the printer. 5. Close the belt unit by pulling it down. 6. 4.


