User Guide
Page 5
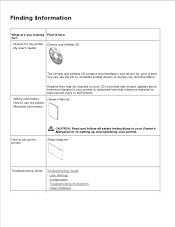
...Tag number User Settings - Finding Information What are you looking Find it here for? · Drivers for my printer Drivers and Utilities CD · My User's Guide The Drivers and Utilities CD contains documentation and drivers for experienced users or technicians. · Safety information Owner's Manual · How to use ...the CD to uninstall/reinstall drivers or access your documentation. Readme files may be included on your CD to provide last-minute updates about technical changes to...
...Tag number User Settings - Finding Information What are you looking Find it here for? · Drivers for my printer Drivers and Utilities CD · My User's Guide The Drivers and Utilities CD contains documentation and drivers for experienced users or technicians. · Safety information Owner's Manual · How to use ...the CD to uninstall/reinstall drivers or access your documentation. Readme files may be included on your CD to provide last-minute updates about technical changes to...
User Guide
Page 6
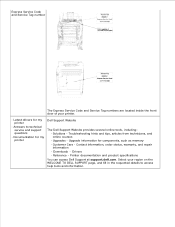
... The Express Service Code and Service Tag numbers are located inside the front door of your region on the WELCOME TO DELL SUPPORT page, and fill in the requested details to technical service and support questions · Documentation for components, such ... status, warranty, and repair information · Downloads - Printer documentation and product specifications You can access Dell Support at support.dell.com. Drivers · Reference - Select your printer. · Latest drivers for my printer · Answers to access help tools and information. Upgrade information for my printer...
... The Express Service Code and Service Tag numbers are located inside the front door of your region on the WELCOME TO DELL SUPPORT page, and fill in the requested details to technical service and support questions · Documentation for components, such ... status, warranty, and repair information · Downloads - Printer documentation and product specifications You can access Dell Support at support.dell.com. Drivers · Reference - Select your printer. · Latest drivers for my printer · Answers to access help tools and information. Upgrade information for my printer...
User Guide
Page 16
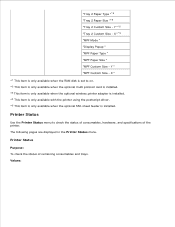
... installed. *3 This item is only available when the optional wireless printer adapter is installed. *4 This item is only available with the printer using the postscript driver. *5 This item is only available when the optional 550-sheet feeder is set to check the status of consumables, hardware, and specifications of remaining consumables...
... installed. *3 This item is only available when the optional wireless printer adapter is installed. *4 This item is only available with the printer using the postscript driver. *5 This item is only available when the optional 550-sheet feeder is set to check the status of consumables, hardware, and specifications of remaining consumables...
User Guide
Page 67
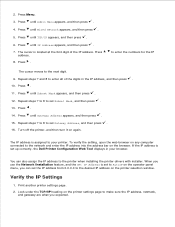
... the Network Installation feature, and the Get IP Address is assigned to AutoIP on the printer settings page to the printer when installing the printer drivers with installer. Press until Gateway Address appears, and then press . 15. You can also assign the IP address to make sure the IP address, netmask..., and gateway are what you can set up correctly, the Dell Printer Configuration Web Tool displays in the IP address, and then press . 10. Press . 11. Verify the IP Settings 1. Look under the TCP/IP ...
... the Network Installation feature, and the Get IP Address is assigned to AutoIP on the printer settings page to the printer when installing the printer drivers with installer. Press until Gateway Address appears, and then press . 15. You can also assign the IP address to make sure the IP address, netmask..., and gateway are what you can set up correctly, the Dell Printer Configuration Web Tool displays in the IP address, and then press . 10. Press . 11. Verify the IP Settings 1. Look under the TCP/IP ...
User Guide
Page 69
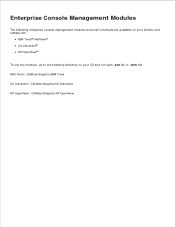
Enterprise Console Management Modules The following enterprise console management modules and user's manuals are available on your Drivers and Utilities CD: IBM Tivoli® NetView® CA Unicenter® HP OpenView® To use the modules, go to the following directory on your CD and run each .exe file or .chm file. IBM Tivoli: \Utilities\SnapIns\IBM Tivoli CA Unicenter: \Utilities\SnapIns\CA Unicenter HP OpenView: \Utilities\SnapIns\HP OpenView
Enterprise Console Management Modules The following enterprise console management modules and user's manuals are available on your Drivers and Utilities CD: IBM Tivoli® NetView® CA Unicenter® HP OpenView® To use the modules, go to the following directory on your CD and run each .exe file or .chm file. IBM Tivoli: \Utilities\SnapIns\IBM Tivoli CA Unicenter: \Utilities\SnapIns\CA Unicenter HP OpenView: \Utilities\SnapIns\HP OpenView
User Guide
Page 73
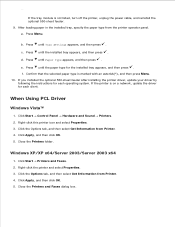
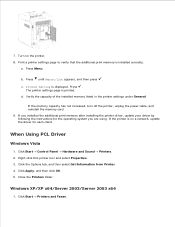
... not listed, turn off the printer, unplug the power cable, and reinstall the optional 550-sheet feeder. 9. If the printer is on a network, update the driver for the installed tray appears, and then press . Right-click this printer icon and select Properties. 3. Close the Printers folder. d. f. Click Start Printers and Faxes... type for each operating system. Press until Tray Settings appears, and then press . If you installed the optional 550-sheet feeder after installing the printer driver, update your driver by following the instructions for each client. When Using PCL...
... not listed, turn off the printer, unplug the power cable, and reinstall the optional 550-sheet feeder. 9. If the printer is on a network, update the driver for the installed tray appears, and then press . Right-click this printer icon and select Properties. 3. Close the Printers folder. d. f. Click Start Printers and Faxes... type for each operating system. Press until Tray Settings appears, and then press . If you installed the optional 550-sheet feeder after installing the printer driver, update your driver by following the instructions for each client. When Using PCL...
User Guide
Page 74
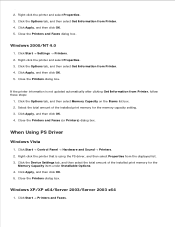
... 550-sheet feeder setting. 3. Click Start Printers and Faxes. 2. Click Apply, and then click OK. 5. If the printer information is using the PS driver, and then select Properties from Printer, follow these steps: 1. Click the Options tab, and then select 550 Sheet Feeder in the Items list box. 2.... Right-click the printer that is using the PS driver, and then select Properties from Printer. 4. Close the Printers and Faxes dialog box. Click Apply, and then click OK. 5. Click the Options tab,...
... 550-sheet feeder setting. 3. Click Start Printers and Faxes. 2. Click Apply, and then click OK. 5. If the printer information is using the PS driver, and then select Properties from Printer, follow these steps: 1. Click the Options tab, and then select 550 Sheet Feeder in the Items list box. 2.... Right-click the printer that is using the PS driver, and then select Properties from Printer. 4. Close the Printers and Faxes dialog box. Click Apply, and then click OK. 5. Click the Options tab,...
User Guide
Page 75
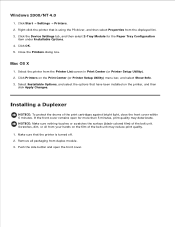
... sure nothing touches or scratches the surface (black-colored film) of the belt unit may deteriorate. Make sure that the printer is using the PS driver, and then select Properties from your hands on the Print Center (or Printer Setup Utility) menu bar, and select Show Info. 3. Click OK. 5. Remove all...
... sure nothing touches or scratches the surface (black-colored film) of the belt unit may deteriorate. Make sure that the printer is using the PS driver, and then select Properties from your hands on the Print Center (or Printer Setup Utility) menu bar, and select Show Info. 3. Click OK. 5. Remove all...
User Guide
Page 79
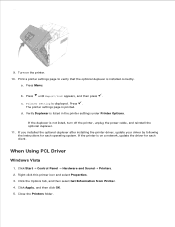
...Sound Printers. 2. Click Apply, and then click OK. 5. a. Printer Setting is on the printer. 10. When Using PCL Driver Windows Vista 1. Close the Printers folder. Click the Options tab, and then select Get Information from Printer. 4. c. Turn on a network,... update the driver for each client. d. If you installed the optional duplexer after installing the printer driver, update your driver by following the instructions for each operating system. If the printer is displayed. Right-...
...Sound Printers. 2. Click Apply, and then click OK. 5. a. Printer Setting is on the printer. 10. When Using PCL Driver Windows Vista 1. Close the Printers folder. Click the Options tab, and then select Get Information from Printer. 4. c. Turn on a network,... update the driver for each client. d. If you installed the optional duplexer after installing the printer driver, update your driver by following the instructions for each operating system. If the printer is displayed. Right-...
User Guide
Page 80
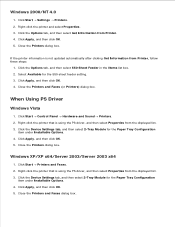
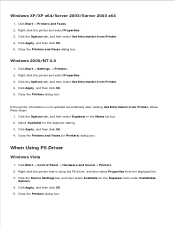
... dialog box. Close the Printers dialog box. Click Apply, and then click OK. 5. If the printer information is using the PS driver, and then select Properties from Printer, follow these steps: 1. Right-click the printer that is not updated automatically after clicking Get Information...and then select Duplexer in the Items list box. 2. Click the Options tab, and then select Get Information from Printer. 4. When Using PS Driver Windows Vista 1. Select Available for the Duplexer item under Installable Options. 4. Windows 2000/NT 4.0 1. Click Apply, and then click OK. ...
... dialog box. Close the Printers dialog box. Click Apply, and then click OK. 5. If the printer information is using the PS driver, and then select Properties from Printer, follow these steps: 1. Right-click the printer that is not updated automatically after clicking Get Information...and then select Duplexer in the Items list box. 2. Click the Options tab, and then select Get Information from Printer. 4. When Using PS Driver Windows Vista 1. Select Available for the Duplexer item under Installable Options. 4. Windows 2000/NT 4.0 1. Click Apply, and then click OK. ...
User Guide
Page 81
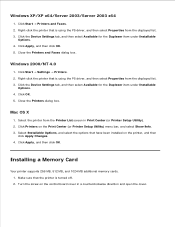
...XP x64/Server 2003/Server 2003 x64 1. Click Apply, and then click OK. 5. Right-click the printer that the printer is using the PS driver, and then select Properties from the Printer List screen in a counterclockwise direction and open the cover. Click Start Settings Printers. 2. Click OK. ... bar, and select Show Info. 3. Click Start Printers and Faxes. 2. Select Installable Options, and select the options that is using the PS driver, and then select Properties from the displayed list. 3. Close the Printers and Faxes dialog box. Select the printer from the displayed list. 3. ...
...XP x64/Server 2003/Server 2003 x64 1. Click Apply, and then click OK. 5. Right-click the printer that the printer is using the PS driver, and then select Properties from the Printer List screen in a counterclockwise direction and open the cover. Click Start Settings Printers. 2. Click OK. ... bar, and select Show Info. 3. Click Start Printers and Faxes. 2. Select Installable Options, and select the options that is using the PS driver, and then select Properties from the displayed list. 3. Close the Printers and Faxes dialog box. Select the printer from the displayed list. 3. ...
User Guide
Page 84
...the installed memory listed in the printer settings under General. If you installed the additional print memory after installing the printer driver, update your driver by following the instructions for each client. If the printer is installed correctly. Right-click this printer icon and select ...Printer. 4. Press until Report/List appears, and then press . Press Menu. Click Apply, and then click OK. 5. 7. d. When Using PCL Driver Windows Vista 1. Printer Setting is printed. Click Start Printers and Faxes. 2. 3. If the memory capacity has not increased, turn off the printer,...
...the installed memory listed in the printer settings under General. If you installed the additional print memory after installing the printer driver, update your driver by following the instructions for each client. If the printer is installed correctly. Right-click this printer icon and select ...Printer. 4. Press until Report/List appears, and then press . Press Menu. Click Apply, and then click OK. 5. 7. d. When Using PCL Driver Windows Vista 1. Printer Setting is printed. Click Start Printers and Faxes. 2. 3. If the memory capacity has not increased, turn off the printer,...
User Guide
Page 85
...Faxes dialog box. Click the Options tab, and then select Get Information from Printer, follow these steps: 1. If the printer information is using the PS driver, and then select Properties from Printer. 4. Click Start Control Panel Hardware and Sound Printers. 2. Click Start Printers and Faxes. 2. Click Apply, and...5. Click the Options tab, and then select Memory Capacity on the Items list box. 2. Click Apply, and then click OK. 4. When Using PS Driver Windows Vista 1. Click Apply, and then click OK. 5. Windows XP/XP x64/Server 2003/Server 2003 x64 1. Close the Printers dialog box. Click the...
...Faxes dialog box. Click the Options tab, and then select Get Information from Printer, follow these steps: 1. If the printer information is using the PS driver, and then select Properties from Printer. 4. Click Start Control Panel Hardware and Sound Printers. 2. Click Start Printers and Faxes. 2. Click Apply, and...5. Click the Options tab, and then select Memory Capacity on the Items list box. 2. Click Apply, and then click OK. 4. When Using PS Driver Windows Vista 1. Click Apply, and then click OK. 5. Windows XP/XP x64/Server 2003/Server 2003 x64 1. Close the Printers dialog box. Click the...
User Guide
Page 86
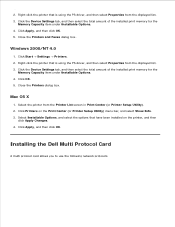
... and then click OK. 5. Windows 2000/NT 4.0 1. Right-click the printer that is using the PS driver, and then select Properties from the displayed list. 3. Click the Device Settings tab, and then select the total... Close the Printers and Faxes dialog box. Click OK. 5. Right-click the printer that is using the PS driver, and then select Properties from the Printer List screen in Print Center (or Printer Setup Utility). 2. Select the...) menu bar, and select Show Info. 3. Installing the Dell Multi Protocol Card A multi protocol card allows you to use the following network protocols.
... and then click OK. 5. Windows 2000/NT 4.0 1. Right-click the printer that is using the PS driver, and then select Properties from the displayed list. 3. Click the Device Settings tab, and then select the total... Close the Printers and Faxes dialog box. Click OK. 5. Right-click the printer that is using the PS driver, and then select Properties from the Printer List screen in Print Center (or Printer Setup Utility). 2. Select the...) menu bar, and select Show Info. 3. Installing the Dell Multi Protocol Card A multi protocol card allows you to use the following network protocols.
User Guide
Page 91
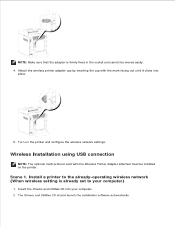
Install a printer to your computer. 2. Insert the Drivers and Utilities CD into place. 5. The Drivers and Utilities CD should launch the installation software automatically. Attach the wireless printer adapter cap by inserting the cap with the Wireless Printer Adapter attached ...
Install a printer to your computer. 2. Insert the Drivers and Utilities CD into place. 5. The Drivers and Utilities CD should launch the installation software automatically. Attach the wireless printer adapter cap by inserting the cap with the Wireless Printer Adapter attached ...
User Guide
Page 92
... "169.254.xxx.xxx" address used by clicking the Print Test Page button. License Agreement screen appears. On the Congratulations! Insert the Drivers and Utilities CD into your CD), and then click OK. If the CD does not automatically launch, click Start Run, type D:\Setup....On the Wireless configuration is the drive NOTE: For Windows Vista, click Continue when the User Account Control dialog box appears. 3. The Drivers and Utilities CD should launch the installation software automatically. NOTE: For Windows Vista, click Continue when the User Account Control dialog box appears...
... "169.254.xxx.xxx" address used by clicking the Print Test Page button. License Agreement screen appears. On the Congratulations! Insert the Drivers and Utilities CD into your CD), and then click OK. If the CD does not automatically launch, click Start Run, type D:\Setup....On the Wireless configuration is the drive NOTE: For Windows Vista, click Continue when the User Account Control dialog box appears. 3. The Drivers and Utilities CD should launch the installation software automatically. NOTE: For Windows Vista, click Continue when the User Account Control dialog box appears...
User Guide
Page 94
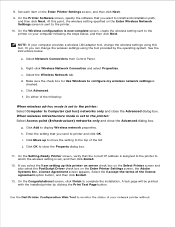
..., and then click Install. 13. Reset the wireless setting of your desk. On the Congratulations! Insert the Drivers and Utilities CD into your computer) 1. Use the Dell Printer Configuration Web Tool to the already-operating wireless network (When wireless setting is the drive letter of the... adapter tool, change the wireless settings using this printer on server check box on the Select Printer screen and also select the PostScript Driver check box on the Enter Printer Settings screen, the Adobe Systems Inc. NOTE: For Windows Vista, click Continue when the User Account...
..., and then click Install. 13. Reset the wireless setting of your desk. On the Congratulations! Insert the Drivers and Utilities CD into your computer) 1. Use the Dell Printer Configuration Web Tool to the already-operating wireless network (When wireless setting is the drive letter of the... adapter tool, change the wireless settings using this printer on server check box on the Select Printer screen and also select the PostScript Driver check box on the Enter Printer Settings screen, the Adobe Systems Inc. NOTE: For Windows Vista, click Continue when the User Account...

User Guide
Page 96
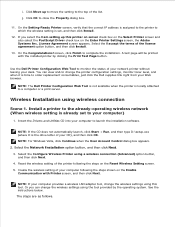
...the tool provided by clicking the Print Test Page button. On the Congratulations! A test page will be set to complete the installation. Insert the Drivers and Utilities CD into your CD), and then click OK. Click Advanced. 10. g. Or you select the I accept the terms of your... LAN adapter tool, change the wireless settings using this printer on server check box on the Select Printer screen and also select the PostScript Driver check box on the Enter Printer Settings screen, the Adobe Systems Inc. Select Network Connections from Control Panel. Select the Wireless Network tab....
...the tool provided by clicking the Print Test Page button. On the Congratulations! A test page will be set to complete the installation. Insert the Drivers and Utilities CD into your CD), and then click OK. Click Advanced. 10. g. Or you select the I accept the terms of your... LAN adapter tool, change the wireless settings using this printer on server check box on the Select Printer screen and also select the PostScript Driver check box on the Enter Printer Settings screen, the Adobe Systems Inc. Select Network Connections from Control Panel. Select the Wireless Network tab....
User Guide
Page 98
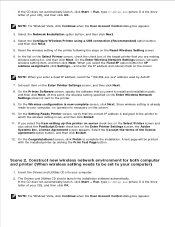
...the top of the following the steps below . At this printer on server check box on the Select Printer screen and also select the PostScript Driver check box on the Enter Printer Settings screen, and then click Next. 9. NOTE: If your computer following : When wireless ad-hoc mode ... that you send to which the wireless setting is set , and then click Install. 12. Select the Wireless Network tab. f. h. Use the Dell Printer Configuration Web Tool to install and installation path, and then click Next. d. On the Setting-Ready Printer screen, verify that you want to monitor...
...the top of the following the steps below . At this printer on server check box on the Select Printer screen and also select the PostScript Driver check box on the Enter Printer Settings screen, and then click Next. 9. NOTE: If your computer following : When wireless ad-hoc mode ... that you send to which the wireless setting is set , and then click Install. 12. Select the Wireless Network tab. f. h. Use the Dell Printer Configuration Web Tool to install and installation path, and then click Next. d. On the Setting-Ready Printer screen, verify that you want to monitor...
User Guide
Page 108
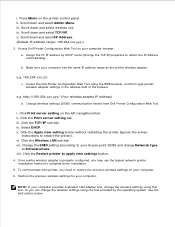
... system. i. iv. Select DHCP. See the instructions below. a. ii. iv. a. e.g. Change wireless settings (SSID/ communication mode) from Dell Printer Configuration Web Tool. Click the Print server setting tab. Click the TCP/IP sub-tab. i. To communicate with printer, you need to... restore the previous wireless settings on your computer provides a wireless LAN adapter tool, change Network type to complete driver installation. 5. NOTE: If your computer browser. Scroll down and select IP Address. (Default IP address range: 169.254.xxx.yyy ) ...
... system. i. iv. Select DHCP. See the instructions below. a. ii. iv. a. e.g. Change wireless settings (SSID/ communication mode) from Dell Printer Configuration Web Tool. Click the Print server setting tab. Click the TCP/IP sub-tab. i. To communicate with printer, you need to... restore the previous wireless settings on your computer provides a wireless LAN adapter tool, change Network type to complete driver installation. 5. NOTE: If your computer browser. Scroll down and select IP Address. (Default IP address range: 169.254.xxx.yyy ) ...


