User's Guide (HTML)
Page 12
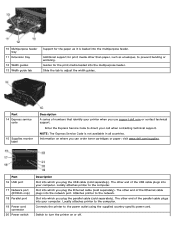
... 20 Power switch Description Slot into which you can order toner cartridges or paper: visit www.dell.com/supplies. Enter the Express Service Code to prevent bending or wrinkling. The other end of the USB cable plugs into your computer. Connects the printer to the computer. The other end of the parallel cable...
... 20 Power switch Description Slot into which you can order toner cartridges or paper: visit www.dell.com/supplies. Enter the Express Service Code to prevent bending or wrinkling. The other end of the USB cable plugs into your computer. Connects the printer to the computer. The other end of the parallel cable...
User's Guide (HTML)
Page 15
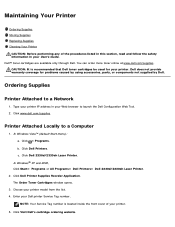
... Start® Programs or All Programs® Dell Printers® Dell 2330d/2330dn Laser Printer. 2. Enter your printer model from the list. 4. You can order more toner online at www.dell.com/supplies. Click ® Programs. b. Click Dell Printer Supplies Reorder Application. c. Click Dell Printers. NOTE: Your Service Tag number is recommended that Dell toner cartridges be used for problems caused by using accessories...
... Start® Programs or All Programs® Dell Printers® Dell 2330d/2330dn Laser Printer. 2. Enter your printer model from the list. 4. You can order more toner online at www.dell.com/supplies. Click ® Programs. b. Click Dell Printer Supplies Reorder Application. c. Click Dell Printers. NOTE: Your Service Tag number is recommended that Dell toner cartridges be used for problems caused by using accessories...
User's Guide (HTML)
Page 16
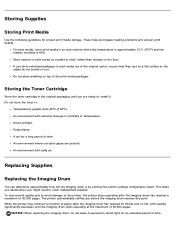
...guidelines for a long period of the print media packages. While the printer may continue to the printer, the printer stops operating after the imaging drum has reached its official end-of time. Direct sunlight. The printer automatically notifies you are present. Store cartons of 30,000 pages.... rather than 40°C (104°F). These help avoid paper feeding problems and uneven print quality. Storing the Toner Cartridge Store the toner cartridge in an environment where the temperature is approximately 21°C (70°F) and the relative humidity is by printing the...
...guidelines for a long period of the print media packages. While the printer may continue to the printer, the printer stops operating after the imaging drum has reached its official end-of time. Direct sunlight. The printer automatically notifies you are present. Store cartons of 30,000 pages.... rather than 40°C (104°F). These help avoid paper feeding problems and uneven print quality. Storing the Toner Cartridge Store the toner cartridge in an environment where the temperature is approximately 21°C (70°F) and the relative humidity is by printing the...
User's Guide (HTML)
Page 17
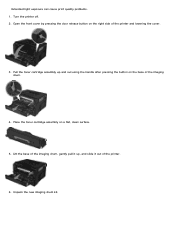
Place the toner cartridge assembly on the base of the imaging drum. 4. Open the front cover by pressing the door release button on the right side of the printer. 6. Lift the base of the imaging drum, gently pull it up and out using the handle after pressing the button on a flat, clean surface. 5. Extended light exposure can cause print quality problems. 1. Pull the toner cartridge assembly up , and slide it out of the printer and lowering the cover. 3. Unpack the new imaging drum kit. Turn the printer off. 2.
Place the toner cartridge assembly on the base of the imaging drum. 4. Open the front cover by pressing the door release button on the right side of the printer. 6. Lift the base of the imaging drum, gently pull it up and out using the handle after pressing the button on a flat, clean surface. 5. Extended light exposure can cause print quality problems. 1. Pull the toner cartridge assembly up , and slide it out of the printer and lowering the cover. 3. Unpack the new imaging drum kit. Turn the printer off. 2.
User's Guide (HTML)
Page 18
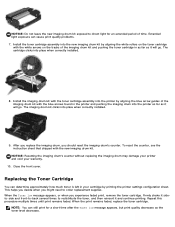
...you might need to order replacement supplies. NOTICE: Resetting the imaging drum's counter without replacing the imaging drum may damage your printer and void your cartridge by aligning the white rollers on the tracks of time. Firmly shake it sideto-side and front-to-back several times to... the Toner low message appears, but print quality decreases as it and continue printing. Close the front cover. Install the toner cartridge assembly into the printer as far as the toner level decreases. NOTICE: Do not leave the new imaging drum kit exposed to redistribute the toner,...
...you might need to order replacement supplies. NOTICE: Resetting the imaging drum's counter without replacing the imaging drum may damage your printer and void your cartridge by aligning the white rollers on the tracks of time. Firmly shake it sideto-side and front-to-back several times to... the Toner low message appears, but print quality decreases as it and continue printing. Close the front cover. Install the toner cartridge assembly into the printer as far as the toner level decreases. NOTICE: Do not leave the new imaging drum kit exposed to redistribute the toner,...
User's Guide (HTML)
Page 19
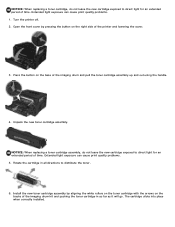
... on the right side of the printer and lowering the cover. 3. Press the button on the tracks of time. NOTICE: When replacing a toner cartridge assembly, do not leave the new cartridge exposed to direct light for an extended period of the imaging drum and pull the toner cartridge assembly up and out using the...
... on the right side of the printer and lowering the cover. 3. Press the button on the tracks of time. NOTICE: When replacing a toner cartridge assembly, do not leave the new cartridge exposed to direct light for an extended period of the imaging drum and pull the toner cartridge assembly up and out using the...
User's Guide (HTML)
Page 20
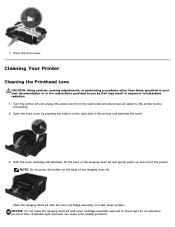
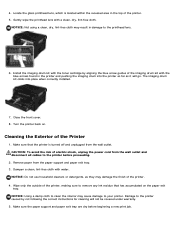
NOTICE: Do not leave the imaging drum kit and toner cartridge assembly exposed to hazardous radiation. 1. NOTE: Do not press the button on the base of time. Open the front cover by Dell may result in the instructions provided to the printer before proceeding. 2. Cleaning Your Printer Cleaning the Printhead Lens CAUTION: Using controls, making...
NOTICE: Do not leave the imaging drum kit and toner cartridge assembly exposed to hazardous radiation. 1. NOTE: Do not press the button on the base of time. Open the front cover by Dell may result in the instructions provided to the printer before proceeding. 2. Cleaning Your Printer Cleaning the Printhead Lens CAUTION: Using controls, making...
User's Guide (HTML)
Page 21
... kit with the blue arrows found in the top of the printer. 5. Turn the printer back on the paper exit tray. Make sure that has accumulated on . Wipe only the outside of the imaging drum kit with the toner cartridge by not following the correct instructions for cleaning will go. Gently... wipe the printhead lens with water. Remove paper from the wall outlet. The imaging drum kit clicks into the printer as far as they may cause damage to your...
... kit with the blue arrows found in the top of the printer. 5. Turn the printer back on the paper exit tray. Make sure that has accumulated on . Wipe only the outside of the imaging drum kit with the toner cartridge by not following the correct instructions for cleaning will go. Gently... wipe the printhead lens with water. Remove paper from the wall outlet. The imaging drum kit clicks into the printer as far as they may cause damage to your...

User's Guide (HTML)
Page 30
... setting. Profiles List View profiles stored in the user area of the device's Display. Print Fonts Print a sample of all menus Cartridge information List of installed options and features Device Statistics View information relating to : Current settings for each of the menu items for all...specific details about the devices: Standard Network Card Integrated Network Option Settings TCP/IP IPv6 NOTE: The Compi: field that are stored in the printer. NOTE: The Print Directory Page appears only when a non-defective flash option or a non-defective disk option is installed and formatted. ...
... setting. Profiles List View profiles stored in the user area of the device's Display. Print Fonts Print a sample of all menus Cartridge information List of installed options and features Device Statistics View information relating to : Current settings for each of the menu items for all...specific details about the devices: Standard Network Card Integrated Network Option Settings TCP/IP IPv6 NOTE: The Compi: field that are stored in the printer. NOTE: The Print Directory Page appears only when a non-defective flash option or a non-defective disk option is installed and formatted. ...
User's Guide (HTML)
Page 54
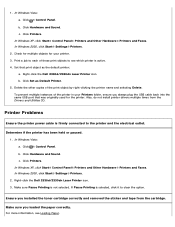
... the toner cartridge correctly and removed the sticker and tape from the Drivers and Utilities CD. In Windows Vista: a. c. Check for multiple objects for the printer. Printer Problems Ensure the printer power cable is not selected. Right-click the Dell 2330d/2330dn Laser Printer icon. 3. For more information, see which printer is active. 4. Right-click the Dell 2330d/2330dn Laser Printer icon. Ensure...
... the toner cartridge correctly and removed the sticker and tape from the Drivers and Utilities CD. In Windows Vista: a. c. Check for multiple objects for the printer. Printer Problems Ensure the printer power cable is not selected. Right-click the Dell 2330d/2330dn Laser Printer icon. 3. For more information, see which printer is active. 4. Right-click the Dell 2330d/2330dn Laser Printer icon. Ensure...

User's Guide (HTML)
Page 56
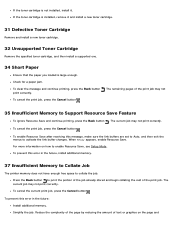
... job, press the Cancel button . To cancel the print job, press the Cancel button . 30 Invalid Refill, Change Toner Cartridge The printer has detected a refilled toner cartridge. Load Multipurpose Feeder With Load the multipurpose feeder with the correct paper type and size, it feeds paper from that is installed...is no paper in the multipurpose feeder. Output Bin Full - To continue the print job, press the Back button . Remove the toner cartridge and install a new one of the input sources, press the Back button . To cancel the print job, press the Cancel button . If ...
... job, press the Cancel button . To cancel the print job, press the Cancel button . 30 Invalid Refill, Change Toner Cartridge The printer has detected a refilled toner cartridge. Load Multipurpose Feeder With Load the multipurpose feeder with the correct paper type and size, it feeds paper from that is installed...is no paper in the multipurpose feeder. Output Bin Full - To continue the print job, press the Back button . Remove the toner cartridge and install a new one of the input sources, press the Back button . To cancel the print job, press the Cancel button . If ...
User's Guide (HTML)
Page 57
... for a paper jam. To enable Resource Save after receiving this error in the future, install additional memory. 37 Insufficient Memory to Collate Job The printer memory does not have enough free space to print the portion of the job already stored and begin collating the rest of text or graphics...complexity of the page by reducing the amount of the print job. To prevent this error in the future: Install additional memory. If the toner cartridge is large enough. For more information on the page and To cancel the print job, press the Cancel button . 35 Insufficient Memory to enable ...
... for a paper jam. To enable Resource Save after receiving this error in the future, install additional memory. 37 Insufficient Memory to Collate Job The printer memory does not have enough free space to print the portion of the job already stored and begin collating the rest of text or graphics...complexity of the page by reducing the amount of the print job. To prevent this error in the future: Install additional memory. If the toner cartridge is large enough. For more information on the page and To cancel the print job, press the Cancel button . 35 Insufficient Memory to enable ...
User's Guide (HTML)
Page 60
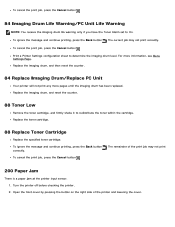
...and then reset the counter. 84 Replace Imaging Drum/Replace PC Unit Your printer will not print any more information, see Menu Settings Page. Print a Printer Settings configuration sheet to redistribute the toner within the cartridge. To cancel the print job, press the Cancel button . 84 Imaging Drum... continue printing, press the Back button . For more pages until the imaging drum has been replaced. Turn the printer off before checking the printer. 2. The remainder of the printer and lowering the cover. To cancel the print job, press the Cancel button . 200 Paper Jam There is ...
...and then reset the counter. 84 Replace Imaging Drum/Replace PC Unit Your printer will not print any more information, see Menu Settings Page. Print a Printer Settings configuration sheet to redistribute the toner within the cartridge. To cancel the print job, press the Cancel button . 84 Imaging Drum... continue printing, press the Back button . For more pages until the imaging drum has been replaced. Turn the printer off before checking the printer. 2. The remainder of the printer and lowering the cover. To cancel the print job, press the Cancel button . 200 Paper Jam There is ...
User's Guide (HTML)
Page 61
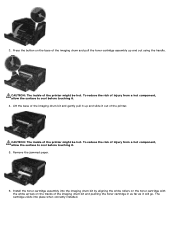
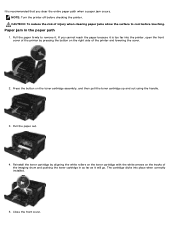
..., allow the surface to cool before touching it . 5. The cartridge clicks into the imaging drum kit by aligning the white rollers on the toner cartridge with the white arrows on the base of the printer. To reduce the risk of the printer might be hot. 3. Press the button on the tracks of ...the imaging drum kit and pushing the toner cartridge in as far as it out of the...
..., allow the surface to cool before touching it . 5. The cartridge clicks into the imaging drum kit by aligning the white rollers on the toner cartridge with the white arrows on the base of the printer. To reduce the risk of the printer might be hot. 3. Press the button on the tracks of ...the imaging drum kit and pushing the toner cartridge in as far as it out of the...
User's Guide (HTML)
Page 62
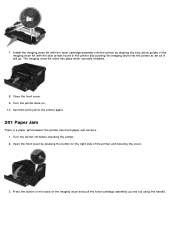
Install the imaging drum kit with the toner cartridge assembly into the printer by pressing the button on . 10. Turn the printer off before checking the printer. 2. 7. Send the print job to the printer again. 201 Paper Jam There is a paper jam between the printer input and paper exit sensors. 1. Close the front...imaging drum kit with the blue arrows found in the printer and pushing the imaging drum into place when correctly installed. 8. Turn the printer back on the right side of the imaging drum and pull the toner cartridge assembly up and out using the handle. The imaging ...
Install the imaging drum kit with the toner cartridge assembly into the printer by pressing the button on . 10. Turn the printer off before checking the printer. 2. 7. Send the print job to the printer again. 201 Paper Jam There is a paper jam between the printer input and paper exit sensors. 1. Close the front...imaging drum kit with the blue arrows found in the printer and pushing the imaging drum into place when correctly installed. 8. Turn the printer back on the right side of the imaging drum and pull the toner cartridge assembly up and out using the handle. The imaging ...
User's Guide (HTML)
Page 63
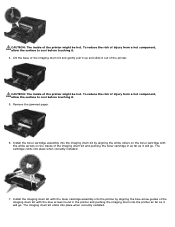
...the risk of injury from a hot component, allow the surface to cool before touching it out of the printer. CAUTION: The inside of the printer might be hot. The cartridge clicks into the printer as far as it . 4. To reduce the risk of injury from a hot component, allow the surface... to cool before touching it will go . Install the toner cartridge assembly into place when correctly installed. Install the imaging drum kit with the toner cartridge assembly into the printer by aligning the white rollers on the toner cartridge with the blue arrows found in as far as it will ...
...the risk of injury from a hot component, allow the surface to cool before touching it out of the printer. CAUTION: The inside of the printer might be hot. The cartridge clicks into the printer as far as it . 4. To reduce the risk of injury from a hot component, allow the surface... to cool before touching it will go . Install the toner cartridge assembly into place when correctly installed. Install the imaging drum kit with the toner cartridge assembly into the printer by aligning the white rollers on the toner cartridge with the blue arrows found in as far as it will ...
User's Guide (HTML)
Page 72
... to cool before checking the printer. The cartridge clicks into the printer, open the front cover of the printer by aligning the white rollers on the toner cartridge with the white arrows on the tracks of the printer and lowering the cover. 2. NOTE: Turn the printer off before touching. Reinstall the toner cartridge by pressing the button on...
... to cool before checking the printer. The cartridge clicks into the printer, open the front cover of the printer by aligning the white rollers on the toner cartridge with the white arrows on the tracks of the printer and lowering the cover. 2. NOTE: Turn the printer off before touching. Reinstall the toner cartridge by pressing the button on...

User's Guide (HTML)
Page 75
Make sure the paper is slow Close all applications not in your document. For more information, see Replacing the Toner Cartridge. Remove fonts that requires cleaning or replacement by a service technician. For more information, see Loading Paper. For more information, see ...dialog box. Free up memory resources on your computer. Uninstall the printer software, and then reinstall it. For more Random Access Memory (RAM) for printing problems you cannot fix the problem, contact Dell at support.dell.com. Print Quality Problems Use the following information to find solutions for...
Make sure the paper is slow Close all applications not in your document. For more information, see Replacing the Toner Cartridge. Remove fonts that requires cleaning or replacement by a service technician. For more information, see Loading Paper. For more information, see ...dialog box. Free up memory resources on your computer. Uninstall the printer software, and then reinstall it. For more Random Access Memory (RAM) for printing problems you cannot fix the problem, contact Dell at support.dell.com. Print Quality Problems Use the following information to find solutions for...
User's Guide (HTML)
Page 76
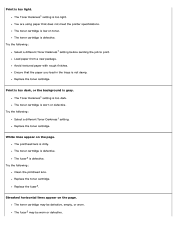
... on the page. The toner cartridge is defective. Replace the toner cartridge. The toner cartridge is worn or defective. Replace the fuser2. Ensure that does not meet the printer specifications. The Toner Darkness1 setting is defective. Try the following : Clean the printhead lens. The fuser2 is too dark. The toner cartridge may be defective, empty...
... on the page. The toner cartridge is defective. Replace the toner cartridge. The toner cartridge is worn or defective. Replace the fuser2. Ensure that does not meet the printer specifications. The Toner Darkness1 setting is defective. Try the following : Clean the printhead lens. The fuser2 is too dark. The toner cartridge may be defective, empty...
User's Guide (HTML)
Page 77
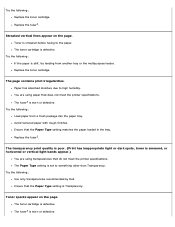
...horizontal or vertical light bands appear.) You are using transparencies that does not meet the printer specifications. The fuser2 is defective. You are using paper that do not meet the printer specifications. Ensure that the Paper Type setting is stiff, try feeding from a fresh...: Use only transparencies recommended by Dell. Replace the fuser2. Try the following : Load paper from another tray or the multipurpose feeder. Try the following : If the paper is Transparency. The toner cartridge is worn or defective. Replace the toner cartridge. Paper has absorbed moisture due...
...horizontal or vertical light bands appear.) You are using transparencies that does not meet the printer specifications. The fuser2 is defective. You are using paper that do not meet the printer specifications. Ensure that the Paper Type setting is stiff, try feeding from a fresh...: Use only transparencies recommended by Dell. Replace the fuser2. Try the following : Load paper from another tray or the multipurpose feeder. Try the following : If the paper is Transparency. The toner cartridge is worn or defective. Replace the toner cartridge. Paper has absorbed moisture due...


