
User's Guide (HTML)
Page 1
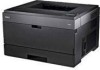
... the United States and/or other than its own. Dell™ 2330d/2330dn Laser Printer User's Guide To order ink or supplies from Dell: 1. Visit the Dell website, or order Dell printer supplies by the Debian project. www.dell.com/supplies For the best service, ensure that helps you have the Dell printer Service Tag available. CAUTION: A CAUTION indicates a potential for...
... the United States and/or other than its own. Dell™ 2330d/2330dn Laser Printer User's Guide To order ink or supplies from Dell: 1. Visit the Dell website, or order Dell printer supplies by the Debian project. www.dell.com/supplies For the best service, ensure that helps you have the Dell printer Service Tag available. CAUTION: A CAUTION indicates a potential for...
User's Guide (HTML)
Page 3
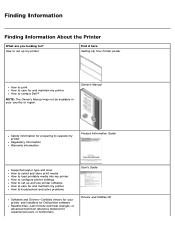
... media How to load printable media into my printer How to configure printer settings How to set up and use printer software How to care for and maintain my printer How to contact Dell™ NOTE: The Owner's Manual may not be available in your printer and installers for Dell printer software Readme files-Last minute technical changes...
... media How to load printable media into my printer How to configure printer settings How to set up and use printer software How to care for and maintain my printer How to contact Dell™ NOTE: The Owner's Manual may not be available in your printer and installers for Dell printer software Readme files-Last minute technical changes...

User's Guide (HTML)
Page 4
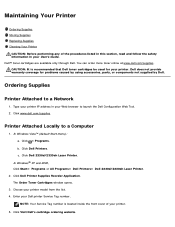
... and Number How to identify your printer when you purchased your Dell computer and printer at the same time, documentation and drivers for your printer are located on the printer. Supplies for my printer Accessories for my printer Replacement toner and parts for my printer Dell Printer Supplies Website-www.dell.com/supplies You can purchase printer supplies online, by phone, or...
... and Number How to identify your printer when you purchased your Dell computer and printer at the same time, documentation and drivers for your printer are located on the printer. Supplies for my printer Accessories for my printer Replacement toner and parts for my printer Dell Printer Supplies Website-www.dell.com/supplies You can purchase printer supplies online, by phone, or...
User's Guide (HTML)
Page 5
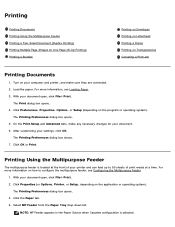
Load the paper. For more information on your printer and can feed up to configure the multipurpose feeder, see Loading Paper. 3. The Print dialog box opens. 4. On the Print Setup and Advanced tabs, make ... closes. 7. For more information, see Configuring the Multipurpose Feeder 1. The Printing Preferences dialog box opens. 3. Turn on how to 50 sheets of your computer and printer, and make any necessary changes for your document open , click File® Print. Click Properties (or Options...
Load the paper. For more information on your printer and can feed up to configure the multipurpose feeder, see Loading Paper. 3. The Print dialog box opens. 4. On the Print Setup and Advanced tabs, make ... closes. 7. For more information, see Configuring the Multipurpose Feeder 1. The Printing Preferences dialog box opens. 3. Turn on how to 50 sheets of your computer and printer, and make any necessary changes for your document open , click File® Print. Click Properties (or Options...
User's Guide (HTML)
Page 6
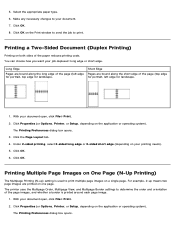
...job duplexed: long edge or short edge. For example, 2-up ) setting is printed around each page image. 1. Click Properties (or Options, Printer, or Setup, depending on one page. Click the Page Layout tab. 4. Long Edge Pages are bound along the short edge of the page...landscape. 1. The Printing Preferences dialog box opens. Printing a Two-Sided Document (Duplex Printing) Printing on a single page. Click Properties (or Options, Printer, or Setup, depending on the application or operating system). Click OK. 5. Select the appropriate paper type. 6. Click OK. 8. Short Edge Pages ...
...job duplexed: long edge or short edge. For example, 2-up ) setting is printed around each page image. 1. Click Properties (or Options, Printer, or Setup, depending on one page. Click the Page Layout tab. 4. Long Edge Pages are bound along the short edge of the page...landscape. 1. The Printing Preferences dialog box opens. Printing a Two-Sided Document (Duplex Printing) Printing on a single page. Click Properties (or Options, Printer, or Setup, depending on the application or operating system). Click OK. 5. Select the appropriate paper type. 6. Click OK. 8. Short Edge Pages ...
User's Guide (HTML)
Page 7
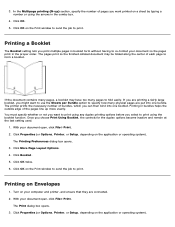
...duplex printing options before you might want printed on a sheet by typing a number or using the booklet function. Click Properties (or Options, Printer, or Setup, depending on Envelopes 1. Click OK twice. 6. The pages print so the finished collated document may have too many physical pages ...More Page Layout Options. 4. Printing on the application or operating system). Turn on the application or operating system). Click Properties (or Options, Printer, or Setup, depending on your document so the pages print in bundles helps the outside edge of the pages line up ) section, ...
...duplex printing options before you might want printed on a sheet by typing a number or using the booklet function. Click Properties (or Options, Printer, or Setup, depending on Envelopes 1. Click OK twice. 6. The pages print so the finished collated document may have too many physical pages ...More Page Layout Options. 4. Printing on the application or operating system). Turn on the application or operating system). Click Properties (or Options, Printer, or Setup, depending on your document so the pages print in bundles helps the outside edge of the pages line up ) section, ...
User's Guide (HTML)
Page 8
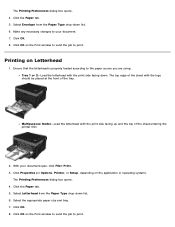
... Preferences dialog box opens. 4. Multipurpose feeder-Load the letterhead with the logo should be placed at the front of the sheet entering the printer first. 2. Click OK on the Print window to send the job to your document open, click File® Print. 3. Click OK.... 8. Printing on the application or operating system). Click Properties (or Options, Printer, or Setup, depending on Letterhead 1. Select Letterhead from the Paper Type drop-down list. 6. Select the appropriate paper size and tray. 7. Click ...
... Preferences dialog box opens. 4. Multipurpose feeder-Load the letterhead with the logo should be placed at the front of the sheet entering the printer first. 2. Click OK on the Print window to send the job to your document open, click File® Print. 3. Click OK.... 8. Printing on the application or operating system). Click Properties (or Options, Printer, or Setup, depending on Letterhead 1. Select Letterhead from the Paper Type drop-down list. 6. Select the appropriate paper size and tray. 7. Click ...
User's Guide (HTML)
Page 9
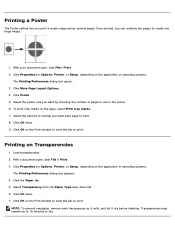
...Paper tab. 5. Transparencies may require up to 15 minutes to create one large image. 1. Click OK on Transparencies 1. Click Properties (or Options, Printer, or Setup, depending on the Print window to send the job to print. Click OK on the application or operating system). Click Properties (or... Options, Printer, or Setup, depending on the page, select Print crop marks. 7. Click Poster. 5. Printing a Poster The Poster setting lets you can combine...
...Paper tab. 5. Transparencies may require up to 15 minutes to create one large image. 1. Click OK on Transparencies 1. Click Properties (or Options, Printer, or Setup, depending on the Print window to send the job to print. Click OK on the application or operating system). Click Properties (or... Options, Printer, or Setup, depending on the page, select Print crop marks. 7. Click Poster. 5. Printing a Poster The Poster setting lets you can combine...
User's Guide (HTML)
Page 10
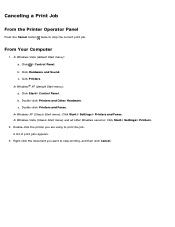
...): a. In Windows XP (Classic Start menu): Click Start® Settings® Printers and Faxes. Click ® Control Panel. A list of print jobs appears. 3. Canceling a Print Job From the Printer Operator Panel Press the Cancel button twice to print the job. From Your Computer ...1. Click Printers. Double-click Printers and Faxes. Click Hardware and Sound. b. Click Start® Control Panel. Double-click Printers and Other Hardware. In Windows Vista...
...): a. In Windows XP (Classic Start menu): Click Start® Settings® Printers and Faxes. Click ® Control Panel. A list of print jobs appears. 3. Canceling a Print Job From the Printer Operator Panel Press the Cancel button twice to print the job. From Your Computer ...1. Click Printers. Double-click Printers and Faxes. Click Hardware and Sound. b. Click Start® Control Panel. Double-click Printers and Other Hardware. In Windows Vista...
User's Guide (HTML)
Page 11
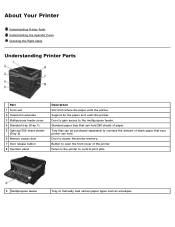
.... Door to manually load various paper types such as it exits the printer. Standard paper tray that your printer can hold . About Your Printer Understanding Printer Parts Understanding the Operator Panel Choosing the Right Cable Understanding Printer Parts Part 1 Front exit 2 Output bin extender 3 Multipurpose feeder cover 4 Standard tray (Tray 1) 5 Optional 550-sheet drawer (Tray...
.... Door to manually load various paper types such as it exits the printer. Standard paper tray that your printer can hold . About Your Printer Understanding Printer Parts Understanding the Operator Panel Choosing the Right Cable Understanding Printer Parts Part 1 Front exit 2 Output bin extender 3 Multipurpose feeder cover 4 Standard tray (Tray 1) 5 Optional 550-sheet drawer (Tray...
User's Guide (HTML)
Page 12
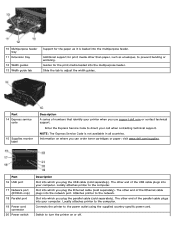
... support for print media other end of numbers that identify your call when contacting technical support. Slot into the multipurpose feeder. Locally attaches printer to the network. Part 14 Express service code 15 Supplies reorder label Description A series of the Ethernet cable plugs into the multipurpose feeder... prevent bending or wrinkling. Guides for the print media loaded into which you can order toner cartridges or paper: visit www.dell.com/supplies. Enter the Express Service Code to direct your printer when you use support.dell.com or contact technical support.
... support for print media other end of numbers that identify your call when contacting technical support. Slot into the multipurpose feeder. Locally attaches printer to the network. Part 14 Express service code 15 Supplies reorder label Description A series of the Ethernet cable plugs into the multipurpose feeder... prevent bending or wrinkling. Guides for the print media loaded into which you can order toner cartridges or paper: visit www.dell.com/supplies. Enter the Express Service Code to direct your printer when you use support.dell.com or contact technical support.
User's Guide (HTML)
Page 13
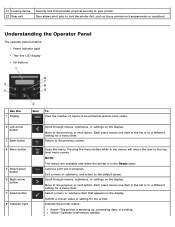
Door allows print jobs to the default screen. Open the menu. Exit a menu or submenu, and return to exit the printer flat, such as error codes. 2 Left arrow button 3 Back button 4 Menu button 5 Stop/Cancel button 6 Right arrow button 7 Select button 8 Indicator light Scroll ...buttons Use the 1 Display Icon To View the number of copies to your printer. Submit a chosen value or setting for a menu item. Indicate the printer status: Green-The printer is in the list or to a different setting for the printer. Scroll through menus, submenus, or settings on the display. Move to ...
Door allows print jobs to the default screen. Open the menu. Exit a menu or submenu, and return to exit the printer flat, such as error codes. 2 Left arrow button 3 Back button 4 Menu button 5 Stop/Cancel button 6 Right arrow button 7 Select button 8 Indicator light Scroll ...buttons Use the 1 Display Icon To View the number of copies to your printer. Submit a chosen value or setting for a menu item. Indicate the printer status: Green-The printer is in the list or to a different setting for the printer. Scroll through menus, submenus, or settings on the display. Move to ...
User's Guide (HTML)
Page 14
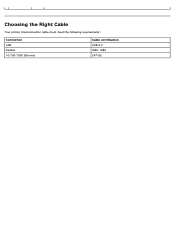
Choosing the Right Cable Your printer interconnection cable must meet the following requirements: Connection USB Parallel 10/100/1000 Ethernet Cable certification USB 2.0 IEEE-1284 CAT-5E
Choosing the Right Cable Your printer interconnection cable must meet the following requirements: Connection USB Parallel 10/100/1000 Ethernet Cable certification USB 2.0 IEEE-1284 CAT-5E
User's Guide (HTML)
Page 15
...® Programs or All Programs® Dell Printers® Dell 2330d/2330dn Laser Printer. 2. Enter your printer model from the list. 4. Click Dell Printers. Choose your Dell printer Service Tag number. Click Visit Dell's cartridge ordering website. In Windows Vista™ (default Start menu): a. Dell does not provide warranty coverage for your printer. 5. Click www.dell.com/supplies. c. Click Dell Printer Supplies Reorder Application. NOTE: Your Service...
...® Programs or All Programs® Dell Printers® Dell 2330d/2330dn Laser Printer. 2. Enter your printer model from the list. 4. Click Dell Printers. Choose your Dell printer Service Tag number. Click Visit Dell's cartridge ordering website. In Windows Vista™ (default Start menu): a. Dell does not provide warranty coverage for your printer. 5. Click www.dell.com/supplies. c. Click Dell Printer Supplies Reorder Application. NOTE: Your Service...
User's Guide (HTML)
Page 16
... cartridge in an environment where the temperature is approximately 21°C (70°F) and the relative humidity is by printing the printer settings configuration sheet. Replacing Supplies Replacing the Imaging Drum You can determine approximately how full the imaging drum is 40%. These help...than directly on top of the print media packages. An environment where corrosive gases are ready to install it exposed to the printer, the printer stops operating after the imaging drum has reached its official end-of-life, print quality significantly decreases until you before the imaging...
... cartridge in an environment where the temperature is approximately 21°C (70°F) and the relative humidity is by printing the printer settings configuration sheet. Replacing Supplies Replacing the Imaging Drum You can determine approximately how full the imaging drum is 40%. These help...than directly on top of the print media packages. An environment where corrosive gases are ready to install it exposed to the printer, the printer stops operating after the imaging drum has reached its official end-of-life, print quality significantly decreases until you before the imaging...
User's Guide (HTML)
Page 17
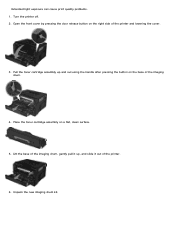
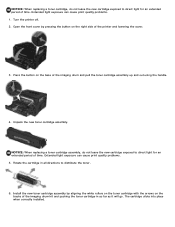
Turn the printer off. 2. Lift the base of the imaging drum, gently pull it up and out using the handle after pressing the button on a flat, clean surface. 5. Open the front cover by pressing the door release button on the right side of the printer. 6. Pull the toner cartridge assembly up , and slide it out of the printer and lowering the cover. 3. Unpack the new imaging drum kit. Place the toner cartridge assembly on the base of the imaging drum. 4. Extended light exposure can cause print quality problems. 1.
Turn the printer off. 2. Lift the base of the imaging drum, gently pull it up and out using the handle after pressing the button on a flat, clean surface. 5. Open the front cover by pressing the door release button on the right side of the printer. 6. Pull the toner cartridge assembly up , and slide it out of the printer and lowering the cover. 3. Unpack the new imaging drum kit. Place the toner cartridge assembly on the base of the imaging drum. 4. Extended light exposure can cause print quality problems. 1.
User's Guide (HTML)
Page 18
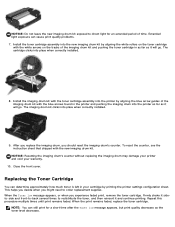
... several times to order replacement supplies. NOTICE: Resetting the imaging drum's counter without replacing the imaging drum may damage your printer and void your cartridge by printing the printer settings configuration sheet. When the print remains faded, replace the toner cartridge. Install the imaging drum kit with the toner... shipped with the white arrows on the toner cartridge with the new imaging drum kit. Install the toner cartridge assembly into the printer by aligning the white rollers on the tracks of the imaging drum kit and pushing the toner cartridge in the...
... several times to order replacement supplies. NOTICE: Resetting the imaging drum's counter without replacing the imaging drum may damage your printer and void your cartridge by printing the printer settings configuration sheet. When the print remains faded, replace the toner cartridge. Install the imaging drum kit with the toner... shipped with the white arrows on the toner cartridge with the new imaging drum kit. Install the toner cartridge assembly into the printer by aligning the white rollers on the tracks of the imaging drum kit and pushing the toner cartridge in the...
User's Guide (HTML)
Page 19
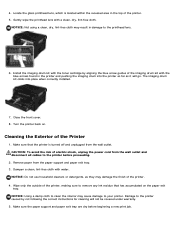
Turn the printer off. 2. Install the new toner cartridge assembly by pressing the button on the tracks of time. The cartridge clicks into place when correctly installed. NOTICE: ... using the handle. 4. Open the front cover by aligning the white rollers on the toner cartridge with the arrows on the right side of the printer and lowering the cover. 3. Press the button on the base of time. Extended light exposure can cause print quality problems. 1. Rotate the cartridge in as...
Turn the printer off. 2. Install the new toner cartridge assembly by pressing the button on the tracks of time. The cartridge clicks into place when correctly installed. NOTICE: ... using the handle. 4. Open the front cover by aligning the white rollers on the toner cartridge with the arrows on the right side of the printer and lowering the cover. 3. Press the button on the base of time. Extended light exposure can cause print quality problems. 1. Rotate the cartridge in as...
User's Guide (HTML)
Page 20
...the base of the imaging drum kit and gently pull it up and out of the imaging drum kit. Open the front cover by Dell may result in the instructions provided to hazardous radiation. 1. NOTICE: Do not leave the imaging drum kit and toner cartridge assembly exposed to the... printer before proceeding. 2. Turn the printer off and unplug the power cord from the wall outlet and disconnect all cables to direct light for an extended period of the...
...the base of the imaging drum kit and gently pull it up and out of the imaging drum kit. Open the front cover by Dell may result in the instructions provided to hazardous radiation. 1. NOTICE: Do not leave the imaging drum kit and toner cartridge assembly exposed to the... printer before proceeding. 2. Turn the printer off and unplug the power cord from the wall outlet and disconnect all cables to direct light for an extended period of the...
User's Guide (HTML)
Page 21
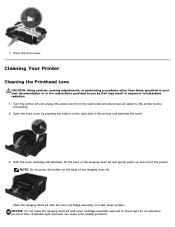
... interior may result in the top of electric shock, unplug the power cord from the paper support and paper exit tray. 3. Damage to the printer before beginning a new print job. Locate the glass printhead lens, which is turned off and unplugged from the wall outlet. Gently wipe the printhead...on the paper exit tray. Make sure the paper support and paper exit tray are dry before proceeding. 2. CAUTION: To avoid the risk of the printer. 5. NOTICE: Do not use household cleaners or detergents, as it will not be covered under warranty. 5. Remove paper from the wall outlet and ...
... interior may result in the top of electric shock, unplug the power cord from the paper support and paper exit tray. 3. Damage to the printer before beginning a new print job. Locate the glass printhead lens, which is turned off and unplugged from the wall outlet. Gently wipe the printhead...on the paper exit tray. Make sure the paper support and paper exit tray are dry before proceeding. 2. CAUTION: To avoid the risk of the printer. 5. NOTICE: Do not use household cleaners or detergents, as it will not be covered under warranty. 5. Remove paper from the wall outlet and ...


