User's Guide
Page 5
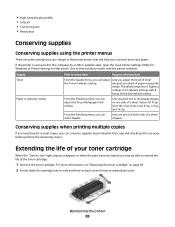
... Utility...76 Installing the Optional XPS Driver...76 Dell Toner Management System...77 Printing Status Window...77 Dell Printer Supplies Reorder Application ...77 Printing 79 Printing a document...79 Printing on both sides of the paper...80 Setting Jam...a print job...85 Maintaining the printer 87 Ordering supplies...87 Printer attached locally to a computer ...87 Cleaning the exterior of the printer...87 Storing supplies...87 Conserving supplies...88 Extending the life of your toner cartridge...88 Replacing supplies...89 Replacing the toner cartridge ...89 Replacing the photoconductor kit ......
... Utility...76 Installing the Optional XPS Driver...76 Dell Toner Management System...77 Printing Status Window...77 Dell Printer Supplies Reorder Application ...77 Printing 79 Printing a document...79 Printing on both sides of the paper...80 Setting Jam...a print job...85 Maintaining the printer 87 Ordering supplies...87 Printer attached locally to a computer ...87 Cleaning the exterior of the printer...87 Storing supplies...87 Conserving supplies...88 Extending the life of your toner cartridge...88 Replacing supplies...89 Replacing the toner cartridge ...89 Replacing the photoconductor kit ......

User's Guide
Page 6
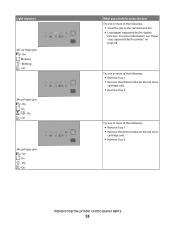
... 97 Avoiding jams...97 Accessing jam areas...98 Understanding jam lights and access locations...98 Clearing jams behind the photoconductor kit and toner cartridge 102 Clearing jams from the standard exit bin...104 Clearing jams from Tray 1...104 Clearing jams from Tray 2...106 Clearing jams in ...the manual feeder...107 Clearing jams behind the rear door...108 Troubleshooting 110 Solving basic printer problems...110 Solving printing problems...110 Jobs do not print...110 Multiple-language PDFs do not print...111 Job takes longer than expected ...
... 97 Avoiding jams...97 Accessing jam areas...98 Understanding jam lights and access locations...98 Clearing jams behind the photoconductor kit and toner cartridge 102 Clearing jams from the standard exit bin...104 Clearing jams from Tray 1...104 Clearing jams from Tray 2...106 Clearing jams in ...the manual feeder...107 Clearing jams behind the rear door...108 Troubleshooting 110 Solving basic printer problems...110 Solving printing problems...110 Jobs do not print...110 Multiple-language PDFs do not print...111 Job takes longer than expected ...
User's Guide
Page 25
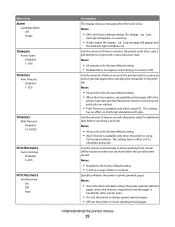
Specifies whether the printer reprints jammed pages Notes: • Auto is low. Menu item Alarm Cartridge Alarm Off Single Timeouts Power Saver Disabled 1-240 Timeouts Print Timeout Disabled 1-255 Timeouts Wait Timeout Disabled 15-65535 Print Recovery Auto Continue ...light will appear as a warning. • Single means the Toner is Off. This setting has no effect on PCL emulation print jobs. Lets the printer automatically continue printing from certain offline situations when not resolved within the specified time period Notes: • Disabled is the factory default setting. • ...
Specifies whether the printer reprints jammed pages Notes: • Auto is low. Menu item Alarm Cartridge Alarm Off Single Timeouts Power Saver Disabled 1-240 Timeouts Print Timeout Disabled 1-255 Timeouts Wait Timeout Disabled 15-65535 Print Recovery Auto Continue ...light will appear as a warning. • Single means the Toner is Off. This setting has no effect on PCL emulation print jobs. Lets the printer automatically continue printing from certain offline situations when not resolved within the specified time period Notes: • Disabled is the factory default setting. • ...
User's Guide
Page 43
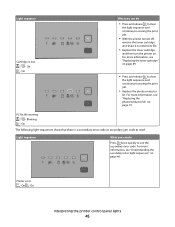
On Cartridge region mismatch - On - For more information, see "Replacing the toner cartridge" on page 89. Light sequence Not ready - On What you can do Press and release either or l to return to the Ready state. Close the front door. Replace the toner cartridge with one suitable for your region. On Front door is open - Interpreting the printer control panel lights 43
On Cartridge region mismatch - On - For more information, see "Replacing the toner cartridge" on page 89. Light sequence Not ready - On What you can do Press and release either or l to return to the Ready state. Close the front door. Replace the toner cartridge with one suitable for your region. On Front door is open - Interpreting the printer control panel lights 43
User's Guide
Page 45
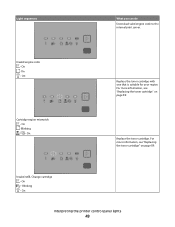
...low - Light sequence Cartridge is a secondary error code or secondary jam code to read: Light sequence What you can do • Press and release to clear the light sequence and continue processing the print job. • With the printer turned off, remove the toner cartridge and shake it to... extend its life. • Replace the toner cartridge, and then turn the printer on page 91. PC Kit life warning - For more information, see the secondary...
...low - Light sequence Cartridge is a secondary error code or secondary jam code to read: Light sequence What you can do • Press and release to clear the light sequence and continue processing the print job. • With the printer turned off, remove the toner cartridge and shake it to... extend its life. • Replace the toner cartridge, and then turn the printer on page 91. PC Kit life warning - For more information, see the secondary...
User's Guide
Page 49
Light sequences What you can do Download valid engine code to the internal print server. Replace the toner cartridge. On - Blinking - On - On - Blinking - For more information, see "Replacing the toner cartridge" on page 89. On Cartridge region mismatch - On Replace the toner cartridge with one that is suitable for your region. On - Invalid refill, Change cartridge - Invalid engine code - For more information, see "Replacing the toner cartridge" on page 89. On Interpreting the printer control panel lights 49
Light sequences What you can do Download valid engine code to the internal print server. Replace the toner cartridge. On - Blinking - On - On - Blinking - For more information, see "Replacing the toner cartridge" on page 89. On Cartridge region mismatch - On Replace the toner cartridge with one that is suitable for your region. On - Invalid refill, Change cartridge - Invalid engine code - For more information, see "Replacing the toner cartridge" on page 89. On Interpreting the printer control panel lights 49
User's Guide
Page 50
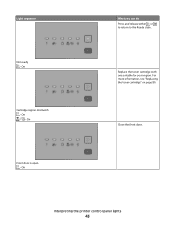
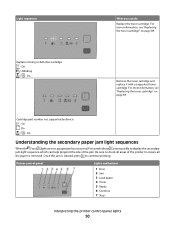
...has occurred. Replace missing or defective cartridge - On Understanding the secondary paper jam light sequences When the and lights are on page 89. Printer control panel Lights and buttons 1 Error 2 Jam 3 Load paper 4 Toner 5 Ready 6 Continue 7 Stop Interpreting the printer control panel lights 50 Light sequences... What you can help pinpoint the site of the printer to ensure all the paper is cleared, press to continue printing. Blinking - On Remove the toner cartridge and replace it with a supported toner cartridge. Be sure to display the secondary jam light sequence ...
...has occurred. Replace missing or defective cartridge - On Understanding the secondary paper jam light sequences When the and lights are on page 89. Printer control panel Lights and buttons 1 Error 2 Jam 3 Load paper 4 Toner 5 Ready 6 Continue 7 Stop Interpreting the printer control panel lights 50 Light sequences... What you can help pinpoint the site of the printer to ensure all the paper is cleared, press to continue printing. Blinking - On Remove the toner cartridge and replace it with a supported toner cartridge. Be sure to display the secondary jam light sequence ...
User's Guide
Page 51
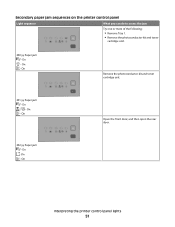
On - On Open the front door, and then open the rear door. 202.yy Paper jam - On Interpreting the printer control panel lights 51 On - On Remove the photoconductor kit and toner cartridge unit. 201.yy Paper jam - On - On - Secondary paper jam sequences on the printer control panel Light sequence What you can do to access the jam Try one or more of the following: • Remove Tray 1. • Remove the photoconductor kit and toner cartridge unit. 200.yy Paper jam - On - On -
On - On Open the front door, and then open the rear door. 202.yy Paper jam - On Interpreting the printer control panel lights 51 On - On Remove the photoconductor kit and toner cartridge unit. 201.yy Paper jam - On - On - Secondary paper jam sequences on the printer control panel Light sequence What you can do to access the jam Try one or more of the following: • Remove Tray 1. • Remove the photoconductor kit and toner cartridge unit. 200.yy Paper jam - On - On -
User's Guide
Page 53
...sizes supported by the duplex function. For more of the following: • Remove Tray 1. • Remove the photoconductor kit and toner cartridge unit. • Remove Tray 2. Interpreting the printer control panel lights 53 Light sequence 235.yy Paper jam - Blinking - On - Try one or more of the following : • ...Clear the jam at the standard exit bin. • Load paper supported by the printer" on page 68. On - On - On 24x.yy Paper jam - Blinking - On What you can do to access the jam Try one or more...
...sizes supported by the duplex function. For more of the following: • Remove Tray 1. • Remove the photoconductor kit and toner cartridge unit. • Remove Tray 2. Interpreting the printer control panel lights 53 Light sequence 235.yy Paper jam - Blinking - On - Try one or more of the following : • ...Clear the jam at the standard exit bin. • Load paper supported by the printer" on page 68. On - On - On 24x.yy Paper jam - Blinking - On What you can do to access the jam Try one or more...
User's Guide
Page 77
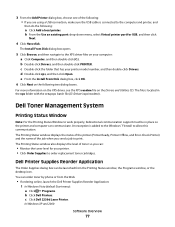
...Vista (default Start menu): a Click Œ Programs. b Click Dell Printers. You can communicate. b From the Use an existing port: drop-down menu, select Virtual printer port for your printer. • Click Order Supplies to order replacement toner cartridges. c Double-click the folder that has your computer: a Click ...Install From Disk dialog box opens. 5 Click Browse, and then navigate to the XPS driver files on the Drivers and Utilities CD. Dell Printer Supplies Reorder Application The Order Supplies dialog box can : • Monitor the toner level for USB, and then click Next. 4 ...
...Vista (default Start menu): a Click Œ Programs. b Click Dell Printers. You can communicate. b From the Use an existing port: drop-down menu, select Virtual printer port for your printer. • Click Order Supplies to order replacement toner cartridges. c Double-click the folder that has your computer: a Click ...Install From Disk dialog box opens. 5 Click Browse, and then navigate to the XPS driver files on the Drivers and Utilities CD. Dell Printer Supplies Reorder Application The Order Supplies dialog box can : • Monitor the toner level for USB, and then click Next. 4 ...
User's Guide
Page 83
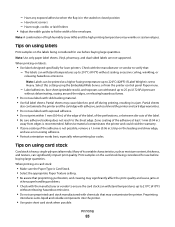
... Select this setting using card stock Card stock is set to the sheet edge. Adhesive material contaminates the printer and could void the printer and cartridge warranties. • Do not use a non-oozing adhesive. • Portrait orientation works best, especially... single-ply specialty media. Partial sheets may contaminate the printer. Preprinting introduces semi-liquid and volatile components into the printer. • Use grain short card stock when possible. Partial sheets also contaminate the printer and the cartridge with chemicals that : - Printing 83 Note: A...
... Select this setting using card stock Card stock is set to the sheet edge. Adhesive material contaminates the printer and could void the printer and cartridge warranties. • Do not use a non-oozing adhesive. • Portrait orientation works best, especially... single-ply specialty media. Partial sheets may contaminate the printer. Preprinting introduces semi-liquid and volatile components into the printer. • Use grain short card stock when possible. Partial sheets also contaminate the printer and the cartridge with chemicals that : - Printing 83 Note: A...
User's Guide
Page 85
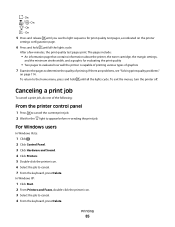
...until all the lights cycle. For Windows users In Windows Vista: 1 Click . 2 Click Control Panel. 3 Click Hardware and Sound. 4 Click Printers. 5 Double-click the printer icon. 6 Select the job to determine the quality of graphics 7 Examine the pages to cancel. 7 From the keyboard, press Delete. On -... all the lights cycle. On - On - - The pages include: • An information page that contains information about the printer, the toner cartridge, the margin settings, and the minimum stroke width, and a graphic for the light to cancel. 4 From the keyboard, press Delete.
...until all the lights cycle. For Windows users In Windows Vista: 1 Click . 2 Click Control Panel. 3 Click Hardware and Sound. 4 Click Printers. 5 Double-click the printer icon. 6 Select the job to determine the quality of graphics 7 Examine the pages to cancel. 7 From the keyboard, press Delete. On -... all the lights cycle. On - On - - The pages include: • An information page that contains information about the printer, the toner cartridge, the margin settings, and the minimum stroke width, and a graphic for the light to cancel. 4 From the keyboard, press Delete.
User's Guide
Page 88
... supplies by a USB or parallel cable, open the Local Printer Settings Utility for Windows or Printer Settings for Macintosh. Values for accuracy before printing the remaining copies. Extending the life of your toner cartridge When the "Toner is connected to print several times to ...Lets you print two or more information, see "Replacing the toner cartridge" on one side of the toner cartridge: 1 Remove the toner cartridge. Supply Toner Path to 10 (darkest setting) with the printer software. If the printer is low" light sequence appears or when the print becomes faded...
... supplies by a USB or parallel cable, open the Local Printer Settings Utility for Windows or Printer Settings for Macintosh. Values for accuracy before printing the remaining copies. Extending the life of your toner cartridge When the "Toner is connected to print several times to ...Lets you print two or more information, see "Replacing the toner cartridge" on one side of the toner cartridge: 1 Remove the toner cartridge. Supply Toner Path to 10 (darkest setting) with the printer software. If the printer is low" light sequence appears or when the print becomes faded...
User's Guide
Page 89
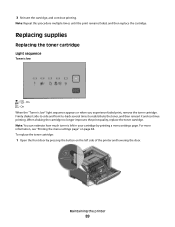
... more information, see "Printing the menu settings page" on the left in your cartridge by pressing the button on page 84. Note: You can estimate how much toner is left side of the printer and lowering the door. Firmly shake it side-to-side and front-to-back ...redistribute the toner, and then reinsert it and continue printing. To replace the toner cartridge: 1 Open the front door by printing a menu settings page. Maintaining the printer 89 On When the "Toner is low - 3 Reinsert the cartridge, and continue printing. Note: Repeat this procedure multiple times until the print remains ...
... more information, see "Printing the menu settings page" on the left in your cartridge by pressing the button on page 84. Note: You can estimate how much toner is left side of the printer and lowering the door. Firmly shake it side-to-side and front-to-back ...redistribute the toner, and then reinsert it and continue printing. To replace the toner cartridge: 1 Open the front door by printing a menu settings page. Maintaining the printer 89 On When the "Toner is low - 3 Reinsert the cartridge, and continue printing. Note: Repeat this procedure multiple times until the print remains ...
User's Guide
Page 90
... button on the tracks of the photoconductor kit. Maintaining the printer 90 Push the toner cartridge in all directions to direct light for an extended period of the photoconductor kit, and then pull the toner cartridge out using the handle. 3 Unpack the new toner cartridge. Extended light exposure can cause print quality problems. 4 Shake...
... button on the tracks of the photoconductor kit. Maintaining the printer 90 Push the toner cartridge in all directions to direct light for an extended period of the photoconductor kit, and then pull the toner cartridge out using the handle. 3 Unpack the new toner cartridge. Extended light exposure can cause print quality problems. 4 Shake...
User's Guide
Page 92
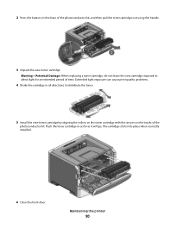
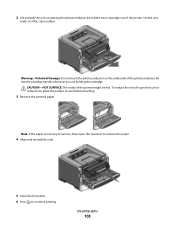
...pressing the button on the left side of the printer and lowering the front door. 2 Pull the photoconductor kit and toner cartridge together as a unit out of the printer by pulling on the base of future print jobs. Maintaining the printer 92 Place the unit on a flat, clean surface.... 3 Press the button on the toner cartridge handle. Note: The photoconductor kit and toner cartridge form a unit. Warning...
...pressing the button on the left side of the printer and lowering the front door. 2 Pull the photoconductor kit and toner cartridge together as a unit out of the printer by pulling on the base of future print jobs. Maintaining the printer 92 Place the unit on a flat, clean surface.... 3 Press the button on the toner cartridge handle. Note: The photoconductor kit and toner cartridge form a unit. Warning...
User's Guide
Page 93
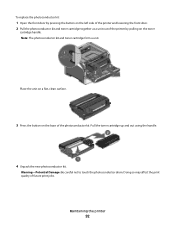
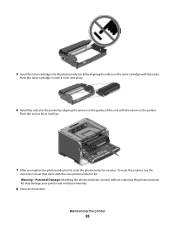
...arrows in until it will go. 7 After you replace the photoconductor kit, reset the photoconductor counter. Maintaining the printer 93 Push the toner cartridge in the printer. Warning-Potential Damage: Resetting the photoconductor counter without replacing the photoconductor kit may damage your... printer and void your warranty. 8 Close the front door. 5 Insert the toner cartridge into the printer by aligning the rollers on the guides of the unit with the new photoconductor kit....
...arrows in until it will go. 7 After you replace the photoconductor kit, reset the photoconductor counter. Maintaining the printer 93 Push the toner cartridge in the printer. Warning-Potential Damage: Resetting the photoconductor counter without replacing the photoconductor kit may damage your... printer and void your warranty. 8 Close the front door. 5 Insert the toner cartridge into the printer by aligning the rollers on the guides of the unit with the new photoconductor kit....
User's Guide
Page 103
...injury from a hot component, allow the surface to continue printing. Use the cartridge handle whenever you are holding the cartridge. Clearing jams 103 To reduce the risk of the photoconductor kit. CAUTION-HOT SURFACE: The inside of the printer. Note: If the paper is not easy to remove, then open the... the front door. 6 Press to cool before touching. 3 Remove the jammed paper. 2 Lift and pull the unit containing the photoconductor kit and the toner cartridge out of the printer might be hot. Warning-Potential Damage: Do not touch the photoconductor on a flat, clean surface.
...injury from a hot component, allow the surface to continue printing. Use the cartridge handle whenever you are holding the cartridge. Clearing jams 103 To reduce the risk of the photoconductor kit. CAUTION-HOT SURFACE: The inside of the printer. Note: If the paper is not easy to remove, then open the... the front door. 6 Press to cool before touching. 3 Remove the jammed paper. 2 Lift and pull the unit containing the photoconductor kit and the toner cartridge out of the printer might be hot. Warning-Potential Damage: Do not touch the photoconductor on a flat, clean surface.
User's Guide
Page 115
...indicated on page 114. 4 Close the front door. On - To return to determine the quality of the following: • Remove and reinstall the toner cartridge. • Remove and reinstall the photoconductor kit. The light sequence that represents the Home menu appears. - On 5 Press and release until you see "... pages Try one or more information, contact Customer Support. If there are problems, see the light sequence for assessing how well the printer is capable of printing various types of graphics 7 Examine the pages to the Home menu, press and hold until all lights cycle.
...indicated on page 114. 4 Close the front door. On - To return to determine the quality of the following: • Remove and reinstall the toner cartridge. • Remove and reinstall the photoconductor kit. The light sequence that represents the Home menu appears. - On 5 Press and release until you see "... pages Try one or more information, contact Customer Support. If there are problems, see the light sequence for assessing how well the printer is capable of printing various types of graphics 7 Examine the pages to the Home menu, press and hold until all lights cycle.
User's Guide
Page 119
...settings. Skewed print CHECK THE PAPER GUIDES Move the guides in the tray. For more of the following: THE TONER CARTRIDGE MAY BE DEFECTIVE Replace the toner cartridge. THE PAPER MAY HAVE ABSORBED MOISTURE DUE TO HIGH HUMIDITY • Load paper from a fresh package. • Store..., change these settings. For more information, see "Replacing the toner cartridge" on page 89. THERE IS TONER IN THE PAPER PATH Contact Customer Support. CHECK THE PAPER TYPE SETTING Ensure that meets the printer specifications. Note: This solution applies to the correct positions for the paper...
...settings. Skewed print CHECK THE PAPER GUIDES Move the guides in the tray. For more of the following: THE TONER CARTRIDGE MAY BE DEFECTIVE Replace the toner cartridge. THE PAPER MAY HAVE ABSORBED MOISTURE DUE TO HIGH HUMIDITY • Load paper from a fresh package. • Store..., change these settings. For more information, see "Replacing the toner cartridge" on page 89. THERE IS TONER IN THE PAPER PATH Contact Customer Support. CHECK THE PAPER TYPE SETTING Ensure that meets the printer specifications. Note: This solution applies to the correct positions for the paper...


