User's Guide
Page 5
... Alert Utility...76 Installing the Optional XPS Driver...76 Dell Toner Management System...77 Printing Status Window...77 Dell Printer Supplies Reorder Application ...77 Printing 79 Printing a document...79 Printing on both sides of the paper...80 Setting Jam ...a computer ...87 Cleaning the exterior of the printer...87 Storing supplies...87 Conserving supplies...88 Extending the life of your toner cartridge...88 Replacing supplies...89 Replacing the toner cartridge ...89 Replacing the photoconductor kit ...91 Moving the printer...94 Before moving the printer ...94 Moving the printer to another...
... Alert Utility...76 Installing the Optional XPS Driver...76 Dell Toner Management System...77 Printing Status Window...77 Dell Printer Supplies Reorder Application ...77 Printing 79 Printing a document...79 Printing on both sides of the paper...80 Setting Jam ...a computer ...87 Cleaning the exterior of the printer...87 Storing supplies...87 Conserving supplies...88 Extending the life of your toner cartridge...88 Replacing supplies...89 Replacing the toner cartridge ...89 Replacing the photoconductor kit ...91 Moving the printer...94 Before moving the printer ...94 Moving the printer to another...

User's Guide
Page 6
......96 Clearing jams 97 Avoiding jams...97 Accessing jam areas...98 Understanding jam lights and access locations...98 Clearing jams behind the photoconductor kit and toner cartridge 102 Clearing jams from the standard exit bin...104 Clearing jams from Tray 1...104 Clearing jams from Tray 2...106 Clearing jams in the manual feeder...
......96 Clearing jams 97 Avoiding jams...97 Accessing jam areas...98 Understanding jam lights and access locations...98 Clearing jams behind the photoconductor kit and toner cartridge 102 Clearing jams from the standard exit bin...104 Clearing jams from Tray 1...104 Clearing jams from Tray 2...106 Clearing jams in the manual feeder...
User's Guide
Page 43
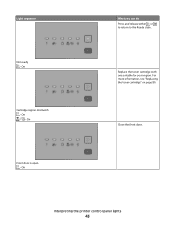
Close the front door. On Cartridge region mismatch - On Front door is open - For more information, see "Replacing the toner cartridge" on page 89. Light sequence Not ready - Interpreting the printer control panel lights 43 Replace the toner cartridge with one suitable for your region. On What you can do Press and release either or l to return to the Ready state. On -
Close the front door. On Cartridge region mismatch - On Front door is open - For more information, see "Replacing the toner cartridge" on page 89. Light sequence Not ready - Interpreting the printer control panel lights 43 Replace the toner cartridge with one suitable for your region. On What you can do Press and release either or l to return to the Ready state. On -
User's Guide
Page 45
...8226; Press and release to clear the light sequence and continue processing the print job. • With the printer turned off, remove the toner cartridge and shake it to clear the light sequence and continue processing the print job. • Replace the photoconductor kit. For more information, ...on . Printer error - On What you can do Press twice quickly to see "Replacing the toner cartridge" on page 89. • Press and release to extend its life. • Replace the toner cartridge, and then turn the printer on page 46. PC Kit life warning - On Interpreting the ...
...8226; Press and release to clear the light sequence and continue processing the print job. • With the printer turned off, remove the toner cartridge and shake it to clear the light sequence and continue processing the print job. • Replace the photoconductor kit. For more information, ...on . Printer error - On What you can do Press twice quickly to see "Replacing the toner cartridge" on page 89. • Press and release to extend its life. • Replace the toner cartridge, and then turn the printer on page 46. PC Kit life warning - On Interpreting the ...
User's Guide
Page 49
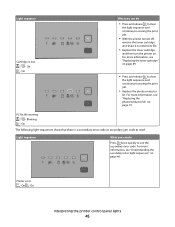
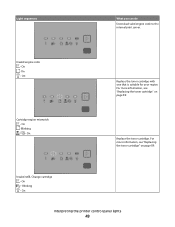
On - For more information, see "Replacing the toner cartridge" on page 89. On Interpreting the printer control panel lights 49 On Replace the toner cartridge with one that is suitable for your region. Replace the toner cartridge. Invalid refill, Change cartridge - Invalid engine code - On Cartridge region mismatch - On - On - Blinking - On - Blinking - Light sequences What you can do Download valid engine code to the internal print server. For more information, see "Replacing the toner cartridge" on page 89.
On - For more information, see "Replacing the toner cartridge" on page 89. On Interpreting the printer control panel lights 49 On Replace the toner cartridge with one that is suitable for your region. Replace the toner cartridge. Invalid refill, Change cartridge - Invalid engine code - On Cartridge region mismatch - On - On - Blinking - On - Blinking - Light sequences What you can do Download valid engine code to the internal print server. For more information, see "Replacing the toner cartridge" on page 89.
User's Guide
Page 50
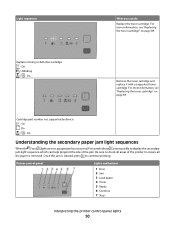
... of the jam. Printer control panel Lights and buttons 1 Error 2 Jam 3 Load paper 4 Toner 5 Ready 6 Continue 7 Stop Interpreting the printer control panel lights 50 Cartridge part number not supported by device - Light sequences What you can help pinpoint the site of the... are on page 89. For more information, see "Replacing the toner cartridge" on , a paper jam has occurred. Blinking - On Remove the toner cartridge and replace it with a supported toner cartridge. For more information, see "Replacing the toner cartridge" on page 89. Once the jam is removed. On - ...
... of the jam. Printer control panel Lights and buttons 1 Error 2 Jam 3 Load paper 4 Toner 5 Ready 6 Continue 7 Stop Interpreting the printer control panel lights 50 Cartridge part number not supported by device - Light sequences What you can help pinpoint the site of the... are on page 89. For more information, see "Replacing the toner cartridge" on , a paper jam has occurred. Blinking - On Remove the toner cartridge and replace it with a supported toner cartridge. For more information, see "Replacing the toner cartridge" on page 89. Once the jam is removed. On - ...
User's Guide
Page 51
On - On Interpreting the printer control panel lights 51 On - On Remove the photoconductor kit and toner cartridge unit. 201.yy Paper jam - On - Secondary paper jam sequences on the printer control panel Light sequence What you can do to access the jam Try one or more of the following: • Remove Tray 1. • Remove the photoconductor kit and toner cartridge unit. 200.yy Paper jam - On Open the front door, and then open the rear door. 202.yy Paper jam - On - On - On -
On - On Interpreting the printer control panel lights 51 On - On Remove the photoconductor kit and toner cartridge unit. 201.yy Paper jam - On - Secondary paper jam sequences on the printer control panel Light sequence What you can do to access the jam Try one or more of the following: • Remove Tray 1. • Remove the photoconductor kit and toner cartridge unit. 200.yy Paper jam - On Open the front door, and then open the rear door. 202.yy Paper jam - On - On - On -
User's Guide
Page 53
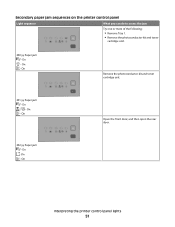
...Paper sizes supported by the duplex function. On - On - For more of the following: • Remove Tray 1. • Remove the photoconductor kit and toner cartridge unit. • Remove Tray 2. On What you can do to access the jam Try one or more of the following : • Remove Tray 1.... • Remove the photoconductor kit and toner cartridge unit. • Remove Tray 2. Light sequence 235.yy Paper jam - Interpreting the printer control panel lights 53 Blinking - On - On 24x.yy...
...Paper sizes supported by the duplex function. On - On - For more of the following: • Remove Tray 1. • Remove the photoconductor kit and toner cartridge unit. • Remove Tray 2. On What you can do to access the jam Try one or more of the following : • Remove Tray 1.... • Remove the photoconductor kit and toner cartridge unit. • Remove Tray 2. Light sequence 235.yy Paper jam - Interpreting the printer control panel lights 53 Blinking - On - On 24x.yy...
User's Guide
Page 77
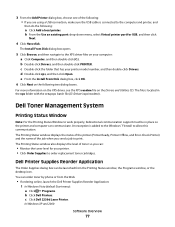
... Order Supplies to order replacement toner cartridges. You can be in the xps folder with the setupxps batch file (D:\Drivers\xps\readme). In Windows XP and 2000: Software Overview 77 The Printing Status window also displays the level of the job when you send a job to print. Dell Toner Management System Printing Status Window...
... Order Supplies to order replacement toner cartridges. You can be in the xps folder with the setupxps batch file (D:\Drivers\xps\readme). In Windows XP and 2000: Software Overview 77 The Printing Status window also displays the level of the job when you send a job to print. Dell Toner Management System Printing Status Window...
User's Guide
Page 85
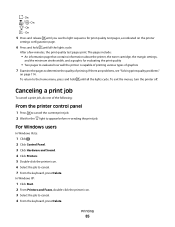
... sequence for print quality test pages, as indicated on page 114. The pages include: • An information page that contains information about the printer, the toner cartridge, the margin settings, and the minimum stroke width, and a graphic for the light to appear before re-sending the print job. Printing 85 To exit...
... sequence for print quality test pages, as indicated on page 114. The pages include: • An information page that contains information about the printer, the toner cartridge, the margin settings, and the minimum stroke width, and a graphic for the light to appear before re-sending the print job. Printing 85 To exit...
User's Guide
Page 88
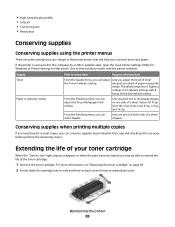
... and checking it for N-up (Multipage Print) setting. From the Finishing menu, you conserve toner and paper. Supply Toner Path to extend the life of the toner cartridge: 1 Remove the toner cartridge. Lets you adjust the level of your toner cartridge When the "Toner is connected to print several times to 10 (darkest setting) with the printer software. Extending...
... and checking it for N-up (Multipage Print) setting. From the Finishing menu, you conserve toner and paper. Supply Toner Path to extend the life of the toner cartridge: 1 Remove the toner cartridge. Lets you adjust the level of your toner cartridge When the "Toner is connected to print several times to 10 (darkest setting) with the printer software. Extending...
User's Guide
Page 89
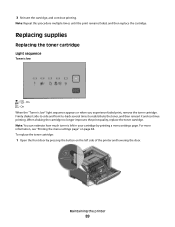
..."Printing the menu settings page" on the left in your cartridge by pressing the button on page 84. On When the "Toner is low - When shaking the cartridge no longer improves the print quality, replace the toner cartridge. On - Firmly shake it side-to-side and front-to... times until the print remains faded, and then replace the cartridge. Maintaining the printer 89 To replace the toner cartridge: 1 Open the front door by printing a menu settings page. Replacing supplies Replacing the toner cartridge Light sequence Toner is low" light sequence appears or when you experience faded ...
..."Printing the menu settings page" on the left in your cartridge by pressing the button on page 84. On When the "Toner is low - When shaking the cartridge no longer improves the print quality, replace the toner cartridge. On - Firmly shake it side-to-side and front-to... times until the print remains faded, and then replace the cartridge. Maintaining the printer 89 To replace the toner cartridge: 1 Open the front door by printing a menu settings page. Replacing supplies Replacing the toner cartridge Light sequence Toner is low" light sequence appears or when you experience faded ...
User's Guide
Page 90
... Damage: When replacing a toner cartridge, do not leave the new cartridge exposed to distribute the toner. 5 Install the new toner cartridge by aligning the rollers on the toner cartridge with the arrows on the base of the photoconductor kit, and then pull the toner cartridge out using the handle. 3 Unpack the new toner cartridge. Maintaining the printer 90 The cartridge clicks into place...
... Damage: When replacing a toner cartridge, do not leave the new cartridge exposed to distribute the toner. 5 Install the new toner cartridge by aligning the rollers on the toner cartridge with the arrows on the base of the photoconductor kit, and then pull the toner cartridge out using the handle. 3 Unpack the new toner cartridge. Maintaining the printer 90 The cartridge clicks into place...
User's Guide
Page 92
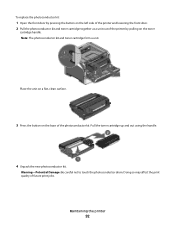
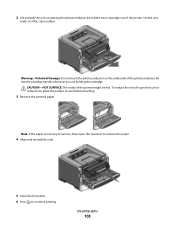
Pull the toner cartridge up and out using the handle. 4 Unpack the new photoconductor kit. Maintaining the printer 92 Warning-Potential Damage: Be careful not to touch the photoconductor ...: 1 Open the front door by pressing the button on the left side of the printer and lowering the front door. 2 Pull the photoconductor kit and toner cartridge together as a unit out of the printer by pulling on the base of future print jobs. Place the unit on a flat, clean surface. 3 Press the...
Pull the toner cartridge up and out using the handle. 4 Unpack the new photoconductor kit. Maintaining the printer 92 Warning-Potential Damage: Be careful not to touch the photoconductor ...: 1 Open the front door by pressing the button on the left side of the printer and lowering the front door. 2 Pull the photoconductor kit and toner cartridge together as a unit out of the printer by pulling on the base of future print jobs. Place the unit on a flat, clean surface. 3 Press the...
User's Guide
Page 93
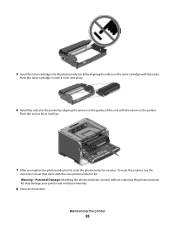
... the printer by aligning the rollers on the guides of the unit with the tracks. Push the toner cartridge in until it will go. 7 After you replace the photoconductor kit, reset the photoconductor counter. Maintaining the printer 93 To reset the counter, see the ... front door. Push the unit as far as it clicks into place. 6 Install the unit into the photoconductor kit by aligning the arrows on the toner cartridge with the arrows in the printer.
... the printer by aligning the rollers on the guides of the unit with the tracks. Push the toner cartridge in until it will go. 7 After you replace the photoconductor kit, reset the photoconductor counter. Maintaining the printer 93 To reset the counter, see the ... front door. Push the unit as far as it clicks into place. 6 Install the unit into the photoconductor kit by aligning the arrows on the toner cartridge with the arrows in the printer.
User's Guide
Page 98
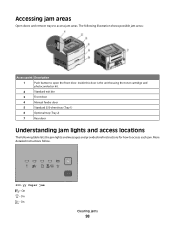
On - On - Inside this door is the unit housing the toner cartridge and photoconductor kit. 2 Standard exit bin 3 Front door 4 Manual feeder door 5 Standard 250-sheet tray (Tray 1) 6 Optional tray (Tray 2) 7 Rear door Understanding jam lights and ...
On - On - Inside this door is the unit housing the toner cartridge and photoconductor kit. 2 Standard exit bin 3 Front door 4 Manual feeder door 5 Standard 250-sheet tray (Tray 1) 6 Optional tray (Tray 2) 7 Rear door Understanding jam lights and ...

User's Guide
Page 99
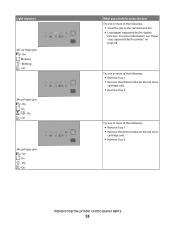
On - On - On - Try one of the following: • Remove Tray 1. • Open the front door, and then remove the photoconductor kit and toner cartridge unit. 201.yy Paper jam - On Open the front door, and then open the rear door. 231.yy Paper jam Clearing jams 99 On - On Open the front door, and then remove the photoconductor kit and toner cartridge unit. 202.yy Paper jam -
On - On - On - Try one of the following: • Remove Tray 1. • Open the front door, and then remove the photoconductor kit and toner cartridge unit. 201.yy Paper jam - On Open the front door, and then open the rear door. 231.yy Paper jam Clearing jams 99 On - On Open the front door, and then remove the photoconductor kit and toner cartridge unit. 202.yy Paper jam -

User's Guide
Page 101
On Remove the jam from the standard exit bin. 24x.yy Paper jam - On - On Try one of the following: • Remove Tray 1. • Open the front door, and then remove the photoconductor kit and toner cartridge unit. • Remove Tray 2. Clearing jams 101 Blinking - On - 235.yy Paper jam - On - Blinking - On -
On Remove the jam from the standard exit bin. 24x.yy Paper jam - On - On Try one of the following: • Remove Tray 1. • Open the front door, and then remove the photoconductor kit and toner cartridge unit. • Remove Tray 2. Clearing jams 101 Blinking - On - 235.yy Paper jam - On - Blinking - On -

User's Guide
Page 102
251.yy Paper jam - On - Clearing jams 102 On Remove the jam from the manual feeder. Clearing jams behind the photoconductor kit and toner cartridge 1 Push the release button, and then lower the front door. On - On -
251.yy Paper jam - On - Clearing jams 102 On Remove the jam from the manual feeder. Clearing jams behind the photoconductor kit and toner cartridge 1 Push the release button, and then lower the front door. On - On -
User's Guide
Page 103
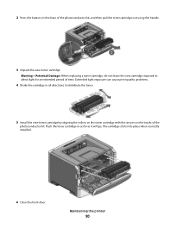
... the risk of the printer might be hot. 2 Lift and pull the unit containing the photoconductor kit and the toner cartridge out of the photoconductor kit. Use the cartridge handle whenever you are holding the cartridge. CAUTION-HOT SURFACE: The inside of injury from a hot component, allow the surface to continue printing. Note: If...
... the risk of the printer might be hot. 2 Lift and pull the unit containing the photoconductor kit and the toner cartridge out of the photoconductor kit. Use the cartridge handle whenever you are holding the cartridge. CAUTION-HOT SURFACE: The inside of injury from a hot component, allow the surface to continue printing. Note: If...


