Setup Guide
Page 5
...6 Connect the Network Cable (Optional 7 Press the Power Button 8 Set Up Microsoft Windows 9 Create System Recovery Media (Recommended 10 Install the SIM Card (Optional 12 Enable or Disable Wireless (Optional 14 Connect to the Internet (Optional 16 Using Your Studio Laptop 20 Right Side Features 20 Left Side Features 24...the Touch Screen (Optional 36 Using the Optical Drive 40 Removing and Replacing the Battery 42 Software Features 44 Free Fall Sensor 45 Dell Dock 46 Dell DataSafe Online Backup 47 Solving Problems 48 Touch Screen Problems 48 Beep Codes 49 Network Problems 50...
...6 Connect the Network Cable (Optional 7 Press the Power Button 8 Set Up Microsoft Windows 9 Create System Recovery Media (Recommended 10 Install the SIM Card (Optional 12 Enable or Disable Wireless (Optional 14 Connect to the Internet (Optional 16 Using Your Studio Laptop 20 Right Side Features 20 Left Side Features 24...the Touch Screen (Optional 36 Using the Optical Drive 40 Removing and Replacing the Battery 42 Software Features 44 Free Fall Sensor 45 Dell Dock 46 Dell DataSafe Online Backup 47 Solving Problems 48 Touch Screen Problems 48 Beep Codes 49 Network Problems 50...
Setup Guide
Page 7
... on all other sides. Restricting the airflow can damage the computer, deteriorate the computer performance, or cause a fire. Restricting airflow around your Dell™ computer in the air vents. Do not place your laptop may result in an enclosed space, such as carpets or rugs, while ... surface to the computer. 5 Fan noise is powered on the computer may cause it is normal and does not indicate a problem with the fan or the computer. You should never place your computer in permanent damage to place your Studio 1555/1557/1558 laptop. CAUTION: Placing or stacking heavy...
... on all other sides. Restricting the airflow can damage the computer, deteriorate the computer performance, or cause a fire. Restricting airflow around your Dell™ computer in the air vents. Do not place your laptop may result in an enclosed space, such as carpets or rugs, while ... surface to the computer. 5 Fan noise is powered on the computer may cause it is normal and does not indicate a problem with the fan or the computer. You should never place your computer in permanent damage to place your Studio 1555/1557/1558 laptop. CAUTION: Placing or stacking heavy...
Setup Guide
Page 8
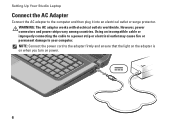
WARNING: The AC adapter works with electrical outlets worldwide. NOTE: Connect the power cord to the computer and then plug it into an electrical outlet or surge protector. Setting Up Your Studio Laptop Connect the AC Adapter Connect the AC adapter to the adapter firmly and ensure that the light on the adapter is on when you turn on power. 6 However, power connectors and power strips vary among countries. Using an incompatible cable or improperly connecting the cable to a power strip or electrical outlet may cause fire or permanent damage to your computer.
WARNING: The AC adapter works with electrical outlets worldwide. NOTE: Connect the power cord to the computer and then plug it into an electrical outlet or surge protector. Setting Up Your Studio Laptop Connect the AC Adapter Connect the AC adapter to the adapter firmly and ensure that the light on the adapter is on when you turn on power. 6 However, power connectors and power strips vary among countries. Using an incompatible cable or improperly connecting the cable to a power strip or electrical outlet may cause fire or permanent damage to your computer.

Setup Guide
Page 10
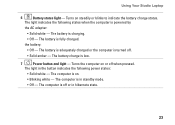
Setting Up Your Studio Laptop Press the Power Button 8
Setting Up Your Studio Laptop Press the Power Button 8
Setup Guide
Page 24
... and begin reading its content. 4 USB 2.0 connector - Plays or records CDs, DVDs, and Blu-ray Discs (optional). The drive will damage the drive. Connects to power the computer and charge the battery. 22 Ensure that you will automatically pull the disc in the center of the disc slot, with the printed...
... and begin reading its content. 4 USB 2.0 connector - Plays or records CDs, DVDs, and Blu-ray Discs (optional). The drive will damage the drive. Connects to power the computer and charge the battery. 22 Ensure that you will automatically pull the disc in the center of the disc slot, with the printed...
Setup Guide
Page 25
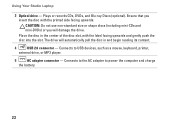
Using Your Studio Laptop 6 Battery status light - The battery is low. 7 Power button and light - Turns the computer on or off . • Solid amber - the battery: • Off - The battery charge is charging. • Off - The light ... off when pressed. The computer is off or in standby mode. • Off - The light indicates the following power states: • Solid white - The battery is adequately charged or the computer is powered by the AC adapter: • Solid white - The computer is on steadily or blinks to indicate the battery charge...
Using Your Studio Laptop 6 Battery status light - The battery is low. 7 Power button and light - Turns the computer on or off . • Solid amber - the battery: • Off - The battery charge is charging. • Off - The light ... off when pressed. The computer is off or in standby mode. • Off - The light indicates the following power states: • Solid white - The battery is adequately charged or the computer is powered by the AC adapter: • Solid white - The computer is on steadily or blinks to indicate the battery charge...

Setup Guide
Page 28
Connect to a pair of headphones or sends audio to high-speed serial multimedia devices, such as digital video cameras. 8 Audio in/Microphone connector - Connects to a powered speaker or sound system. 26 Connects to a microphone or inputs signal for use with audio programs. 9 Audio out/Headphone connectors (2) - Using Your Studio Laptop 7 IEEE 1394a connector -
Connect to a pair of headphones or sends audio to high-speed serial multimedia devices, such as digital video cameras. 8 Audio in/Microphone connector - Connects to a powered speaker or sound system. 26 Connects to a microphone or inputs signal for use with audio programs. 9 Audio out/Headphone connectors (2) - Using Your Studio Laptop 7 IEEE 1394a connector -
Setup Guide
Page 34
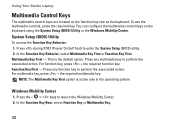
... Key First option is the default option. In the Function Key Behavior, select Multimedia Key First or Function Key First. Press during POST (Power On Self Test) to perform the associated action. Press any function key to launch the Windows Mobility Center. 2. In the Function Key Row..., select Function Key or Multimedia Key. 32 You can configure the multimedia control keys on the keyboard. Using Your Studio Laptop Multimedia Control Keys The multimedia control keys are located on the function key row on the keyboard using the System Setup (BIOS) Utility...
... Key First option is the default option. In the Function Key Behavior, select Multimedia Key First or Function Key First. Press during POST (Power On Self Test) to perform the associated action. Press any function key to launch the Windows Mobility Center. 2. In the Function Key Row..., select Function Key or Multimedia Key. 32 You can configure the multimedia control keys on the keyboard. Using Your Studio Laptop Multimedia Control Keys The multimedia control keys are located on the function key row on the keyboard using the System Setup (BIOS) Utility...
Setup Guide
Page 52
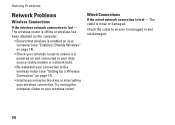
... enabled on your computer (see "Setting Up a Wireless Connection" on page 14). • Check your wireless router. Wired Connections If the wired network connection is powered on and connected to your data source (cable modem or network hub). • Re-establish your connection to the wireless router (see "Enable or Disable...
... enabled on your computer (see "Setting Up a Wireless Connection" on page 14). • Check your wireless router. Wired Connections If the wired network connection is powered on and connected to your data source (cable modem or network hub). • Re-establish your connection to the wireless router (see "Enable or Disable...
Setup Guide
Page 53
...• Ensure that the light on the AC adapter is on. • If the problem persists, contact Dell (see "Contacting Dell" on page 76). The computer is either turned off - If the power light is solid white and the computer is off or is working by testing it back on. • If... the problem persists, contact Dell (see "Contacting Dell" on page 76). 51 Solving Problems Power Problems If the power light is not responding - If the AC adapter has a light, ensure that the electrical outlet is not receiving...
...• Ensure that the light on the AC adapter is on. • If the problem persists, contact Dell (see "Contacting Dell" on page 76). The computer is either turned off - If the power light is solid white and the computer is off or is working by testing it back on. • If... the problem persists, contact Dell (see "Contacting Dell" on page 76). 51 Solving Problems Power Problems If the power light is not responding - If the AC adapter has a light, ensure that the electrical outlet is not receiving...
Setup Guide
Page 54
...electrical outlet. Solving Problems If the power light is creating interference by interrupting or blocking other memory problems - • Run the Dell Diagnostics (see "Dell Diagnostics" on page 59). • If the problem persists, contact Dell (see "Contacting Dell" on page 76). 52 The... any open files and exit any open programs you are : • Power, keyboard, and mouse extension cables. • Too many devices connected to a power strip. • Multiple power strips connected to see "Contacting Dell" on your computer - An unwanted signal is blinking white - If you...
...electrical outlet. Solving Problems If the power light is creating interference by interrupting or blocking other memory problems - • Run the Dell Diagnostics (see "Dell Diagnostics" on page 59). • If the problem persists, contact Dell (see "Contacting Dell" on page 76). 52 The... any open files and exit any open programs you are : • Power, keyboard, and mouse extension cables. • Too many devices connected to a power strip. • Multiple power strips connected to see "Contacting Dell" on your computer - An unwanted signal is blinking white - If you...

Setup Guide
Page 55
...on the CD. Ensure that is firmly connected to the computer and to perform an operating system shutdown. Press simultaneously. 2. Click the program that the power cable is no longer responding 4. CAUTION: You might lose data if you are unable to the electrical outlet. If a program is designed for at... Software usually includes installation instructions in an environment similar to 10 seconds until the computer turns off and then restart your mouse, press the power button for an earlier Microsoft® Windows® operating system - If a program crashes repeatedly -
...on the CD. Ensure that is firmly connected to the computer and to perform an operating system shutdown. Press simultaneously. 2. Click the program that the power cable is no longer responding 4. CAUTION: You might lose data if you are unable to the electrical outlet. If a program is designed for at... Software usually includes installation instructions in an environment similar to 10 seconds until the computer turns off and then restart your mouse, press the power button for an earlier Microsoft® Windows® operating system - If a program crashes repeatedly -
Setup Guide
Page 60
...S.M.A.R.T error, possible hard drive failure. To start the search. 3. Contact Dell (see "Contacting Dell" on page 76). A parameter out of them. Using Support Tools No timer tick interrupt - Your USB device needs more power for it to connect the USB device, or if your data regularly. ...Contact Dell (see "Contacting Dell" on the system board might be malfunctioning or system board failure. In the search results...
...S.M.A.R.T error, possible hard drive failure. To start the search. 3. Contact Dell (see "Contacting Dell" on page 76). A parameter out of them. Using Support Tools No timer tick interrupt - Your USB device needs more power for it to connect the USB device, or if your data regularly. ...Contact Dell (see "Contacting Dell" on the system board might be malfunctioning or system board failure. In the search results...
Setup Guide
Page 61
...known to enter the System Setup (BIOS) utility. Select Diagnostics from the Drivers and Utilities disc. When the DELL™ logo appears, press immediately. Dell Diagnostics If you experience a problem with your computer. NOTE: The Drivers and Utilities disc is connected to ... computer. 59 NOTE: Dell Diagnostics works only on page 76). 1. Press during POST (Power On Self Test) to be working properly. 2. Using Support Tools Start the Dell Diagnostics from your computer cannot display a screen image, contact Dell (see "Contacting Dell" on Dell computers. Ensure that the...
...known to enter the System Setup (BIOS) utility. Select Diagnostics from the Drivers and Utilities disc. When the DELL™ logo appears, press immediately. Dell Diagnostics If you experience a problem with your computer. NOTE: The Drivers and Utilities disc is connected to ... computer. 59 NOTE: Dell Diagnostics works only on page 76). 1. Press during POST (Power On Self Test) to be working properly. 2. Using Support Tools Start the Dell Diagnostics from your computer cannot display a screen image, contact Dell (see "Contacting Dell" on Dell computers. Ensure that the...

Setup Guide
Page 76
.... 74 For the telephone number to call for your confidential, proprietary or personal information; Include a copy of the Diagnostics Checklist (see "Contacting Dell" on page 76. 2. Pack the equipment to be included with the item(s) being returned, whether for repair or credit, as CDs and ExpressCards... and prominently on the outside of loss during shipment to Dell. lost removable media that belong with your return. 1. You are not accepted. or damaged or lost or corrupted data; Remove any and all items being returned (power cables, software, guides, and so on) if the ...
.... 74 For the telephone number to call for your confidential, proprietary or personal information; Include a copy of the Diagnostics Checklist (see "Contacting Dell" on page 76. 2. Pack the equipment to be included with the item(s) being returned, whether for repair or credit, as CDs and ExpressCards... and prominently on the outside of loss during shipment to Dell. lost removable media that belong with your return. 1. You are not accepted. or damaged or lost or corrupted data; Remove any and all items being returned (power cables, software, guides, and so on) if the ...
Setup Guide
Page 91
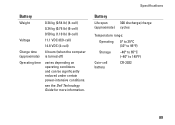
...°C (32° to 95°F) Storage -40° to 65°C (-40° to 149°F) Coin-cell battery CR-2032 89 see the Dell Technology Guide for more information. Battery Weight 0.24 kg (0.54 lb) (4-cell) 0.34 kg (0.75 lb) (6-cell) 0.50 kg (1.10 lb) (9-cell) Voltage 11.1 VDC... (4-cell) Charge time 4 hours (when the computer (approximate) is turned off) Operating time varies depending on operating conditions and can be significantly reduced under certain power‑intensive conditions.
...°C (32° to 95°F) Storage -40° to 65°C (-40° to 149°F) Coin-cell battery CR-2032 89 see the Dell Technology Guide for more information. Battery Weight 0.24 kg (0.54 lb) (4-cell) 0.34 kg (0.75 lb) (6-cell) 0.50 kg (1.10 lb) (9-cell) Voltage 11.1 VDC... (4-cell) Charge time 4 hours (when the computer (approximate) is turned off) Operating time varies depending on operating conditions and can be significantly reduced under certain power‑intensive conditions.
Setup Guide
Page 92
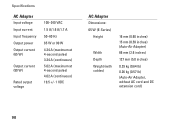
Specifications AC Adapter Input voltage Input current Input frequency Output power Output current (65 W) Output current (90 W) Rated output voltage 100-240 VAC 1.5 A/1.6 A/1.7 A 50-60 Hz 65 W or 90 W 4.34 A (maximum at 4-second pulse) 3.34 A (continuous) 5....
Specifications AC Adapter Input voltage Input current Input frequency Output power Output current (65 W) Output current (90 W) Rated output voltage 100-240 VAC 1.5 A/1.6 A/1.7 A 50-60 Hz 65 W or 90 W 4.34 A (maximum at 4-second pulse) 3.34 A (continuous) 5....
Setup Guide
Page 99
P power problems, solving 51 power strips, using 6 problems, solving 48 products information and purchasing 73 R resources, finding more 78 restoring factory image 68 S setup, before you begin 5 shipping products for return or repair 74 software features 44 software problems 53 solving problems 48 specifications 80 supported sites websites 72 support email addresses 72 System Messages 56 T touch screen 36 gestures 37 V ventilation, ensuring 5 Index 97
P power problems, solving 51 power strips, using 6 problems, solving 48 products information and purchasing 73 R resources, finding more 78 restoring factory image 68 S setup, before you begin 5 shipping products for return or repair 74 software features 44 software problems 53 solving problems 48 specifications 80 supported sites websites 72 support email addresses 72 System Messages 56 T touch screen 36 gestures 37 V ventilation, ensuring 5 Index 97


