User's Guide
Page 6
... Errors 76 Printing a Device Settings Page 77 Resetting Defaults 77 12 Printing 79 Tips for Successful Printing 79 Tips on Storing Print Media 79 Avoiding Paper Jams 79 Sending a Job to Print 79 Canceling a Print Job 80 Canceling From the Operator Panel 80 Canceling a Job From the Computer Running Windows 80 Manual...
... Errors 76 Printing a Device Settings Page 77 Resetting Defaults 77 12 Printing 79 Tips for Successful Printing 79 Tips on Storing Print Media 79 Avoiding Paper Jams 79 Sending a Job to Print 79 Canceling a Print Job 80 Canceling From the Operator Panel 80 Canceling a Job From the Computer Running Windows 80 Manual...
User's Guide
Page 9
... the Color Registration Chart 127 Determining Values 128 Entering Values 129 17 Clearing Jams 131 Avoiding Jams 131 Identifying the Location of Paper Jams 132 Clearing Paper Jams From the Front of the Printer . . . 133 Clearing Paper Jams From the Back of the Printer . . . 134 Clearing Paper Jams From the Output Tray 136 Troubleshooting 139 18 Troubleshooting 141 Basic Printer...
... the Color Registration Chart 127 Determining Values 128 Entering Values 129 17 Clearing Jams 131 Avoiding Jams 131 Identifying the Location of Paper Jams 132 Clearing Paper Jams From the Front of the Printer . . . 133 Clearing Paper Jams From the Back of the Printer . . . 134 Clearing Paper Jams From the Output Tray 136 Troubleshooting 139 18 Troubleshooting 141 Basic Printer...
User's Guide
Page 51
... than 60 g/m2 (16 lb) may not feed properly, and could cause paper jams. For best performance, use 90 g/m2 (24 lb) xerographic, grain long paper. See "Loading Paper" on the paper package, and load the paper accordingly. Before buying large quantities of any print media, it is recommended that you follow these guidelines when evaluating...
... than 60 g/m2 (16 lb) may not feed properly, and could cause paper jams. For best performance, use 90 g/m2 (24 lb) xerographic, grain long paper. See "Loading Paper" on the paper package, and load the paper accordingly. Before buying large quantities of any print media, it is recommended that you follow these guidelines when evaluating...

User's Guide
Page 54
... and letterhead printed using an offset lithographic or engraved printing process. • Select paper that the paper is acceptable for use in the MPF. • Flex paper back and forth, and then fan them. This may result in a paper jam. • Ensure that absorb ink, but do not bleed. • Avoid... paper with rough or heavily textured surfaces. • Use paper printed with the manufacturer or vendor to determine...
... and letterhead printed using an offset lithographic or engraved printing process. • Select paper that the paper is acceptable for use in the MPF. • Flex paper back and forth, and then fan them. This may result in a paper jam. • Ensure that absorb ink, but do not bleed. • Avoid... paper with rough or heavily textured surfaces. • Use paper printed with the manufacturer or vendor to determine...

User's Guide
Page 55
... To select and use pre-punched paper: • Test paper from several manufacturers before ordering and using large quantities of holes and in a ream. Print Media Guidelines 53 Loading Letterhead Load the letterhead in a paper jam. • Pre-punched paper can include more frequent cleaning and ...feed reliability may not be as good as standard paper. • Weight guidelines for pre-punched paper are the same as non-punched paper. This may result in the printer...
... To select and use pre-punched paper: • Test paper from several manufacturers before ordering and using large quantities of holes and in a ream. Print Media Guidelines 53 Loading Letterhead Load the letterhead in a paper jam. • Pre-punched paper can include more frequent cleaning and ...feed reliability may not be as good as standard paper. • Weight guidelines for pre-punched paper are the same as non-punched paper. This may result in the printer...

User's Guide
Page 67
The amount of the envelopes as shown below when loading them as shown in the MPF right after they have been removed from the packaging, they may bulge. Loading Print Media 65 NOTE: If envelopes are still not fed correctly, add some bending to the printer. NOTE: If you do not load envelopes in the following illustration. To avoid jams, flatten them in the MPF. These lead to paper jams and can cause damage to the flap of the bending shall be 5mm (0.20 inches) or less. NOTICE: Never use envelopes with windows, or coated linings.
The amount of the envelopes as shown below when loading them as shown in the MPF right after they have been removed from the packaging, they may bulge. Loading Print Media 65 NOTE: If envelopes are still not fed correctly, add some bending to the printer. NOTE: If you do not load envelopes in the following illustration. To avoid jams, flatten them in the MPF. These lead to paper jams and can cause damage to the flap of the bending shall be 5mm (0.20 inches) or less. NOTICE: Never use envelopes with windows, or coated linings.

User's Guide
Page 71
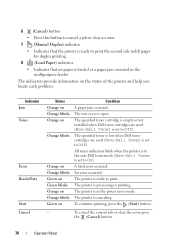
...Panel Using the Operator Panel Buttons The operator panel has two buttons and several indicators that show the status of the printer. 1 2 3 5 4 1 (Jam) indicator • Indicates that a paper jam occurred or the rear cover is open. 2 (Toner) indicator • Indicates that the toner is low or empty, or toner error occurred. 3 (Error...; Indicates the printer status, such as receiving and printing data. 5 (Start) button/indicator • Press this button to start duplex printing after loading paper. • Press and hold this button to print the Report pages. Operator Panel 69
...Panel Using the Operator Panel Buttons The operator panel has two buttons and several indicators that show the status of the printer. 1 2 3 5 4 1 (Jam) indicator • Indicates that a paper jam occurred or the rear cover is open. 2 (Toner) indicator • Indicates that the toner is low or empty, or toner error occurred. 3 (Error...; Indicates the printer status, such as receiving and printing data. 5 (Start) button/indicator • Press this button to start duplex printing after loading paper. • Press and hold this button to print the Report pages. Operator Panel 69
User's Guide
Page 72
... 8 (Load Paper) indicator • Indicates that no paper is loaded or a paper jam occurred in the power saver mode. The indicators provide information on Condition A paper jam occurred. The specified toner cartridge is empty or not installed when Dell toner cartridges are used (Non-Dell Toner is set ...to On). The specified toner is low when Dell toner cartridges are used (Non-Dell Toner is canceling. To...
... 8 (Load Paper) indicator • Indicates that no paper is loaded or a paper jam occurred in the power saver mode. The indicators provide information on Condition A paper jam occurred. The specified toner cartridge is empty or not installed when Dell toner cartridges are used (Non-Dell Toner is set ...to On). The specified toner is low when Dell toner cartridges are used (Non-Dell Toner is canceling. To...

User's Guide
Page 73
The wrong size of paper), or service. Understanding the Operator Panel Lights The operator panel lights mean different things, depending on , and/or blinking indicate printer conditions such as printer ... Sequences The following table shows the most common light status. Operator Panel 71 Off On Fast Blink Slow Blink - No paper is loaded. Indicator Manual Duplex Load Paper Status Green blinks Orange on Orange blinks Condition The printer is waiting for example, out of paper is loaded or a paper jam occurred in the multipurpose feeder.
The wrong size of paper), or service. Understanding the Operator Panel Lights The operator panel lights mean different things, depending on , and/or blinking indicate printer conditions such as printer ... Sequences The following table shows the most common light status. Operator Panel 71 Off On Fast Blink Slow Blink - No paper is loaded. Indicator Manual Duplex Load Paper Status Green blinks Orange on Orange blinks Condition The printer is waiting for example, out of paper is loaded or a paper jam occurred in the multipurpose feeder.

User's Guide
Page 76
... secondary error light sequences. - - - - - The specified toner cartridge is open. The density of paper is loaded. See "Replacing Toner - - - - See "Clearing Jams" on page 35. - - - - - See "Replacing Toner Cartridges" on page 35. - - - - - Re-install - - - - - No paper is not enough. See "Loading Paper" on page 118. - - - - - - - - - supported. - - - - - The wrong size of the specified toner is...
... secondary error light sequences. - - - - - The specified toner cartridge is open. The density of paper is loaded. See "Replacing Toner - - - - See "Clearing Jams" on page 35. - - - - - See "Replacing Toner Cartridges" on page 35. - - - - - Re-install - - - - - No paper is not enough. See "Loading Paper" on page 118. - - - - - - - - - supported. - - - - - The wrong size of the specified toner is...

User's Guide
Page 81
You may need to click Preferences from Tool Box. If you can avoid paper jams. See the following instructions on loading print media: • "Loading Print Media" on page 59 • "Avoiding Jams" on page 157 for instructions. Print settings selected from the driver have precedence over ... a job from a software program, a window representing the printer driver opens. Printing 79 Tips for Successful Printing Tips on page 117. Avoiding Paper Jams NOTE: It is recommended that you try a limited sample of any print media you want to print. When you choose Print from a typical...
You may need to click Preferences from Tool Box. If you can avoid paper jams. See the following instructions on loading print media: • "Loading Print Media" on page 59 • "Avoiding Jams" on page 157 for instructions. Print settings selected from the driver have precedence over ... a job from a software program, a window representing the printer driver opens. Printing 79 Tips for Successful Printing Tips on page 117. Avoiding Paper Jams NOTE: It is recommended that you try a limited sample of any print media you want to print. When you choose Print from a typical...

User's Guide
Page 84
... Printing on page 87 to identify the display and operator panel buttons if you need help. 82 Printing NOTE: Warped or curled prints can cause paper jams. Straighten them before setting them. 3 Next stack the prints and set them as they are printed in the order of page 1, page 3, then... of printing a report page. See "Operator Panel" on page 69 or "Understanding the Tool Box Menus" on both sides of the paper is complete, remove the paper stack from the output tray. Printing a Printer Settings Page To verify detailed printer settings, print a printer settings page. Printing a Report...
... Printing on page 87 to identify the display and operator panel buttons if you need help. 82 Printing NOTE: Warped or curled prints can cause paper jams. Straighten them before setting them. 3 Next stack the prints and set them as they are printed in the order of page 1, page 3, then... of printing a report page. See "Operator Panel" on page 69 or "Understanding the Tool Box Menus" on both sides of the paper is complete, remove the paper stack from the output tray. Printing a Printer Settings Page To verify detailed printer settings, print a printer settings page. Printing a Report...
User's Guide
Page 105
.... 1 Click Start All Programs Dell Printers Additional Color Laser Software Dell Supplies Management System. Status Monitor Console Use the Status Monitor Console to manage multiple instances of the Status Window for example, when a paper jam occurs or toner is a warning or when an... a printer from the list view (or Printer Selection) by phone or from the All Programs menu or the desktop icon. Dell Supplies Management System You can set the Printer Status window to always launch when printing in Printing Status Window Properties. 14 Understanding ...
.... 1 Click Start All Programs Dell Printers Additional Color Laser Software Dell Supplies Management System. Status Monitor Console Use the Status Monitor Console to manage multiple instances of the Status Window for example, when a paper jam occurs or toner is a warning or when an... a printer from the list view (or Printer Selection) by phone or from the All Programs menu or the desktop icon. Dell Supplies Management System You can set the Printer Status window to always launch when printing in Printing Status Window Properties. 14 Understanding ...

User's Guide
Page 133
...width guide. • Do not load wrinkled, creased, damp, or curled print media. • Flex, fan, and straighten print media before you to avoid paper jams. See "Print Media Guidelines" on page 49 for more information. • See "Loading Print Media" on page 56. • Ensure that all cables that... the stack print media height does not exceed the maximum height indicated by the line with print media, try a sample first. 17 Clearing Jams Careful selection of any print media, it . Ensure that connect to load print media properly. • Do not overload the print media sources....
...width guide. • Do not load wrinkled, creased, damp, or curled print media. • Flex, fan, and straighten print media before you to avoid paper jams. See "Print Media Guidelines" on page 49 for more information. • See "Loading Print Media" on page 56. • Ensure that all cables that... the stack print media height does not exceed the maximum height indicated by the line with print media, try a sample first. 17 Clearing Jams Careful selection of any print media, it . Ensure that connect to load print media properly. • Do not overload the print media sources....

User's Guide
Page 134
This may occur along the print media path. 1 3 2 4 6 5 1 Output Tray 2 Transfer Belt 3 Fuser Release Lever 4 Rear Cover 5 Front Cover 6 Multipurpose Feeder (MPF) 132 Clearing Jams The following illustration shows where paper jams may permanently damage the printer. Identifying the Location of Paper Jams CAUTION: Do not attempt to clear any jams using tools or instruments.
This may occur along the print media path. 1 3 2 4 6 5 1 Output Tray 2 Transfer Belt 3 Fuser Release Lever 4 Rear Cover 5 Front Cover 6 Multipurpose Feeder (MPF) 132 Clearing Jams The following illustration shows where paper jams may permanently damage the printer. Identifying the Location of Paper Jams CAUTION: Do not attempt to clear any jams using tools or instruments.

User's Guide
Page 135
Clearing Jams 133 Clearing Paper Jams From the Front of the Printer CAUTION: Before performing any paper jammed from the front of the following procedures, read and follow the safety instructions in the printer. NOTE: To resolve the error displayed on the operator panel, you must clear all print media from the print media path. 1 Pull the paper cover out. 2 Remove any of the printer. 3 Replace the paper cover in your Product Information Guide.
Clearing Jams 133 Clearing Paper Jams From the Front of the Printer CAUTION: Before performing any paper jammed from the front of the following procedures, read and follow the safety instructions in the printer. NOTE: To resolve the error displayed on the operator panel, you must clear all print media from the print media path. 1 Pull the paper cover out. 2 Remove any of the printer. 3 Replace the paper cover in your Product Information Guide.

User's Guide
Page 136
CAUTION: To avoid burns, do not clear paper jams immediately after printing. NOTE: To resolve the error displayed on the operator panel, you must clear all print media from the grounded outlet before performing ... from the print media path. 1 Push the rear cover release handle and open the rear cover. 2 Lift up the fuser release levers. 134 Clearing Jams Clearing Paper Jams From the Back of the Printer CAUTION: Before performing any of the following procedures, read and follow the safety instructions in your Product Information Guide.
CAUTION: To avoid burns, do not clear paper jams immediately after printing. NOTE: To resolve the error displayed on the operator panel, you must clear all print media from the grounded outlet before performing ... from the print media path. 1 Push the rear cover release handle and open the rear cover. 2 Lift up the fuser release levers. 134 Clearing Jams Clearing Paper Jams From the Back of the Printer CAUTION: Before performing any of the following procedures, read and follow the safety instructions in your Product Information Guide.

User's Guide
Page 137
3 Remove any paper jammed from the back of the printer. 4 Lower the fuser release levers to their original position. 5 Close the rear cover. Clearing Jams 135
3 Remove any paper jammed from the back of the printer. 4 Lower the fuser release levers to their original position. 5 Close the rear cover. Clearing Jams 135

User's Guide
Page 138
Clearing Paper Jams From the Output Tray CAUTION: Before performing any of the following procedures, read and follow the safety instructions in your Product Information Guide. The fuser ... cable from the print media path. 1 Push the rear cover release handle and open the rear cover. 2 Lift up the fuser release levers. 136 Clearing Jams NOTE: To resolve the error displayed on the operator panel, you must clear all print media from the grounded outlet before performing maintenance. CAUTION: To...
Clearing Paper Jams From the Output Tray CAUTION: Before performing any of the following procedures, read and follow the safety instructions in your Product Information Guide. The fuser ... cable from the print media path. 1 Push the rear cover release handle and open the rear cover. 2 Lift up the fuser release levers. 136 Clearing Jams NOTE: To resolve the error displayed on the operator panel, you must clear all print media from the grounded outlet before performing maintenance. CAUTION: To...

User's Guide
Page 139
Clearing Jams 137 3 Remove any paper jammed out of the printer. If no paper is found in the paper path, then remove any paper jammed from the back of the output tray. 4 Lower the fuser release levers to their original position. 5 Close the rear cover.
Clearing Jams 137 3 Remove any paper jammed out of the printer. If no paper is found in the paper path, then remove any paper jammed from the back of the output tray. 4 Lower the fuser release levers to their original position. 5 Close the rear cover.


