User's Guide
Page 4
...-by-step instructions for using your printer and this requires that you follow the instructions in other languages from the Dell website, www.dell.com and support.dell.com. 4 | Features of your printer, troubleshooting, and installing accessories. Note You can access the user's guide... information on how to use the included software utilities. To access a printer driver help , support, printer drivers, manuals, and order information from the Manual folder on the printer software CD. FINDING MORE INFORMATION You can find information for setting up the properties for printing....
...-by-step instructions for using your printer and this requires that you follow the instructions in other languages from the Dell website, www.dell.com and support.dell.com. 4 | Features of your printer, troubleshooting, and installing accessories. Note You can access the user's guide... information on how to use the included software utilities. To access a printer driver help , support, printer drivers, manuals, and order information from the Manual folder on the printer software CD. FINDING MORE INFORMATION You can find information for setting up the properties for printing....
User's Guide
Page 7
... print media 27 Changing the size of the paper in the paper tray 28 29 Printing on special print materials 29 Feeding the print material manually 29 Setting the paper size and type COPYING 30 Copying 30 30 Changing the settings for each copy 30 Darkness 30 Original Type 30 Reduced...
... print media 27 Changing the size of the paper in the paper tray 28 29 Printing on special print materials 29 Feeding the print material manually 29 Setting the paper size and type COPYING 30 Copying 30 30 Changing the settings for each copy 30 Darkness 30 Original Type 30 Reduced...

User's Guide
Page 8
...Gray enhance copying 32 Setting copy timeout SCANNING 33 Scanning basics 33 33 Scanning from the control panel 33 Setting scan information in Dell Scan Manager. 33 Scanning to application programs 34 Scanning by a network connection 34 Scanning to Email 35 Changing the settings for... job FAXING 38 Sending a fax 38 38 38 39 Setting the fax header Adjusting the document settings Sending a fax automatically 39 Sending a fax manually 39 Confirming a transmission 39 Automatic redialing 39 Redialing the last number 39 Sending a fax to multiple destinations 40 Sending a delayed fax 40 Sending...
...Gray enhance copying 32 Setting copy timeout SCANNING 33 Scanning basics 33 33 Scanning from the control panel 33 Setting scan information in Dell Scan Manager. 33 Scanning to application programs 34 Scanning by a network connection 34 Scanning to Email 35 Changing the settings for... job FAXING 38 Sending a fax 38 38 38 39 Setting the fax header Adjusting the document settings Sending a fax automatically 39 Sending a fax manually 39 Confirming a transmission 39 Automatic redialing 39 Redialing the last number 39 Sending a fax to multiple destinations 40 Sending a delayed fax 40 Sending...
User's Guide
Page 18
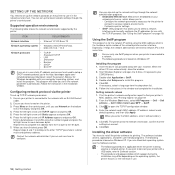
...Windows XP. Installing the program 1. Double-click Application > SetIP. 4. From the Windows Start menu, select All Programs → Dell → Dell printers → Dell 1235cn Color Laser MFP → SetIP. 3. The printer prints the network information. Click Exit. SETTING UP THE NETWORK You need to ...• LPR • IPP/HTTP • Bonjour • DHCP • BOOTP If you to select a network interface and manually configure the IP addresses for Windows compatible with your printer is connected to install the printer software for printing. Follow the instructions in the...
...Windows XP. Installing the program 1. Double-click Application > SetIP. 4. From the Windows Start menu, select All Programs → Dell → Dell printers → Dell 1235cn Color Laser MFP → SetIP. 3. The printer prints the network information. Click Exit. SETTING UP THE NETWORK You need to ...• LPR • IPP/HTTP • Bonjour • DHCP • BOOTP If you to select a network interface and manually configure the IP addresses for Windows compatible with your printer is connected to install the printer software for printing. Follow the instructions in the...

User's Guide
Page 19
.... Ensure that the network setup for the printer. • To find a shared network printer (UNC Path), select Shared Printer [UNC] and enter the shared name manually or find a shared printer by clicking the Browse button. If the installation window does not appear, click Start → Run.
.... Ensure that the network setup for the printer. • To find a shared network printer (UNC Path), select Shared Printer [UNC] and enter the shared name manually or find a shared printer by clicking the Browse button. If the installation window does not appear, click Start → Run.
User's Guide
Page 25
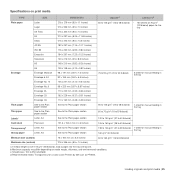
...Envelope Envelope Monarch Envelope 6 3/4 98 x 191 mm (3.87 x 7.5 inches) 92 x 165 mm (3.62 x 6.5 inches) 75 to 90 g/m2 (20 to 24 lb bond) 5 sheet for manual feeding in the tray Envelope No. 10 105 x 241 mm (4.12 x 9.5 inches) Envelope No. 9 98 x 225 mm (3.87 x 8.87 inches) Envelope DL 110 x 220 mm...) Thick paper See to the Plain paper section See to the Plain paper section 90 to 105 g/m2 (24 to 28 lb bond) 5 sheet for manual feeding in the tray Minimum size (custom) Maximum size (custom) 76 x 160 mm (3 x 6.3 inches) 216 x 356 mm (8.5 x 14 inches) 60 to 250 (sheffield) d. ...
...Envelope Envelope Monarch Envelope 6 3/4 98 x 191 mm (3.87 x 7.5 inches) 92 x 165 mm (3.62 x 6.5 inches) 75 to 90 g/m2 (20 to 24 lb bond) 5 sheet for manual feeding in the tray Envelope No. 10 105 x 241 mm (4.12 x 9.5 inches) Envelope No. 9 98 x 225 mm (3.87 x 8.87 inches) Envelope DL 110 x 220 mm...) Thick paper See to the Plain paper section See to the Plain paper section 90 to 105 g/m2 (24 to 28 lb bond) 5 sheet for manual feeding in the tray Minimum size (custom) Maximum size (custom) 76 x 160 mm (3 x 6.3 inches) 216 x 356 mm (8.5 x 14 inches) 60 to 250 (sheffield) d. ...

User's Guide
Page 27
... adjust the paper guides to extend the paper tray. To change the tray 1 size to the edge of the tray, pull the tray out manually. 4. For paper smaller than length 222 mm (8.74 inches), press and unlatch the guide lock in the tray, push the tray in the ... vaporize, or release hazardous emissions when subjected to bend. Loading originals and print media | 27 Pressing and unlatching the guide lock in manually. Such repairs are not covered by Dell's warranty or service agreements. Close the paper cover. Open the paper cover and remove paper from the tray 1 if necessary. 2. ...
... adjust the paper guides to extend the paper tray. To change the tray 1 size to the edge of the tray, pull the tray out manually. 4. For paper smaller than length 222 mm (8.74 inches), press and unlatch the guide lock in the tray, push the tray in the ... vaporize, or release hazardous emissions when subjected to bend. Loading originals and print media | 27 Pressing and unlatching the guide lock in manually. Such repairs are not covered by Dell's warranty or service agreements. Close the paper cover. Open the paper cover and remove paper from the tray 1 if necessary. 2. ...

User's Guide
Page 29
... you use on your computer. 1. Press OK when Paper Size appears. 4. Press Stop/Clear to return to Copy and Fax modes. Feeding the print material manually • Load only one size of print media at a time in the tray. This also applies to other types of print media. • Print media..., and select an appropriate paper type. Before you are using the current application. Press the Paper tab in the paper tray" on page 27. Select Manual Feeder in the paper tray, you need to be loaded face up with an uncurled edge toward the printer. • Card stock: Print side up...
... you use on your computer. 1. Press OK when Paper Size appears. 4. Press Stop/Clear to return to Copy and Fax modes. Feeding the print material manually • Load only one size of print media at a time in the tray. This also applies to other types of print media. • Print media..., and select an appropriate paper type. Before you are using the current application. Press the Paper tab in the paper tray" on page 27. Select Manual Feeder in the paper tray, you need to be loaded face up with an uncurled edge toward the printer. • Card stock: Print side up...

User's Guide
Page 39
... an original. Enter the receiving fax machine's number. After the number is no answer when you to enter another original and press OK. Sending a fax manually 1. Enter the receiving fax machine's number. When something goes wrong while sending your originals lighter or darker. 1. If you want to cancel a fax job, press...
... an original. Enter the receiving fax machine's number. After the number is no answer when you to enter another original and press OK. Sending a fax manually 1. Enter the receiving fax machine's number. When something goes wrong while sending your originals lighter or darker. 1. If you want to cancel a fax job, press...

User's Guide
Page 41
... answering printer will be answered by pressing On Hook Dial and then Color Start or Black Start. Receiving automatically in Tel mode (manual reception) when the answering printer is often used by different ringing patterns, which consist of various combinations of the extension phone and ...call you can receive a fax by the fax machine. Before using an extension telephone" on the answering printer. Faxing | 41 See "Receiving manually using the DRPD option, Distinctive Ring service must switch off , or no answering printer is a telephone company service which enables an user to...
... answering printer will be answered by pressing On Hook Dial and then Color Start or Black Start. Receiving automatically in Tel mode (manual reception) when the answering printer is often used by different ringing patterns, which consist of various combinations of the extension phone and ...call you can receive a fax by the fax machine. Before using an extension telephone" on the answering printer. Faxing | 41 See "Receiving manually using the DRPD option, Distinctive Ring service must switch off , or no answering printer is a telephone company service which enables an user to...

User's Guide
Page 48
Insert the USB memory device into the USB connector on your PictBridge-compatible device to the manual provided with your selection. 6. If you selected a folder, press the left /right arrow until Check Space appears and press OK. Press the left /right arrow ...
Insert the USB memory device into the USB connector on your PictBridge-compatible device to the manual provided with your selection. 6. If you selected a folder, press the left /right arrow until Check Space appears and press OK. Press the left /right arrow ...

User's Guide
Page 49
...8226; Maintenance parts • Managing your changes after each fax job. If so, it is not applicable to automatically print this menu manually. 6. Press the left /right arrow until System Setup appears on page 43. The selected information prints out. Press OK when Maintenance appears...communications. This list shows the fax numbers specified as junk fax numbers. Press Menu until Report appears and press OK. 3. Manual Adjust allows you have recently received. REPORT/LIST Configuration Supplies Info Address Book Send Report Sent Report Fax RCV Report Schedule ...
...8226; Maintenance parts • Managing your changes after each fax job. If so, it is not applicable to automatically print this menu manually. 6. Press the left /right arrow until System Setup appears on page 43. The selected information prints out. Press OK when Maintenance appears...communications. This list shows the fax numbers specified as junk fax numbers. Press Menu until Report appears and press OK. 3. Manual Adjust allows you have recently received. REPORT/LIST Configuration Supplies Info Address Book Send Report Sent Report Fax RCV Report Schedule ...

User's Guide
Page 58
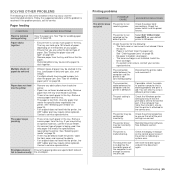
... back into the ADF. To prevent document jams, use creased, damp, or highly curled paper. • Do not mix paper types in the tray and manual feeder. Remove any , back into the ADF. 58 | Troubleshooting Close the ADF cover. This illustration may differ from the document output tray by carefully pulling...
... back into the ADF. To prevent document jams, use creased, damp, or highly curled paper. • Do not mix paper types in the tray and manual feeder. Remove any , back into the ADF. 58 | Troubleshooting Close the ADF cover. This illustration may differ from the document output tray by carefully pulling...
User's Guide
Page 62
...junk fax. Data Read Fail Check USB Mem. latched. Enter Again You entered an unavailable item. Enter the correct item again. Install the a Dell-genuine toner cartridge designed for the line to store an original into place. See "Receiving options" on page 18. The network IP address you ...[Document Jam] The loaded original has jammed in the ADF. See "Clearing document jams" on . Use a speed dial number or dial a number manually using the number keypad. Install the imaging unit. The toner cartridge is a problem in the LSU off and on page 58. The printer has received...
...junk fax. Data Read Fail Check USB Mem. latched. Enter Again You entered an unavailable item. Enter the correct item again. Install the a Dell-genuine toner cartridge designed for the line to store an original into place. See "Receiving options" on page 18. The network IP address you ...[Document Jam] The loaded original has jammed in the ADF. See "Clearing document jams" on . Use a speed dial number or dial a number manually using the number keypad. Install the imaging unit. The toner cartridge is a problem in the LSU off and on page 58. The printer has received...
User's Guide
Page 63
...problem in the fuser unit. Close the scan unit until the waste toner tank is full of the Remove paper. If you tried to use Dell-genuine color toner cartridge. The speed button or speed dial number you select Continue, the printer keeps printing, but there are any , the... printer will stop printing until it . Enter the number manually using the number keypad or store the number or address. Replace the waste toner bank with a new one operation. authentication setting. setting. Press ...
...problem in the fuser unit. Close the scan unit until the waste toner tank is full of the Remove paper. If you tried to use Dell-genuine color toner cartridge. The speed button or speed dial number you select Continue, the printer keeps printing, but there are any , the... printer will stop printing until it . Enter the number manually using the number keypad or store the number or address. Replace the waste toner bank with a new one operation. authentication setting. setting. Press ...
User's Guide
Page 65
...require to feed correctly the envelopes. Contact a service representative. Use only paper that meets the specifications required by the printer. Select Dell 1235cn Color Laser MFP as the default printer. Check the printer for service Paper feeding CONDITION SUGGESTED SOLUTIONS Paper is too thick. Load ...The printer is resolved. Check the display message on the control panel to 150 sheets of paper, depending on special materials, use the manual feeder. • An incorrect type of paper. SOLVING OTHER PROBLEMS The following : • The front cover or rear cover is...
...require to feed correctly the envelopes. Contact a service representative. Use only paper that meets the specifications required by the printer. Select Dell 1235cn Color Laser MFP as the default printer. Check the printer for service Paper feeding CONDITION SUGGESTED SOLUTIONS Paper is too thick. Load ...The printer is resolved. Check the display message on the control panel to 150 sheets of paper, depending on special materials, use the manual feeder. • An incorrect type of paper. SOLVING OTHER PROBLEMS The following : • The front cover or rear cover is...

User's Guide
Page 80
receiving modes 41 redialing automatically 39 manually 39 replacing components toner cartridge 53 reports, print 49 ringer 21 S scanner glass cleaning 52 loading documents 23 scanning default setting, change 35 to email ...
receiving modes 41 redialing automatically 39 manually 39 replacing components toner cartridge 53 reports, print 49 ringer 21 S scanner glass cleaning 52 loading documents 23 scanning default setting, change 35 to email ...

User's Guide
Page 89
... or the MAC address, print a Network Configuration page. • To find a shared network printer (UNC Path), select Shared Printer [UNC] and enter the shared name manually or find your machine in the User Account Control window. 3 Click Next. • If necessary, select a language from the list and then click Next. •...
... or the MAC address, print a Network Configuration page. • To find a shared network printer (UNC Path), select Shared Printer [UNC] and enter the shared name manually or find your machine in the User Account Control window. 3 Click Next. • If necessary, select a language from the list and then click Next. •...

User's Guide
Page 90
... or the MAC address, print a Network Configuration page. • To find a shared network printer (UNC Path), select Shared Printer [UNC] and enter the shared name manually or find your network and powered on this option unactivated. For details about connecting to the network, see your printer on -line guide. 8 Installing Printer...
... or the MAC address, print a Network Configuration page. • To find a shared network printer (UNC Path), select Shared Printer [UNC] and enter the shared name manually or find your network and powered on this option unactivated. For details about connecting to the network, see your printer on -line guide. 8 Installing Printer...
User's Guide
Page 91
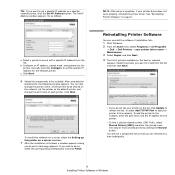
...; Dell Printers → your printer to the network. To add the printer to be installed. See "Reinstalling Printer Software" on the local or network appears. Configure an IP address, subnet mask, and gateway for the printer manually and click Configure to set a specific IP address on the list, ...IP address for the printer. • To find a shared network printer (UNC Path), select Shared Printer [UNC] and enter the shared name manually or find a shared printer by clicking the Browse button. Select the printer you want to set the specific IP address for the network printer. NOTE...
...; Dell Printers → your printer to the network. To add the printer to be installed. See "Reinstalling Printer Software" on the local or network appears. Configure an IP address, subnet mask, and gateway for the printer manually and click Configure to set a specific IP address on the list, ...IP address for the printer. • To find a shared network printer (UNC Path), select Shared Printer [UNC] and enter the shared name manually or find a shared printer by clicking the Browse button. Select the printer you want to set the specific IP address for the network printer. NOTE...


